


1972 Highboy Build Progress
Thread Starter
|
Elder User
Joined: May 2014
Posts: 617
Likes: 0
Seat is out. Gas tank out. I will put new rubber mounts on to help with the body lines. According to how the bed is on the truck, The cab needs to go up on the drivers side and down on the passenger side. Once I put new rubber on the drivers side, I think it will do the trick. The drivers side is more compressed than the passenger side. So I have the rubber mounts and will put them on.
Thread Starter
|
Elder User
Joined: May 2014
Posts: 617
Likes: 0
I need a new Fuel Tank Neck Grommet. Is the below best option? Or is there any NOS ava?
Fuel Tank Neck Grommet | Dennis Carpenter Ford Restoration Parts
Looks like there's some foam strips on the back side as well. Looks pretty common.
Thxs -
Fuel Tank Neck Grommet | Dennis Carpenter Ford Restoration Parts
Looks like there's some foam strips on the back side as well. Looks pretty common.
Thxs -
Lead Driver
Joined: Aug 2003
Posts: 7,592
Likes: 10
From: **** hole San Jose ca.
Yes I did but not sure as of yet as, I had a problem an sent the cpu back for testing which the techs said oh no problems with it but was working when they shipped it back.
So, I thing they re- flashed the cpu that corrected the problem.
The problem, I was having was the electric fuel pump stopped working.
as the power up wire voltage dropped to 2.8volts after about 15 minutes of run time.
The techs said it must be in my wiring socket cpu or TBI plug to wring harness. But it all checked out good.
And when returned I reinstalled the cpu an it fired right up so, I think they just re-flashed it to correct the problem, I was having with it!
I do miss the Holley 600 as I had it setup perfect an when you stepped on the gas pedal it took off.
I'm going through some different setting an still working on getting it turned to the way, I want it to run.
So it's kind of hard to answer your question with were, I'm at with it right now to be honest.
My old burned out brain now has a hard time remembering all this new TBI stuff getting things all sorted out.
Orich
Hotshot


Joined: Mar 2013
Posts: 14,255
Likes: 199
From: Phoenix, Az.
I need a new Fuel Tank Neck Grommet. Is the below best option? Or is there any NOS ava?
Fuel Tank Neck Grommet | Dennis Carpenter Ford Restoration Parts
Looks like there's some foam strips on the back side as well. Looks pretty common.
Thxs -
Fuel Tank Neck Grommet | Dennis Carpenter Ford Restoration Parts
Looks like there's some foam strips on the back side as well. Looks pretty common.
Thxs -
D0TZ9080C:
Bowman Sales And Service
701.523.3257
xGreen Sales
(800) 543-4959
xRPN Parts
888-864-9305
K.C. Motor Company
Part Number DOTZ9080C
Seller:K.C. Motor Company -
Description:FILLER GROMMETT
Phone (561) 722-6208
Thread Starter
|
Elder User
Joined: May 2014
Posts: 617
Likes: 0
Body lines and gap. I will put the new rubber mounts in which should fix the left side being lower than the right side. My issue is that the bed or the cab is off. The gap between the bed and cab is 1 and a half on one side and 1 and 3/4 on the other. Thoughts on what is going on? I think its the cab that has to adjust and not the bed...?
I measured the bed to square it using the bed rails under the truck that sit right on the frame. Those are right on. Only issue with the bed is by the back bumper where the frame ends there is 2 and a half on one side and 2 and 3/8 on the other. I would think those should be the same but not sure.
Thanks Jeff, for the part number and contact(s)... Going to order tomorrow.
So, does anyone have specs on where the beds sits on the frame? Where the cab sits on the frame? I'm trying to do this without taking the front end apart but maybe I will have to. I know once I take those original inner fenders and rad support off, they will be toast.
Thanks for the help !
Hotshot
Joined: Mar 2013
Posts: 14,255
Likes: 199
From: Phoenix, Az.
Have you checked the front metal cab mounts? They may be rusted and/or cracked. Not only the rubber but they may need to be replaced also. If so they could be causing you measurements to be off also.
FTE Stories
Ford Trucks for Ford Truck Enthusiasts

10 Fords to Drive Before You Die
Joe Kucinski
3 Best / Worst Features Of The 2025+ Ford Expedition
Brett Foote
10 Ways Ford is LOSING to the Competition
Joe Kucinski
Top 6 Best Deals Available on New Fords & Lincolns Right Now
Brett Foote
This Hennessey Takes the Expedition Tremor's Off-Roading Capability to the Next Level
Verdad Gallardo
Top 10 Fords at 2026 Carlisle Ford Nationals
Joe Kucinski
3 Best / 3 Worst Parts of Modern Ford Ownership
Brett Foote
10 Amazing Upgrades That Solve Common Ford Truck Owner Headaches
Pouria Savadkouei
Every 2026 Ford Engine Explained
Brett FooteThread Starter
|
Elder User
Joined: May 2014
Posts: 617
Likes: 0

Having a hard time removing the rubber cab mounts so I shimmed the drivers side about 3/8 inch up and took this pic. Passenger side is still high just a bit. Can one of you guys take the same pic of your truck so I can see where that line on the cab should line up with the bed?
Cargo Master
Joined: Nov 2005
Posts: 2,694
Likes: 45
From: La Ribera, Baja, Mexico
I can't today, but we fly to Baja tomorrow, and first thing Mon. morning, I will take some photos of mine.. Meanwhile, I expect you to see some posted by Bump Kingdom members. Maybe we will even hear from the Young Prince Trozi... Long time no hear young prince...
Baja
Baja
Thread Starter
|
Elder User
Joined: May 2014
Posts: 617
Likes: 0
I can't today, but we fly to Baja tomorrow, and first thing Mon. morning, I will take some photos of mine.. Meanwhile, I expect you to see some posted by Bump Kingdom members. Maybe we will even hear from the Young Prince Trozi... Long time no hear young prince...
Baja
Baja
You guys on this site have been a huge blessing in helping me get thru various obstacles. So I am very appreciative of the help. My Gandmother is still hanging in there. She is 93 and does not like to get out much. But I take photo's to her. It gives us something to talk about other than how she is feeling.


Thread Starter
|
Elder User
Joined: May 2014
Posts: 617
Likes: 0

Instrument Cluster Lens... I need to find a quality cluster lens. and some touch up paint for the needle. Or should I find a palce ro just send it off to be rebuilt? I tried cleaning the cluster lens but it only helped a bit. <br/><br/>So main thing will be to order a new lens. C7TZ-10880-B ...Jeff, is that the right number? Where would be the best place to buy a new lens? <br/>
Hotshot
Joined: Mar 2013
Posts: 14,255
Likes: 199
From: Phoenix, Az.
Instrument Cluster Lens... I need to find a quality cluster lens. and some touch up paint for the needle. Or should I find a palce ro just send it off to be rebuilt? I tried cleaning the cluster lens but it only helped a bit. <br/><br/>So main thing will be to order a new lens. C7TZ-10880-B ...Jeff, is that the right number? Where would be the best place to buy a new lens? <br/>
DC has it at $24.95. www.dennis-carpenter.com.
Also:
NOS Parts Ltd.
Recently Updated
Part Number:C7TZ10880B
Seller:NOS Parts Ltd. -
Description:GLASS- INSTRUMENT CLUSTER
Phone (972) 937-2201
Cargo Master
Joined: Nov 2005
Posts: 2,694
Likes: 45
From: La Ribera, Baja, Mexico
I have 2 original instrument clusters, that I do not intend to use. One came out of my '68, and the other I believe was from a '72 in case you need one. Next trip North, in mid July, I could bring one if you wish. I am sure that Jeff can tell you the difference. I replaced mine with one from a F600, with the old round instruments, and the aircraft look from WWII.. I snagged it out of an old dump truck, sitting in a little junk yard, along side the Baha highway. The owner showed up, and wanted $20, so it went on home with me, and is in my old 68 now.. The speedometer even worked... surprise, surprise..
Baja
Baja
Hotshot
Joined: Mar 2013
Posts: 14,255
Likes: 199
From: Phoenix, Az.

Instrument Panels
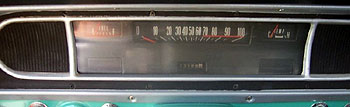
 ABOVE: This is an example of standard instrumentation for the 1967-1969 Ford and Mercury models and included a steel surround (bezel). 1967 bezels were trimmed in white and '68-'69 versions (shown here) were trimmed in silver.
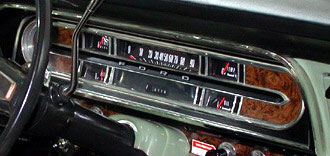
UPPER RIGHT: Ford's full instrumentation package also included gauges in the lower two pods instead of just idiot lights and were standard on the Custom Cab and Ranger. The chrome-plated plastic versions were offered from '67-'69 on the Custom Cab and Ranger as well as on all '70-'72 models.
LOWER RIGHT: The woodgrain cluster was introduced in '69 on the Ranger and was used for '70-'72 XLTs, which also had lower woodgrain panels and a plastic woodgrain 'modesty' panel below the RH side of the dash. The '70-'72 non-XLT Ranger had no woodgrain accents. The '70-'72 woodgrain was also darker than the '69s.
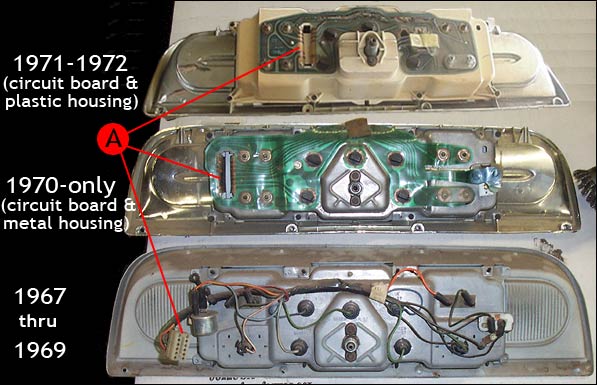
(A = Wiring Harness Connection)
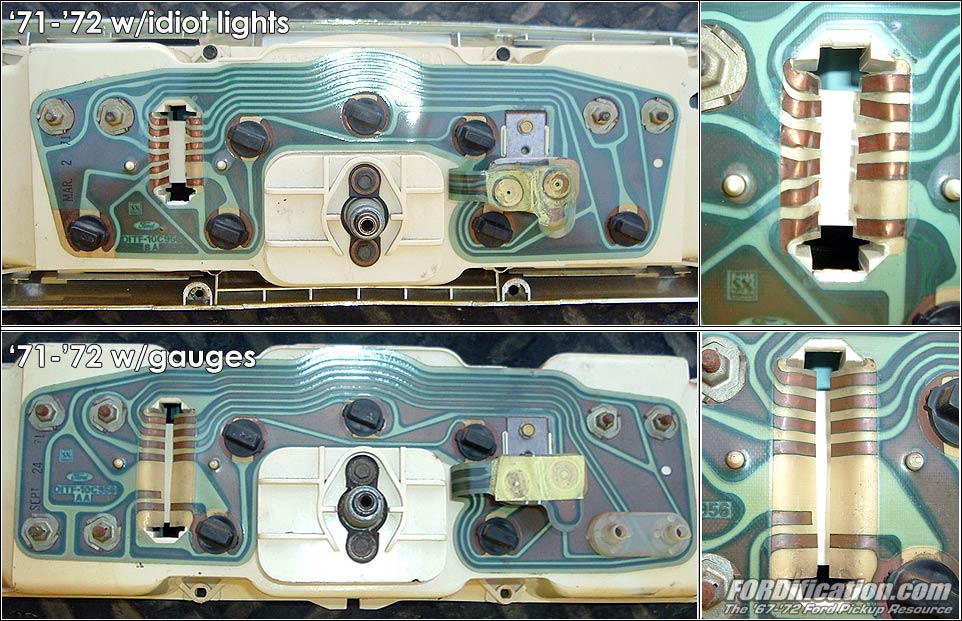
Pictured here are the differences in the instrument panels. The '67-'69 panels had a stamped steel rear gauge housing using individually-wired 1895 bulbs. The '70-'72 versions had a printed circuit board and removable 168/194 bulb sockets. The early panel assemblies are not interchangeable with the later assemblies, although all bezels are fully interchangeable. Although the '70 circuit boards do have a printed circuit board like the '71-'72 versions, the '70 circuit board is a one-year-only item...they are slightly different from the '71-'72 versions. The '70 harness connector is 1-1/2" high whereas the '71-'72 connector is 2-1/4" high (for the gauge version).
(Click the image at right to enlarge a comparison picture of the two styles.)
You cannot install a gauge-type panel in a truck originally equipped with idiot lights (or vice versa) without installing a matching wiring harness, because of differences in wiring for the ammeter in the harness under the dash and hood. The gauge-type wiring harness includes a shunt located between the alternator and the starter solenoid. Two wires come from the shunt to feed the ammeter. The gauge-type harness and plug for the instrument panel are also wired differently. Also, with the ammeter, the ignition switch feeds the "S" terminal on the regulator with 12V. With the idiot lights, the regulator "S" terminal gets voltage from the stator. Essentially, it's a big swap to do for a oil gauge and barely-functioning factory ammeter. Go to the FORDification.com forums and do a search for "F600 panel" or "shunt"....the subject has come up many times there. If the purpose of your desire to add the full-instrumentation panel to your truck is for functioning gauges, you'd be better off installing a set of aftermarket underdash gauges. The installation would be MUCH simpler and the gauges much more accurate. However, if you're determined to do this with junkyard parts, then it's highly suggested you install the main and underdash wiring harnesses that match the instrument panel being used.