When you click on links to various merchants on this site and make a purchase, this can result in this site earning a commission. Affiliate programs and affiliations include, but are not limited to, the eBay Partner Network.
Hey, that engine compartment turned out beautiful. Looking good.
Thank you! Its amazing the difference how much more enjoyment and quality there is building a project truck slowly vs getting your daily driver fixed and back in use in a hurry.
That looks like Santa's workshop! Getting stuff done!! Just to rub it in, I got several cans of the rust o'leum engine paint at our local dollar store. They even had the high heat stuff for painting grills so I used that on the heads since I already spent the big bucks for VHT paint for the manifolds.
I have dedicated locations for all tools. In fact if the wife puts it in the wrong place, I likely will not easily find it. The rule is: Put it on the bench by my vice and I will put it away (easier for both of us LOL).
Clean bench This is my Air Fuel Ratio interface real-time. Its extremely interesting to keep an eye on.
And those of you who have removed the bed with an engine hoist, are there any do’s and don’ts I should consider? Not sure how to anchor the chains yet.
Don't know where to attach on bed but when I lifted my cab I used a spreader bar with my engine hoist. It was still a long process to get it to balance but better than moving chains. Are there holes at the top of bed stake holes? Or maybe remove bed mount bolts jack up bed and bolt chains to bolt holes. Or put eye bolts there. Or get a couple or four guys to lift it off.
I have been procrastinating because of all the sanding in my future. I has been fun breaking in my new engine! Varying speeds and loads is the old standard we always use on pre ‘90 engines. Truth is its just so fun to drive I dont want to tear it apart but too much on a budget to have it painted.
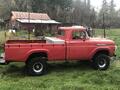
Johnnewb I do not profess to be an expert in any way when it comes to painting but I will share the “new paint” Urithane family and the process I am using. This truck is a driver not intended for show so the finish is not show gloss, but more of a standard finish with some crinkle.
Hood is set up for wetsanding and a couple small dings need filled (left of center) Sawhorses are a little low but provide good reach so I can access the whole hood with leverage.
It will look nice when done but a lot of work. I picked my bed off with two other guys. I put it back on alone by having it up on planks under it and drove in under it. You could take it off the same way. Unhook it all and just keep lifting corners until you get it high enough to support it above the frame and roll the truck out. Probably not the way they do it on TV or magazines but safe and effective.
It will look nice when done but a lot of work. I picked my bed off with two other guys. I put it back on alone by having it up on planks under it and drove in under it. You could take it off the same way. Unhook it all and just keep lifting corners until you get it high enough to support it above the frame and roll the truck out. Probably not the way they do it on TV or magazines but safe and effective.
Wet sanding the green as a guide coat today I finally realized the appeal of flat patina. I found multiple runs and sags in the green paint and 3-5 extra dings to fix that could not be seen with the flat paint. The ship has already sailed for me on leaving it. Not to mention the front fender rust bubbling that needs attention.
First up will be High Build Primer
Basically it will be used 4 parts primer to 1 part hardener and 1 part reducer. Inexpensive mixing cups are good insurance to get the mix correct no matter the volume you pour. All of the paints are toxic and you will need a respirator.
This Hennessey Takes the Expedition Tremor's Off-Roading Capability to the Next Level
Slideshow: The VelociRaptor Expedition gains a lift, upgraded suspension, Brembo brakes, and trail-ready equipment while retaining the stock 440-horsepower EcoBoost V6.
Rezvani's Latest Post-Apocalyptic Monster Is a Ford F-150 Raptor Underneath
Slideshow: Called the Fortress, the 850-horsepower pickup combines Raptor underpinnings with military-inspired features, survival equipment, and a starting price of $285,000.