


Bye Bye Front Drums
Thread Starter
|
Lead Driver


Joined: Apr 2011
Posts: 6,399
Likes: 40
From: El Dorado, Arkansas
I got this on Christmas Eve, 2006.

Four months later (April, 2007), I got this.

They've cleaned a LOT of parts since I've had them (compressor and blast cabinet) and it would have been just about impossible to get the parts to look as nice without them.
I'll paint the rear sway bar the same color I painted the front sway bar --Ford Semi-Gloss Black. Dupli-Color DE1635. I'm not going for any attention-getting colors. While the various parts that have been installed aren't stock to the truck, my main approach is generally to try and make it (as much as possible) look like it came from the factory that way.
For someone that knows these trucks, they would know the bar didn't come on it from the factory. For someone that knows little to nothing about them, they would think it was stock from the factory.
Cargo Master
Joined: Nov 2005
Posts: 2,694
Likes: 45
From: La Ribera, Baja, Mexico
Way nice equipment amigo... I am green with envy.. but hauling that 1000 miles South of the border, well.... that would be a chore, not to mention the customs $$$ My truck is not factory, or even close, but neither am I any more. Check out my '67 Facelift forum, for some recent photos, of actually, a butt lift...if you are technical ..
Baja
Baja
Laughing Gas
Joined: Oct 2013
Posts: 947
Likes: 6
From: Manitoba, Canada
Well after a LOT of reading on the subject it appears that the Module needs to have a full 12 volts but the coil need a resistor. The Mustang Steve diagram I referenced before shows to cut the pink wire but it also describes the coil as a "12v hi-performance coil". I've already snipped my pink resistance wire off flush at the ignition switch so if I'm going to use the original 79 coil from the 79 Duraspark II system I'm going to have to splice in a ballast resistor, maybe one of those ceramic ones you see on fenders and firewalls. ?or change the coil to one with an internal resistor?
Thread Starter
|
Lead Driver
Joined: Apr 2011
Posts: 6,399
Likes: 40
From: El Dorado, Arkansas
Preliminary Test Fit of the '79 Bronco Rear Sway Bar on My '69 F100
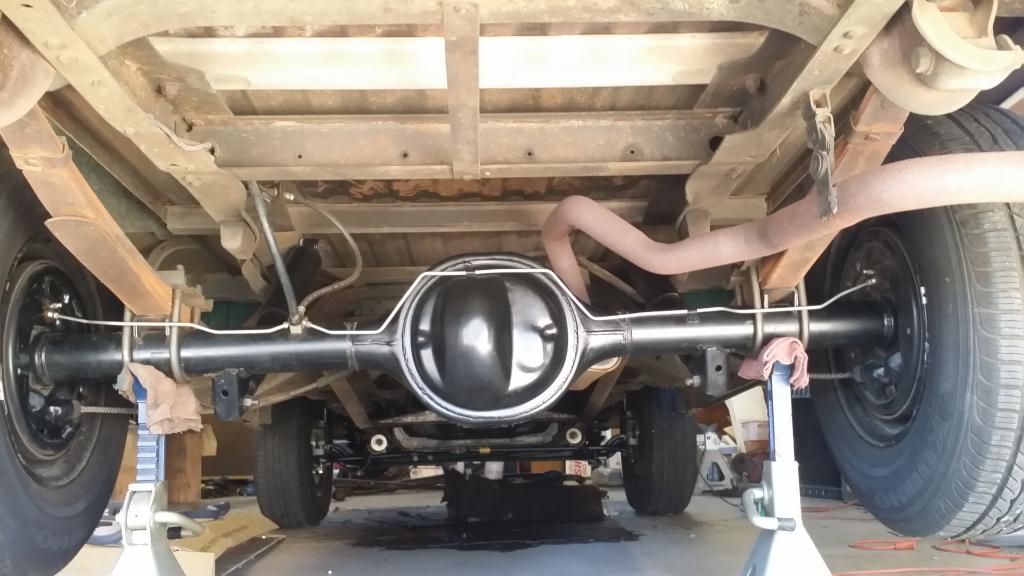
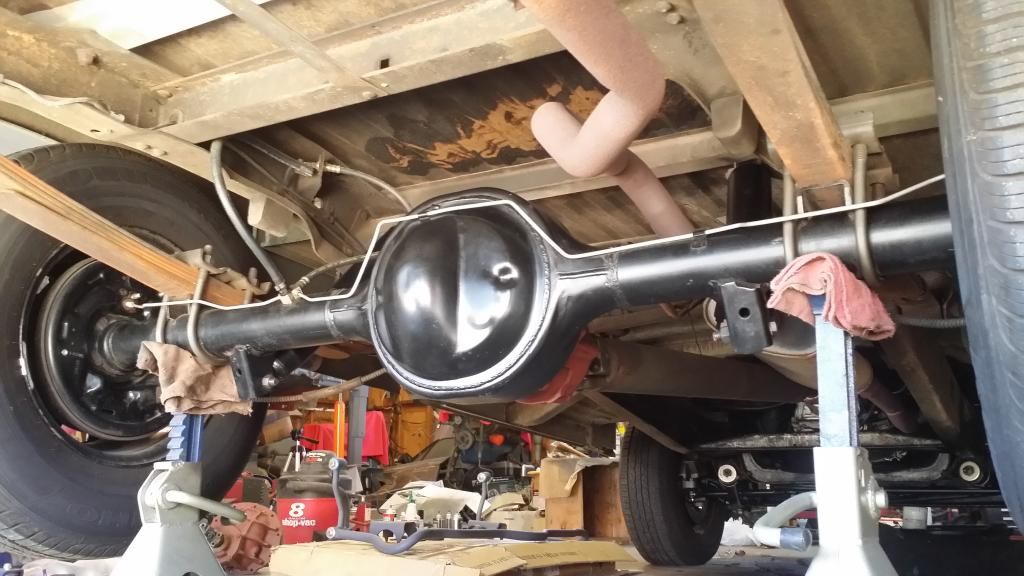
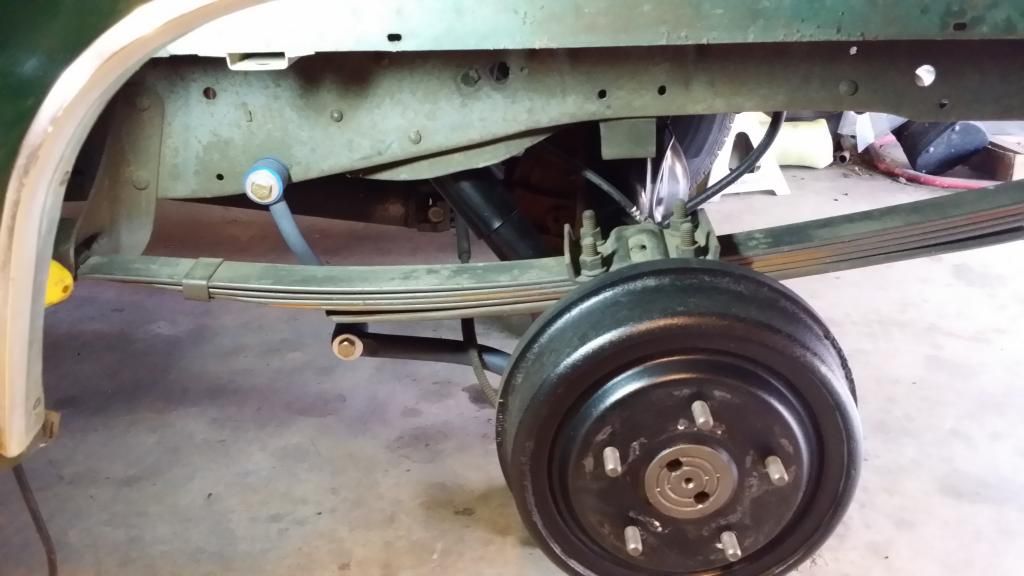
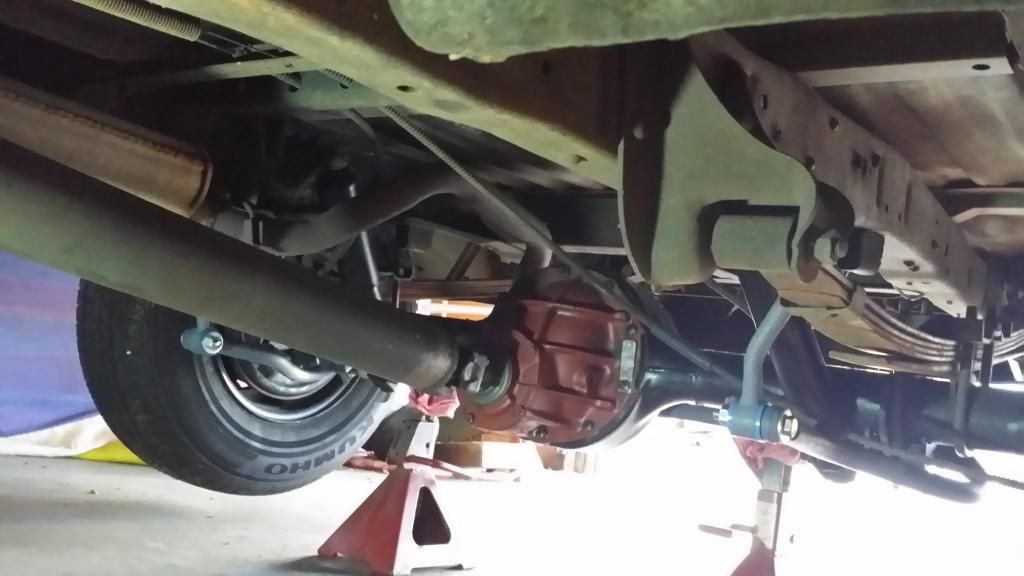
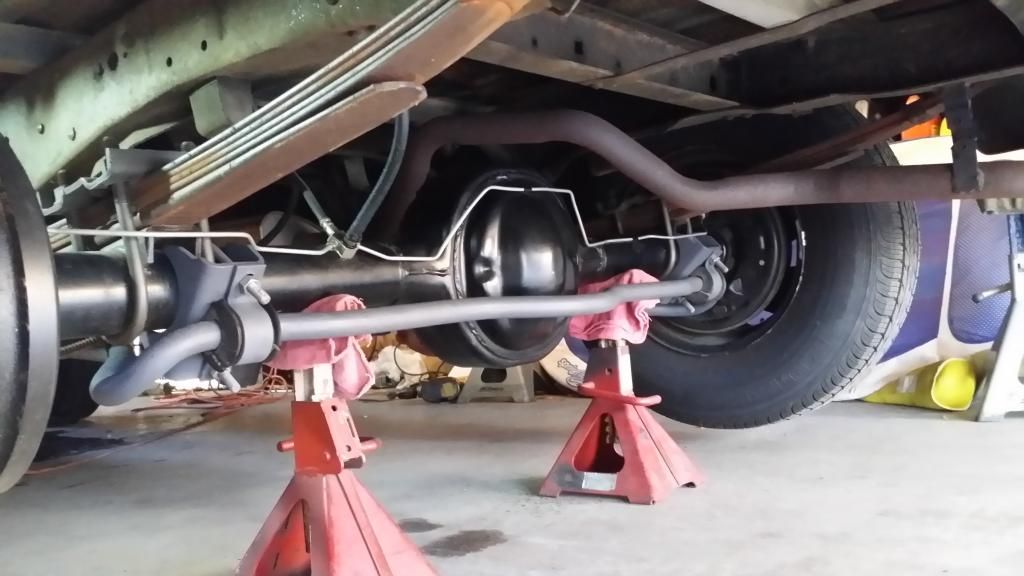
Here are a couple of photos of the 9-inch rear end under my '69 F100. I had pulled the rear end out, bead blasted and painted it, when I redid the brakes, right after I first bought the truck in 2011. The rear end still looks pretty good considering I did that four years ago.
This is what I started with, prior to testing out the fitment of the '79 Bronco rear sway bar today.
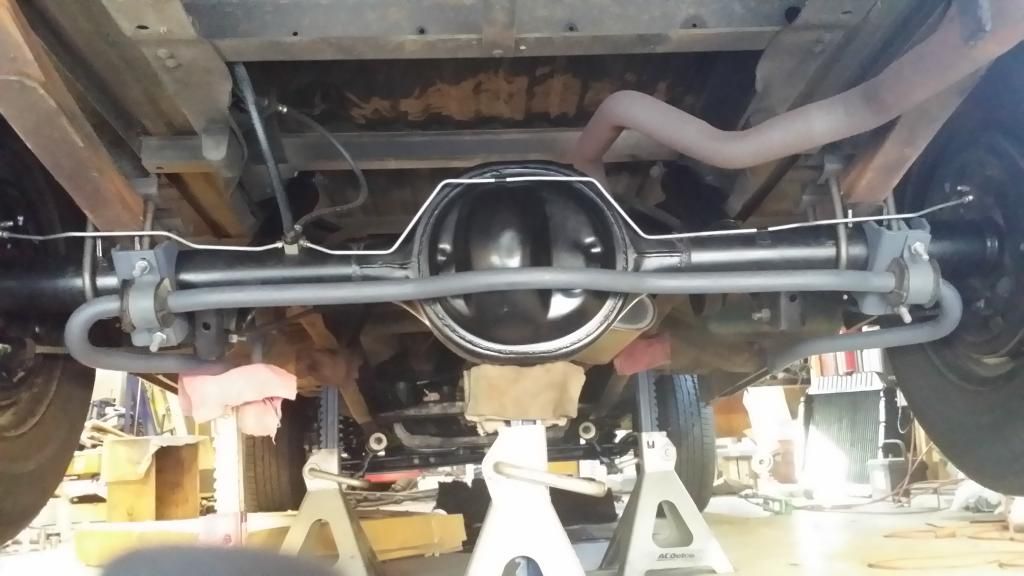
I had mentioned there may be a possibility of the leaf springs/perches being a problem, since the '67-'72 F100 rear leafs/perches are 2" per side more inboard than those on a '73-'79 Dentside truck/'78-'79 Bronco.
I had to slightly bias the sway bar a little to the right to get the sway bar-to-housing brackets to bolt up. The bracket U-bolt holes are positioned towards the outboard sides in their original Bronco application. I had to flip the left side bracket around so that the holes were positioned on the inboard side.
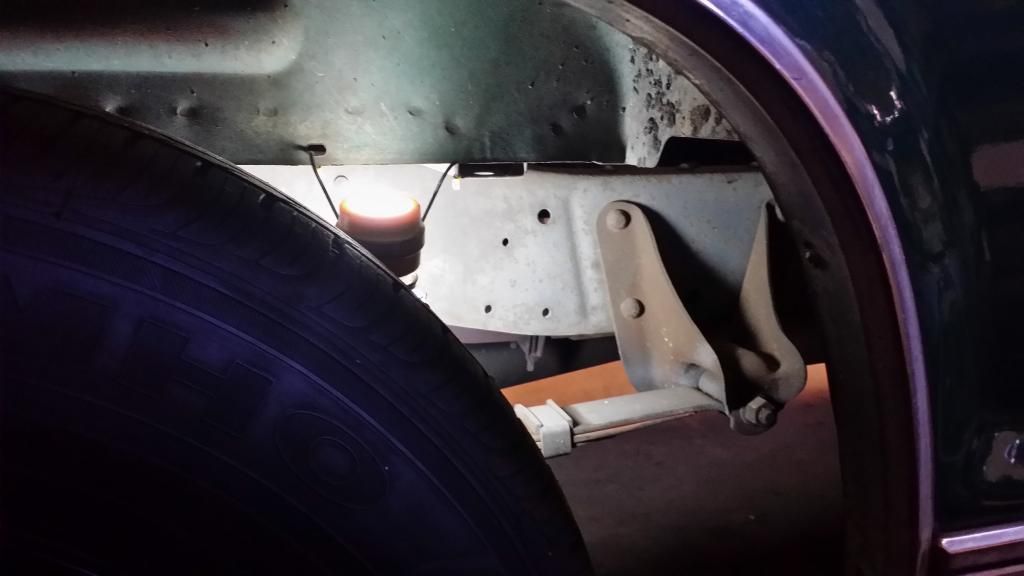
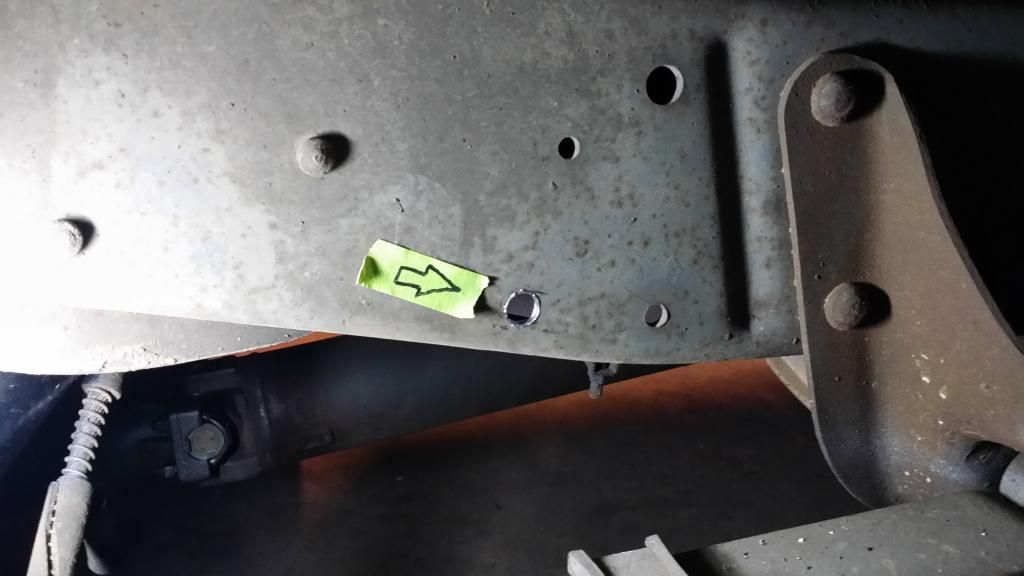
This is a photo of the left side rear frame rail. You'll notice there are three rivet heads present on the side of the frame in this shot. These three rivets attach the mounting bracket to the inside of the frame, for the upper end of the left rear shock. --note the rivet head I have marked with the arrow.
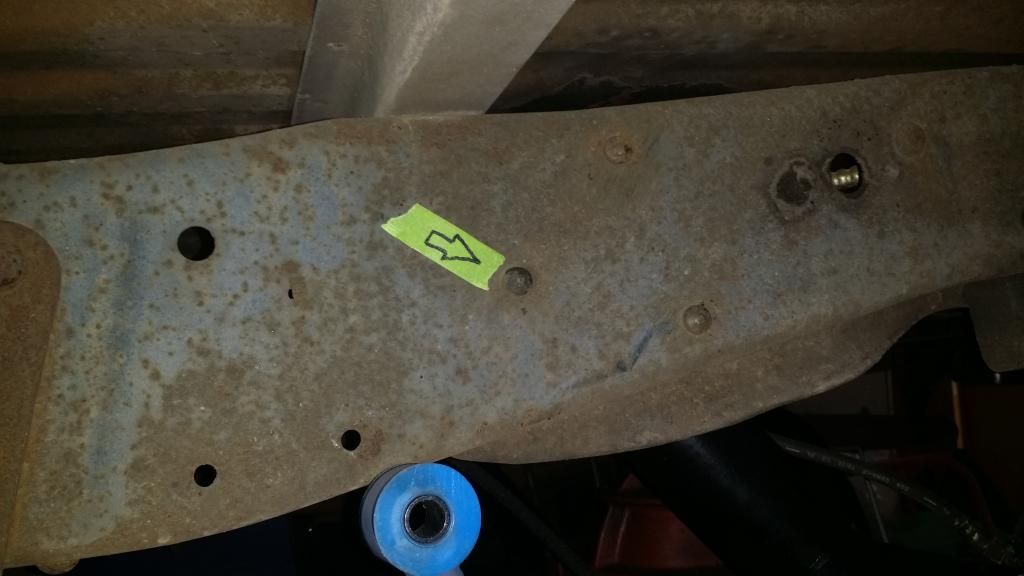
This rivet just happens to line up with the eyelet of the upper end of the end link. If this rivet was drilled out, a grade-8 bolt could be inserted through the end link and through the frame rail, in this location.
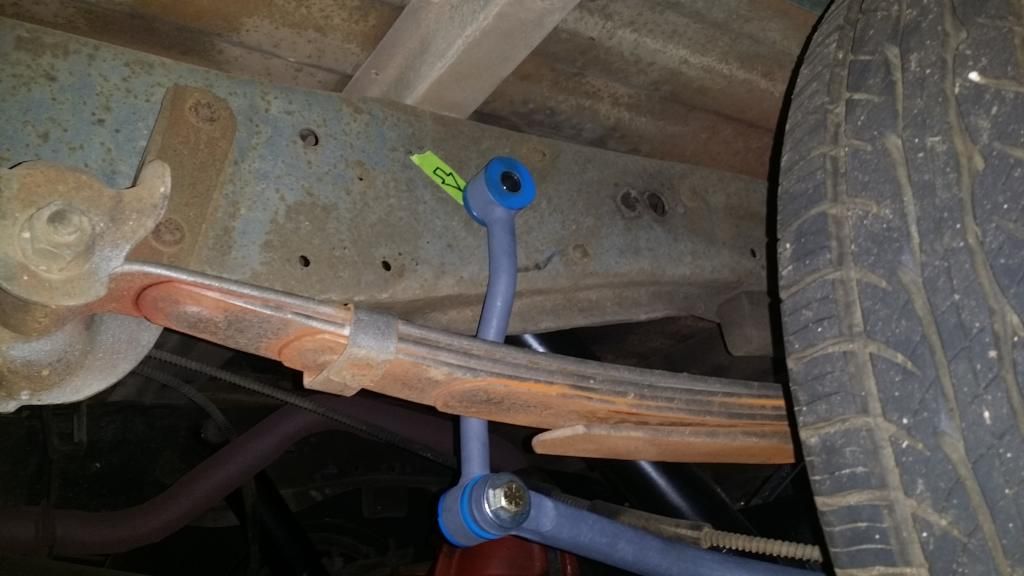
I may end up having to fabricate some custom end links, to avoid any conflicts between the stock Bronco end links and the '69 F100 leaf springs but, I'm about 99% sure at this point that I can make this work.
This is what I started with, prior to testing out the fitment of the '79 Bronco rear sway bar today.


I had mentioned there may be a possibility of the leaf springs/perches being a problem, since the '67-'72 F100 rear leafs/perches are 2" per side more inboard than those on a '73-'79 Dentside truck/'78-'79 Bronco.
I had to slightly bias the sway bar a little to the right to get the sway bar-to-housing brackets to bolt up. The bracket U-bolt holes are positioned towards the outboard sides in their original Bronco application. I had to flip the left side bracket around so that the holes were positioned on the inboard side.

This is a photo of the left side rear frame rail. You'll notice there are three rivet heads present on the side of the frame in this shot. These three rivets attach the mounting bracket to the inside of the frame, for the upper end of the left rear shock. --note the rivet head I have marked with the arrow.

This rivet just happens to line up with the eyelet of the upper end of the end link. If this rivet was drilled out, a grade-8 bolt could be inserted through the end link and through the frame rail, in this location.

I may end up having to fabricate some custom end links, to avoid any conflicts between the stock Bronco end links and the '69 F100 leaf springs but, I'm about 99% sure at this point that I can make this work.
Thread Starter
|
Lead Driver
Joined: Apr 2011
Posts: 6,399
Likes: 40
From: El Dorado, Arkansas
The rivet I mentioned earlier wasn't going to work out. The stamping body shape of the upper shock bracket, on the back side of the frame rail, is too close to the rivet hole to be able to get a grade-8 flat washer and a grade-8 prevailing torque lock nut on the hole in that location.
Sometimes life is like that. When we're at the zenith of doing something great and all seems right with the world, reality sets in and deals you a bushel of lemons. --When that happens, I say make orange juice instead.
I took another look at the left rear frame rail and saw two small factory-drilled holes (21/64" diameter), down to the left of the rivet.
I raised the sway bar/end link up and saw that the upper end of the left side end link eyelet would line up with this 21/64" hole.
The fasteners for the end links are 1/2" diameter so, it was just a matter of starting with an 11/64" bit and going through the drill index until I got to the 1/2" drill bit to open up this existing hole.
This location also pushed the forward ends of the sway bar down to more of a parallel orientation to the ground, instead of being kicked upwards, --as it would have been if the rivet hole location would have worked out.
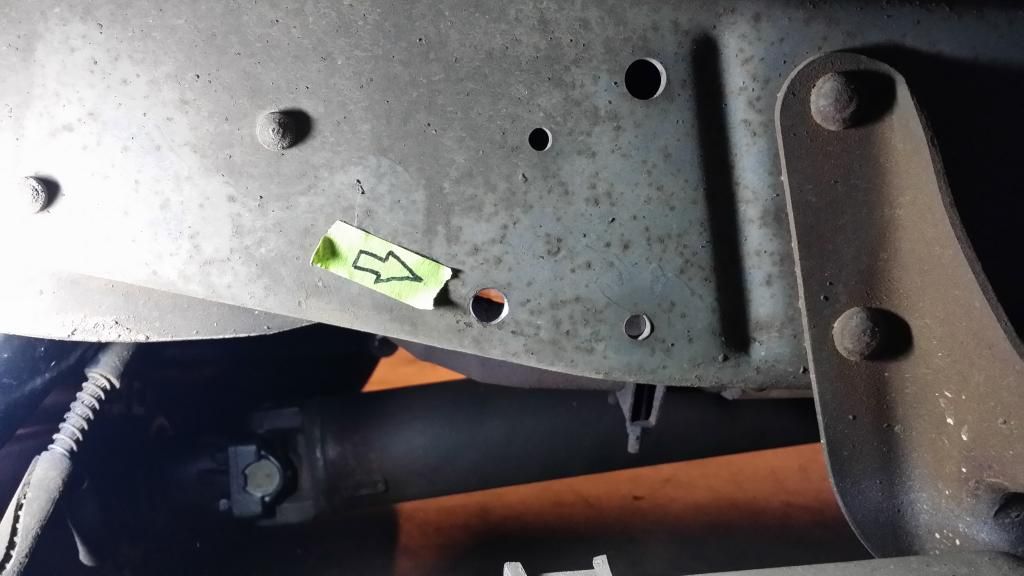
Existing hole location left of rivet head (already opened up to 1/2" diameter in this photo. Original 21/64" hole was the same size as the smaller 21/64" hole to the left of the one I drilled out).
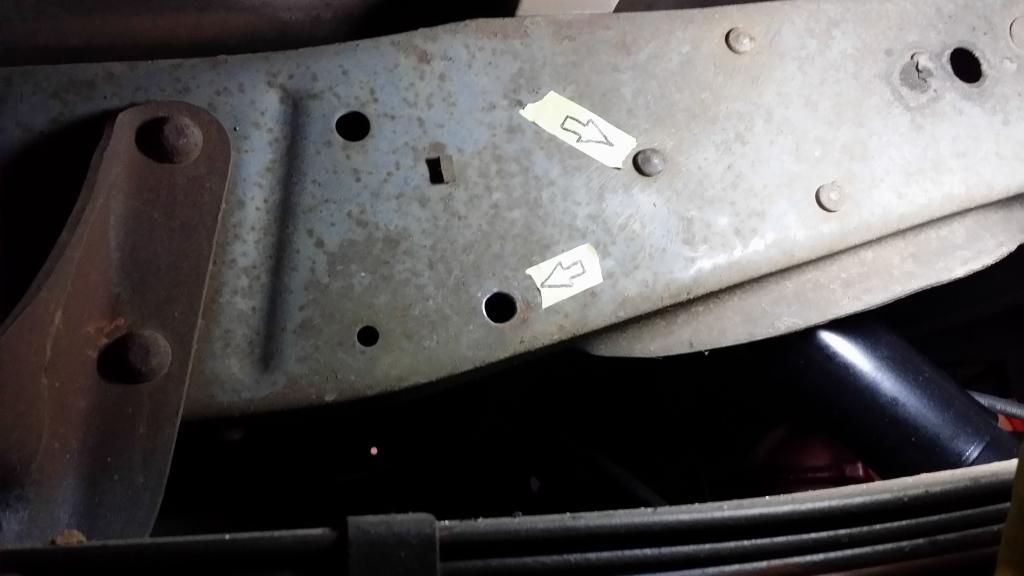
Factory '79 Bronco spacer on the outboard side of the left frame rail.
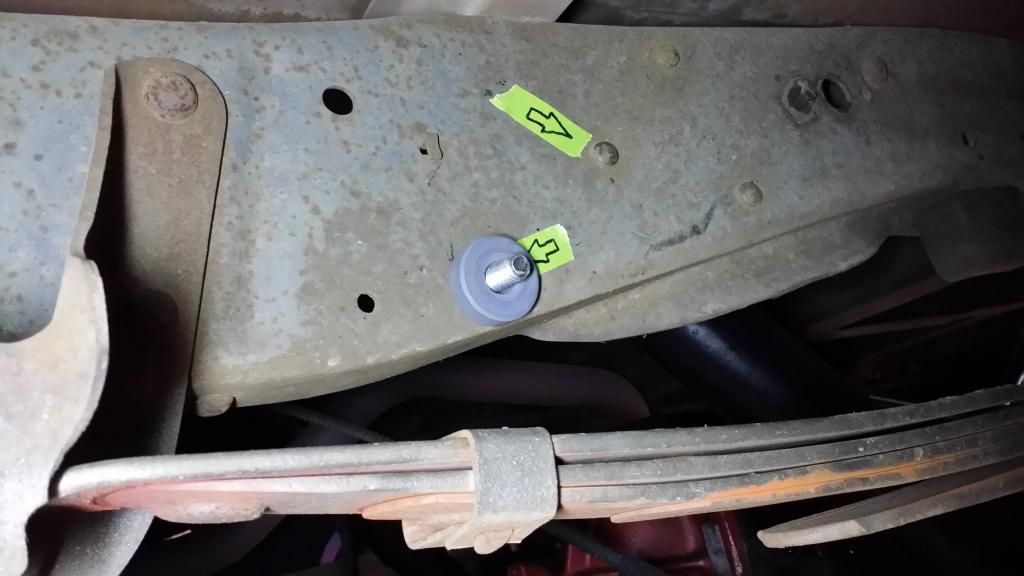
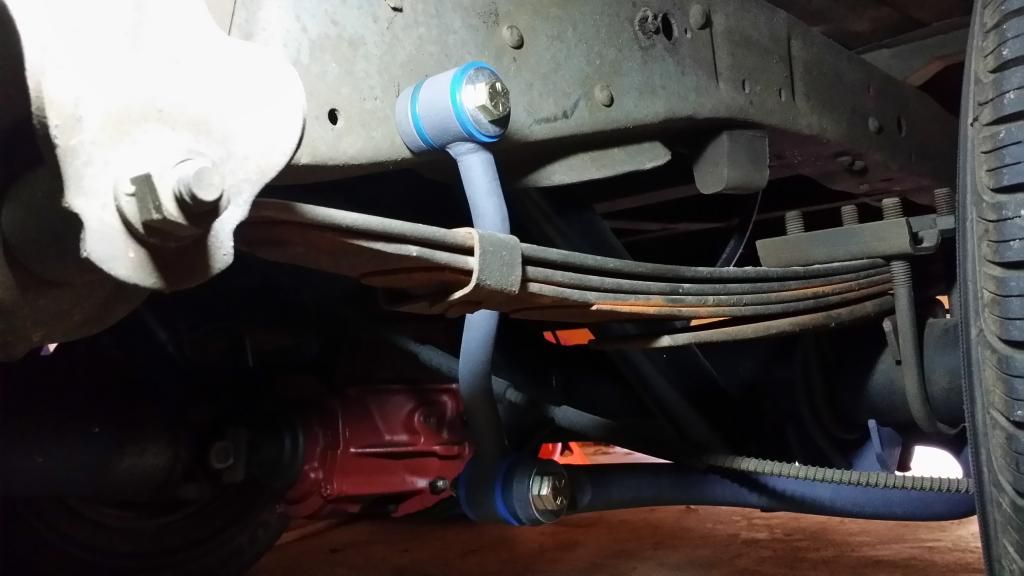
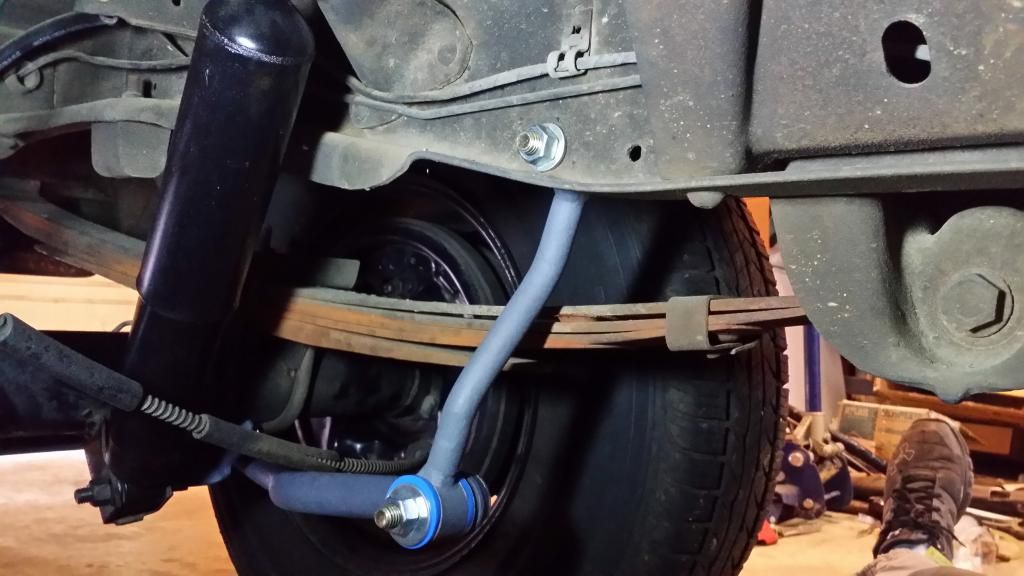
Upper end of end link bolted to the frame and the lower end of end link connected to the left arm of the sway bar --no spacers between the lower end of the end link and the sway bar.
View of upper end link fastener attachment inside left frame rail.
Same hole locations (and stock diameters) on right side frame rail.
Hole diameter stepped up to 1/2" (notice burr around the opening).
No burr after trimmed with the chamfering bit (BOTH sides of the hole).
The sway bar and end links are fully installed and connected to the chassis. This is still experimental since I don't have any drive time on it yet, to prove it out in whether there will be any interference problems or, whether it's going to work like a champ.
Now, I get to pull it all back off so I can paint the bar, brackets and end links Ford Semi-Gloss Black then, re-install all of it again.
Sometimes life is like that. When we're at the zenith of doing something great and all seems right with the world, reality sets in and deals you a bushel of lemons. --When that happens, I say make orange juice instead.
I took another look at the left rear frame rail and saw two small factory-drilled holes (21/64" diameter), down to the left of the rivet.
I raised the sway bar/end link up and saw that the upper end of the left side end link eyelet would line up with this 21/64" hole.
The fasteners for the end links are 1/2" diameter so, it was just a matter of starting with an 11/64" bit and going through the drill index until I got to the 1/2" drill bit to open up this existing hole.
This location also pushed the forward ends of the sway bar down to more of a parallel orientation to the ground, instead of being kicked upwards, --as it would have been if the rivet hole location would have worked out.
Existing hole location left of rivet head (already opened up to 1/2" diameter in this photo. Original 21/64" hole was the same size as the smaller 21/64" hole to the left of the one I drilled out).

Factory '79 Bronco spacer on the outboard side of the left frame rail.

Upper end of end link bolted to the frame and the lower end of end link connected to the left arm of the sway bar --no spacers between the lower end of the end link and the sway bar.

View of upper end link fastener attachment inside left frame rail.

Same hole locations (and stock diameters) on right side frame rail.

Hole diameter stepped up to 1/2" (notice burr around the opening).

No burr after trimmed with the chamfering bit (BOTH sides of the hole).

The sway bar and end links are fully installed and connected to the chassis. This is still experimental since I don't have any drive time on it yet, to prove it out in whether there will be any interference problems or, whether it's going to work like a champ.
Now, I get to pull it all back off so I can paint the bar, brackets and end links Ford Semi-Gloss Black then, re-install all of it again.


Cargo Master
Joined: Nov 2005
Posts: 2,694
Likes: 45
From: La Ribera, Baja, Mexico
Very nice work, and great detail in the explanation. Well done all around. I love this kind of thinking, (out of the box), that takes it way beyond the normal factory thinking.
$ stars amigo
Baja
$ stars amigo
Baja
Thread Starter
|
Lead Driver
Joined: Apr 2011
Posts: 6,399
Likes: 40
From: El Dorado, Arkansas
I got the pair of 31-spline axles cleaned up. Now, they're just waiting for me to press some new bearings on.
New parts store bearings for these axles are about $100.00 dollars each. I may have possibly located a pair of NOS bearings for these axles for $12.50 a piece. --we'll see.....
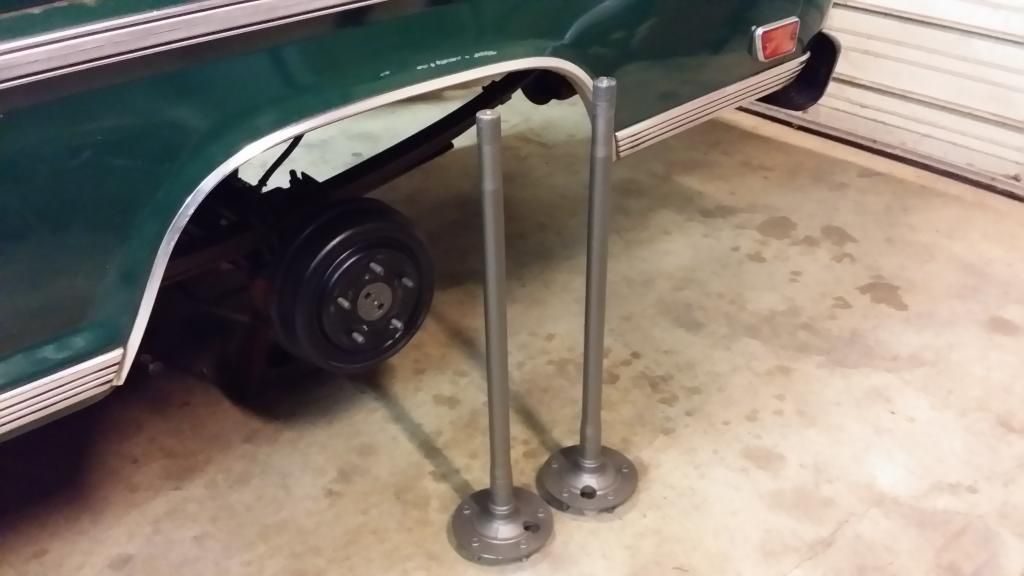
Also, in reference to the old wives tale that two circular divots on the center register indicates the axles are 31-spline ....Not true (but, I already knew that).
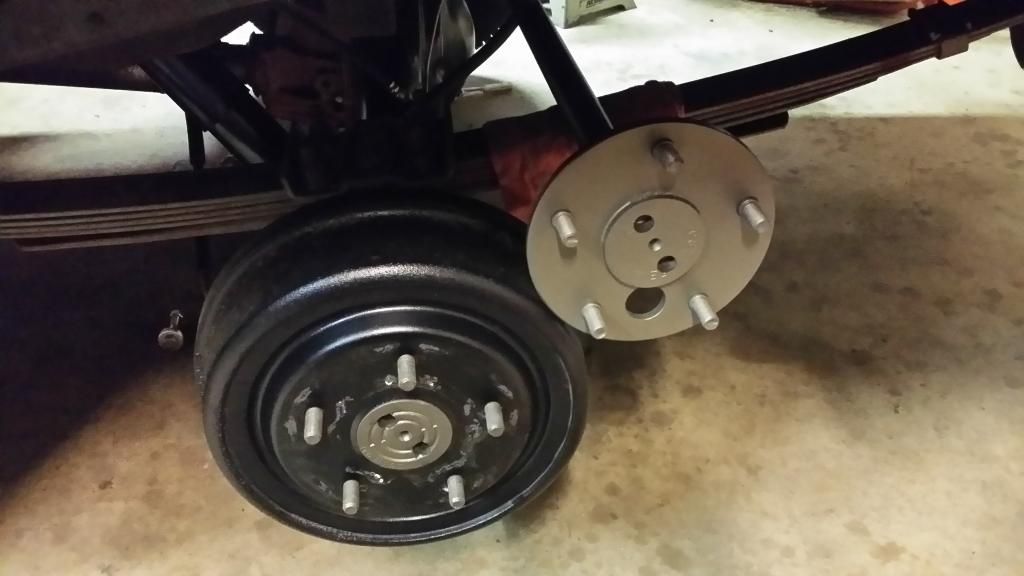
My stock '69 F100 28-spline axles are still currently in the rear end housing. You can see in the following photo that my 28-spline axle has two divots on the center register, just like my 31-spline axle (shown to the right of the rear brake drum).
Other than part numbers, (and I don't know if this is a definite visual identifier in the differences) but, notice my stock 28-spline axle has two circular grooves around the face of the center register.
Other than the divots, the face of the 31-spline axle register is flat and smooth.
The part number on the center register of my 28-spline axle is C8TW5D. The number on my 31-spline axle is C8TW5E.
New parts store bearings for these axles are about $100.00 dollars each. I may have possibly located a pair of NOS bearings for these axles for $12.50 a piece. --we'll see.....

Also, in reference to the old wives tale that two circular divots on the center register indicates the axles are 31-spline ....Not true (but, I already knew that).
My stock '69 F100 28-spline axles are still currently in the rear end housing. You can see in the following photo that my 28-spline axle has two divots on the center register, just like my 31-spline axle (shown to the right of the rear brake drum).
Other than part numbers, (and I don't know if this is a definite visual identifier in the differences) but, notice my stock 28-spline axle has two circular grooves around the face of the center register.
Other than the divots, the face of the 31-spline axle register is flat and smooth.
The part number on the center register of my 28-spline axle is C8TW5D. The number on my 31-spline axle is C8TW5E.

FTE Stories
Ford Trucks for Ford Truck Enthusiasts

2027 Ford Super Duty Buyer's Guide (Every Model, Engine, & Package)
Brett Foote
Top 10 Ford Truck Tragedies
Joe Kucinski
AEV FXL Super Duty - the Super Duty Raptor Ford Doesn't Make
Brett Foote
Lobo Vs Lobo: Proof the F-150 Lobo Should Be Even Lower!
Michael S. Palmer
Ford's 2001 Explorer Sportsman Concept Looks For a New Home
Verdad Gallardo
10 Best Ford Truck Engines We Miss the Most!
Joe Kucinski
2026 Shelby F-150 Off-Road: Better Than a Raptor R?
Brett Foote
2027 Super Duty Carhartt Package First Look: 12 Things You NEED to Know!
Michael S. Palmer
10 Most Surprising 2026 Ford Truck Features!
Joe Kucinski
Fleet Owner
Joined: Dec 2009
Posts: 20,678
Likes: 82
From: NorCal
Do me a favor and provide outside measurement of the Bronco swaybar from endlink mount to endlink mount ... I wanna understand how much clearance there is between the bolt heads and the leaf springs.
Thread Starter
|
Lead Driver
Joined: Apr 2011
Posts: 6,399
Likes: 40
From: El Dorado, Arkansas
Dang, and I just locked up the shop for the night....give me just a few minutes and I'll go measure the eyelet distance on the rear sway bar. Back momentarily with that information for you....
Thread Starter
|
Lead Driver
Joined: Apr 2011
Posts: 6,399
Likes: 40
From: El Dorado, Arkansas
Ok, on the eyelet ends of the sway bar's forward arms, --where the lower ends of the links attach but, WITHOUT the links being attached to the bar, the span of the arms (outside-to-outside) is 37-5/16".
The inside-to-inside measurement of the eyelets on the bar is 35-15/16".
The inside-to-inside measurement of the eyelets on the bar is 35-15/16".
Fleet Owner
Joined: Dec 2009
Posts: 20,678
Likes: 82
From: NorCal
Ok, on the eyelet ends of the sway bar's forward arms, --where the lower ends of the links attach but, WITHOUT the links being attached to the bar, the span of the arms (outside-to-outside) is 37-5/16".
The inside-to-inside measurement of the eyelets on the bar is 35-15/16".
The inside-to-inside measurement of the eyelets on the bar is 35-15/16".

Thread Starter
|
Lead Driver
Joined: Apr 2011
Posts: 6,399
Likes: 40
From: El Dorado, Arkansas
You're welcome. Hmmm, 10:37 pm CST here. Gotta get to bed if I'm going to get up and make another day at work tomorrow. (Sigh)
Thread Starter
|
Lead Driver
Joined: Apr 2011
Posts: 6,399
Likes: 40
From: El Dorado, Arkansas
I'm sure that there are probably slightly varying tolerances from one bar to another. There are probably also varying vehicle assembly tolerances as well --especially when you factor in the parts are 30 plus years old and the truck they're being put on has 40 plus years of wear and tear on it.
The stock rubber bushings of the Bronco links stopped flush with the edge of the eyelets at the ends of the links. The blue poly bushings I have has a shoulder on them that slide up against the OUTSIDE of the link eyelets. The bushing shoulder thickness is about 1/8" thick.
1/8" bushing thickness on the inside of the sway bar-to-endlink connection and 1/8" at the upper end link-to-frame connection is like having a 1/4" spacer (overall) between the components.
In their original Bronco installation, the endlinks were installed in a mirror image (turned the opposite of each other). In my application, I had to bias the sway bar a little to the right so, I had to turn the links in the same orientation on both sides.
I only had to use one of the stock Bronco frame-to-upper endlink spacers --I installed it on the left, outboard side of the frame. I didn't need the other spacer on the right side. --but also, my poly bushings had the added shoulder outside the endlink eyelets that the original rubber bushings didn't have.
I can't remember if your '70 is an F100 or a 250 (?). The F100/F150 Dentside/'78-'79 F150 Bronco rear sway bar, for a 9-inch rear end, is not the same as the factory sway bar for an F250 Dentside truck with Dana rear end.
The stock rubber bushings of the Bronco links stopped flush with the edge of the eyelets at the ends of the links. The blue poly bushings I have has a shoulder on them that slide up against the OUTSIDE of the link eyelets. The bushing shoulder thickness is about 1/8" thick.
1/8" bushing thickness on the inside of the sway bar-to-endlink connection and 1/8" at the upper end link-to-frame connection is like having a 1/4" spacer (overall) between the components.
In their original Bronco installation, the endlinks were installed in a mirror image (turned the opposite of each other). In my application, I had to bias the sway bar a little to the right so, I had to turn the links in the same orientation on both sides.
I only had to use one of the stock Bronco frame-to-upper endlink spacers --I installed it on the left, outboard side of the frame. I didn't need the other spacer on the right side. --but also, my poly bushings had the added shoulder outside the endlink eyelets that the original rubber bushings didn't have.
I can't remember if your '70 is an F100 or a 250 (?). The F100/F150 Dentside/'78-'79 F150 Bronco rear sway bar, for a 9-inch rear end, is not the same as the factory sway bar for an F250 Dentside truck with Dana rear end.
Thread Starter
|
Lead Driver
Joined: Apr 2011
Posts: 6,399
Likes: 40
From: El Dorado, Arkansas
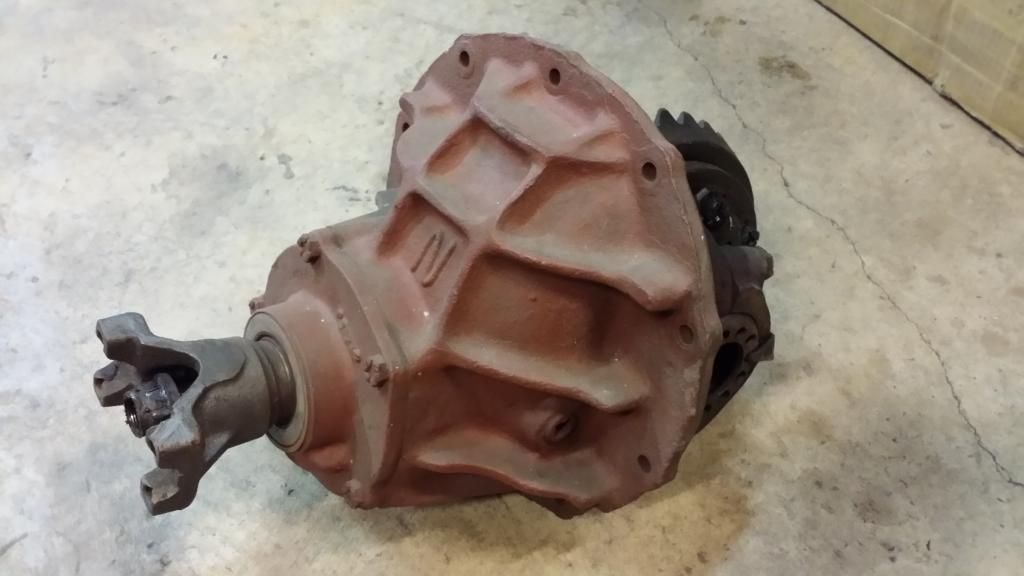
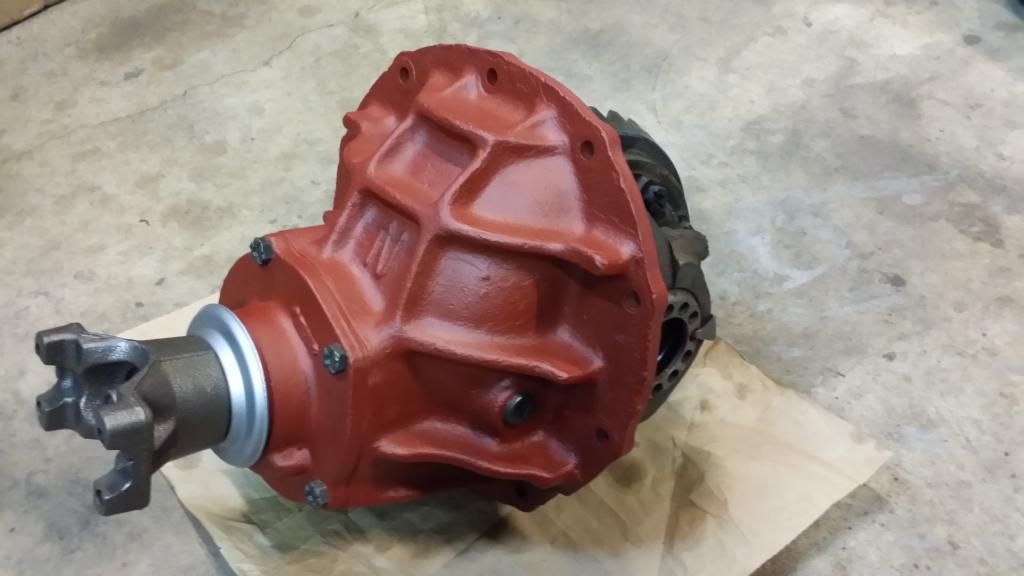
Ford 9-inch N-case 31-spline 4-pinion Traction-Lok 3rd Member
My Ford Nodular iron 9-inch 31-spline 4-pinion Traction-Lok 3.50 ratio 3rd member before.
After. Not too bad considering I picked this bad boy up (in the wrecking yard, a number of years ago) for $75.00.
1330 U-joint flange installed.
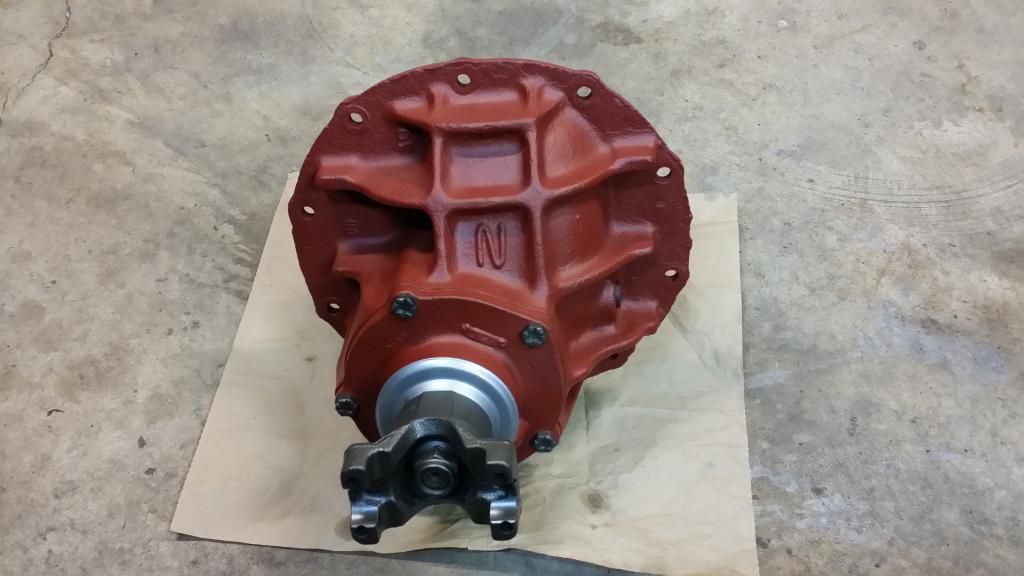

After. Not too bad considering I picked this bad boy up (in the wrecking yard, a number of years ago) for $75.00.

1330 U-joint flange installed.
