




Bye Bye Front Drums

Senior User
Joined: Aug 2013
Posts: 226
Likes: 0
The LED came from Autolumination.com . It's a switchback LED listed as; 60 LED Prec. The colors I got are White-Red.
I got an 1157 metal socket from Summit racing. The part number for it is; 84725. It has two contact wires (black) and one ground wire (white). It had some tabs around the opening of the socket that weren't needed. I took some needle nose pliers and broke them off the socket housing.
When I went to insert the LED into the socket, I accidently broke the THIN fiberglass wafer that keeps the contacts of the wires located and separated. The wafer is keyed so, make sure it's lined up in the slot BEFORE you try to put the LED in the metal socket. I went to O'Reilly Auto Parts and got a replacement contact/wire set to install in the socket, p/n 85801.
Off and on, I had tried to come up with a way to double the cargo light as a 3rd brake light but, I just couldn't come up with a clean and easy solution to accomplish this.
A while back, I had seen on Fordification where a guy had done this with a switchback LED (which before then, I didn't know such a thing even existed). The main credit goes to Coupe5oh in figuring this out.
However, his description of how he did it only consisted of mentioning where he got the LED, he said he used a universal 1157 socket and he ran another circuit to go to the cargo light (and I believe he said) he wired it into the rear brake lights (?). I just sort of had to fill in the blanks of the unknowns of how it was done, to make the modifications to my cargo light, and how I wired mine to get it to work the way it does now.
Coupe5oh posted two photos: one of the cargo light lit up white, with the cargo light **** pulled out and, one of it lit up red, when the brakes were applied.
I have no idea in his setup if the cargo light flashes red when the flashers are on or, if it will alternate between red/white when the flashers AND the cargo **** are activated (?).
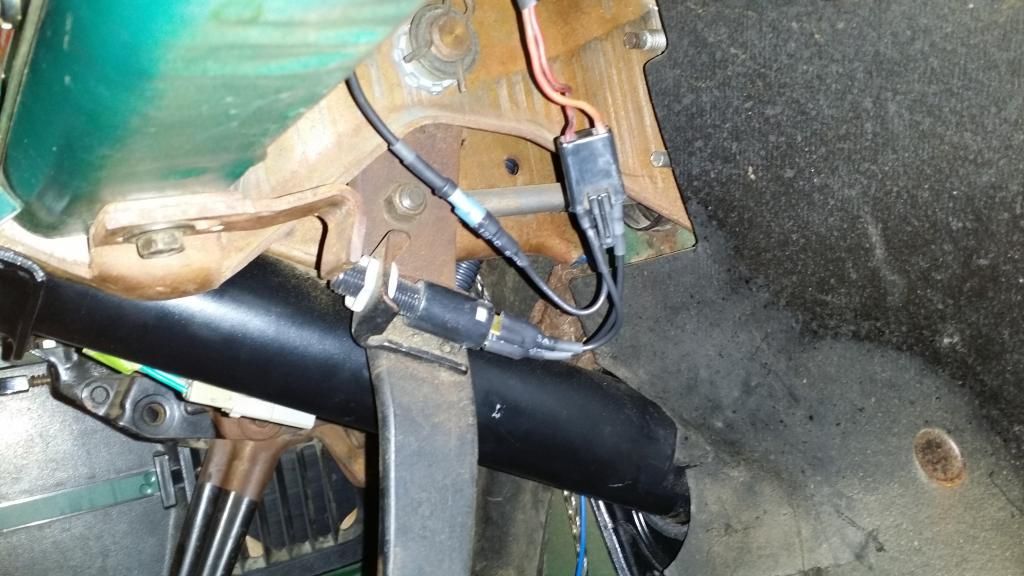
I wired my 3rd brake light circuit off the switched side of the brake pedal switch. My factory brake switch mounts to a bracket under the dash. It's a normally closed switch, held open. There are two wires on the spade connector that plugs into the back of the switch. One wire is Red/Black. This is the constant 12v hot wire to the switch. The other wire is solid Red. It's the wire on the switched side of the circuit. --this circuit is dead when the pedal is back because the switch contacts are being held open (no current/voltage flow through it).
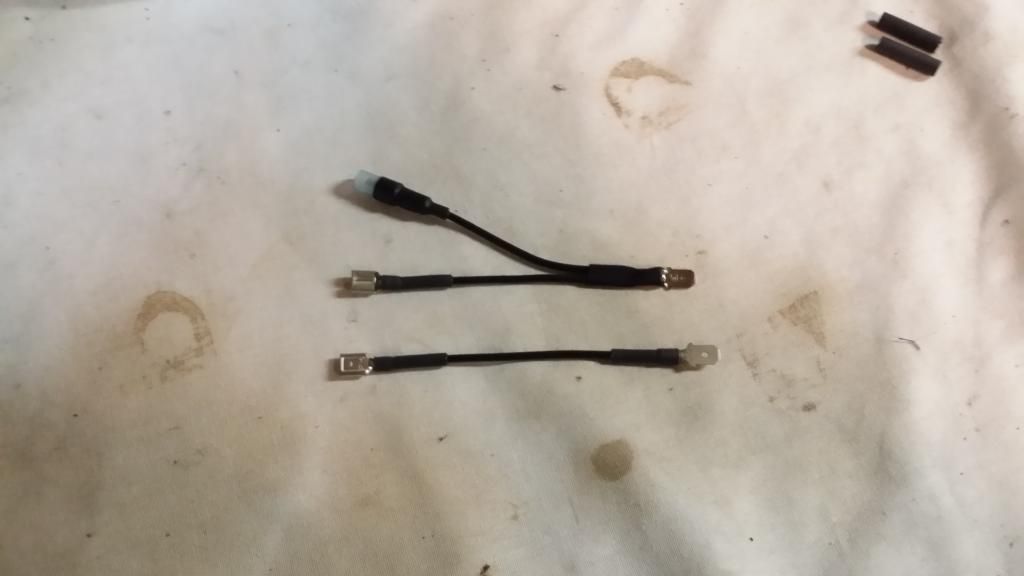
I took the factory connector loose from the back of the brake pedal switch and made two short jumpers with spade connectors at each end. On one of the jumpers for the switched side (Red wire) of the brake switch, I made a breakout pigtail and attached a .157" female bullet terminal. --this breakout would be connected to the circuit going to the cargo light, to turn on the red portion of the LED.
These are the jumpers (patch wires) I made to go between the spade terminals of the brake switch and the wiring harness connector that used to plug into the brake switch. The top jumper in the photo is the one with the breakout and the female bullet terminal attached.
The jumpers installed in between the switch and the original wiring connector (wires have since been wire-tied and tucked away from when this photo was taken --and there were also no factory wiring harness wires cut).
I put a male bullet terminal on some black 14 ga. automotive primary wire, plugged it into the breakout jumper, fed the wire behind the instrument cluster, up through the A-pillar, over the top of the drivers door and then around to the opening where the cargo light mounts. --this was really easy, given the fact I don't (presently) have a headliner.
Wire fed up through the hole in the A-pillar, behind where the left end of the instrument cluster is located.
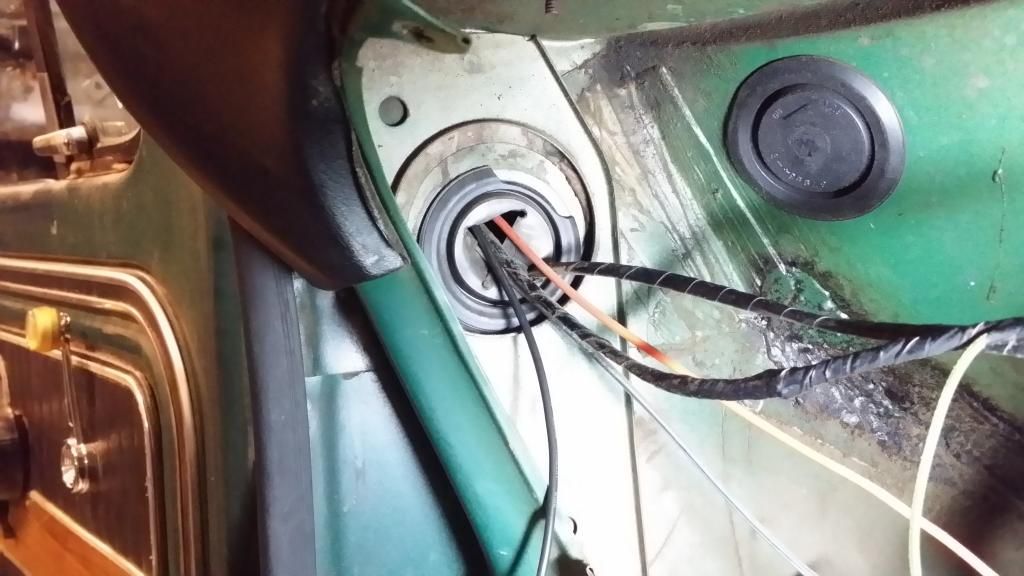
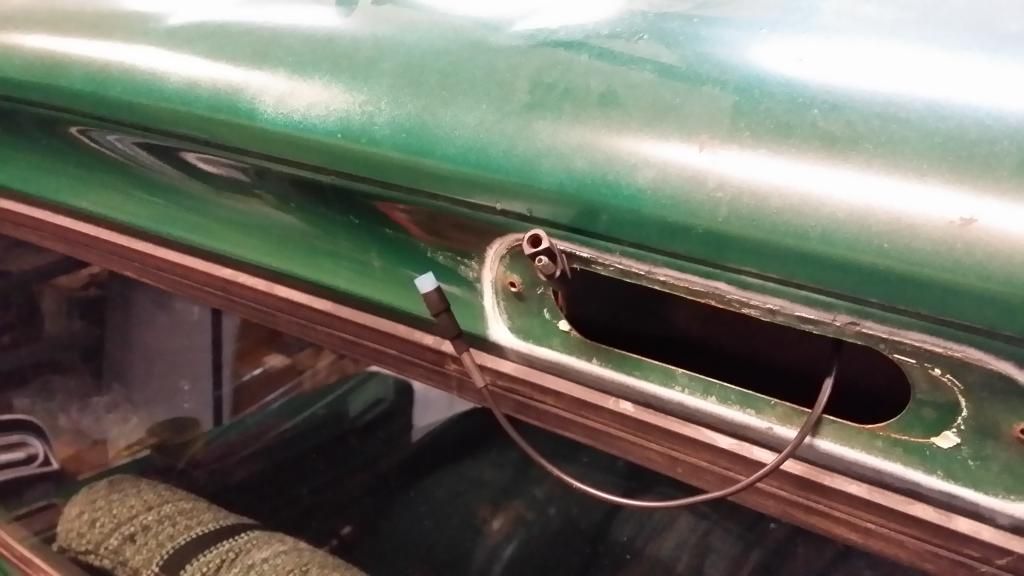
New wire (with female bullet connector attached) poking out of the hole along with the original cargo light male/female moulded bullet connector. (it took 11' of 14 ga. wire to get from the brake switch to the hole for the cargo light).
The original socket in the cargo light housing is an 1156. It's designed for a bulb with a single filament (one function). For this to work, the 1156 single filament metal socket has to be swapped for a dual filament 1157 socket.
Original 1156 socket in the housing of the cargo light.
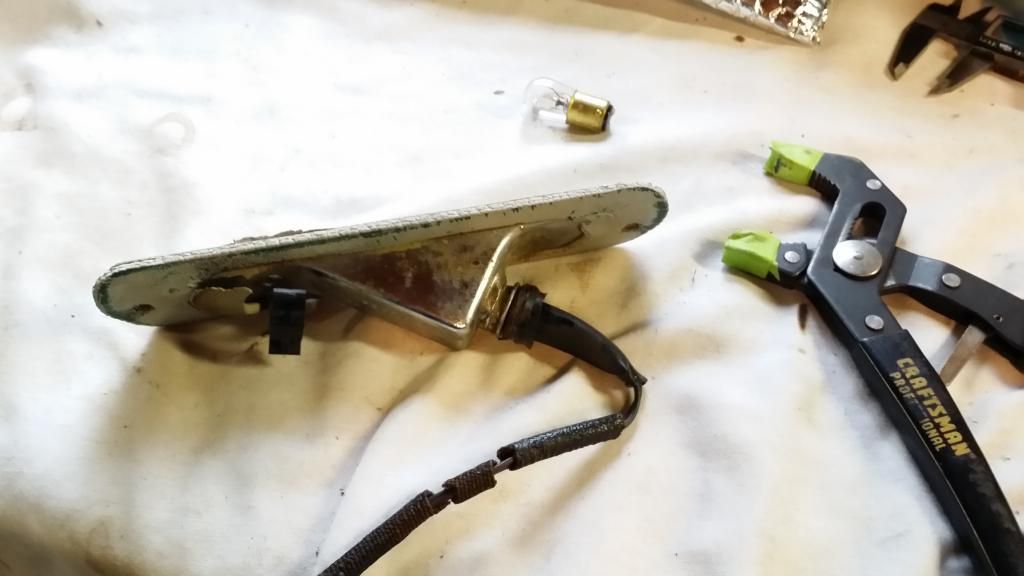
I just took some channel locks, gripped the metal ridge around the outside of the socket and twisted it back and forth while pulling outward on it and the socket slid out of the housing.
1156 socket removed from housing.
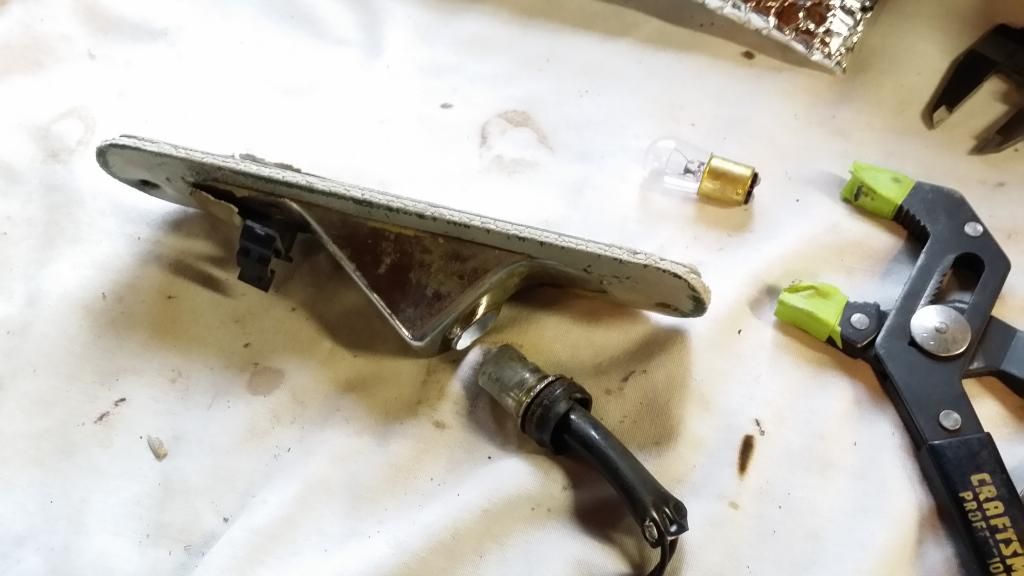
I didn't really document the steps beyond this with photos but, I took my die grinder with a carbide bit and had to make (3) small divots in the I.D. of the cargo light housing for the 1157 metal socket to slide in --two divots to clear the ears on the socket for the offset tabs on each side of the bulb, where its base plugs into the socket and, one divot to clear the keyed tab that runs the length of the metal socket. --remove a little material at a time, try to install the socket into the housing until the socket will finally slide into the bore fairly tight.
The new base will have a wired ground so, it will not be dependent on the 1157 socket being absolutely tight to the cargo light housing for its ground path.
Once the socket will fit into the housing, slide it back out and install the switchback LED into the socket, then install the socket/LED into the housing as a unit --it will be harder to install the LED into the socket if the socket is installed into the housing, first.
After the LED/socket are installed, JB Weld the socket to the housing and let it harden.
Now, you can check which black wire of the socket illuminates the LED white and which goes to the red.
Once I figured this out, I marked the wires, clipped the male/female moulded bullet connector off the old 1156 socket, spliced the appropriate terminal to the wire of the socket going to the white portion of the LED, connected the white (ground) wire to the other bullet terminal on the original moulded connector from the old socket and then, connected the wire I ran from the brake switch to the other black wire on the 1157 socket that illuminates the red portion of the LED.
This modification is really pretty easy to do. The explanation is just lengthy in trying to explain how I did it.
I got an 1157 metal socket from Summit racing. The part number for it is; 84725. It has two contact wires (black) and one ground wire (white). It had some tabs around the opening of the socket that weren't needed. I took some needle nose pliers and broke them off the socket housing.
When I went to insert the LED into the socket, I accidently broke the THIN fiberglass wafer that keeps the contacts of the wires located and separated. The wafer is keyed so, make sure it's lined up in the slot BEFORE you try to put the LED in the metal socket. I went to O'Reilly Auto Parts and got a replacement contact/wire set to install in the socket, p/n 85801.
Off and on, I had tried to come up with a way to double the cargo light as a 3rd brake light but, I just couldn't come up with a clean and easy solution to accomplish this.
A while back, I had seen on Fordification where a guy had done this with a switchback LED (which before then, I didn't know such a thing even existed). The main credit goes to Coupe5oh in figuring this out.
However, his description of how he did it only consisted of mentioning where he got the LED, he said he used a universal 1157 socket and he ran another circuit to go to the cargo light (and I believe he said) he wired it into the rear brake lights (?). I just sort of had to fill in the blanks of the unknowns of how it was done, to make the modifications to my cargo light, and how I wired mine to get it to work the way it does now.
Coupe5oh posted two photos: one of the cargo light lit up white, with the cargo light **** pulled out and, one of it lit up red, when the brakes were applied.
I have no idea in his setup if the cargo light flashes red when the flashers are on or, if it will alternate between red/white when the flashers AND the cargo **** are activated (?).
I wired my 3rd brake light circuit off the switched side of the brake pedal switch. My factory brake switch mounts to a bracket under the dash. It's a normally closed switch, held open. There are two wires on the spade connector that plugs into the back of the switch. One wire is Red/Black. This is the constant 12v hot wire to the switch. The other wire is solid Red. It's the wire on the switched side of the circuit. --this circuit is dead when the pedal is back because the switch contacts are being held open (no current/voltage flow through it).
I took the factory connector loose from the back of the brake pedal switch and made two short jumpers with spade connectors at each end. On one of the jumpers for the switched side (Red wire) of the brake switch, I made a breakout pigtail and attached a .157" female bullet terminal. --this breakout would be connected to the circuit going to the cargo light, to turn on the red portion of the LED.
These are the jumpers (patch wires) I made to go between the spade terminals of the brake switch and the wiring harness connector that used to plug into the brake switch. The top jumper in the photo is the one with the breakout and the female bullet terminal attached.

The jumpers installed in between the switch and the original wiring connector (wires have since been wire-tied and tucked away from when this photo was taken --and there were also no factory wiring harness wires cut).

I put a male bullet terminal on some black 14 ga. automotive primary wire, plugged it into the breakout jumper, fed the wire behind the instrument cluster, up through the A-pillar, over the top of the drivers door and then around to the opening where the cargo light mounts. --this was really easy, given the fact I don't (presently) have a headliner.
Wire fed up through the hole in the A-pillar, behind where the left end of the instrument cluster is located.

New wire (with female bullet connector attached) poking out of the hole along with the original cargo light male/female moulded bullet connector. (it took 11' of 14 ga. wire to get from the brake switch to the hole for the cargo light).

The original socket in the cargo light housing is an 1156. It's designed for a bulb with a single filament (one function). For this to work, the 1156 single filament metal socket has to be swapped for a dual filament 1157 socket.
Original 1156 socket in the housing of the cargo light.

I just took some channel locks, gripped the metal ridge around the outside of the socket and twisted it back and forth while pulling outward on it and the socket slid out of the housing.
1156 socket removed from housing.

I didn't really document the steps beyond this with photos but, I took my die grinder with a carbide bit and had to make (3) small divots in the I.D. of the cargo light housing for the 1157 metal socket to slide in --two divots to clear the ears on the socket for the offset tabs on each side of the bulb, where its base plugs into the socket and, one divot to clear the keyed tab that runs the length of the metal socket. --remove a little material at a time, try to install the socket into the housing until the socket will finally slide into the bore fairly tight.
The new base will have a wired ground so, it will not be dependent on the 1157 socket being absolutely tight to the cargo light housing for its ground path.
Once the socket will fit into the housing, slide it back out and install the switchback LED into the socket, then install the socket/LED into the housing as a unit --it will be harder to install the LED into the socket if the socket is installed into the housing, first.
After the LED/socket are installed, JB Weld the socket to the housing and let it harden.
Now, you can check which black wire of the socket illuminates the LED white and which goes to the red.
Once I figured this out, I marked the wires, clipped the male/female moulded bullet connector off the old 1156 socket, spliced the appropriate terminal to the wire of the socket going to the white portion of the LED, connected the white (ground) wire to the other bullet terminal on the original moulded connector from the old socket and then, connected the wire I ran from the brake switch to the other black wire on the 1157 socket that illuminates the red portion of the LED.
This modification is really pretty easy to do. The explanation is just lengthy in trying to explain how I did it.

Thread Starter
|
Lead Driver


Joined: Apr 2011
Posts: 6,399
Likes: 40
From: El Dorado, Arkansas
The cargo/3rd brake light LED is inside a closed housing. The light from the LED can't come back through the dome light lens and into the cab for this reason.
The light can only shine outward from the cargo/3rd brake light housing.
Senior User
Joined: Aug 2013
Posts: 226
Likes: 0
Not a "dumb question." The dome light and the cargo light are two separate things and each have their own separate bulbs.
The cargo/3rd brake light LED is inside a closed housing. The light from the LED can't come back through the dome light lens and into the cab for this reason.
The light can only shine outward from the cargo/3rd brake light housing.
The cargo/3rd brake light LED is inside a closed housing. The light from the LED can't come back through the dome light lens and into the cab for this reason.
The light can only shine outward from the cargo/3rd brake light housing.
Thanks, now I have another project


Fleet Owner
Joined: Dec 2009
Posts: 20,678
Likes: 83
From: NorCal
I'm not sure it matters but if ya wanna be uber correct, the endlink to C-bracket bolt is inserted in the opposite direction and the nut inboard. I had to insert mine like that pictured because DJM beams don't have that relief cast into the stock I-beams.
Thread Starter
|
Lead Driver
Joined: Apr 2011
Posts: 6,399
Likes: 40
From: El Dorado, Arkansas
However, I haven't torqued the bolts yet so, it would be easy enough to flip them around.

Senior User
Joined: Aug 2013
Posts: 226
Likes: 0
Where are you getting vacuum for the brake booster?
I have a 300/6 and don't see any fittings on the intake manifold.
Thanks
I have a 300/6 and don't see any fittings on the intake manifold.
Thanks
FTE Stories
Ford Trucks for Ford Truck Enthusiasts

Top 10 Fords at 2026 Carlisle Ford Nationals
Joe Kucinski
3 Best / 3 Worst Parts of Modern Ford Ownership
Brett Foote
10 Amazing Upgrades That Solve Common Ford Truck Owner Headaches
Pouria Savadkouei
Every 2026 Ford Engine Explained
Brett Foote
10 Ugly Ford Trucks That We Still Kinda Love
Joe Kucinski
10 Things Every Truck Owner NEEDS (2026 Edition)
Michael S. Palmer
Rezvani's Latest Post-Apocalyptic Monster Is a Ford F-150 Raptor Underneath
Verdad Gallardo
Top 10 Most Expensive Ford Trucks Ever Sold on Bring a Trailer
Joe Kucinski
2027 Ford Super Duty Buyer's Guide (Every Model, Engine, & Package)
Brett Foote


Thread Starter
|
Lead Driver
Joined: Apr 2011
Posts: 6,399
Likes: 40
From: El Dorado, Arkansas
I installed a street run tee in the port of the intake --the street run tee has (2) 3/8" NPT female ports and (1) 3/8" NPT male port. I have (2) 3/8" male NPT barbed hose fittings screwed into the street run tee.
The 3/8" vacuum hose going straight up goes to the PCV valve. The 3/8" vacuum hose going off to the left is going to the vacuum brake booster.
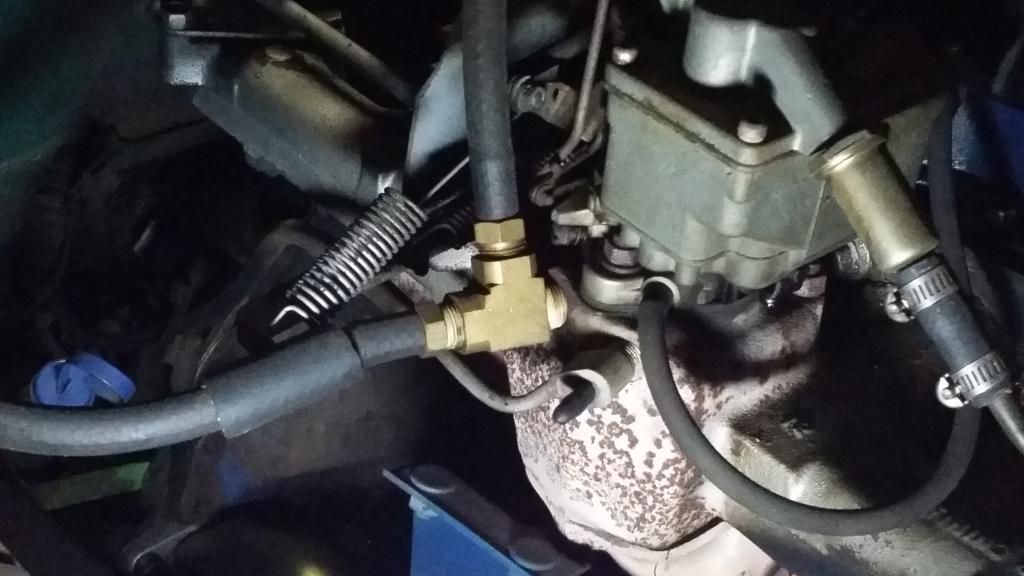
The 3/8" vacuum hose going straight up goes to the PCV valve. The 3/8" vacuum hose going off to the left is going to the vacuum brake booster.

Senior User
Joined: Aug 2013
Posts: 226
Likes: 0
I installed a street run tee in the port of the intake --the street run tee has (2) 3/8" NPT female ports and (1) 3/8" NPT male port. I have (2) 3/8" male NPT barbed hose fittings screwed into the street run tee.
The 3/8" vacuum hose going straight up goes to the PCV valve. The 3/8" vacuum hose going off to the left is going to the vacuum brake booster.
The 3/8" vacuum hose going straight up goes to the PCV valve. The 3/8" vacuum hose going off to the left is going to the vacuum brake booster.
I notice you're not using the extra port for the distributor.
Mine came with the dual vacuum advance unit that seems to be working.
Did you swap out your vacuum pod on your dizzy or did your truck come without?

Elder User
Joined: Jun 2014
Posts: 727
Likes: 3
I got my 7-blade fan from ebay. 7-blade Ford (clutch) fans are all over the place in price. When I was looking, some were in the $100.00 dollar range. I scored this one for $15.00 plus $12.00 shipping.
If I've done something you think might help you, have at it. I don't know if you a have fan shroud (I don't) but, it would probably help your cooling tremendously. It would just be a matter of determining what's the correct shroud for your engine, radiator and fan diameter/depth.
Sorry, but, I can't help on the water pump situation. I'm hoping I don't have to change the water pump on my old 240 before I change engines. --I have a 5.0L H.O. fuel injected engine from a 1990 Mustang GT I plan to eventually swap in place of the old carbureted 240.
In the mean time, until the engine swap can happen, I just want to make some improvements with what I currently have in place.
If I've done something you think might help you, have at it. I don't know if you a have fan shroud (I don't) but, it would probably help your cooling tremendously. It would just be a matter of determining what's the correct shroud for your engine, radiator and fan diameter/depth.
Sorry, but, I can't help on the water pump situation. I'm hoping I don't have to change the water pump on my old 240 before I change engines. --I have a 5.0L H.O. fuel injected engine from a 1990 Mustang GT I plan to eventually swap in place of the old carbureted 240.
In the mean time, until the engine swap can happen, I just want to make some improvements with what I currently have in place.