




Bye Bye Front Drums

Thread Starter
|
Lead Driver


Joined: Apr 2011
Posts: 6,399
Likes: 40
From: El Dorado, Arkansas
Thanks amigos, now to find them in Baja, or put it on the "Bringo" list for next trip North. I am sure that they would be way more 'clean' looking than a cut up plastic barrel, so I am on the hunt for awhile. Thanks again amigos, Oh how I do love this site, and all you guys with mucho experience. Wonder if DC has any?? Shipping will probably kill me though... Local junk yards are my best bet. Meanwhile, during the trailer ride, for the new bed, I discovered a '79 tilt steering column... but the guy would not turn loose of it... luckily, his buddy, has 3, so I am still in the game on that one..
Unless there are any tilt column parts available NOS, there is no supply for them and no one reproduces the critical mechanical components for these columns.
If you find a good one, it wouldn't be a bad idea to try to buy a good spare column, to use for spare parts, in the future.
There are (3) bearings in the '78/'79 tilt columns. There's one small bearing in the top of the upper tilt flange and another bearing in the upper flange that's slightly larger.
The 3rd bearing is located in the plastic bushing/cap at the very end of the column tube. --this small bearing is the same size as the upper most bearing in the top of the upper tilt flange.
I believe these bearings are still available from Ford. They are also available from some aftermarket sources for around $25.00 each (ouch!). They are very small bearings.
The lower column bearing, and the plastic bushing that houses that bearing, is a majorly weak, POS design.
I'll probably have a piece of Delrin or UHMW machined to slide into the end of the tube and a much heavier duty ball bearing to insert into it, to replace the lower bearing and plastic cap.
Cargo Master
Joined: Nov 2005
Posts: 2,694
Likes: 45
From: La Ribera, Baja, Mexico
Way good info Ultra, I will take your advice, and beef up the bearings before I attempt the swap.. I have time, as the bed project is on the burner now, and I am shooting for mid to late Feb. for completion. Not much happens in Mexico over the holidays, other than lots of fiesta, and slow days. Mostly from long nights of fiesta. Not rocket science to figure that one. BTW, singing comes in 2 versions, good, and tequila induced. I vastly prefer the Voice, to 12 neighbors with a karaoke machine. The CIA might be well advised to look into this, as a waterboarding replacement.
Baja
Baja
Thread Starter
|
Lead Driver
Joined: Apr 2011
Posts: 6,399
Likes: 40
From: El Dorado, Arkansas
While I was installing the delay wiper setup yesterday, and had the instrument cluster out, I decided today I would finish touching up the instrument bezel before I install it back into the dash.
Since my truck is a '69 Ranger, it means it originally came with a bezel that had (fake) teak wood inserts in the "U's" at each end of the bezel.
My bezel was faded out and the lens was so cloudy, when I bought the truck, I could hardly see the instruments. The lens was so cloudy over the odometer, I didn't even know how many miles were showing at the time I went to buy the truck.
Not long after I bought the truck in 2011, I pulled a bezel from a regular '68 F250 CS to replace my bezel with. The donor bezel didn't look great but, it looked better than my Ranger's bezel and the donor had a lens that wasn't all cloudy.
Masking an instrument cluster bezel off to paint it can be tedious and time consuming but, I painted the donor bezel to make it look better than what it looked like, when I first brought it home.
Even so, the first time I painted the bezel, I didn't mask off the division bars between the gauges/idiot lights or the "U's" at each end. This area all got painted cast aluminum silver.
This time, I masked them off to black those areas out and painted the F-O-R-D letters, in the center, black as well.
It's not perfect by any means but, it looks better than from before --considering it was basically just a ratty looking wrecking yard donor part to start with.
Cluster after I painted it, initially, but didn't blackout certain areas.
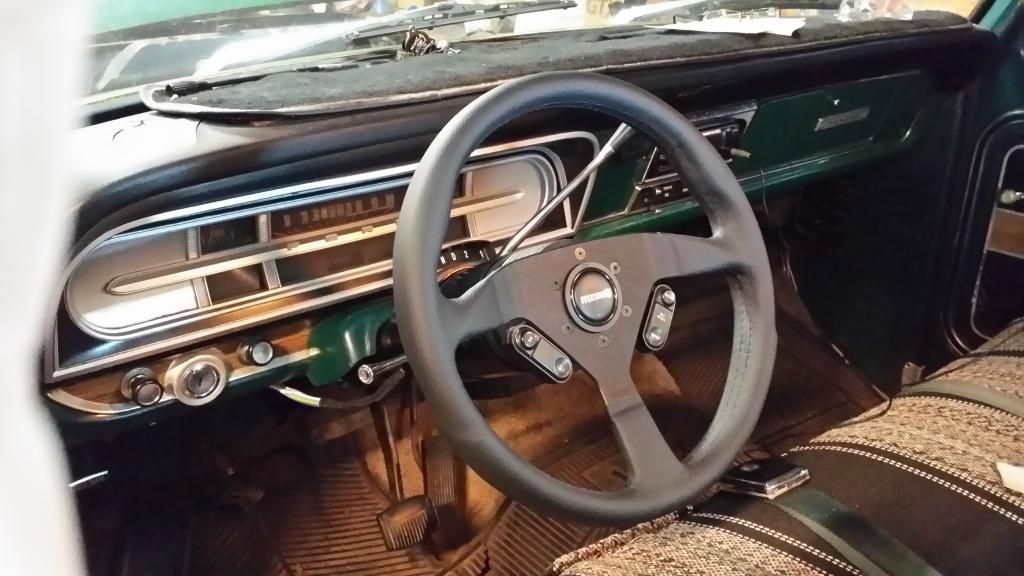
After I went back and blacked out the division bars and U's.
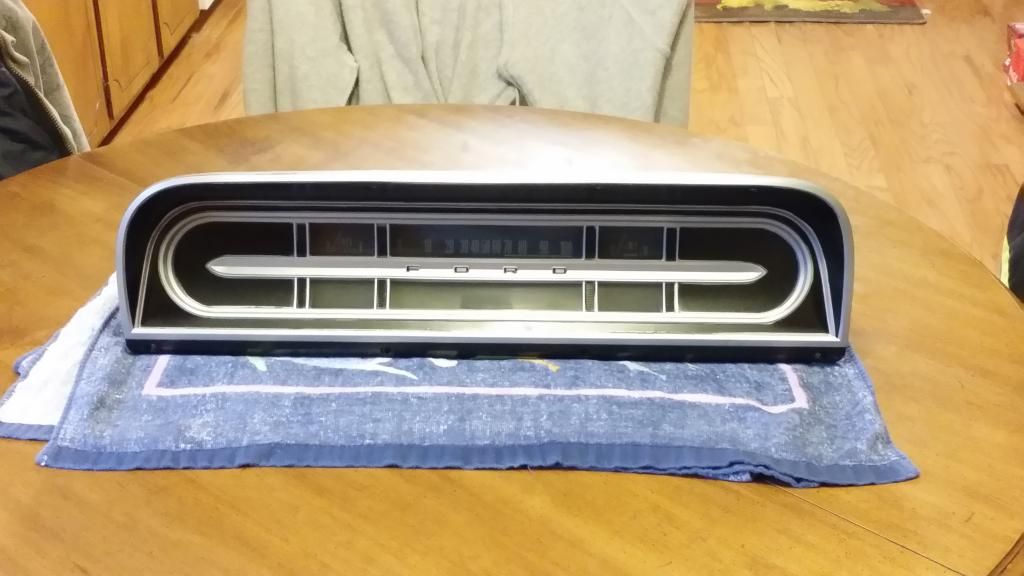
Revamped junk yard bezel compared to my old, original, Ranger bezel.
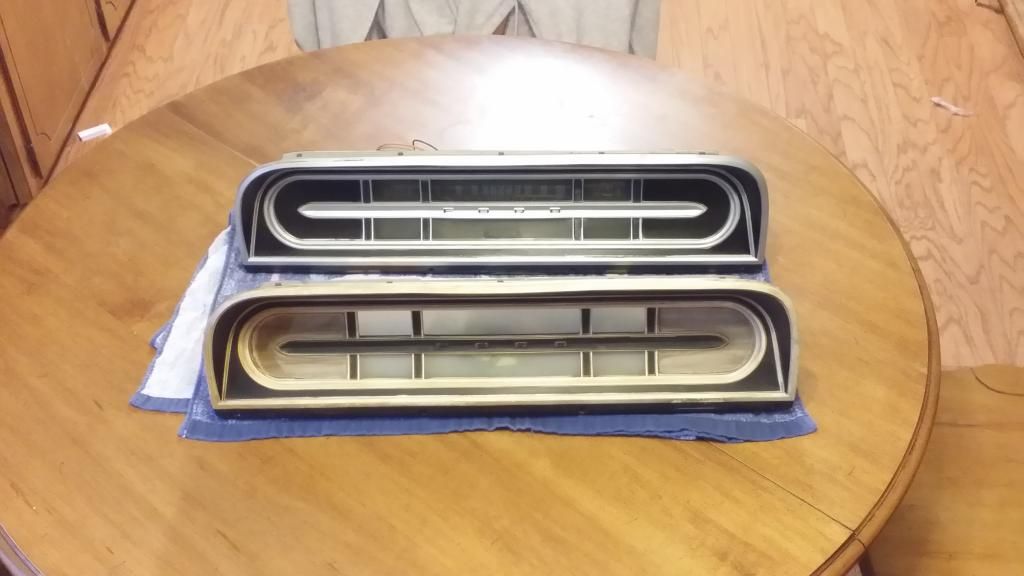
Since my truck is a '69 Ranger, it means it originally came with a bezel that had (fake) teak wood inserts in the "U's" at each end of the bezel.
My bezel was faded out and the lens was so cloudy, when I bought the truck, I could hardly see the instruments. The lens was so cloudy over the odometer, I didn't even know how many miles were showing at the time I went to buy the truck.
Not long after I bought the truck in 2011, I pulled a bezel from a regular '68 F250 CS to replace my bezel with. The donor bezel didn't look great but, it looked better than my Ranger's bezel and the donor had a lens that wasn't all cloudy.
Masking an instrument cluster bezel off to paint it can be tedious and time consuming but, I painted the donor bezel to make it look better than what it looked like, when I first brought it home.
Even so, the first time I painted the bezel, I didn't mask off the division bars between the gauges/idiot lights or the "U's" at each end. This area all got painted cast aluminum silver.
This time, I masked them off to black those areas out and painted the F-O-R-D letters, in the center, black as well.
It's not perfect by any means but, it looks better than from before --considering it was basically just a ratty looking wrecking yard donor part to start with.
Cluster after I painted it, initially, but didn't blackout certain areas.

After I went back and blacked out the division bars and U's.

Revamped junk yard bezel compared to my old, original, Ranger bezel.


Hotshot


Joined: Mar 2013
Posts: 14,255
Likes: 199
From: Phoenix, Az.
The lower column bearing, and the plastic bushing that houses that bearing, is a majorly weak, POS design.
I'll probably have a piece Delrin or UHMW machined to slide into the end of the tube and a much heavier duty ball bearing to insert into it, to replace the lower bearing and plastic cap.
Hotshot
Joined: Mar 2013
Posts: 14,255
Likes: 199
From: Phoenix, Az.
I did much the same but I added the 69 woodgrain back in with shown below in my 68. I had bought this stuff from Parts Express a few years ago for a bathroom cabinet project and had some left over. Got some 69 door trim panels and add it to them also. Mine look like yours. I don't remember which stain and polyeurethene I used though.

Roll over image to zoom Click for larger image
<TABLE id=ctl00_ctl00_MainContent_uxProduct_uxProductSwat ches_DataListSwatches border=0 cellSpacing=5 cellPadding=5><TBODY><TR><TD class=ItemStyle>
</TD><TD class=ItemStyle>
</TD><TD></TD><TD></TD></TR></TBODY></TABLE>
Band-It Red Oak Veneer 24" x 96" Paper-Backed
Brand: Band-It
| Model: 24910
<DL class=bv-stars-container role=presentation itemscope itemtype="http://schema.org/AggregateRating" itemprop="aggregateRating" sizset="false" sizcache043821877393361147="296 8 57">****** name=bvDateModified content=12/26/2014>****** content='Band-It Red Oak Veneer 24" x 96" Paper-Backed' itemprop="itemReviewed"><DD class=bv-rating-ratio role=presentation>★★★★★ ★★★★★ ****** content=5 itemprop="bestRating">4 out of 5 stars. Read reviews. </DD><DD aria-hidden=true class=bv-rating-ratio-number role=presentation sizset="false" sizcache043821877393361147="296 8 57">4 out of 5 rating. 4.0
</DD><DD class=bv-rating-ratio-count role=presentation>2 Reviews </DD></DL>
1 question and 2 answers for this product
<BUTTON class="bv-write-review bv-focusable bv-submission-button">Write a review . This action will open a modal dialog.</BUTTON>
<BUTTON class="bv-ask-question bv-focusable bv-submission-button">Ask a question</BUTTON>
Overview
Band-It's premium Red Oak veneer offers the quality and beauty that you would find on high-end speakers, but in a form factor that is cost effective and easy-to-apply.
Highlights
Part # 260-046
Weight: 2.16 lbs.

Roll over image to zoom Click for larger image
<TABLE id=ctl00_ctl00_MainContent_uxProduct_uxProductSwat ches_DataListSwatches border=0 cellSpacing=5 cellPadding=5><TBODY><TR><TD class=ItemStyle>
</TD><TD class=ItemStyle>

</TD><TD></TD><TD></TD></TR></TBODY></TABLE>
Band-It Red Oak Veneer 24" x 96" Paper-Backed
Brand: Band-It
| Model: 24910
<DL class=bv-stars-container role=presentation itemscope itemtype="http://schema.org/AggregateRating" itemprop="aggregateRating" sizset="false" sizcache043821877393361147="296 8 57">****** name=bvDateModified content=12/26/2014>****** content='Band-It Red Oak Veneer 24" x 96" Paper-Backed' itemprop="itemReviewed"><DD class=bv-rating-ratio role=presentation>★★★★★ ★★★★★ ****** content=5 itemprop="bestRating">4 out of 5 stars. Read reviews. </DD><DD aria-hidden=true class=bv-rating-ratio-number role=presentation sizset="false" sizcache043821877393361147="296 8 57">4 out of 5 rating. 4.0
</DD><DD class=bv-rating-ratio-count role=presentation>2 Reviews </DD></DL>
1 question and 2 answers for this product
<BUTTON class="bv-write-review bv-focusable bv-submission-button">Write a review . This action will open a modal dialog.</BUTTON>
<BUTTON class="bv-ask-question bv-focusable bv-submission-button">Ask a question</BUTTON>
Overview
Band-It's premium Red Oak veneer offers the quality and beauty that you would find on high-end speakers, but in a form factor that is cost effective and easy-to-apply.
Highlights
- Furniture grade premium veneer
- Pre-sanded and ready-to-finish
- Paper backing adds strength and flexibility
Part # 260-046
Weight: 2.16 lbs.
Thread Starter
|
Lead Driver
Joined: Apr 2011
Posts: 6,399
Likes: 40
From: El Dorado, Arkansas

This plastic cap/bushing and the (bolted) flange are specific to the tilt column --different from non-tilt column components. If you don't have this specific flange (my '78 tilt column didn't have this bolted flange on it when I bought the column), a regular column rag joint will not couple up properly --since I didn't have this specific bolted flange, I converted to a stainless steel Borgeson U-joint.
I bought my tilt column off ebay a couple or so years ago. It didn't come with the steering wheel. It appears when the person went to take the steering wheel off the tilt column shaft that they struck the tip of the splined shaft with a hammer, to try and force the shaft out of the steering wheel.
In doing so, it partially mushroomed the 'button' on the tip of the shaft. It also bent the snap ring in the upper tilt flange, broke one of the small bearings in the upper tilt flange and cracked the plastic bearing cap and broke its three plastic engagement tabs off, at the lower end of the column tube.
I replaced all three column bearings with new bearings and I replaced the effed-up snap ring with a new one. I wasn't able to replace the cracked plastic cap because I couldn't find one for a tilt column. --these parts were senselessly damaged.--some people shouldn't be allowed to touch or work on vehicle components!
My cab mounts aren't collapsed but, evidently the rubber mounts at the rear of my cab are slightly compressed and causing the rear of the cab to slightly drop down, causing the end of the column tube to be pitched upward by a few degrees. --this would explain why the lower bearing on my old fixed column was non-existent, half the head of the hex on the bolt and nut on the rag joint clamp were worn away and, the column tube was sawing a groove into the old steering shaft.
I had JB Welded the crack in the plastic bearing cap of the tilt column but, when I installed the tilt column and went to secure the column to the under side of the dash, the extra pressure of the upward pitch on the end of the column tube split the plastic cap open again.

I've seen several variations of engineered bushings/bearings to replace this weak and troublesome OEM design. With the exception of one design, I don't know who made the others. --the steering shaft diameter is 3/4". The I.D. of the column tube is 2-1/8".
There's this design.

This design.

This design by Mustang Steve ...although, I wouldn't want to use a split collar and, with my Borgeson steering joint, I don't think I would have enough room on the steering shaft to mount a split collar.

And then, there's this design. This design interests me the most. It doesn't have the addition of a (mechanical) ball bearing to wear out and the added expense of installing/replacing a ball bearing.
I don't know what material this bushing is made of but in the case of Delrin, it's self-lubricating and thus wouldn't need a mechanical ball bearing (extra moving part).


I think one deviation I would make with this bushing is have threaded inserts put in it, every 120 degrees, to line up with the slots in the bottom of the tilt column tube. Then, I would screw some button head Allen screws through the tube and into the bushing to retain the bushing into the tube, so it couldn't work it's way out the end of the tube.
Thread Starter
|
Lead Driver
Joined: Apr 2011
Posts: 6,399
Likes: 40
From: El Dorado, Arkansas
Thanks, Trozei.
It isn't flawless but, it looks a lot better than it did and looks way better than the original bezel it replaced.
It would be interesting to know how the factory masked these bezels off, to paint them during their original production run.
It isn't flawless but, it looks a lot better than it did and looks way better than the original bezel it replaced.
It would be interesting to know how the factory masked these bezels off, to paint them during their original production run.
FTE Stories
Ford Trucks for Ford Truck Enthusiasts

Top 6 Best Deals Available on New Fords & Lincolns Right Now
Brett Foote
This Hennessey Takes the Expedition Tremor's Off-Roading Capability to the Next Level
Verdad Gallardo
Top 10 Fords at 2026 Carlisle Ford Nationals
Joe Kucinski
3 Best / 3 Worst Parts of Modern Ford Ownership
Brett Foote
10 Amazing Upgrades That Solve Common Ford Truck Owner Headaches
Pouria Savadkouei
Every 2026 Ford Engine Explained
Brett Foote
10 Ugly Ford Trucks That We Still Kinda Love
Joe Kucinski
10 Things Every Truck Owner NEEDS (2026 Edition)
Michael S. Palmer
Rezvani's Latest Post-Apocalyptic Monster Is a Ford F-150 Raptor Underneath
Verdad Gallardo
Thread Starter
|
Lead Driver
Joined: Apr 2011
Posts: 6,399
Likes: 40
From: El Dorado, Arkansas
I did much the same but I added the 69 woodgrain back in with shown below in my 68. I had bought this stuff from Parts Express a few years ago for a bathroom cabinet project and had some left over. Got some 69 door trim panels and add it to them also. Mine look like yours. I don't remember which stain and polyeurethene I used though.
It was on my '69 Ranger's original instrument cluster, a strip across the door panels and under the instrument bezel where the dash ***** are.
Regular production '68 Mustangs had camera case finished dash panels. My '68 Mustang came as a deluxe coupe. It had a fancier interior than regular base models --roof and floor consoles, nicer door panels, etc.
My '68 Mustang dash panels had teak wood trim and a narrow wood grained strip across the door panels and on the center trim piece on the spokes of the steering wheel.
'68 Shelby shown. Floor console is different from my console but, dash and door trim are the same.

It's just a personal preference/opinion but, I didn't really care for the wood grained trim in my '69 F-100 or in my '68 Mustang.
The coolest factory dashes, to me, were in the '67 Shelby Mustangs. The brushed aluminum dash inserts in them were way ahead of their time.
'67 Shelby Mustang dash.

Since there's nothing like this for the Bumpside trucks, I like the painted look on the instrument bezels.
I'm not big into chrome either. I'm more of a paint and powder coat kinda guy.



Lead Driver
Joined: Aug 2003
Posts: 7,592
Likes: 10
From: **** hole San Jose ca.

orich

Logistics Pro

Joined: Jun 2003
Posts: 3,928
Likes: 276

He musta been looking down at his levers and switches when I went by him....
Cargo Master
Joined: Nov 2005
Posts: 2,694
Likes: 45
From: La Ribera, Baja, Mexico
I love it Bobby, and might have given an old ******** to see that...
Saw a 52 Ford coup, roast a new Healy 6 when they first came out... Salesman in the Healy looked like his Cinderella turned into a pumpkin... The coup had big iron under the hood...
Baja
Saw a 52 Ford coup, roast a new Healy 6 when they first came out... Salesman in the Healy looked like his Cinderella turned into a pumpkin... The coup had big iron under the hood...
Baja
Thread Starter
|
Lead Driver
Joined: Apr 2011
Posts: 6,399
Likes: 40
From: El Dorado, Arkansas
Conversely, the Farrari's steering wheel is very similar to my Bumpside's steering wheel. --although mine is more closely related to the Momo Veloce steering wheel which was standard equipment in the '89 Saleen Mustangs, (as were the cruise control switches/bracket, which is what my CC bracket came off of).