


Bye Bye Front Drums
Thread Starter
|
Lead Driver


Joined: Apr 2011
Posts: 6,399
Likes: 40
From: El Dorado, Arkansas
Bye Bye Front Drums
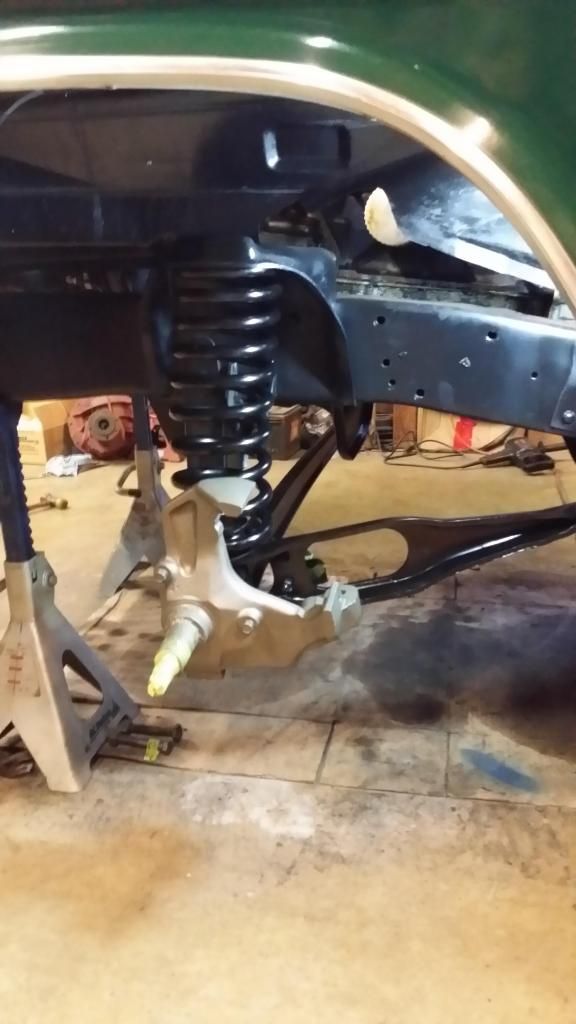
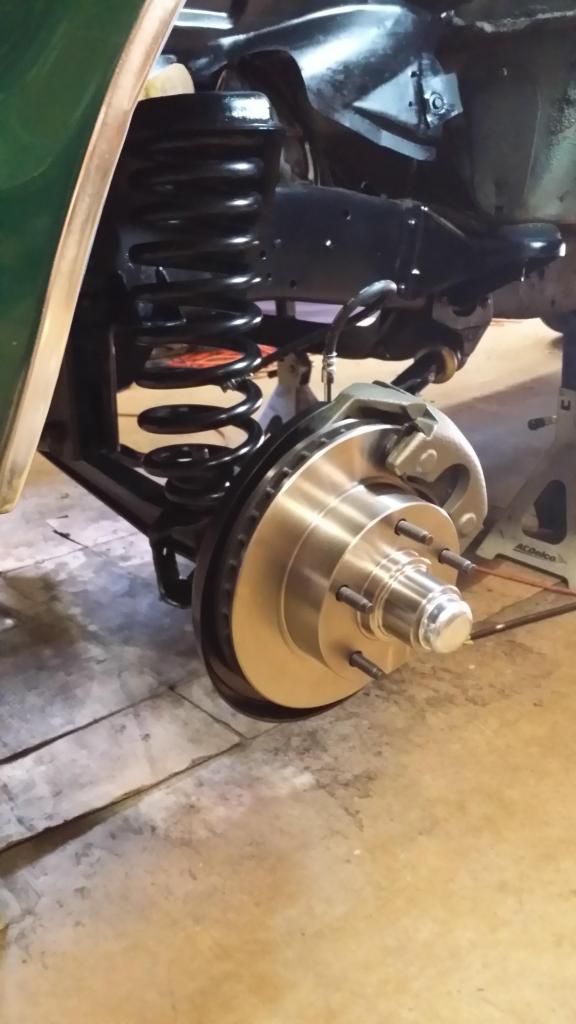
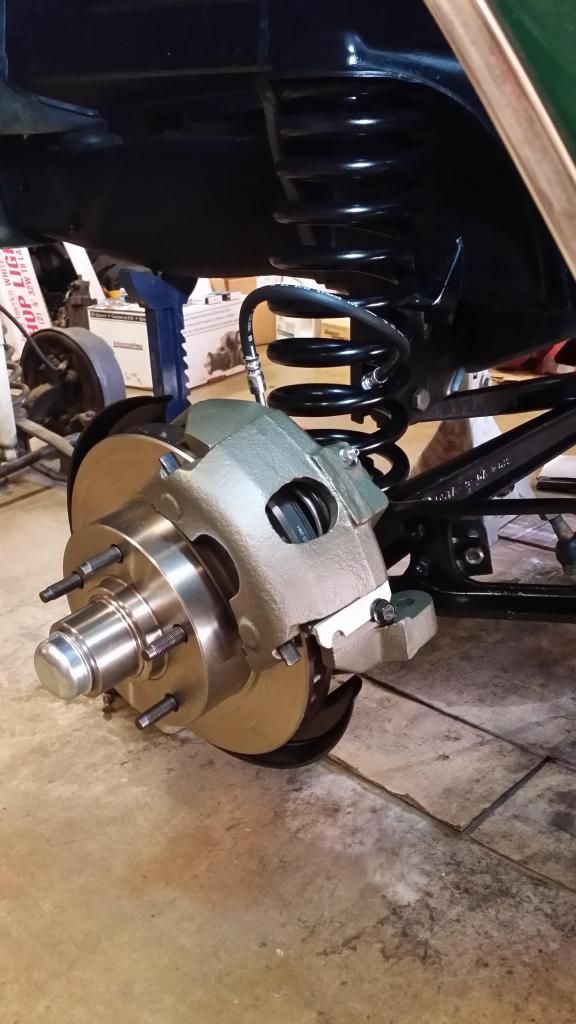
Here's some of this weekends progress. Getting close to having all the front suspension and discs installed, from a '77 F-100, into my '69 F-100 Ranger.
After that, it's on to installing a '78 F-150 Saginaw power steering gear box, a Ford C-2 power steering pump and brackets that came off an '82 pickup with a 300, and then install a tilt steering column from a '78 F-150.
I'm going to give the new Moog CC808 progressive front coil springs some time to settle before I install the front sway bar from a '78 F-250 Camper Special.


Fleet Owner
Joined: Dec 2009
Posts: 20,678
Likes: 83
From: NorCal
**NICE**.
Btw, if ya don't already know, the 78 hoses will come up short at full steering lock. In 71, Ford changed the hard line/hose bracket due to the front disc calipers whose hoses drop in from the top versus drum hoses whose hoses are more horizontal.

Btw, if ya don't already know, the 78 hoses will come up short at full steering lock. In 71, Ford changed the hard line/hose bracket due to the front disc calipers whose hoses drop in from the top versus drum hoses whose hoses are more horizontal.
Mountain Pass
Joined: Nov 2013
Posts: 217
Likes: 0
From: Hazelwood
2X... also, the combination after adding the sway bar.
Thread Starter
|
Lead Driver
Joined: Apr 2011
Posts: 6,399
Likes: 40
From: El Dorado, Arkansas
Yeah, I grabbed the hard line-to-flexible line frame brackets off the '77 when I got the rest of the suspension parts to do this conversion.
Thread Starter
|
Lead Driver
Joined: Apr 2011
Posts: 6,399
Likes: 40
From: El Dorado, Arkansas


Trending Topics
Fleet Mechanic


Joined: Aug 2014
Posts: 1,729
Likes: 50
From: Charleston, SC
I have front drums and armstrong PS on my 68 F-250. Like others have said; I'm interested to know what you think of the difference the disc brakes and PS make.
FTE Stories
Ford Trucks for Ford Truck Enthusiasts

Top 10 Fords at 2026 Carlisle Ford Nationals
Joe Kucinski
3 Best / 3 Worst Parts of Modern Ford Ownership
Brett Foote
10 Amazing Upgrades That Solve Common Ford Truck Owner Headaches
Pouria Savadkouei
Every 2026 Ford Engine Explained
Brett Foote
10 Ugly Ford Trucks That We Still Kinda Love
Joe Kucinski
10 Things Every Truck Owner NEEDS (2026 Edition)
Michael S. Palmer
Rezvani's Latest Post-Apocalyptic Monster Is a Ford F-150 Raptor Underneath
Verdad Gallardo
Top 10 Most Expensive Ford Trucks Ever Sold on Bring a Trailer
Joe Kucinski
2027 Ford Super Duty Buyer's Guide (Every Model, Engine, & Package)
Brett Foote

Thread Starter
|
Lead Driver
Joined: Apr 2011
Posts: 6,399
Likes: 40
From: El Dorado, Arkansas
Thanks, Bobby.
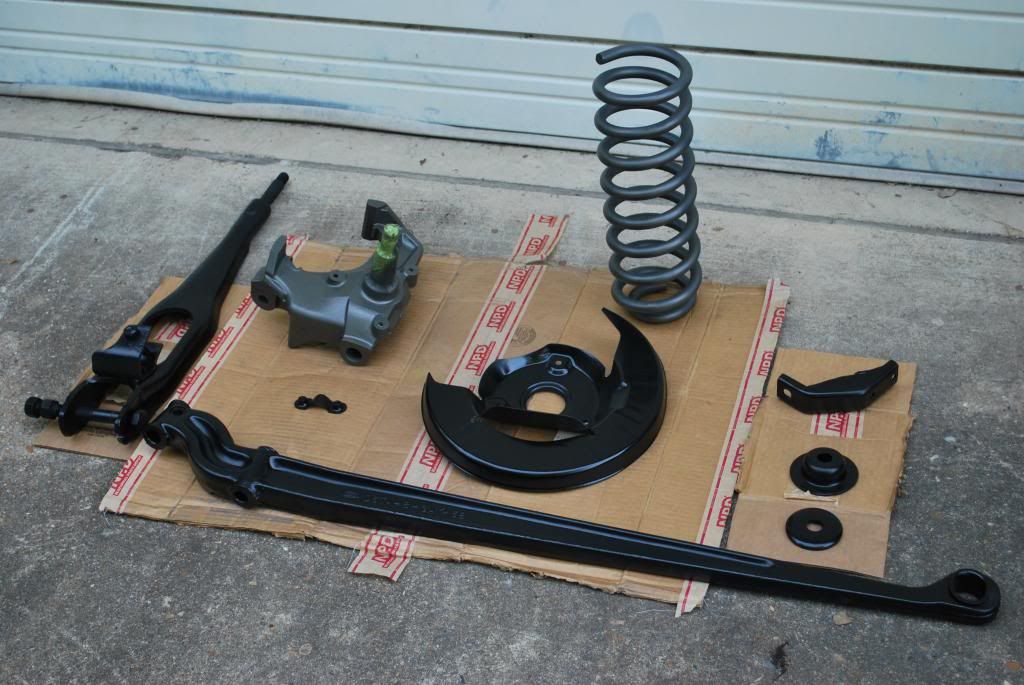
This is what I started out with on the '77 wrecking yard donor parts I bought during the summer a year ago. --It's actually cleaner in this photo than when I got home with it. I had pressure washed it before I took this photo.

Some of the suspension components after liberal doses of Castrol Super Clean, wire brushing and then a trip through the bead blast cabinet and then 2 coats of primer and 4 top coats of paint.
I checked with alignment and auto repair shops around my area but, no one had the reamer to do the kingpin bushings --I guess kingpin installations are a lost or dying art. I called an engine machine shop (CMS Racing Engines) in a neighboring town and told them what I had and asked if they had a reamer to ream the kingpin bushings. The owner said he had three. I asked how much would it cost for them to ream the bushings, the owner (who doesn't even know me) said I was welcome to borrow what he had. I picked the reamers up last Friday, after I got off work, came home and hand reamed the bushings. I used the piloted-reamer to start the first pass so that both bushings would be inline and straight, relative to each other. The piloted-reamer was just slightly undersized, compared to the kingpin diameter.
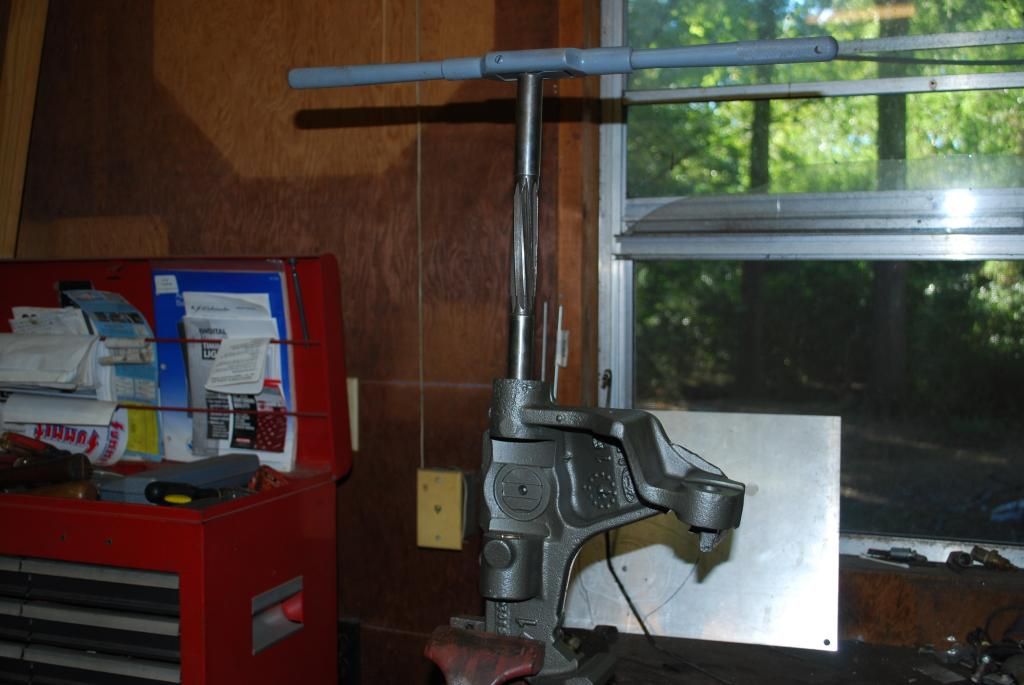
Piloted-reamer just passing through the 2nd, lower, bushing (after this photo, I changed the spindle to a horizontal position and ran the piloted-reamer on through).
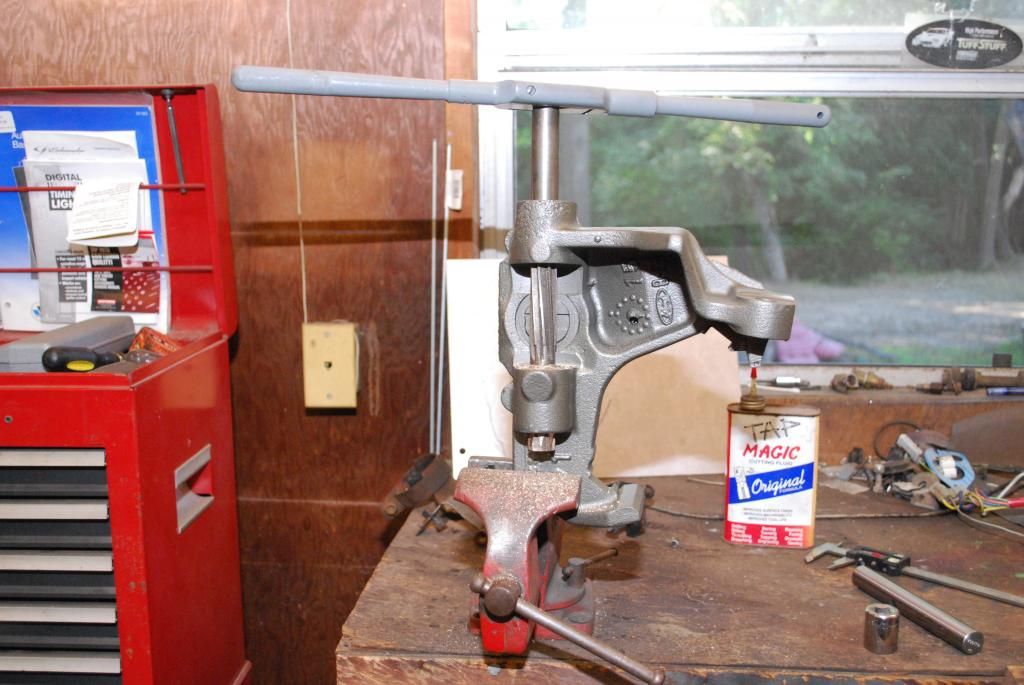
One of the other borrowed reamers was an adjustable one that I set to make the final pass through the bushings with. I've never dealt with kingpins before so, this was definitely a learning experience.
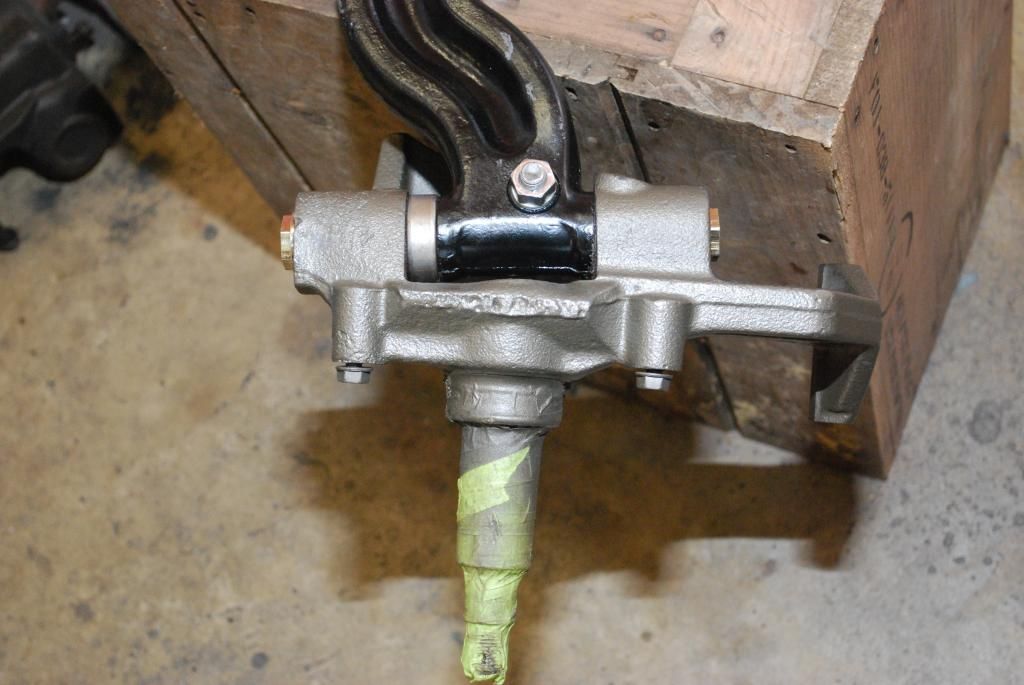
The left side assembled, everything nice and tight and the spindle rotates smoothly with no slack.
This is what I started out with on the '77 wrecking yard donor parts I bought during the summer a year ago. --It's actually cleaner in this photo than when I got home with it. I had pressure washed it before I took this photo.

Some of the suspension components after liberal doses of Castrol Super Clean, wire brushing and then a trip through the bead blast cabinet and then 2 coats of primer and 4 top coats of paint.

I checked with alignment and auto repair shops around my area but, no one had the reamer to do the kingpin bushings --I guess kingpin installations are a lost or dying art. I called an engine machine shop (CMS Racing Engines) in a neighboring town and told them what I had and asked if they had a reamer to ream the kingpin bushings. The owner said he had three. I asked how much would it cost for them to ream the bushings, the owner (who doesn't even know me) said I was welcome to borrow what he had. I picked the reamers up last Friday, after I got off work, came home and hand reamed the bushings. I used the piloted-reamer to start the first pass so that both bushings would be inline and straight, relative to each other. The piloted-reamer was just slightly undersized, compared to the kingpin diameter.

Piloted-reamer just passing through the 2nd, lower, bushing (after this photo, I changed the spindle to a horizontal position and ran the piloted-reamer on through).

One of the other borrowed reamers was an adjustable one that I set to make the final pass through the bushings with. I've never dealt with kingpins before so, this was definitely a learning experience.
The left side assembled, everything nice and tight and the spindle rotates smoothly with no slack.


Logistics Pro


Joined: Jun 2003
Posts: 3,928
Likes: 276
Thanks, Bobby.
This is what I started out with on the '77 wrecking yard donor parts I bought during the summer a year ago. --It's actually cleaner in this photo than when I got home with it. I had pressure washed it before I took this photo.
Some of the suspension components after liberal doses of Castrol Super Clean, wire brushing and then a trip through the bead blast cabinet and then 2 coats of primer and 4 top coats of paint.
I checked with alignment and auto repair shops around my area but, no one had the reamer to do the kingpin bushings --I guess kingpin installations are a lost or dying art. I called an engine machine shop (CMS Racing Engines) in a neighboring town and told them what I had and asked if they had a reamer to ream the kingpin bushings. The owner said he had three. I asked how much would it cost for them to ream the bushings, the owner (who doesn't even know me) said I was welcome to borrow what he had. I picked the reamers up last Friday, after I got off work, came home and hand reamed the bushings. I used the piloted-reamer to start the first pass so that both bushings would be inline and straight, relative to each other. The piloted-reamer was just slightly undersized, compared to the kingpin diameter.
Piloted-reamer just passing through the 2nd, lower, bushing (after this photo, I changed the spindle to a horizontal position and ran the piloted-reamer on through).
One of the other borrowed reamers was an adjustable one that I set to make the final pass through the bushings with. I've never dealt with kingpins before so, this was definitely a learning experience.
The left side assembled, everything nice and tight and the spindle rotates smoothly with no slack.
I had mine done at an engine shop with a wrist pin hone.