


Bye Bye Front Drums
Hotshot


Joined: Mar 2013
Posts: 14,255
Likes: 199
From: Phoenix, Az.

Thread Starter
|
Lead Driver


Joined: Apr 2011
Posts: 6,399
Likes: 40
From: El Dorado, Arkansas
What's that darned ol' ultraranger up to now? And why's there a light bulb dangling down on the back glass of his truck?


Hey! It lights up when he steps on the brake pedal!


Hey! It lights up when he steps on the brake pedal!
Cargo Master
Joined: Nov 2005
Posts: 2,694
Likes: 45
From: La Ribera, Baja, Mexico
Well, I like lights, as don't see well in the dark any more, but I am not sure about the practical aspects. I do see the red glow, reflected on the door, from the brake lights, so they are working too... reminds me, I have one taillight out...
Baja
Baja
Fleet Owner
Joined: Dec 2009
Posts: 20,678
Likes: 83
From: NorCal
 Too funny.
...'did the same the same thing about a week ago but I rigged up a mirror to the side yard gate since I work outside.
Thread Starter
|
Lead Driver
Joined: Apr 2011
Posts: 6,399
Likes: 40
From: El Dorado, Arkansas
Since I had my instrument cluster out, to install the delay wiper switch/module and to pretty up the cluster while it was out, I decided to run a wire that would go from the brake pedal switch to the cargo light at the top, back of the cab.
There's a hole behind the instrument cluster and at the base of the A-pillar that I ran the wire up through (11' of black 14 ga. automotive primary wire).

End of wire hanging out after I fed it up through the A-pillar.

I pulled it on around and fed it out of the hole for the cargo light and put a .157" female bullet connector on the end of the wire.

I made some short jumpers with a breakout pigtail, with another .157" female bullet connector, to go between the brake light switch connector and the two terminals on the back of the brake light switch. --The breakout connector comes off the Red/Black wire. The Red wire is the constant 12v hot wire to the brake switch.


I took the cargo light (a left over from the '65 Thunderbird parts bin --it was originally a left hand backup light from the '65 T-Birds), and pulled the 1156 (single element) bulb socket out of it.


I ordered a 3-wire 3/4" metal 1157 dual element bulb socket and a white/red switchback LED and a ballast resistor. Hopefully, they'll arrive by week's end.
If the cargo light is needed, the cargo **** is pulled out and white light illuminates the bed of the truck, just like it did before.
However, when the brake pedal is stepped on, the color of the LED switches to red and the cargo light then doubles as a high mount 3rd brake light.
I had tried for a while to figure out a way to accomplish this but couldn't come up with anything I liked for a clean install. Then one day, I saw where a guy had figured out a really slick way to accomplish this. He didn't give all the specific details but, I was able to fill in the blanks to sort it out.
Credit for the following photos, and the one that originally figured out this conversion, goes to Coupe5oh.


Cargo Master
Joined: Nov 2005
Posts: 2,694
Likes: 45
From: La Ribera, Baja, Mexico
Way nice amigo, and tricky to the max, I must admit. I like it, and may try to do the same... first I have to find a bed light... oh yeah, before that, I have to put on a bed... but that is in the works...
Baja
Baja
Thread Starter
|
Lead Driver
Joined: Apr 2011
Posts: 6,399
Likes: 40
From: El Dorado, Arkansas
Messin' Around
I was digging around in a box of Autometer Phantom-series gauges, I had bought years ago for my '68 Mustang, and pulled out a gauge pod I had purchased to put in the center depression, between the browse of a '67/'68 Mustang dash pad.
The gauge pod (Autometer p/n 10001) was actually designed to mount on the dash of a '94-'98 SN95 Mustang. --it was designed to replace the factory clock/pod on those models.
My '69 F-100's dash pad is pretty split up but, I set the gauge pod on the dash pad cover, over the speaker hole (I don't have a speaker mounted there) just for grins and giggles to check it out.


The gauges are 2-1/16" and could be anything a person would want accurate readings on ...volts, oil pressure, water temperature ... if you were going to be running a turbo, one of the gauges could be a Vacuum/Boost gauge. If you had a diesel engine, one gauge could be for exhaust gas temperature. The gauge faces and bezels also come in many different colors and styles that could be installed in the dash pod and isn't limited to just Autometer brand gauges.
I've never seen or heard of anyone using one of these dash pods in a Bumpside (or an older Mustang for that matter) but, it would be different and a very clean way to add extra (accurate) gauges to an old 5th generation truck.
94 Ford Mustang Clock For Sale :: Popular 2014 Toy Store
FTE Stories
Ford Trucks for Ford Truck Enthusiasts

Top 6 Best Deals Available on New Fords & Lincolns Right Now
Brett Foote
This Hennessey Takes the Expedition Tremor's Off-Roading Capability to the Next Level
Verdad Gallardo
Top 10 Fords at 2026 Carlisle Ford Nationals
Joe Kucinski
3 Best / 3 Worst Parts of Modern Ford Ownership
Brett Foote
10 Amazing Upgrades That Solve Common Ford Truck Owner Headaches
Pouria Savadkouei
Every 2026 Ford Engine Explained
Brett Foote
10 Ugly Ford Trucks That We Still Kinda Love
Joe Kucinski
10 Things Every Truck Owner NEEDS (2026 Edition)
Michael S. Palmer
Rezvani's Latest Post-Apocalyptic Monster Is a Ford F-150 Raptor Underneath
Verdad GallardoLead Driver
Joined: Aug 2003
Posts: 7,592
Likes: 10
From: **** hole San Jose ca.
I bought one of those 3 ga pods and was going to mount over my speaker grille but did not really want punch any hole in my cherry dash pad so Shxt canned that idea. I like the manual gauges over electric one and would of put to big of hole in pad.
Orich
Orich
Thread Starter
|
Lead Driver
Joined: Apr 2011
Posts: 6,399
Likes: 40
From: El Dorado, Arkansas
The wires of the gauges I have are very thin and would thread right through the existing speaker hole perforations in the center of the dash pad.
(More accurate than stock) mechanical aftermarket gauges could also be installed in the pod.
The pod could also be flipped upside down and mounted to the ceiling in front of the windshield, between the inner gaps of the visors.
Thread Starter
|
Lead Driver
Joined: Apr 2011
Posts: 6,399
Likes: 40
From: El Dorado, Arkansas
Some time back, when I started working on the various modifications to my truck, I wasn't sure if my stock '69 C-4 gear selector linkage rod was going to work with my 'new' column (changed from fixed '69 manual steering column to a '78 tilt column for power steering).
I initially thought I might have to take some 3/8" rod, thread both ends and install either Heim or ball joint rod ends on it, to connect from the lever on the end of the steering column to the lever on the side of the transmission.
As it turns out, my stock linkage rod connected up with no problem.

Now, the remaining issue goes back to the stock '69 C-4 lever on the side of the transmission and mounting a neutral safety switch there.

The threaded bosses are cast onto the side of the transmission to mount a NSS there but, the lever itself isn't designed to actuate a transmission-mounted NSS.
I had found a later model (wrecking yard) C-4 transmission selector lever arm that's compatible with the transmission-mounted NSS but, the arm is shorter in length than the current stock one on my transmission. --the donor lever was from a transmission that was in a passenger car.
Donor transmission lever (and trans mounted NSS).

I could take a piece of 1/8" flat steel and weld it to the tip of the donor lever to extend it but, I took my calipers and measured the shoulder diameter of the donor lever (where the NSS would slide up on it) and compared it to the shoulder diameter of my existing transmission lever. The diameters measure the same. The only difference there is the addition of the two slots (180-degrees apart) machined into the shoulders of the donor lever, where my current lever has no slots in it.
Since I would have to remove my existing lever from the transmission anyway, to swap the donor lever in, I think it would be better to just take my existing lever out, take it and the donor lever to the machine shop and let them use the donor lever as a pattern to get the measurements of the donor lever's slots, and their placement, and just have my existing lever slotted to match it.
Thread Starter
|
Lead Driver
Joined: Apr 2011
Posts: 6,399
Likes: 40
From: El Dorado, Arkansas
Seems the little brown truck paid a visit today while I was at work. This was waiting for me on the carport when I got home --31-spline axle from a '71 F-100 that had a 9-3/8" rear end.

31-spline axle fitted up to the 31-spline 4-pinion Traction-Lok differential of my factory Daytona 9-inch N case 3rd member.--I had pulled the N case out of a '75 F-150 four wheel drive truck back in the late '90s/early 2000s.
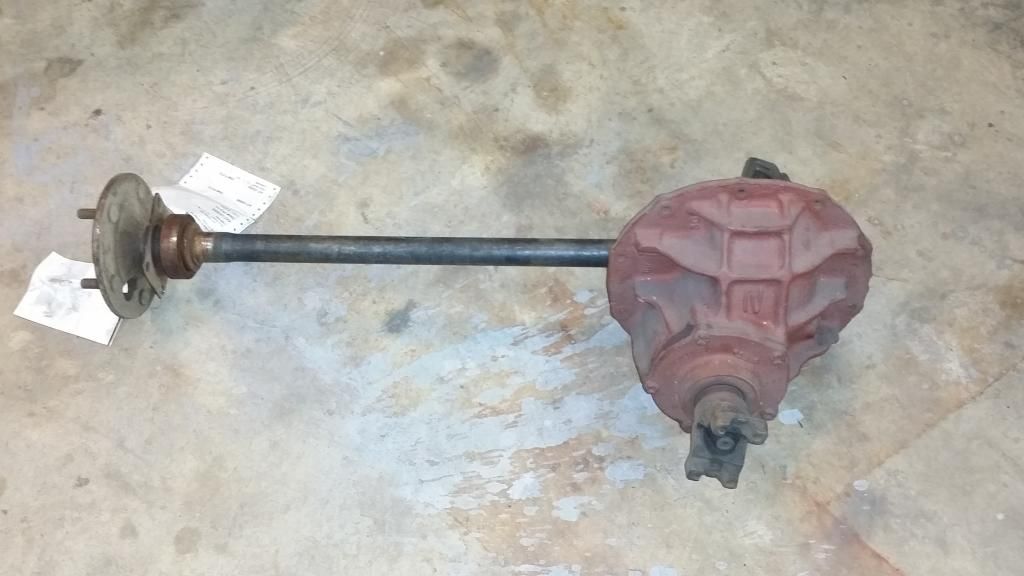
The other '71 F-100 31-spline axle should be here next Monday or Tuesday.
Gotta get this axle into the 20-ton press and pop the bearing off. It's a little rough. The axle will take a trip through my bead blast cabinet, before I press a new bearing on it.
The O.D. of this bearing matches the I.D. of the bearing socket on the end of the axle housing tube on my '69 F-100. I'm sure I'll have to change the axle seals to match the larger journal of the 31-spline axles, which kinda sucks since I just replaced the axle seals less than four years ago.
Oh well. Worth the minor inconvenience and the long wait in the search for a pair of 31-splines, and to have finally found a set. 

31-spline axle fitted up to the 31-spline 4-pinion Traction-Lok differential of my factory Daytona 9-inch N case 3rd member.--I had pulled the N case out of a '75 F-150 four wheel drive truck back in the late '90s/early 2000s.

The other '71 F-100 31-spline axle should be here next Monday or Tuesday.
Gotta get this axle into the 20-ton press and pop the bearing off. It's a little rough. The axle will take a trip through my bead blast cabinet, before I press a new bearing on it.
The O.D. of this bearing matches the I.D. of the bearing socket on the end of the axle housing tube on my '69 F-100. I'm sure I'll have to change the axle seals to match the larger journal of the 31-spline axles, which kinda sucks since I just replaced the axle seals less than four years ago.
Oh well. Worth the minor inconvenience and the long wait in the search for a pair of 31-splines, and to have finally found a set.
Thread Starter
|
Lead Driver
Joined: Apr 2011
Posts: 6,399
Likes: 40
From: El Dorado, Arkansas
Depends on what you do, or plan to do, to the truck. Currently, I just have the stock, tired 240. The 240 is little threat to the regular C7AW single vertical rib 9-inch 3rd member case and is little threat to the stock 28-spline axles.
Eventually, I plan to install a much stronger fuel injected 5.0L H.O. engine from a '90 Mustang GT. Even at that, it's probably not a threat to my current 9-inch 3rd member or the 28-spline axles.
However, who knows what the future holds? Somewhere down the road, I may decide to get a wild hair and install a 460 based 514 stroker. The addition of the 31-splines and an N-case now just means I don't have to keep beefing up drive line components later or, as I go.
Even if I don't install a big-block stroker, I already had the N-case and the axles only set me back $165.00 dollars (not including shipping). I've probably thrown away $165.00 (or much more) on a lot stupider and much more worthless things in my past.
I have half a dozen or more 31-spline Traction-Lok 9-inch 3rd members --two of which are factory N -cases. I haven't had a 28-spline Traction-Lok 9-inch 3rd member in 10 or 11 years. I wanted a Traction-Lok to replace my single track differential with. For me, buying the 31-spline axles was cheaper than buying a 28-spline Traction-Lok differential to swap in. The 31-spline axles also happen to be about 30-percent stronger so, it was a simple choice for me to make.
Do I 'need' 31-spline axles or an N-case? Probably not any more than I 'need' a '69 F-100 but, need or not, I wanted them, found them and I have them.

Thread Starter
|
Lead Driver
Joined: Apr 2011
Posts: 6,399
Likes: 40
From: El Dorado, Arkansas
The 31-spline axle on the left is the 'Daytona' axle I pulled from the '75 F-150 4x4 the 9-inch N-case came from.
Notice the very large tapered Timken roller bearing, compared to the bearing on the 31-spline axle from the '71 F-100 and the VERY thick bearing retainer.


Notice the very large tapered Timken roller bearing, compared to the bearing on the 31-spline axle from the '71 F-100 and the VERY thick bearing retainer.

