


Bye Bye Front Drums
Hotshot


Joined: Mar 2013
Posts: 14,255
Likes: 199
From: Phoenix, Az.

Logistics Pro

Joined: Jun 2003
Posts: 3,928
Likes: 276


Thread Starter
|
Lead Driver


Joined: Apr 2011
Posts: 6,399
Likes: 40
From: El Dorado, Arkansas

The Armor Guard, Gravel Guard or Spring Wrap (whatever you prefer to call it) is an item I get through Classic Tube. In addition to giving the lines protection from road debris, it will also help draw heat out of the lines --if they are near manifolds/headers --sort of like fins on valve covers but, it also just gives an installation a lot more professional look.
It's sold by the inch and the longest continuous length of it you can get comes in 20 foot sections. The last time I bought it (12-17-2010), I got (5) 20' sections for $113.28, delivered.--at one time, I did a lot of disc brake conversions and, I used to sell it through my (early Mustang) website for people who were wanting to use it on their own brake conversions.
The part number is: AGE-OE 3/16" Diameter Armor Guard. The variety I use is coated steel but, for more money, you can get it in stainless steel too.
The standard flare nut fitting size, for 3/16" hard brake line tubing, is 3/8"-24. Since this is the standard fitting size, these fittings can be bought, individually, through most any auto parts stores.
However, Ford also used 7/16"-24, 1/2"-20 and 9/16"-18 flare nut fittings on 3/16" diameter tubing.These specialty sizes are most often NOT available from the parts houses.

These are OEM steel fittings and are also available from Classic Tube.
The 7/16"-24 fitting (red) is p/n ST8006. .20 cents ea.
The 1/2"-20 fitting (black) is p/n ST8007. .25 cents ea.
The 9/16"-18 fitting (gold --looks more olive green to me) is p/n ST8010. $1.00 ea. --at least, these were the prices a few years ago.
For more money, you can also get the fittings in stainless steel as well.
Steve
Logistics Pro
Joined: Jun 2003
Posts: 3,928
Likes: 276
I get it from a box on my work bench. ....oh! you're asking WHO I get it from!
The Armor Guard, Gravel Guard or Spring Wrap (whatever you prefer to call it) is an item I get through Classic Tube. In addition to giving the lines protection from road debris, it will also help draw heat out of the lines --if they are near manifolds/headers --sort of like fins on valve covers but, it also just gives an installation a lot more professional look.
It's sold by the inch and the longest continuous length of it you can get comes in 20 foot sections. The last time I bought it (12-17-2010), I got (5) 20' sections for $113.28, delivered.--at one time, I did a lot of disc brake conversions and, I used to sell it through my (early Mustang) website for people who were wanting to use it on their own brake conversions.
The part number is: AGE-OE 3/16" Diameter Armor Guard. The variety I use is coated steel but, for more money, you can get it in stainless steel too.
The standard flare nut fitting size, for 3/16" hard brake line tubing, is 3/8"-24. Since this is the standard fitting size, these fittings can be bought, individually, through most any auto parts stores.
However, Ford also used 7/16"-24, 1/2"-20 and 9/16"-18 flare nut fittings on 3/16" diameter tubing.These specialty sizes are most often NOT available from the parts houses.

These are OEM steel fittings and are also available from Classic Tube.
The 7/16"-24 fitting (red) is p/n ST8006. .20 cents ea.
The 1/2"-20 fitting (black) is p/n ST8007. .25 cents ea.
The 9/16"-18 fitting (gold --looks more olive green to me) is p/n ST8010. $1.00 ea. --at least, these were the prices a few years ago.
For more money, you can also get the fittings in stainless steel as well.
Steve
The Armor Guard, Gravel Guard or Spring Wrap (whatever you prefer to call it) is an item I get through Classic Tube. In addition to giving the lines protection from road debris, it will also help draw heat out of the lines --if they are near manifolds/headers --sort of like fins on valve covers but, it also just gives an installation a lot more professional look.
It's sold by the inch and the longest continuous length of it you can get comes in 20 foot sections. The last time I bought it (12-17-2010), I got (5) 20' sections for $113.28, delivered.--at one time, I did a lot of disc brake conversions and, I used to sell it through my (early Mustang) website for people who were wanting to use it on their own brake conversions.
The part number is: AGE-OE 3/16" Diameter Armor Guard. The variety I use is coated steel but, for more money, you can get it in stainless steel too.
The standard flare nut fitting size, for 3/16" hard brake line tubing, is 3/8"-24. Since this is the standard fitting size, these fittings can be bought, individually, through most any auto parts stores.
However, Ford also used 7/16"-24, 1/2"-20 and 9/16"-18 flare nut fittings on 3/16" diameter tubing.These specialty sizes are most often NOT available from the parts houses.
These are OEM steel fittings and are also available from Classic Tube.
The 7/16"-24 fitting (red) is p/n ST8006. .20 cents ea.
The 1/2"-20 fitting (black) is p/n ST8007. .25 cents ea.
The 9/16"-18 fitting (gold --looks more olive green to me) is p/n ST8010. $1.00 ea. --at least, these were the prices a few years ago.
For more money, you can also get the fittings in stainless steel as well.
Steve
Sweet. Thanks, buddy.*(Copied/pasted to a Word document.)*
Thread Starter
|
Lead Driver
Joined: Apr 2011
Posts: 6,399
Likes: 40
From: El Dorado, Arkansas
I just bought a decent Imperial-Eastman flaring bar, flaring yoke, tubing cutter and double flare buttons (manual hand tools) back in the mid-'80s when I was in high school.
Brake tubing is cheap so, I bought a couple of 60" straight sticks of it, cut it into smaller lengths and started the process of figuring out how to make double flares that wouldn't leak. I didn't get it right the first time or, the first several times. But, after a bit, you develop a 'feel' for it and it's easy.
After that, you move on to figuring out bends.
It's mostly just technique and a few simple things applied that will result in nice lines that don't leak and look professional in appearance. It's something anyone can learn to do.
You're a smart fellow. You can do it too!
Hotshot
Joined: Mar 2013
Posts: 14,255
Likes: 199
From: Phoenix, Az.
I wasn't born knowing how to double flare or bend brake line tubing. I didn't have anyone to show me how to do either of these things and the Internet didn't even exist when I figured out how to do it.
I just bought a decent Imperial-Eastman flaring bar, flaring yoke, tubing cutter and double flare buttons (manual hand tools) back in the mid-'80s when I was in high school.
Brake tubing is cheap so, I bought a couple of 60" straight sticks of it, cut it into smaller lengths and started the process of figuring out how to make double flares that wouldn't leak. I didn't get it right the first time or, the first several times. But, after a bit, you develop a 'feel' for it and it's easy.
After that, you move on to figuring out bends.
It's mostly just technique and a few simple things applied that will result in nice lines that don't leak and look professional in appearance. It's something anyone can learn to do.
You're a smart fellow. You can do it too!
FTE Stories
Ford Trucks for Ford Truck Enthusiasts

Top 10 Fords at 2026 Carlisle Ford Nationals
Joe Kucinski
3 Best / 3 Worst Parts of Modern Ford Ownership
Brett Foote
10 Amazing Upgrades That Solve Common Ford Truck Owner Headaches
Pouria Savadkouei
Every 2026 Ford Engine Explained
Brett Foote
10 Ugly Ford Trucks That We Still Kinda Love
Joe Kucinski
10 Things Every Truck Owner NEEDS (2026 Edition)
Michael S. Palmer
Rezvani's Latest Post-Apocalyptic Monster Is a Ford F-150 Raptor Underneath
Verdad Gallardo
Top 10 Most Expensive Ford Trucks Ever Sold on Bring a Trailer
Joe Kucinski
2027 Ford Super Duty Buyer's Guide (Every Model, Engine, & Package)
Brett FooteCargo Master
Joined: Mar 2014
Posts: 2,031
Likes: 72

Ultra have you ever seen the pre-made stainless steel brake line kits offered by a few places for stock vehicles. If so, would you categorize them as high quality? Pondering using that approach when I replace brake lines on my 69 LWB.
I am impressed with the work you have demonstrated. My efforts are effective but crude.
I am impressed with the work you have demonstrated. My efforts are effective but crude.
Thread Starter
|
Lead Driver
Joined: Apr 2011
Posts: 6,399
Likes: 40
From: El Dorado, Arkansas
Ultra have you ever seen the pre-made stainless steel brake line kits offered by a few places for stock vehicles. If so, would you categorize them as high quality? Pondering using that approach when I replace brake lines on my 69 LWB.
I am impressed with the work you have demonstrated. My efforts are effective but crude.
I am impressed with the work you have demonstrated. My efforts are effective but crude.
In many cases with the prefabbed lines and all stock brake components, many people report still having to 'tweak' the lines to get them to line up/hook up.
Aside from that, I've never really had any desire to buy manufactured lines since I have the flaring and bending tools to fabricate my own custom lines that are an exact fit for the particular application, regardless of what components (stock or aftermarket) I'm working with.
We both live in the south so, they aren't bad about salting the roads here in the winter time and there's not much worry about it eating up the steel brake lines. Stainless does look nice but, it's also more difficult to work with --particularly when trying to double flare it.
Bundy tinned steel lines on either of our vehicles (in our areas) will likely outlast either one of us.
There's also the factor of satisfaction that comes from crafting something with my own hands vs. buying something ready-made off the shelf.
Thread Starter
|
Lead Driver
Joined: Apr 2011
Posts: 6,399
Likes: 40
From: El Dorado, Arkansas
Thank You for the compliment Steve. My addition to your thread here started out me complimenting You and Hio. Both of you guys have done some awesome work with tubing. I am a bit of a perfectionist also so it caught my eye. I don't like to blow smoke but, the truth be known about myself you two are correct. One time a freind of mine looked at me and said "is there anything you CAN'T do?" I believe in my sig. That's how I got to where I am.
I explain tubing prep and what to do during the two stages of the double flaring process. Tube prep (or the lack of) and tightening the flaring yoke down too much, on the 2nd stage of the double flaring process, is probably where most people wind up with leaky flares.
Some of the photos from this thread are of the same ones I recently posted in this thread but, in the interest of me not having to dig up the procedural photos again and make commentary on each one, it's easier to just provide this link.
If you follow the instructions, you should be very successful at making leak-free double flares.
I hope this will be beneficial to you.
The FORDification.com Forums ? View topic - Front and rear drum brake overhaul
Thread Starter
|
Lead Driver
Joined: Apr 2011
Posts: 6,399
Likes: 40
From: El Dorado, Arkansas
I've been at a little bit of a stand still in my front disc brake conversion, mainly because I don't know if either of the disc/drum brake valves I have are still good.
One factory valve is a Kelsey/Hayes cast iron valve assembly that came from the '77 that I got my disc brake/I-beam parts from.
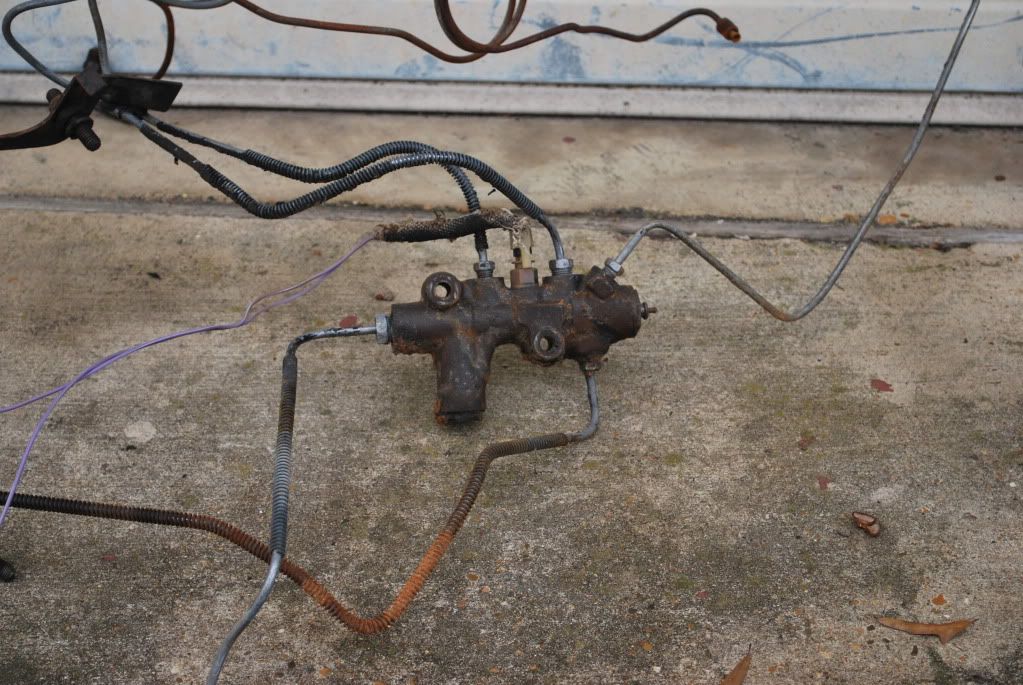
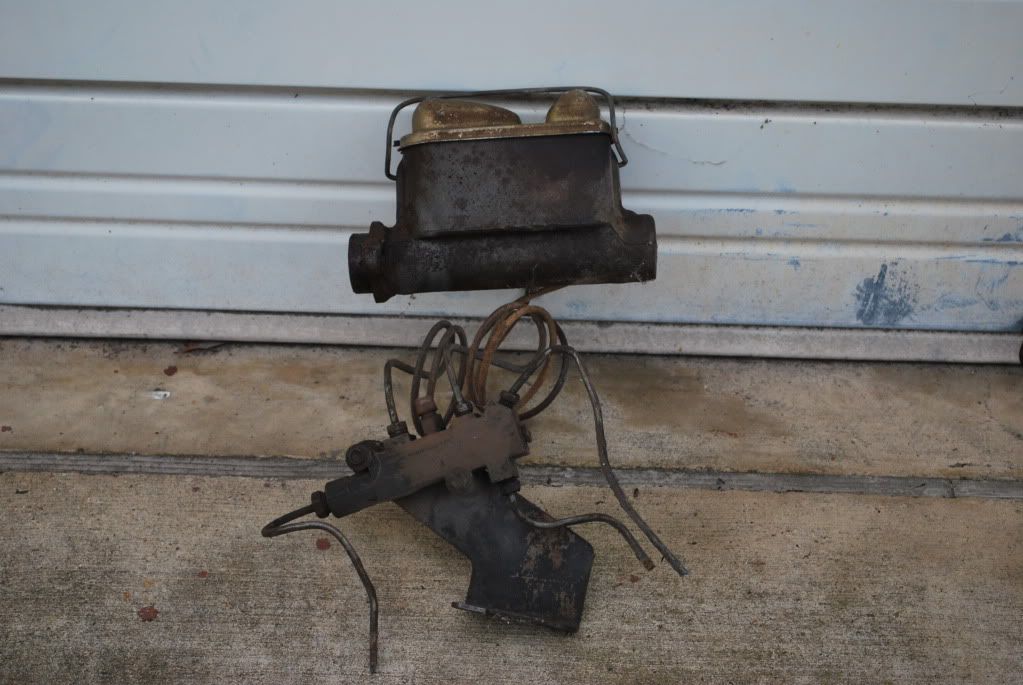
The other factory valve I have is made by Weatherhead and was on the '75 I got my brake booster from.
I searched online and found both valve types. They are both (new) OEM NOS valves in their original Ford boxes. The K/H valve was $335.00 and the Weatherhead valve was $124.00.
The K/H valve is physically larger than the Weatherhead valve and it's constructed out of cast iron (subject to rusting --outside and inside). The Weatherhead valve is a little smaller, constructed out of brass (won't rust) and was a good bit less expensive than the K/H. --I ordered the new WH valve.
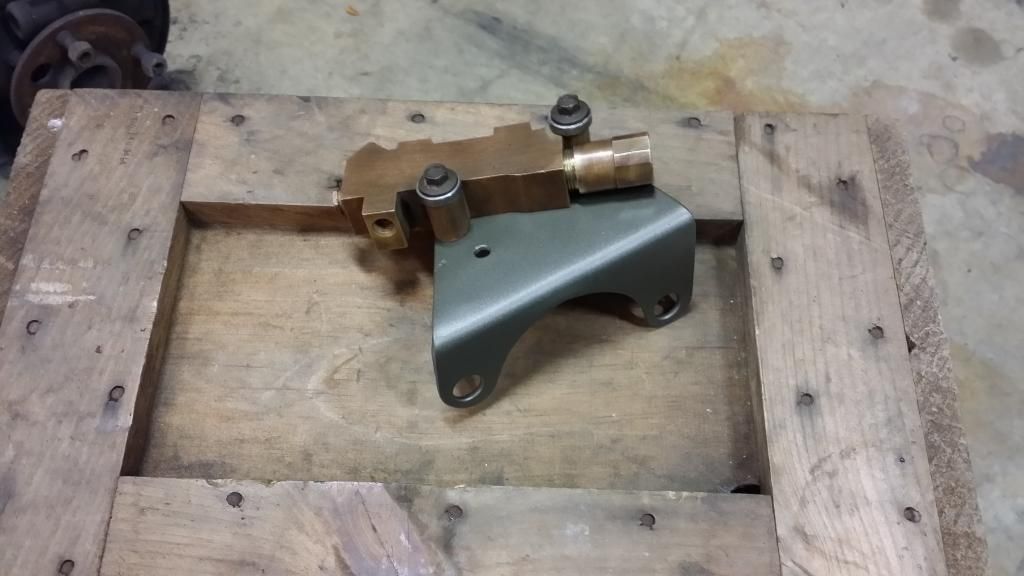
Now that I knew what valve I would be working with, I had to start looking where I would mount it. Due to it being larger than the original drum/drum pressure differential valve, putting it inside the frame rail, where the original valve was, wasn't a good choice due to limited space.
I looked at mounting it to the back, left side of the front crossmember (where the K/H valve was mounted on the '77) but, I eventually plan to change engines and I don't want any potential problems with header/exhaust clearance issues in the future. So, I decided against mounting it there.
The Weatherhead valve, from the '75 donor truck my booster came from, was mounted to a bracket on top of the steering gear box. However, the steering gear box on that truck was manual and I'm installing a Saginaw power steering gear box in my '69 F-100. The factory mounting bracket for the manual steering gear box won't work because the top cover bolt holes are a different pattern from the Saginaw power steering gear box.
That just left one choice --make my own mounting bracket to bolt the brake valve to the top of the Saginaw box. I took some 1/8" thick aluminum plate, laid the pattern out on it, drilled the mounting bolt holes, popped the larger center hole out with a 2-1/2" electricians Greenlee Knockout punch, cut the perimeter of the bracket out with a hacksaw then, took a die grinder and a hand file to smooth the edges out, primed it and sprayed it with iron cast paint.
Since I don't currently have a gear box in my truck, I made a little miscalculation in drilling the valve mounting holes. I wanted the valve to be level when the bracket's bolted to the top of the box. I discovered (after the fact) the top of the box has a steeper angle than I originally thought. --should have compared the angle off the original bracket to start with. --At least there was enough material on the bracket I made to correct this error in mounting angle.
('75 donor truck WH brake valve being used for mock up in making the mounting bracket).

The NOS brake valve should be here this week. When it comes in, I'll be able to mount the valve and then I can start fabbing up my brake lines.
One factory valve is a Kelsey/Hayes cast iron valve assembly that came from the '77 that I got my disc brake/I-beam parts from.

The other factory valve I have is made by Weatherhead and was on the '75 I got my brake booster from.

I searched online and found both valve types. They are both (new) OEM NOS valves in their original Ford boxes. The K/H valve was $335.00 and the Weatherhead valve was $124.00.
The K/H valve is physically larger than the Weatherhead valve and it's constructed out of cast iron (subject to rusting --outside and inside). The Weatherhead valve is a little smaller, constructed out of brass (won't rust) and was a good bit less expensive than the K/H. --I ordered the new WH valve.
Now that I knew what valve I would be working with, I had to start looking where I would mount it. Due to it being larger than the original drum/drum pressure differential valve, putting it inside the frame rail, where the original valve was, wasn't a good choice due to limited space.
I looked at mounting it to the back, left side of the front crossmember (where the K/H valve was mounted on the '77) but, I eventually plan to change engines and I don't want any potential problems with header/exhaust clearance issues in the future. So, I decided against mounting it there.
The Weatherhead valve, from the '75 donor truck my booster came from, was mounted to a bracket on top of the steering gear box. However, the steering gear box on that truck was manual and I'm installing a Saginaw power steering gear box in my '69 F-100. The factory mounting bracket for the manual steering gear box won't work because the top cover bolt holes are a different pattern from the Saginaw power steering gear box.
That just left one choice --make my own mounting bracket to bolt the brake valve to the top of the Saginaw box. I took some 1/8" thick aluminum plate, laid the pattern out on it, drilled the mounting bolt holes, popped the larger center hole out with a 2-1/2" electricians Greenlee Knockout punch, cut the perimeter of the bracket out with a hacksaw then, took a die grinder and a hand file to smooth the edges out, primed it and sprayed it with iron cast paint.
Since I don't currently have a gear box in my truck, I made a little miscalculation in drilling the valve mounting holes. I wanted the valve to be level when the bracket's bolted to the top of the box. I discovered (after the fact) the top of the box has a steeper angle than I originally thought. --should have compared the angle off the original bracket to start with. --At least there was enough material on the bracket I made to correct this error in mounting angle.
('75 donor truck WH brake valve being used for mock up in making the mounting bracket).


The NOS brake valve should be here this week. When it comes in, I'll be able to mount the valve and then I can start fabbing up my brake lines.
Thread Starter
|
Lead Driver
Joined: Apr 2011
Posts: 6,399
Likes: 40
From: El Dorado, Arkansas
I already knew O'Reilly's only carried the E-coated lines so, I went to where I got the last silver lines from (about a year and a half ago when I made the brake lines on a '67 Mustang for a guy local to me). I went to Bumper to Bumper Auto Parts. They no longer carry the silver lines either! (Grrrrr) So, I had no choice but to get some olive drab brake tubing.
I guess the only plus with the E-coated lines is it will make the Armor Guard stand out more against the darker background of the tubing.
The bad part is the finish scratches off the E-coated lines if you're not really careful. That was not a problem with the tinned lines.