



Project TGM
Thread Starter
|
Post Fiend
Joined: Nov 2011
Posts: 8,908
Likes: 1
From: Algona, Washington
I have only owned 1 stang.. I gifted it to my step-brother as a late marriage early birthday present and it got wrecked. I admit it WAS a 4 eyed one but Mine was kind of rare, it was a GL model and had a 200 I6, i even had the original 8-track for it and would play an 8-track till i got a working CD player in it. Here is what i looked like before a tow truck came and took it away.

Kinda sad seeing your first car smashed up but whatever. It is also kind of sad seeing that my 88 ranger is about to blow up O.o but oh well as well, i got TGM to fill those holes. As soon as my brother gets my ranger back to me i am going to strip out my stereo stuff and if i can't sell it within a week i am going to see if the junkyard wants it as their yard truck. They already have one that is pretty beat up.
Kinda sad seeing your first car smashed up but whatever. It is also kind of sad seeing that my 88 ranger is about to blow up O.o but oh well as well, i got TGM to fill those holes. As soon as my brother gets my ranger back to me i am going to strip out my stereo stuff and if i can't sell it within a week i am going to see if the junkyard wants it as their yard truck. They already have one that is pretty beat up.
Thread Starter
|
Post Fiend
Joined: Nov 2011
Posts: 8,908
Likes: 1
From: Algona, Washington
Alright well i figured i will post here first. Here is a sneak peek  i will have more pictures tomorrow but for now i leave you with this

I shall tell you a tale. First off the reason the pump is sideways is cause i don't have the correct bolt in the adjustment slot, i need to buy some other bolts so that one can get put back, for now i stuck whatever i had i there. Now if you notice, the old pump is still in there, it is in front of my Saggy, and still has the lines on it as this is just a mock up for all you FTE friends. So to kick off my tale, i will start with the lines. in the picture depicted:
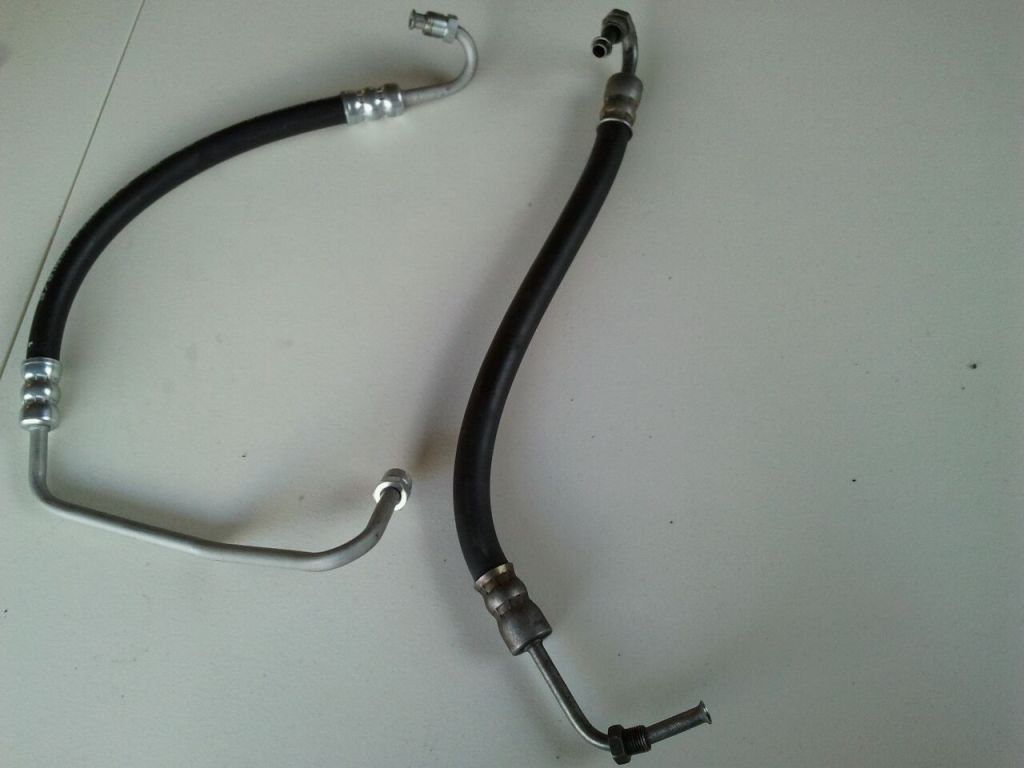
You will see on the left side is a brand spankin new high pressure line for a 78 Ford E-van, well bad news is it didn't fit. The end that goes into the Sag port was the wrong kind this was a normal double flare end where the 87 pump i got uses a flared end with an o-ring on it. On the right is, can you guess? Yup the original line form the van i swiped the pump from, this one, once cleaned up, looks to be in good condition still. Keep in mind that old one looked like the new one in length almost down to a T but it was ever so slightly different. What i did was i took it over to my super awesome neighbor who is a plumber/mechanic/genius/drag racer/ i don't know what else. He was able to trim it and flare it so it matched my stock 78 one for the stock bronco pump. Then he went the extra awesome mile and fabbed a bracket for me. I was able to keep the old saginaw bracket but it was too short to reach the hols on the head to use for the long bolt, so he took a piece of steel that looked to be about 1/2 an inch thick then he cut it diagonally and drilled 2 holes to match up with ones on the block you would use to lift it from an engine bay. then he drilled another hole in the middle and tapped it to match the long bolt i had, now i have a place for the pump to bolt to, then i have the regular bracket that mounts to the water pump housing, or whatever it is that the stock one bolts to. The only way i could pay him though was by giving him the tap and drill bit i bought from lowes to tap the metal threads, it isn't much but it is better than a thank you and nothing more. So basically the only things i have left are the old pump removal, new pump official installation, with lines. Then i have to make sure the belt fits good, otherwise i will need another. Other than that and buying a few more bolts the sag swap is completed for TGM, when i pull it apart tomorrow i will take a picture or 2 of the way it is mounted for future reference. And to think, i was going to Eff up the original Sag bracket by welding more metal on it and drilling a bunch of holes. So till then
i will have more pictures tomorrow but for now i leave you with thisI shall tell you a tale. First off the reason the pump is sideways is cause i don't have the correct bolt in the adjustment slot, i need to buy some other bolts so that one can get put back, for now i stuck whatever i had i there. Now if you notice, the old pump is still in there, it is in front of my Saggy, and still has the lines on it as this is just a mock up for all you FTE friends. So to kick off my tale, i will start with the lines. in the picture depicted:
You will see on the left side is a brand spankin new high pressure line for a 78 Ford E-van, well bad news is it didn't fit. The end that goes into the Sag port was the wrong kind this was a normal double flare end where the 87 pump i got uses a flared end with an o-ring on it. On the right is, can you guess? Yup the original line form the van i swiped the pump from, this one, once cleaned up, looks to be in good condition still. Keep in mind that old one looked like the new one in length almost down to a T but it was ever so slightly different. What i did was i took it over to my super awesome neighbor who is a plumber/mechanic/genius/drag racer/ i don't know what else. He was able to trim it and flare it so it matched my stock 78 one for the stock bronco pump. Then he went the extra awesome mile and fabbed a bracket for me. I was able to keep the old saginaw bracket but it was too short to reach the hols on the head to use for the long bolt, so he took a piece of steel that looked to be about 1/2 an inch thick then he cut it diagonally and drilled 2 holes to match up with ones on the block you would use to lift it from an engine bay. then he drilled another hole in the middle and tapped it to match the long bolt i had, now i have a place for the pump to bolt to, then i have the regular bracket that mounts to the water pump housing, or whatever it is that the stock one bolts to. The only way i could pay him though was by giving him the tap and drill bit i bought from lowes to tap the metal threads, it isn't much but it is better than a thank you and nothing more. So basically the only things i have left are the old pump removal, new pump official installation, with lines. Then i have to make sure the belt fits good, otherwise i will need another. Other than that and buying a few more bolts the sag swap is completed for TGM, when i pull it apart tomorrow i will take a picture or 2 of the way it is mounted for future reference. And to think, i was going to Eff up the original Sag bracket by welding more metal on it and drilling a bunch of holes. So till then
Lead Driver


Joined: May 2009
Posts: 6,815
Likes: 708
From: Tobyhanma, PA
Awesome! Must be nice to have a fabricator next door....if only he had a twin brother down here....
O I was gonna mention, I will prolly be selling my super cool air cleaner here soon. I have stumbled upon a too-great-to-pass-up deal and won't be needing it.
O I was gonna mention, I will prolly be selling my super cool air cleaner here soon. I have stumbled upon a too-great-to-pass-up deal and won't be needing it.
Thread Starter
|
Post Fiend
Joined: Nov 2011
Posts: 8,908
Likes: 1
From: Algona, Washington
Well i wouldn't mind buying it, but right now i have to buy an intake, then i could invest in the air cleaner. Any idea how much you want for it?
Thread Starter
|
Post Fiend
Joined: Nov 2011
Posts: 8,908
Likes: 1
From: Algona, Washington
OK GUYS THIS IS IT!!! I finally finished the swap, it was easy by means of looking at it as a whole, but each and every part was difficult... But for now i bring pictures 
So this is the bracket my neighbor made for me,

It is an awesome idea, the long bolt almost hits the head on the other side but it doesn't.
It has 2 big holes and one smaller one for the bolt.

My only concern with it was weather or not it might rust over time, i was going to paint it but i figured i would just get it all done.

So here is the low pressure return line, i used the metal pipe from the the van i got the Sag from. Basically the only thing from my stock pump that is left is the bolt for the first part of the bracket the rest is either new (hose and bolts) or from the e-van.

I had to do a bit of bending and fenaggling to get this one to mount to the steering box. I also had to cut the rubber hose longer, this one worked ok and bolted on both sides but the hose was being kinked in 2 places.
This was where that first homemade mounting plate went.

The beginning of assembly, the first 2 parts of the bracket are in place and ready for the pump.
Here is the pump in right after about an hour of screaming, cursing, and throwing things, i finally got the PS lines on. I ended up throwing the washer fluid reservoir, it helped me not be angry and gave me more space, and was banging on stuff with a wrench...

Yes there is a ton of low pressure line there but whatever it works.
This is with the belt on and tightened, ready for fluid and bleeding. I didn't have to get a belt or anything, it worked great.

Over all, this pump is great, it is easier to fill and i no longer have the groan, whine, and low vibration like it was low of fluid. As for the ease of turning i will say, it is ever so slightly easier, the stock ford pump gave it hell and turned the 35s better than i would have thought, and this Sag seems to perform slightly better while not working half as hard AND it was a $35 junkyard special... Overall i am happy i did it and i am happy it is done. I definitely recommend doing it if you have the stock pump and it groans even when topped off with fluid. Now down to business, who want's an old 78 stock PS pump
So this is the bracket my neighbor made for me,
It is an awesome idea, the long bolt almost hits the head on the other side but it doesn't.
It has 2 big holes and one smaller one for the bolt.
My only concern with it was weather or not it might rust over time, i was going to paint it but i figured i would just get it all done.
So here is the low pressure return line, i used the metal pipe from the the van i got the Sag from. Basically the only thing from my stock pump that is left is the bolt for the first part of the bracket the rest is either new (hose and bolts) or from the e-van.
I had to do a bit of bending and fenaggling to get this one to mount to the steering box. I also had to cut the rubber hose longer, this one worked ok and bolted on both sides but the hose was being kinked in 2 places.
This was where that first homemade mounting plate went.
The beginning of assembly, the first 2 parts of the bracket are in place and ready for the pump.
Here is the pump in right after about an hour of screaming, cursing, and throwing things, i finally got the PS lines on. I ended up throwing the washer fluid reservoir, it helped me not be angry and gave me more space, and was banging on stuff with a wrench...
Yes there is a ton of low pressure line there but whatever it works.
This is with the belt on and tightened, ready for fluid and bleeding. I didn't have to get a belt or anything, it worked great.
Over all, this pump is great, it is easier to fill and i no longer have the groan, whine, and low vibration like it was low of fluid. As for the ease of turning i will say, it is ever so slightly easier, the stock ford pump gave it hell and turned the 35s better than i would have thought, and this Sag seems to perform slightly better while not working half as hard AND it was a $35 junkyard special... Overall i am happy i did it and i am happy it is done. I definitely recommend doing it if you have the stock pump and it groans even when topped off with fluid. Now down to business, who want's an old 78 stock PS pump
Thread Starter
|
Post Fiend
Joined: Nov 2011
Posts: 8,908
Likes: 1
From: Algona, Washington
So it is small update time. Thanks to a few good FTE fellows (Brett-EdgeThis and shane-Weez440) I am now getting a 4 barrel Edlebrock intake and a 4 bbl about 600 CFM Carter carb. It will be here around the end of this week i am very excited. Cost me $250 so i feel like i did good here. Thanks to Brett for linking me to that ad and thanks to Shane for being a good person and working with me on a budget buy. I don't quite have pictures yet and i could get some from his Photobucket but i'll wait and do my own when it gets here
i am very excited. Cost me $250 so i feel like i did good here. Thanks to Brett for linking me to that ad and thanks to Shane for being a good person and working with me on a budget buy. I don't quite have pictures yet and i could get some from his Photobucket but i'll wait and do my own when it gets here
Post Fiend
Joined: Sep 2006
Posts: 14,325
Likes: 14
From: Island Southeast Alaska
FTE Stories
Ford Trucks for Ford Truck Enthusiasts

Top 6 Best Deals Available on New Fords & Lincolns Right Now
Brett Foote
This Hennessey Takes the Expedition Tremor's Off-Roading Capability to the Next Level
Verdad Gallardo
Top 10 Fords at 2026 Carlisle Ford Nationals
Joe Kucinski
3 Best / 3 Worst Parts of Modern Ford Ownership
Brett Foote
10 Amazing Upgrades That Solve Common Ford Truck Owner Headaches
Pouria Savadkouei
Every 2026 Ford Engine Explained
Brett Foote
10 Ugly Ford Trucks That We Still Kinda Love
Joe Kucinski
10 Things Every Truck Owner NEEDS (2026 Edition)
Michael S. Palmer
Rezvani's Latest Post-Apocalyptic Monster Is a Ford F-150 Raptor Underneath
Verdad Gallardo

Thread Starter
|
Post Fiend
Joined: Nov 2011
Posts: 8,908
Likes: 1
From: Algona, Washington
Aw man sorry to hear that. I try to update what i can but i just dont do a lot now that i have no full time job. But after june ill be able to get back into it amd get more money. Also after doing that PS pump swap i planned to take it kinda easy for a short while before the next thing breaks...
Thread Starter
|
Post Fiend
Joined: Nov 2011
Posts: 8,908
Likes: 1
From: Algona, Washington
The problem is gas hehe, if i can make sure not to blow a ton of gas running it hard then i would. I know some of the weak spots and i know some of the spots that are getting weak (bent radius arm  ) but other than that and my fiberglass top being about to fall off it should be stable
) but other than that and my fiberglass top being about to fall off it should be stable