


Project TGM
Thread Starter
|
Post Fiend
Joined: Nov 2011
Posts: 8,908
Likes: 1
From: Algona, Washington
Oh ok, i will look into the fuse box and see what kinds of acc slots are there. As for the coil wire, i read that it is supposed to go to the negative... Not sure about that so we will see.
I hear ya guys on the Magnaflows, but what kind would you guys recommend? I don't know any of the types so you might have to tell me. I want a vicious growl and a nice low rumble at idle so if they got something in those lines that would be great.
As an update, i washed TGM today As well as my mothers Mach 1 mustang
Here be the beast all dirty
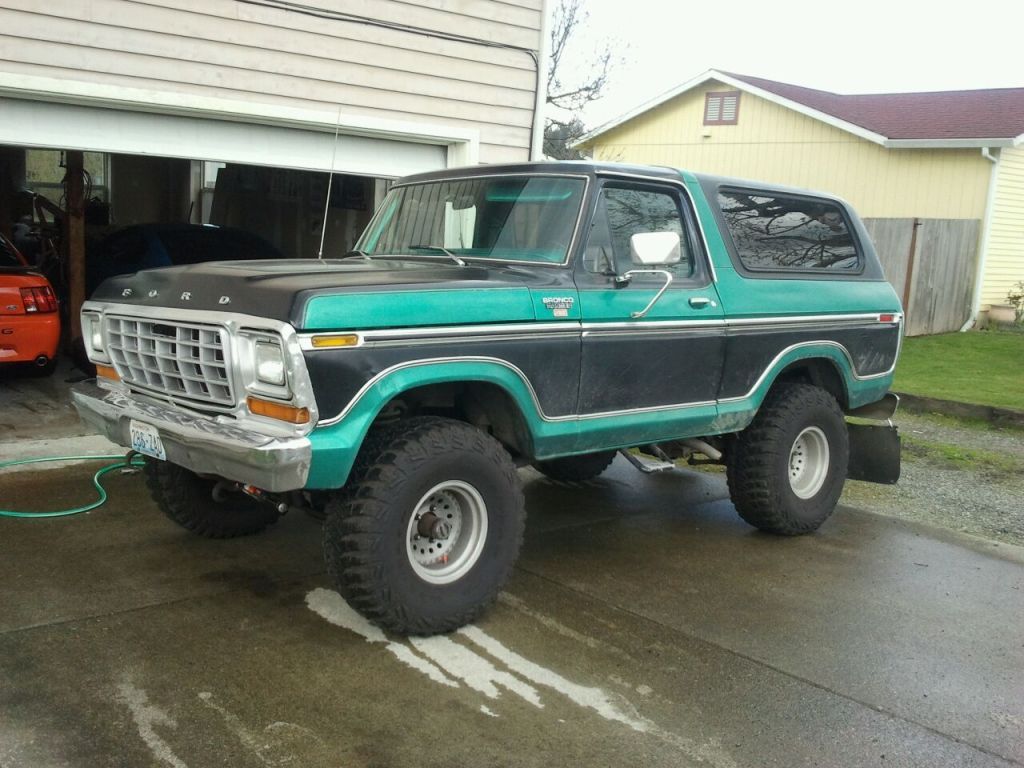
And after i got it all clean, i didn't dry it cause it was drying by its self so i let it be.
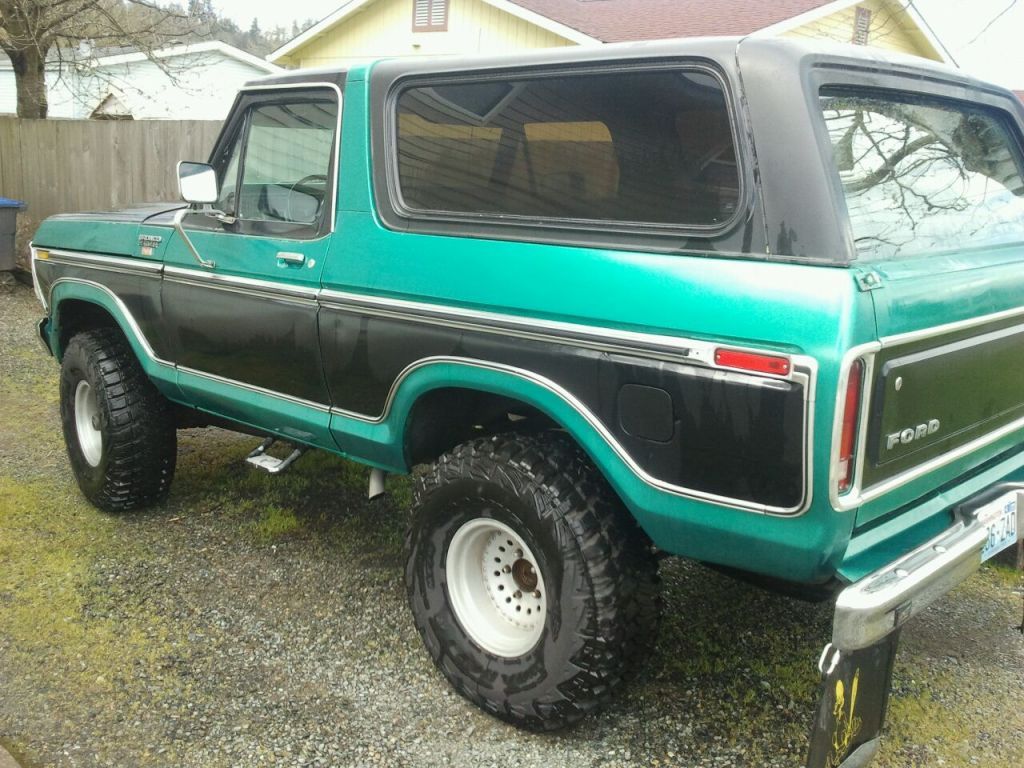
Looks pretty good cleaned up.
News, after i get my hitch done and a little further down the road i am going to get some custom plates for TGM, unfortunately they didn't have TGM available to use so i tried my name GruesomeJeans which is going to be GRSMJNS and that was available. So once i have about $100 extra to spend i am going to get that all done up.
Other than that nothing new has really been happening, i did notice when i start my truck after letting it sit overnight it does have a pretty good sized cloud of blue smoke but goes away after a few seconds, i doubt this is bad but your opinions would be appreciated. Other than that i have no more news.
I hear ya guys on the Magnaflows, but what kind would you guys recommend? I don't know any of the types so you might have to tell me. I want a vicious growl and a nice low rumble at idle so if they got something in those lines that would be great.
As an update, i washed TGM today
As well as my mothers Mach 1 mustang Here be the beast all dirty
And after i got it all clean, i didn't dry it cause it was drying by its self so i let it be.
Looks pretty good cleaned up.
News, after i get my hitch done and a little further down the road i am going to get some custom plates for TGM, unfortunately they didn't have TGM available to use so i tried my name GruesomeJeans which is going to be GRSMJNS and that was available. So once i have about $100 extra to spend i am going to get that all done up.
Other than that nothing new has really been happening, i did notice when i start my truck after letting it sit overnight it does have a pretty good sized cloud of blue smoke but goes away after a few seconds, i doubt this is bad but your opinions would be appreciated. Other than that i have no more news.
Lead Driver


Joined: May 2009
Posts: 6,815
Likes: 708
From: Tobyhanma, PA
Im not sure on the coil wire. The truck looks great! Have you ever thought about a classic plate? I put a 1968 plate on my Mustang. It'd be different and it's usually only a few bucks to register it. Tho you'd have to locate a WA 1978 plate.

Senior User
Joined: Jan 2012
Posts: 100
Likes: 0
From: Amarillo, TX
Here in Texas you can get those but they only let you drive 1500 miles a year. I'm.not sure they check the mileage though
Lead Driver
Joined: May 2009
Posts: 6,815
Likes: 708
From: Tobyhanma, PA
There are two types sometimes one type is limited use like you said the other is just like a regular plate. Its cheaper to register for limited use but I wanna drive my classic!! At least that's the case in WV.
Elder User
Joined: Jan 2012
Posts: 954
Likes: 0
From: Viva Las Vegas
So disconnect the speedo...
On the smoke it is the valve guide seals, they look like umbrellas and seal the top of the valve.
They are probably dry and brittle like plastic.
This is what mine looked like when I pulled them out.


They were rubber originally...
On the smoke it is the valve guide seals, they look like umbrellas and seal the top of the valve.
They are probably dry and brittle like plastic.
This is what mine looked like when I pulled them out.
They were rubber originally...
Thread Starter
|
Post Fiend
Joined: Nov 2011
Posts: 8,908
Likes: 1
From: Algona, Washington
Raleigh1: Man when i read your post and aw the pictures i was like, "what the heck? What is he talking about smoke? what? Then i realized i had mentioned the smoke from my exhaust 
As the plate goes, to have a classic plate here you can only drive to and from shows, and it has to be regulated to be able to drive freeway speeds. Since mine is my DD it won't work. I was going to try for those but found out i wouldn't be able too unless i owned a show car...
As for those valve guide seals, do you pull the valve covers to get to those? I
m not sure if the passenger side is the same but i would end up replacing them all.
I got the hitch installed, it took about 3 hours when it was only supposed to be about 1.5... The guy doing it was drilling the holes and didn't properly line up the hitch so the holes were off. But it all ended well and now i have a hitch. Turns out my truck had one on it previously that was cut off, there is even working trailer wires but i have to find a way to extend the wires down cause for some reason their tucked up next to the frame, i can't pull them down further without ripping the whole harness down. I am thinking, cut the wires and splice in long sections and reconnect the plug.

New User
Joined: Jul 2004
Posts: 19
Likes: 0
[/quote]Turns out my truck had one on it previously that was cut off, there is even working trailer wires but i have to find a way to extend the wires down cause for some reason their tucked up next to the frame, i can't pull them down further without ripping the whole harness down. I am thinking, cut the wires and splice in long sections and reconnect the plug.[/quote]
You should be able to pick up a flat 4 wire extension at your local parts store. It will have a male and female end. Just use that, eliminating splices that could fail down the road.
You should be able to pick up a flat 4 wire extension at your local parts store. It will have a male and female end. Just use that, eliminating splices that could fail down the road.
Lead Driver
Joined: May 2009
Posts: 6,815
Likes: 708
From: Tobyhanma, PA
Replacing the valve seals is a bit more involved then just pull the covers. Have to mess with valve train.
Also you may be ok with the wires. The trailer should have some slack in the wiring to allow it to reach if its close.
Also you may be ok with the wires. The trailer should have some slack in the wiring to allow it to reach if its close.
FTE Stories
Ford Trucks for Ford Truck Enthusiasts

Top 6 Best Deals Available on New Fords & Lincolns Right Now
Brett Foote
This Hennessey Takes the Expedition Tremor's Off-Roading Capability to the Next Level
Verdad Gallardo
Top 10 Fords at 2026 Carlisle Ford Nationals
Joe Kucinski
3 Best / 3 Worst Parts of Modern Ford Ownership
Brett Foote
10 Amazing Upgrades That Solve Common Ford Truck Owner Headaches
Pouria Savadkouei
Every 2026 Ford Engine Explained
Brett Foote
10 Ugly Ford Trucks That We Still Kinda Love
Joe Kucinski
10 Things Every Truck Owner NEEDS (2026 Edition)
Michael S. Palmer
Rezvani's Latest Post-Apocalyptic Monster Is a Ford F-150 Raptor Underneath
Verdad GallardoElder User
Joined: Jan 2012
Posts: 954
Likes: 0
From: Viva Las Vegas
As far as valve guide seals go you can pull the heads and do head gaskets at the same time.
Another way to go is to
1. Pull the valve covers
2. Pull the rocker arms and push rods (be sure to keep them in order).
3. One at a time, place each cylinder at TDC.
4. Using a valve spring compressor, unload one spring at a time and remove the retainers (there are 2 halves on each spring).
5. Replace the seal.
Repeat for all valves.
I did it once in the past this way and it worked great.
Thread Starter
|
Post Fiend
Joined: Nov 2011
Posts: 8,908
Likes: 1
From: Algona, Washington
Oh man that sounds like a lot of work.... I didn't really want to pull the heads 
As for the trailer wires, i need a 3 wire plug as i only have 3. There would be enough length for the trailer to just hook onto it but it is up in between the frame and the gas tank, i would have to lay down every time i wanted to connect the plug.
As for the trailer wires, i need a 3 wire plug as i only have 3. There would be enough length for the trailer to just hook onto it but it is up in between the frame and the gas tank, i would have to lay down every time i wanted to connect the plug.
New User
Joined: Jul 2004
Posts: 19
Likes: 0
You will need at least four to hook up basic trailer wiring. One wire carries signal for the running light/tail-light. Two wires are carry signal for the bright filament (blinker/brake). The fourth is usually a ground.
Some will have 5, six or seven wires when you add constant power and brake controllers.
The store wiring kits I've used before will typically have a chart in the box to explain the color codes so you know which wire goes where.
I've not seen a three wire connector for trailers. The standard four flat will have three male and one female (or the reverse for the opposite end) so you can't reverse the wiring when hooking up.
Thread Starter
|
Post Fiend
Joined: Nov 2011
Posts: 8,908
Likes: 1
From: Algona, Washington
So i got some pictures, turns out it is only 3 wires and i have an offsite ground (further down the wiring harness)
This is my new hitch, got the ball part in the back of the truck.

The 3 prong connector in question, there are similar plugs nearby that are plugged into other connectors so i think those are brake lights
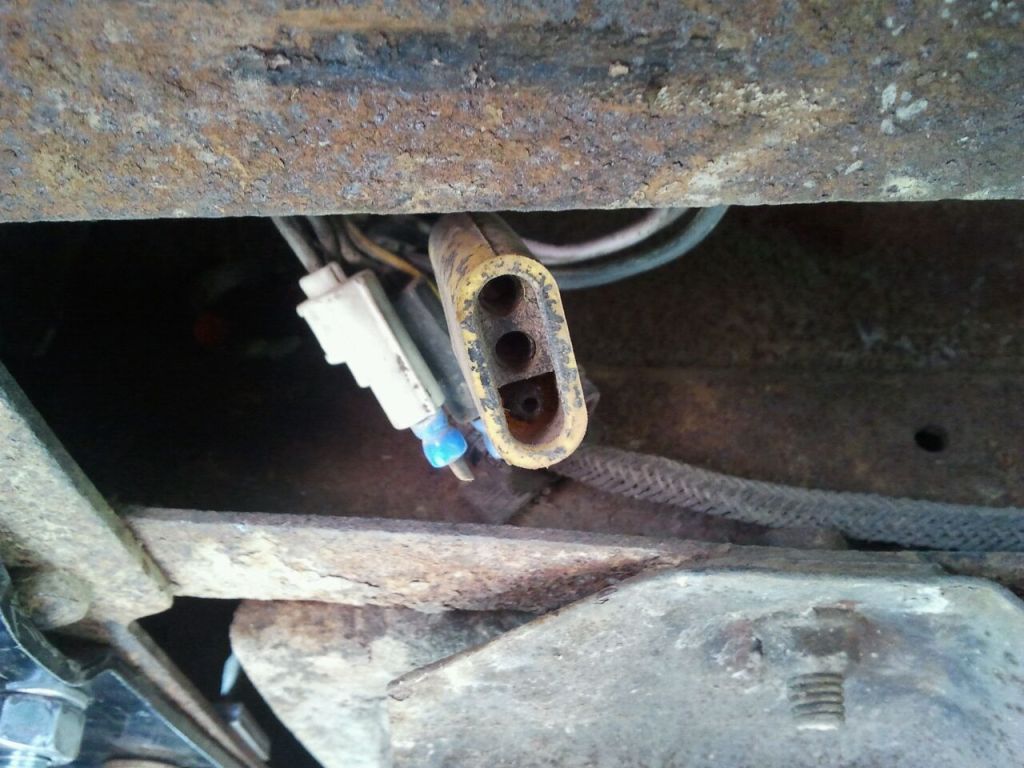
I'm not sure what these 2 are for but there are 2 of the same on the passenger side as well. The white one has a constant power to it.
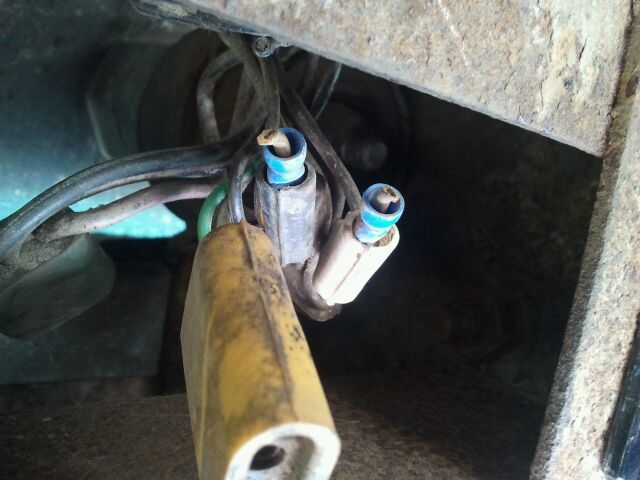
And the 3 wires going to said connector. The far left is black with a yellow stripe, Center is green as if you guys didn't already know :P And the far right looks like it is a white or yellow.
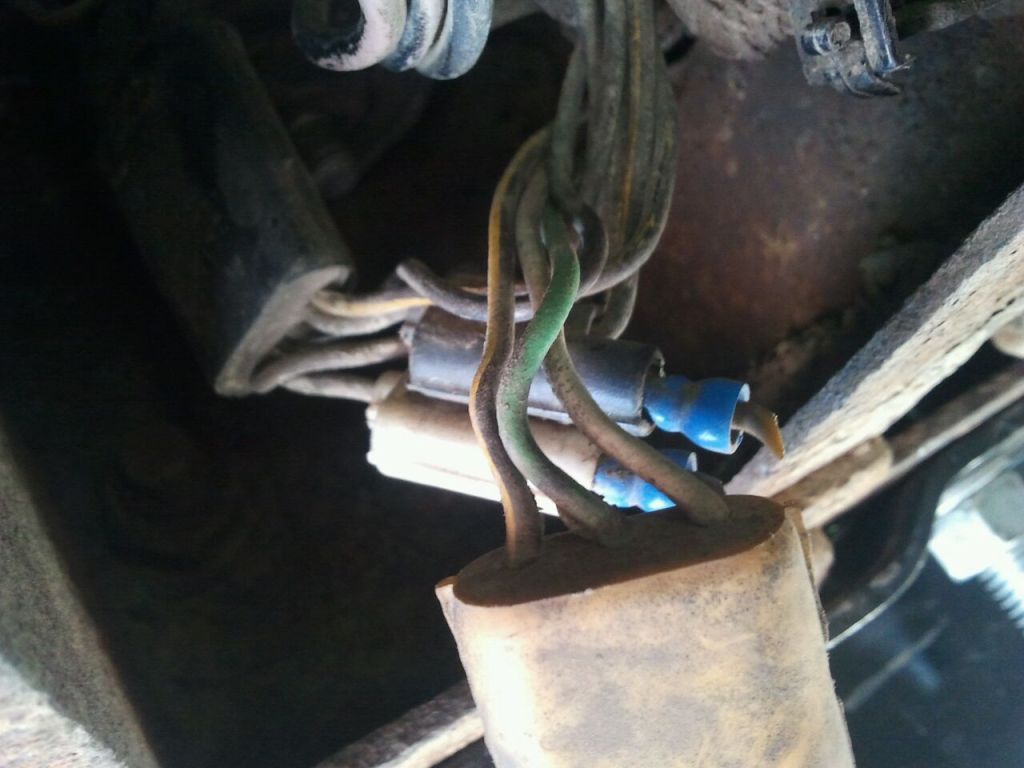
That is what i am dealing with, and it is in kind of a hard to reach spot so finding an extension of some sort would be nice.
This is my new hitch, got the ball part in the back of the truck.
The 3 prong connector in question, there are similar plugs nearby that are plugged into other connectors so i think those are brake lights
I'm not sure what these 2 are for but there are 2 of the same on the passenger side as well. The white one has a constant power to it.
And the 3 wires going to said connector. The far left is black with a yellow stripe, Center is green as if you guys didn't already know :P And the far right looks like it is a white or yellow.
That is what i am dealing with, and it is in kind of a hard to reach spot so finding an extension of some sort would be nice.
Elder User
Joined: Jan 2012
Posts: 954
Likes: 0
From: Viva Las Vegas
That is NOT a trailer wire harness.
That is the passenger side tail/signal/brake harness.
Looks like someone bypassed it and possibly hardwired it?
Good luck, wiring like that is a nightmare!
That is the passenger side tail/signal/brake harness.
Looks like someone bypassed it and possibly hardwired it?
Good luck, wiring like that is a nightmare!