


Power Door Locks FIXED!!!!
Freshman User
Joined: Nov 2003
Posts: 49
Likes: 0
this is a great thread!!!
I just fixed my locks, I was a mechanic for about 20 years before getting into automotive engineering (which I do now)
A couple tips that I did not see, maybe they are there.
1- When you remove the door handle, mark the link that connects to the latch before you remove it so you can put it back in the same place as it can be connected any place along the threaded area and can cause you grief.
2-after you make the repair, try the power lock at different stages of reassembly to make sure its still working and you did not mess something up and have to take it back apart.
3- On taking the motor apart, just use a small screwdriver that fits in the slot to pry the case back, its very easy to do with the proper width screwdriver.
4- when putting the resistor back in (I used a piece of copper since I had access to it) make sure you put it in the side that it came out from! There are slots on both sides of the end cap. I was not paying attention and put it in the wrong spot, I pried the contacts back and slid it in. I did not notice that where it was supposed to go, those contacts were spread apart. After I put the whole thing back together, it did not work. Thats why I suggest testing it while you are putting it back together!
4- On splitting the casing, I just took my dremel and a cutoff wheel and ground down the plastic rivets. I did not do all of them, just enough to spread the case. Then I just drilled pilot holes in them and put it back together with sheetmetal screws.
5- After doing the first one, when I did the other I just left it attached to the door and went at it since I knew exactly what I was doing, this saved tons of time

Post Fiend
Joined: Mar 2009
Posts: 11,798
Likes: 14
From: Mt. Shasta California
this is a great thread!!!
I just fixed my locks, I was a mechanic for about 20 years before getting into automotive engineering (which I do now)
A couple tips that I did not see, maybe they are there.
1- When you remove the door handle, mark the link that connects to the latch before you remove it so you can put it back in the same place as it can be connected any place along the threaded area and can cause you grief.
I didn't remove any door handles, it just complicates it.
2-after you make the repair, try the power lock at different stages of reassembly to make sure its still working and you did not mess something up and have to take it back apart.
You shouldn't have to do that.
3- On taking the motor apart, just use a small screwdriver that fits in the slot to pry the case back, its very easy to do with the proper width screwdriver.
[/quote]
You can just remove the bottom rivets and drop the motor out like a clam.
4- when putting the resistor back in (I used a piece of copper since I had access to it) make sure you put it in the side that it came out from! There are slots on both sides of the end cap. I was not paying attention and put it in the wrong spot, I pried the contacts back and slid it in. I did not notice that where it was supposed to go, those contacts were spread apart. After I put the whole thing back together, it did not work. Thats why I suggest testing it while you are putting it back together!
[/quote]
The slot the wafer was in is pretty obvious, I just crammed tin foil in there.
4- On splitting the casing, I just took my dremel and a cutoff wheel and ground down the plastic rivets. I did not do all of them, just enough to spread the case. Then I just drilled pilot holes in them and put it back together with sheetmetal screws.
[/quote]
I just drilled the bottom rivet heads and used tie wire through the holes later.
5- After doing the first one, when I did the other I just left it attached to the door and went at it since I knew exactly what I was doing, this saved tons of time[/quote]
After you do one the rest are naturally a no brainer.
Post Fiend
Joined: Mar 2009
Posts: 11,798
Likes: 14
From: Mt. Shasta California
Me too, I never implied you weren't perfect. Everyone does this a different way because of the variables, and I just injected more food for thought.

New User
Joined: Jun 2003
Posts: 24
Likes: 0
All -I tried this one time. I ended up messing my lock up. I found locks and put them in. I have just placed all of the locks back in and am only hearing a click under the dash. I have given up. It takes some patience here. My hands are way too big for this. I have a 2002 with 131k. It runs like a champ. For now I reach over and pull the blasted things up manually in my Super Crew. Any Ideas? It there anything else? There were some pics here. But cannot seem to find them
Thanks
Thanks
Post Fiend
Joined: Mar 2009
Posts: 11,798
Likes: 14
From: Mt. Shasta California
All -I tried this one time. I ended up messing my lock up. I found locks and put them in. I have just placed all of the locks back in and am only hearing a click under the dash. I have given up. It takes some patience here. My hands are way too big for this. I have a 2002 with 131k. It runs like a champ. For now I reach over and pull the blasted things up manually in my Super Crew. Any Ideas? It there anything else? There were some pics here. But cannot seem to find them
Thanks
Thanks
 .
.
More Turbo


Joined: Feb 2003
Posts: 532
Likes: 0
From: Grand Rapids, MI
Originally did my passenger door a few weeks back and it was a bit tricky. Took probably 90mins all said and done, including cleaning the exposed sections of door panel while I had the chance.
The other day I finally tackled the driver side and it went MUCH quicker. First thing I did this time was pop the outside door handle off and it went a breeze. Other than that, I did manage both times to pry open just the motor side of the actuator casing so I did not need to rivet or bolt anything together. A couple of zip ties (2 is one and one is none!) and back in they went. two working power door locks and I'm a happy camper!
The other day I finally tackled the driver side and it went MUCH quicker. First thing I did this time was pop the outside door handle off and it went a breeze. Other than that, I did manage both times to pry open just the motor side of the actuator casing so I did not need to rivet or bolt anything together. A couple of zip ties (2 is one and one is none!) and back in they went. two working power door locks and I'm a happy camper!
FTE Stories
Ford Trucks for Ford Truck Enthusiasts

Top 10 Fords at 2026 Carlisle Ford Nationals
Joe Kucinski
3 Best / 3 Worst Parts of Modern Ford Ownership
Brett Foote
10 Amazing Upgrades That Solve Common Ford Truck Owner Headaches
Pouria Savadkouei
Every 2026 Ford Engine Explained
Brett Foote
10 Ugly Ford Trucks That We Still Kinda Love
Joe Kucinski
10 Things Every Truck Owner NEEDS (2026 Edition)
Michael S. Palmer
Rezvani's Latest Post-Apocalyptic Monster Is a Ford F-150 Raptor Underneath
Verdad Gallardo
Top 10 Most Expensive Ford Trucks Ever Sold on Bring a Trailer
Joe Kucinski
2027 Ford Super Duty Buyer's Guide (Every Model, Engine, & Package)
Brett Foote
5th Wheeling
Joined: Dec 2010
Posts: 48
Likes: 0
I cannot beleive what a cool thread this is,and what a relatively easy fix this is too.
I fixed two of the four door locks today on my 2001 Crew Cab Lariat PSD,and will finish the other two tommorrow. The two repaired locks operate with authority now !!!!
As the original poster stated,he thought it might be an electrical problem upstream, and that's what I thought too,as the locks all seemed to degrade in operation at the about the same rate ,which made me think it had to be a problem in common with all four locks.
I had a heck of a time bending the original motor tabs out of the way,to get the cover off,but after reviewing the post here in more depth,I noticed that somebody used a fly bit to pry the tabs off.That's what I did with the second lock motor,and it worked like a champ.
Tried posting pictures ,but just couldn't get them to work?
Thanks so much !!! Something simple like this helped to make my holiday season better!
Rick
Fleet Owner


Joined: Apr 2012
Posts: 27,307
Likes: 549
From: Spanaway
SD Rick,
Here is a link on how to post photos
https://www.ford-trucks.com/forums/1...he-forums.html
Sean
Here is a link on how to post photos
https://www.ford-trucks.com/forums/1...he-forums.html
Sean
5th Wheeling
Joined: Dec 2010
Posts: 48
Likes: 0
SD Rick,
Here is a link on how to post photos
https://www.ford-trucks.com/forums/1...he-forums.html
Sean
Here is a link on how to post photos
https://www.ford-trucks.com/forums/1...he-forums.html
Sean
Thanks Sean....
I'm going to give it a try...
I belong to another car Forum ,for American Motors cars. That Forum has a similar proceedure for posting pics.. It took me a while,but finally figured out what I was doing wrong there,which is something I tried here ,with no success. One nice thing about the other Forum is that they updated the way things were done,and now when I want to post a picture,it browses my computer for it,rather than the old way of putting it on Photobucket or similar first, and then transfering it to the forum site.
The FTE forum here ,hands down ,is the most helpful forum I've had the privilege of being part of. Extremely helpful and positive members ,and hats off to the people that run it.Very well done!!!

Rick
5th Wheeling
Joined: Dec 2010
Posts: 48
Likes: 0
OK... Thanks Sean for the link on posting pics,and Colby for creating the tutorial on how to post them. Pretty simple stuff,and Colby taught me something new about posting the pics on Photobucket as well.
I'm going to post a few pics with verbage here,to show what I did when splitting the case and how I reassembled it. I think the tie wrap or bolt through method works just fine,but this thought occured to me while disassembling the case.
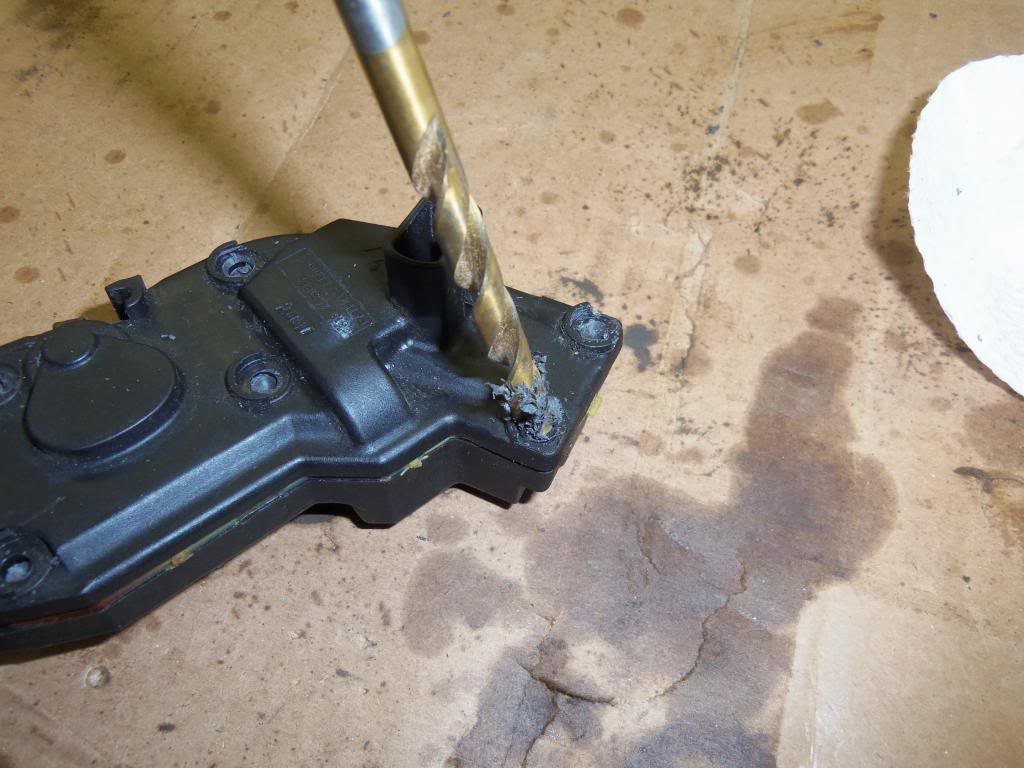
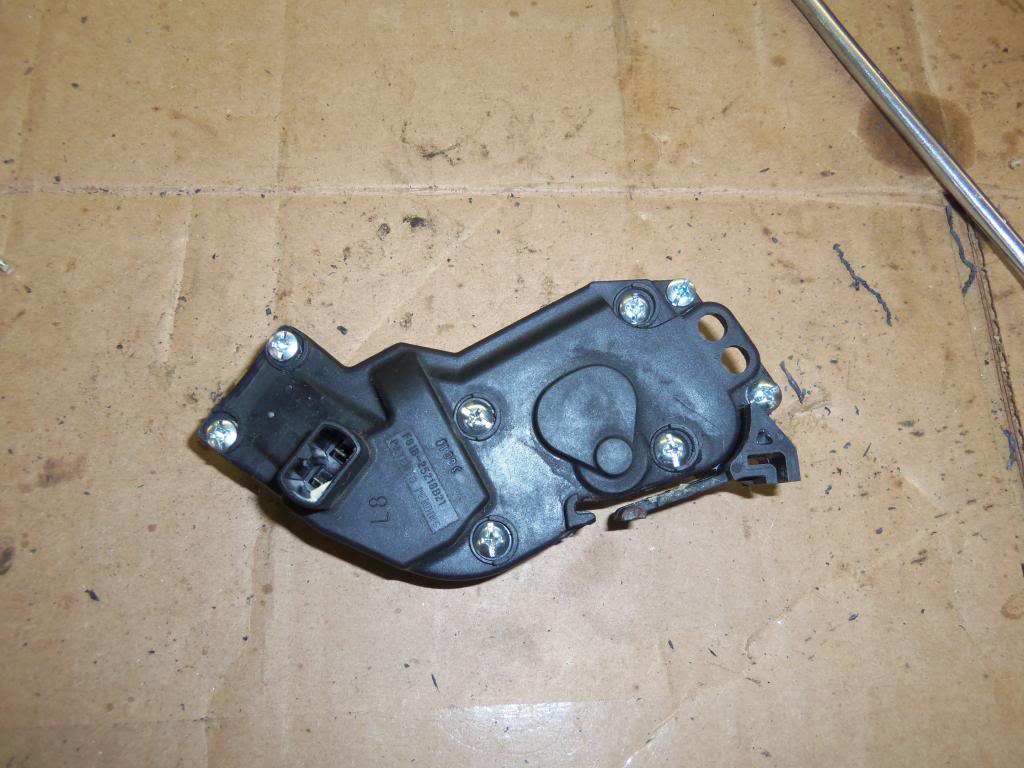
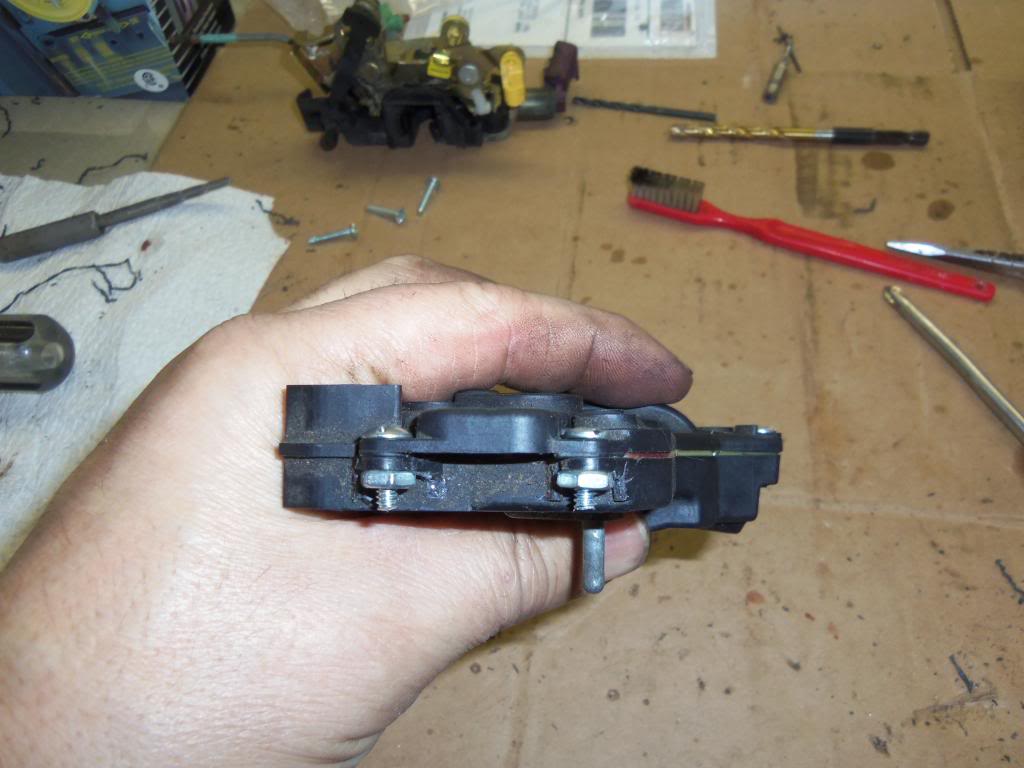
While first trying to split the case, I noticed how the mushroom plastic heads ,that are on the factory sealed case,wanted to pop off when prying.Not wanting to crack the case, I decided to just drill them off,leaving the plastic molded rivet shaft below it. See Pic.....
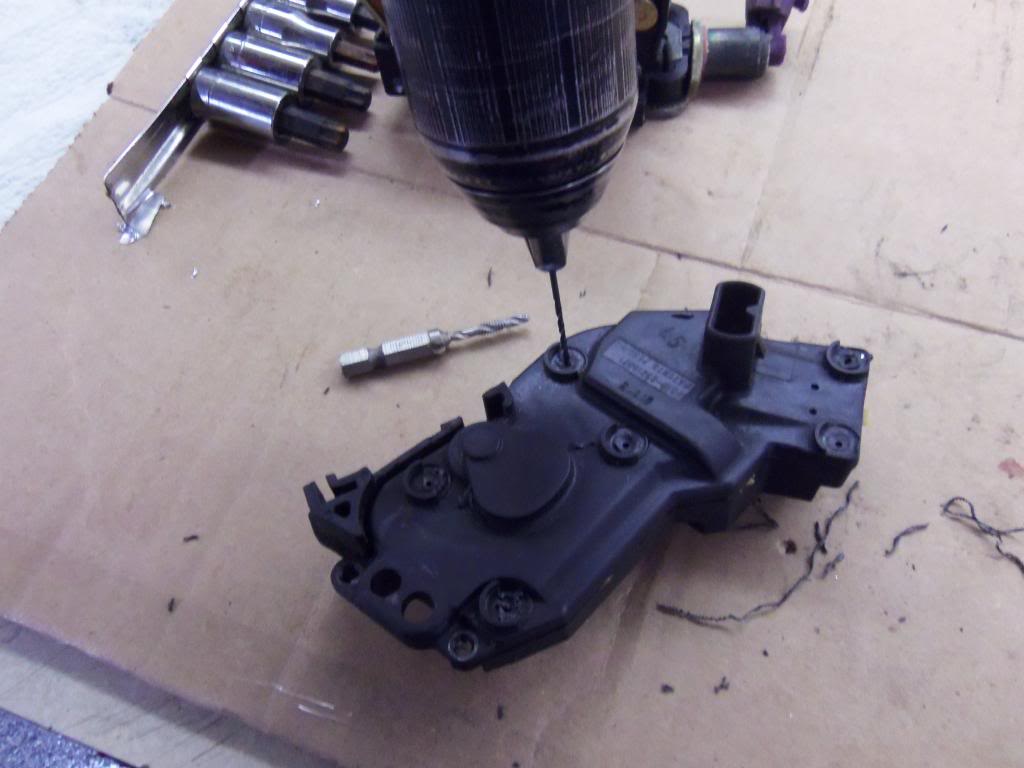
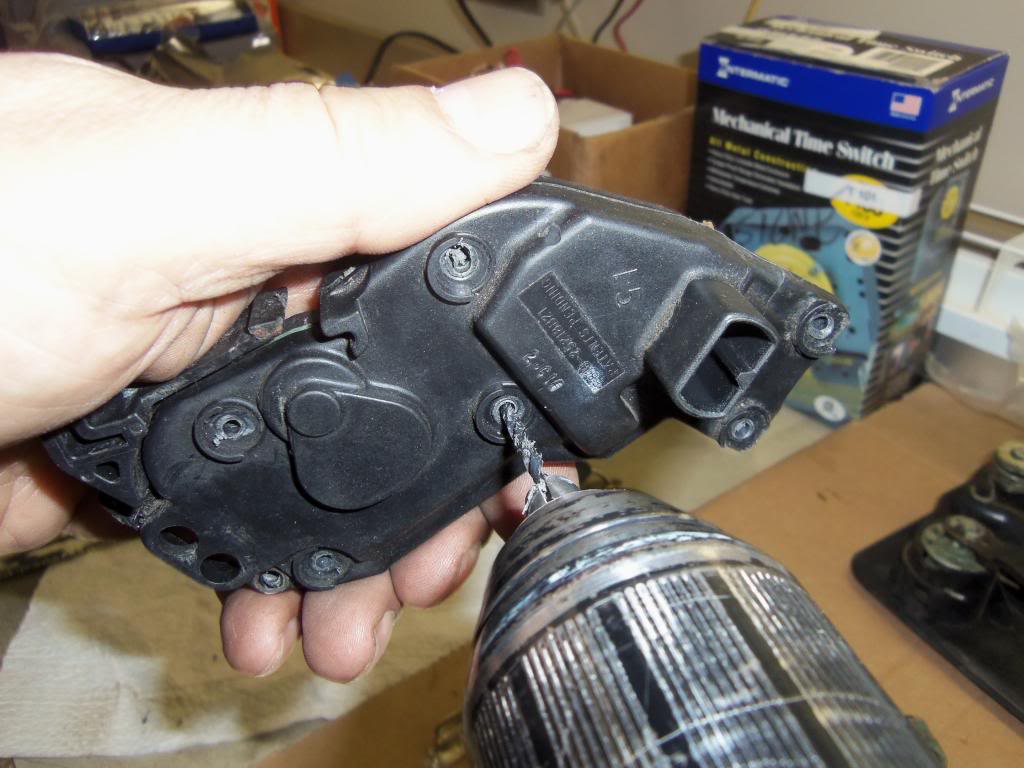
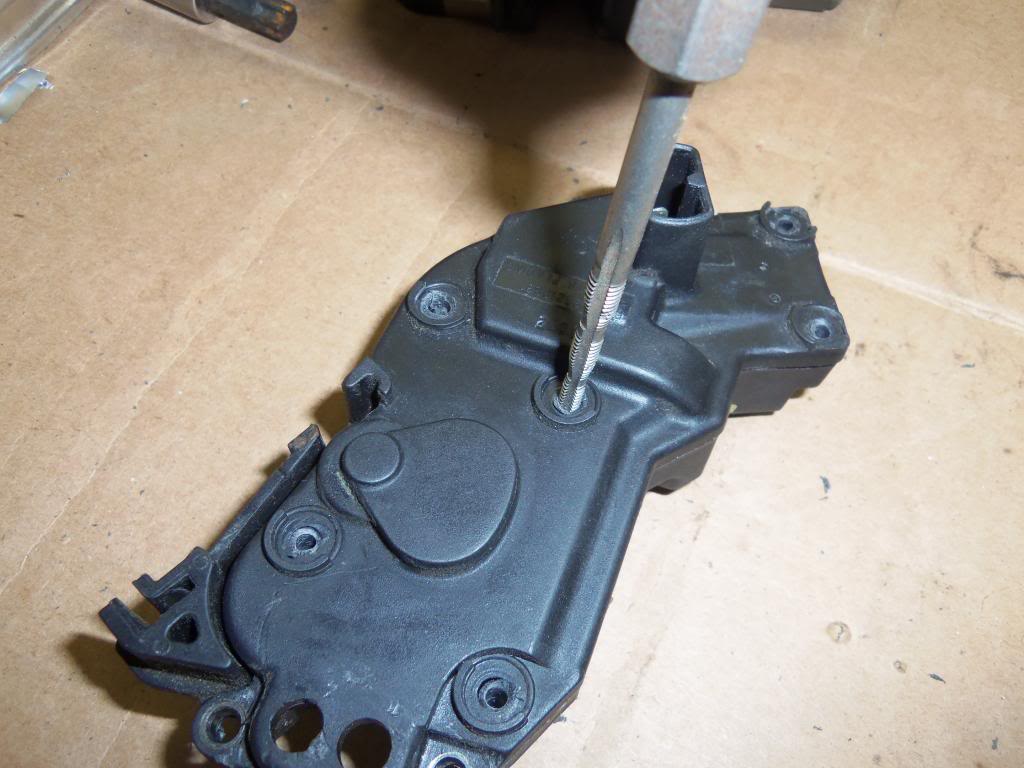
After drilling out the two remaining aluminium/steel? rivets ,I took the case apart,which was easy at that point. I saw how much of the plastic rivet shaft was left,and decided to see if I could tap it,for 6-32 threads. It looked promising,so I piloted it with a small drill bit first,,then moved up to the bit needed for the 6-32 tap. I used a series of 6-32 screws,cut to length to thread into the tapped holes,and a couple 6-32 screws and nuts to secure the riveted end.The following are pics I took of the process,and the finished bolted case. Use just a little lube when tapping the holes.
This all worked well for me.
Good Luck!!!
Rick
I'm going to post a few pics with verbage here,to show what I did when splitting the case and how I reassembled it. I think the tie wrap or bolt through method works just fine,but this thought occured to me while disassembling the case.
While first trying to split the case, I noticed how the mushroom plastic heads ,that are on the factory sealed case,wanted to pop off when prying.Not wanting to crack the case, I decided to just drill them off,leaving the plastic molded rivet shaft below it. See Pic.....
After drilling out the two remaining aluminium/steel? rivets ,I took the case apart,which was easy at that point. I saw how much of the plastic rivet shaft was left,and decided to see if I could tap it,for 6-32 threads. It looked promising,so I piloted it with a small drill bit first,,then moved up to the bit needed for the 6-32 tap. I used a series of 6-32 screws,cut to length to thread into the tapped holes,and a couple 6-32 screws and nuts to secure the riveted end.The following are pics I took of the process,and the finished bolted case. Use just a little lube when tapping the holes.
This all worked well for me.
Good Luck!!!
Rick
Hotshot

Joined: Jan 2002
Posts: 17,988
Likes: 207
From: La La Land

Except for cutting off the plastic rivet heads with an Exacto knife, that's exactly how I did mine, using stainless screws, washers, and nuts.
I think I did mine with #4 hardware, though, and only used #6 for the two through-holes.
Yours look both neat and strong.
Pop
I think I did mine with #4 hardware, though, and only used #6 for the two through-holes.
Yours look both neat and strong.
Pop