


Engine Rebuild Part 2

Senior User
Joined: May 2014
Posts: 151
Likes: 0
From: Charlotte
I have two, one for under and one for above a CNCdudes spacer.
They certainly are pricey and high quality. Also much thinner than the traditional rubber one so if you were using the rubber for clearance with the valve cover then you may have have an issue.
They certainly are pricey and high quality. Also much thinner than the traditional rubber one so if you were using the rubber for clearance with the valve cover then you may have have an issue.
Thread Starter
|
Moderator


Joined: Dec 2007
Posts: 7,987
Likes: 104
From: Boise, Idaho

I noticed that the Real Gasket said "set of two" but I figured that was a copy/paste typo from a V8. It didn't make sense that you'd automatically have to buy two valve cover gaskets. But who knows?
Thread Starter
|
Moderator
Joined: Dec 2007
Posts: 7,987
Likes: 104
From: Boise, Idaho
The last few days have been painting. Painting painting painting.
I thought the block and head was hard but that was the easy part.
I initially tried cleaning and stripping the covers myself, but no matter how many passes I did, I simply couldn't even get all of the gunk and oil off of them. I never even made it to the paint stripper that I bought.

This was the closest I got.


So many nooks and crannies were still just filled with old oil and gunk.

I was in talking with my machinist about a completely unrelated topic and stripping the parts came up. He said he'd give me a "friend" price of $15 to strip everything and I jumped at it. Two days later, I got these beauties back.


Starting to paint:

Valve cover painted:

(Note that I ground the little fuel line hook off. I never used it, and constantly caught myself on it. It had to go.)


When originally painting the block, it didn't even occur to me just how much of the face of it was uncovered when everything was bolted to it. I wasn't a fan of all of the unpainted surface. It really kept the black from "popping" like I wanted it to.

So, I outlined everything with a marker and then taped it off and painted.

A very tedious process with an exacto knife.

White undercoat.

And red


Much better!!

Also scrubbed and cleaned all the bolts for the water pump, thermostat housing, valve cover, timing cover and push rod cover so I could paint them. Not my favorite!
I also had the fine pleasure of meeting our member Brian (Brian_153624) today. Had a great time talking with him and seeing his nice ride (and am jealous about his find for his 300).
He generously gave me these railings for the oil pan. I've never even seen a pair before, let alone had any, so I'm excited about having them!
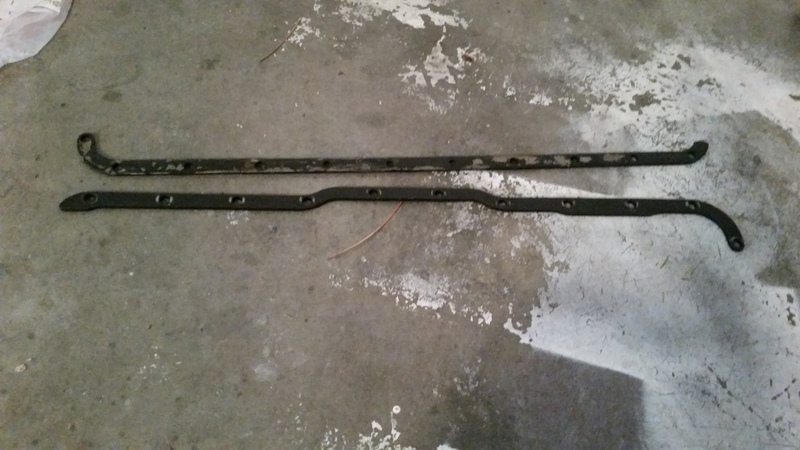
I spent the next hour or so cleaning all the bolts so I could paint them (tedious!), but I think they'll look great! Thanks again.

So, lots of taping off and painting of parts, and about 45 little bolts to scrub, so my hands are sore.
Very close though....
I thought the block and head was hard but that was the easy part.
I initially tried cleaning and stripping the covers myself, but no matter how many passes I did, I simply couldn't even get all of the gunk and oil off of them. I never even made it to the paint stripper that I bought.
This was the closest I got.
So many nooks and crannies were still just filled with old oil and gunk.
I was in talking with my machinist about a completely unrelated topic and stripping the parts came up. He said he'd give me a "friend" price of $15 to strip everything and I jumped at it. Two days later, I got these beauties back.
Starting to paint:
Valve cover painted:
(Note that I ground the little fuel line hook off. I never used it, and constantly caught myself on it. It had to go.)
When originally painting the block, it didn't even occur to me just how much of the face of it was uncovered when everything was bolted to it. I wasn't a fan of all of the unpainted surface. It really kept the black from "popping" like I wanted it to.
So, I outlined everything with a marker and then taped it off and painted.
A very tedious process with an exacto knife.
White undercoat.
And red
Much better!!
Also scrubbed and cleaned all the bolts for the water pump, thermostat housing, valve cover, timing cover and push rod cover so I could paint them. Not my favorite!
I also had the fine pleasure of meeting our member Brian (Brian_153624) today. Had a great time talking with him and seeing his nice ride (and am jealous about his find for his 300).
He generously gave me these railings for the oil pan. I've never even seen a pair before, let alone had any, so I'm excited about having them!
I spent the next hour or so cleaning all the bolts so I could paint them (tedious!), but I think they'll look great! Thanks again.
So, lots of taping off and painting of parts, and about 45 little bolts to scrub, so my hands are sore.
Very close though....
Lead Driver
Joined: Mar 2008
Posts: 7,182
Likes: 380
From: Near Los Angeles
It looks great, dangerously close to chebby orange, but great nonetheless!
Wow, I guess Clifford stopped selling the v.cover, and, of course, the gasket. Try this:
Felpro Valve Cover Gasket VS50028R - Read Reviews on Felpro #VS50028R
And yes, with the gasket co. saying for a pair. Ha! The V8 explanation never occurred to me. I guess I've been thinking I6 for too long.
Oh, btw, I spied a ZF S542 4X4 behind a 351 in the j/y. The yard wants $187.00.
I found on a 96 that Ford installed a nice little channel bracket that sits between the water neck and v.cover. It was intended to hold some wiring there, but I'm modifying mine to hold the fuel line, and extending it back to the carburetor. It will also protect the line from heat, and look better than routing the line over the v.cover.
Sorry to keep tacking on bits, but I wondered if your t.gear set is Cloyes. If not, and I don't want to scare you, the last set I used that came in a gasket kit, made so much noise I thought I spun a bearing, and had to change them with only 50 miles on the engine. I hope that's not the case with you. Are they Comp?
Thread Starter
|
Moderator
Joined: Dec 2007
Posts: 7,987
Likes: 104
From: Boise, Idaho
Man, I think you need to get your eyes checked. 


I did look at that valve cover gasket, it's the one I have on my current engine.
However, I can't use it. It's one of the few reasons I wished that I had gone with a newer head (I think around 86-ish?). They changed the bolts and valve cover a little bit. The bolts are a bit smaller. As such, the metal rings in that silicone gasket are too small for the older style head valve cover bolts to go through. Maybe there's a way to helicoil the current bolt holes to use the smaller thread bolts? I'd love to use the silicone gasket. I'm curious why FelPro just doesn't make that gasket with two different diameter rings.
That's a nice deal! I'd be mighty tempted to go pull that...
Now you have me nervous...
I believe he just used timing gears from the rebuild kit. I didn't think much of it. But, now that you mention it, I do remember you talking about that issue before. Just a bad set possibly?
I did look at that valve cover gasket, it's the one I have on my current engine.
However, I can't use it. It's one of the few reasons I wished that I had gone with a newer head (I think around 86-ish?). They changed the bolts and valve cover a little bit. The bolts are a bit smaller. As such, the metal rings in that silicone gasket are too small for the older style head valve cover bolts to go through. Maybe there's a way to helicoil the current bolt holes to use the smaller thread bolts? I'd love to use the silicone gasket. I'm curious why FelPro just doesn't make that gasket with two different diameter rings.
Oh, btw, I spied a ZF S542 4X4 behind a 351 in the j/y. The yard wants $187.00.
Sorry to keep tacking on bits, but I wondered if your t.gear set is Cloyes. If not, and I don't want to scare you, the last set I used that came in a gasket kit, made so much noise I thought I spun a bearing, and had to change them with only 50 miles on the engine. I hope that's not the case with you. Are they Comp?
I believe he just used timing gears from the rebuild kit. I didn't think much of it. But, now that you mention it, I do remember you talking about that issue before. Just a bad set possibly?
Lead Driver
Joined: Mar 2008
Posts: 7,182
Likes: 380
From: Near Los Angeles
Lol, oh, touched a nerve, did I? Thanks for the reminder. You're correct. It is a far cry from chebby orange.
I'm sorry to worry you about the t.gears. I'm sure yours will be fine. Mine came in a set from Summit.
I'm sorry to worry you about the t.gears. I'm sure yours will be fine. Mine came in a set from Summit.
Thread Starter
|
Moderator
Joined: Dec 2007
Posts: 7,987
Likes: 104
From: Boise, Idaho
Juuuust setting the record straight. But maybe.
I will have to check what brand the rebuild kit was. I don't recall at the moment, but now I'm curious.
But maybe.I will have to check what brand the rebuild kit was. I don't recall at the moment, but now I'm curious.
FTE Stories
Ford Trucks for Ford Truck Enthusiasts

Top 10 Most Expensive Ford Trucks Ever Sold on Bring a Trailer
Joe Kucinski
2027 Ford Super Duty Buyer's Guide (Every Model, Engine, & Package)
Brett Foote
Top 10 Ford Truck Tragedies
Joe Kucinski
AEV FXL Super Duty - the Super Duty Raptor Ford Doesn't Make
Brett Foote
Lobo Vs Lobo: Proof the F-150 Lobo Should Be Even Lower!
Michael S. Palmer
Ford's 2001 Explorer Sportsman Concept Looks For a New Home
Verdad Gallardo
10 Best Ford Truck Engines We Miss the Most!
Joe Kucinski
2026 Shelby F-150 Off-Road: Better Than a Raptor R?
Brett Foote
2027 Super Duty Carhartt Package First Look: 12 Things You NEED to Know!
Michael S. PalmerThread Starter
|
Moderator
Joined: Dec 2007
Posts: 7,987
Likes: 104
From: Boise, Idaho
So I looked through my build receipts. The timing gears are Sealed Power 2764S gears.
Summit has a generic picture:
https://www.summitracing.com/parts/s...TCDxoCHzvw_wcB
https://www.carid.com/sealed-power/e...Jd4BoCF-jw_wcB
Summit has a generic picture:
https://www.summitracing.com/parts/s...TCDxoCHzvw_wcB
https://www.carid.com/sealed-power/e...Jd4BoCF-jw_wcB
Thread Starter
|
Moderator
Joined: Dec 2007
Posts: 7,987
Likes: 104
From: Boise, Idaho
Well, bummer. Looks like the shortened pushrods from O'Reilly were way too long. I got in a set of twelve 10.080" undersized pushrods in hopes that they'd be right on. However, they were way too long.

So, it looks like I'm going to be looking into some custom length push rods. I need them to be around 10.050".
I read where you can take current pushrods and have a machine shop shorten them, but will have to call around to see if that's more economical than having someone make them from scratch. Open to ideas though.
Lead Driver
Joined: Mar 2008
Posts: 7,182
Likes: 380
From: Near Los Angeles
Oh man, I seem to remember FTF mentioning a source for custom p.rods. I seem to remember Smith Brothers, or Manly ... but I would PM FTF and get the name of the company and order to length. Good luck.
Oh, and when all else fails, Google it!
Manton, Smith Brothers, Crane, and Crower, so says Google!
Oh, and when all else fails, Google it!
Manton, Smith Brothers, Crane, and Crower, so says Google!
Thread Starter
|
Moderator
Joined: Dec 2007
Posts: 7,987
Likes: 104
From: Boise, Idaho
Yeah, he mentioned Trend Performance. I looked them up and if I read their services right, it was about $9 a pushrod. The ones I have are $2.50 a pushrod. So, I'm seeing if maybe I can have them just shortened for $30 or something. Otherwise, I'll have to save up for them.
And done lots and lots of Google searches.
And done lots and lots of Google searches.
Fleet Mechanic
Joined: Nov 2002
Posts: 1,643
Likes: 69
If your current pushrods have pressed-in ends you can probably shorten them. If they are like most OEM Ford pushrods that have inertia welded ends then no, they cannot be easily shortened.
I make my own pushrods from 4130 chrome moly tubing. It requires a lathe, hydraulic press and a proprietary fixture. It takes me several hours to do a set. I think shortening a set would run you more than $30, unless the shop has a system that is way more sophisticated than mine and can do it quickly.
I make my own pushrods from 4130 chrome moly tubing. It requires a lathe, hydraulic press and a proprietary fixture. It takes me several hours to do a set. I think shortening a set would run you more than $30, unless the shop has a system that is way more sophisticated than mine and can do it quickly.
Thread Starter
|
Moderator
Joined: Dec 2007
Posts: 7,987
Likes: 104
From: Boise, Idaho
I am just not having any luck on gaskets. My Remflex 3005 gasket showed up, and whoever packaged it didn't have a box long enough, so they taped another box onto the end of it. However, they gave it a good shove to make sure they were tightly together and folded the gasket in the middle. So, it was full of splits and cracks from being bent.
Back it goes!
So, I'm running into a strange issue and I can't find an answer for it. Still trying to figure out the exact measurement for pushrods. I'm finding that the intake and exhaust are requiring different lengths, with the exhaust wanting a longer rod than the intake.
The strange thing is, I can't find anything that would cause this discrepancy. The valve lift on the cam is 0.504" on both intake/exhaust. S.I. Valves lists the same length on both int/exh valves.
What would make a difference?
IF this is the case though, it's looking that the exhaust may get away with using the stock undersized 10.080" push rods, but the intake is looking to be a bit shorter.
Thoughts? The different lengths is confusing me.
Thread Starter
|
Moderator
Joined: Dec 2007
Posts: 7,987
Likes: 104
From: Boise, Idaho
I spoke with my machinist about the issue and he said that stamped rocker arms have a lot more forgiveness than roller rocker arms. Roller rockers have to be very precise, whereas stamped just have to be in the general area (which is why most automotive manufacturer's use them). So, I'll check them again with the undersized ones from O'Reilly this evening.