


Engine Rebuild Part 2
Thread Starter
|
Moderator


Joined: Dec 2007
Posts: 7,987
Likes: 104
From: Boise, Idaho

I now have all my paint and started in on the prep work.
Due to how long this build has taken (started it March 2016) the block had a bit of surface rust on it. I sprayed it down with some degreaser and then spent about 30 minutes or more with a wire attachment for my drill.

It worked really well. Definitely glad I did. I had that lazy "it'll be fine" moment, but once I started, there was a good amount of rust dust filling the air.


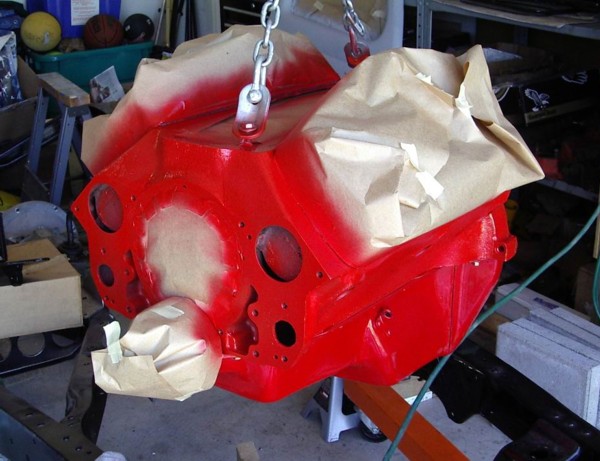
A base coat to get it started.

After the base coat dries, I'll spray it down with the red, and then do the other side.
I also got the head prepped a bit, but no paint yet.


I need to get some spark plugs to plug the holes so I can paint that side too.

Due to how long this build has taken (started it March 2016) the block had a bit of surface rust on it. I sprayed it down with some degreaser and then spent about 30 minutes or more with a wire attachment for my drill.
It worked really well. Definitely glad I did. I had that lazy "it'll be fine" moment, but once I started, there was a good amount of rust dust filling the air.
A base coat to get it started.
After the base coat dries, I'll spray it down with the red, and then do the other side.
I also got the head prepped a bit, but no paint yet.
I need to get some spark plugs to plug the holes so I can paint that side too.
Thread Starter
|
Moderator
Joined: Dec 2007
Posts: 7,987
Likes: 104
From: Boise, Idaho
My phone camera did terrible justice to just how nice the red looks, but the block is painted a nice Ford Red. Next, I need to get some spark plugs so I can block up the head and paint it. Then, assembly!


I put vaseline over the freeze plugs, so once it dries, I'll clean those off.
I put vaseline over the freeze plugs, so once it dries, I'll clean those off.
Lead Driver
Joined: Mar 2008
Posts: 7,182
Likes: 381
From: Near Los Angeles
Lol, I'm laughing because of my remark in the PM, where I mentioned the pink that the engine appeared to be, would make onlookers wonder what side of the fence you were on, made you clarify by quickly posting another photo of the red the engine really is.
Lol, "I just want to set something straight ..."
Lol, "I just want to set something straight ..."
Thread Starter
|
Moderator
Joined: Dec 2007
Posts: 7,987
Likes: 104
From: Boise, Idaho
Haha, well, you're not the only one. My brothers had some interesting comments on my "pink" engine.
I'm going to have to go out and snap some much better pictures to replace the ones above.
On a side note, does anyone know the thread pitch on our spark plugs? I'd like to get some cheapie bolts to use instead of going and getting actual spark plugs.
I'm going to have to go out and snap some much better pictures to replace the ones above.
On a side note, does anyone know the thread pitch on our spark plugs? I'd like to get some cheapie bolts to use instead of going and getting actual spark plugs.

Lead Driver
Joined: Jul 2009
Posts: 6,477
Likes: 19
From: Sheffield, AL
Haha, well, you're not the only one. My brothers had some interesting comments on my "pink" engine.
I'm going to have to go out and snap some much better pictures to replace the ones above.
On a side note, does anyone know the thread pitch on our spark plugs? I'd like to get some cheapie bolts to use instead of going and getting actual spark plugs.
I'm going to have to go out and snap some much better pictures to replace the ones above.
On a side note, does anyone know the thread pitch on our spark plugs? I'd like to get some cheapie bolts to use instead of going and getting actual spark plugs.
Spark plugs are probably just as cheap! Especially if just the regular ones [non-platinum].

Autolite Copper Core 45 - Spark Plug | O'Reilly Auto Parts
Thread Starter
|
Moderator
Joined: Dec 2007
Posts: 7,987
Likes: 104
From: Boise, Idaho
I thought about that. But I have a place to get some pretty inexpensive hardware. Could probably get a set of 6 bolts that would fit the holes for the same as one or two spark plugs.
Lead Driver
Joined: Jul 2009
Posts: 6,477
Likes: 19
From: Sheffield, AL
Additional Details
- Center Electrode Design: Standard/Regular
- Ground Electrode Tip Material: Copper
- Hex Size (In): 13/16 Inch
- Hex Size (mm): 21mm
- Insulator Type: Projected
- Resistor Plug: Yes
- Seat: Tapered
- Thread Size: M18-1.50
- Thread Reach (In): 0.468 Inch
- Insulator Material: Ceramic
- Center Electrode Core Material: Copper
- Center Electrode Tip Material: Copper
FTE Stories
Ford Trucks for Ford Truck Enthusiasts

10 Things Every Truck Owner NEEDS (2026 Edition)
Michael S. Palmer
Rezvani's Latest Post-Apocalyptic Monster Is a Ford F-150 Raptor Underneath
Verdad Gallardo
Top 10 Most Expensive Ford Trucks Ever Sold on Bring a Trailer
Joe Kucinski
2027 Ford Super Duty Buyer's Guide (Every Model, Engine, & Package)
Brett Foote
Top 10 Ford Truck Tragedies
Joe Kucinski
AEV FXL Super Duty - the Super Duty Raptor Ford Doesn't Make
Brett Foote
Lobo Vs Lobo: Proof the F-150 Lobo Should Be Even Lower!
Michael S. Palmer
Ford's 2001 Explorer Sportsman Concept Looks For a New Home
Verdad Gallardo
10 Best Ford Truck Engines We Miss the Most!
Joe KucinskiThread Starter
|
Moderator
Joined: Dec 2007
Posts: 7,987
Likes: 104
From: Boise, Idaho
Got some more painting done last night.
Put another coat on the block, and then finished up the head. (Now time to bolt them together!)
I wasn't able to find bolts big enough to fill the spark plug holes, but while I was at the store, I found something even better.

Plus, they were about 35 cents a pop. Can't argue with that.

One thing that I found that was a nice perk of ordering parts for your engine online is that all the boxes have to be long enough for the parts, which makes them long enough for the engine. They made for a great splash guard.

Laid down a base coat and then painted. These pictures also do a MUCH better job of capturing the red I used, even though they're still not quite there. The fluorescent lights really screw with the photos.


I'm planning to pull all the tape off and bolt it together, as well as put on the oil pan this weekend. Then, I can measure for pushrods and get the valve train done.
Put another coat on the block, and then finished up the head. (Now time to bolt them together!)
I wasn't able to find bolts big enough to fill the spark plug holes, but while I was at the store, I found something even better.
Plus, they were about 35 cents a pop. Can't argue with that.
One thing that I found that was a nice perk of ordering parts for your engine online is that all the boxes have to be long enough for the parts, which makes them long enough for the engine.
They made for a great splash guard.Laid down a base coat and then painted. These pictures also do a MUCH better job of capturing the red I used, even though they're still not quite there. The fluorescent lights really screw with the photos.
I'm planning to pull all the tape off and bolt it together, as well as put on the oil pan this weekend. Then, I can measure for pushrods and get the valve train done.

Lead Driver
Joined: Mar 2008
Posts: 7,182
Likes: 381
From: Near Los Angeles
Is that Alice Cooper's signature on the lower left?
Ha ha. Hate the color, but that's okay.
I would use studs for the fuel pump mount, run a braided line from pump to carb, and allow the engine to utilize all the mods you paid for by ditching those efi manifolds and using headers, and top it with a good looking v. cover.
Ha ha. Hate the color, but that's okay.
I would use studs for the fuel pump mount, run a braided line from pump to carb, and allow the engine to utilize all the mods you paid for by ditching those efi manifolds and using headers, and top it with a good looking v. cover.
Thread Starter
|
Moderator
Joined: Dec 2007
Posts: 7,987
Likes: 104
From: Boise, Idaho
I like the idea of studs for the fuel pump. And I'm goin gto throw away all the vacuum and fuel lines and start them over from scratch. Some braided fuel line would be nice to get and use.
So, I think I actually got pictures that captured the darn color. It was sunny out today so I was able to open the garage door while I was working.
Got the ARP head studs installed. They were really nice to work with. They had a hex wrench fitting on the top for easy installation, and then came with fastener lubricant to help them turn easier. Their torque spec is 80 ft/lbs instead of the stock 85 ft/lbs, which I thought was interesting.


Here is the Fel Pro 1024 gasket.
Here's the more generic Fel Pro 8168 that came with the rebuild kit.


The last time I'll see the chambers on the head in a while. (At least it better be!)


The ARP head studs / nuts.


Installed the oil pump and screen.


Set the oil pan in place to get a look at the color combo I have picked out (red and black).

I like it.
Next is to borrow the solid lifter from my machinist so I can measure push rod length. Also going to bring him all my covers and get them sand blasted so I can paint them. I'd love a nicer valve cover, but Clifford is about the only one who makes one, and they charge a pretty penny for them, so, stock it is.
So, I think I actually got pictures that captured the darn color. It was sunny out today so I was able to open the garage door while I was working.
Got the ARP head studs installed. They were really nice to work with. They had a hex wrench fitting on the top for easy installation, and then came with fastener lubricant to help them turn easier. Their torque spec is 80 ft/lbs instead of the stock 85 ft/lbs, which I thought was interesting.
Here is the Fel Pro 1024 gasket.
Here's the more generic Fel Pro 8168 that came with the rebuild kit.
The last time I'll see the chambers on the head in a while. (At least it better be!)
The ARP head studs / nuts.
Installed the oil pump and screen.
Set the oil pan in place to get a look at the color combo I have picked out (red and black).
I like it.
Next is to borrow the solid lifter from my machinist so I can measure push rod length. Also going to bring him all my covers and get them sand blasted so I can paint them. I'd love a nicer valve cover, but Clifford is about the only one who makes one, and they charge a pretty penny for them, so, stock it is.
Lead Driver
Joined: Mar 2008
Posts: 7,182
Likes: 381
From: Near Los Angeles
Wow, you are right. It looks so different in the light. Quite a change. I might even have to stop razzing you about it. Ha ha.
All joking aside, it looks great. What a beauty. What a shame you had to install that head. I just love every photo you took of it and the chambers.
Eighty pounds torque on the head studs? I don't recall torquing mine, but it's been years since installation. Nice work. I do remember being told that studs torqued different than bolts, applying more torque, so maybe that is why the different amount of torque. Guess.
Quite an engine.