


Dad's Engine
Thread Starter
|
FTE Legend


Joined: Jul 2010
Posts: 32,875
Likes: 48
From: Northeast, OK
I'd vote for the 400-4V HO if there's space. Next would be 400 HO or 400HO or 400H.O. as that is a takeoff of another Ford decal and engine, but just enough different that only those "in the know" would catch it. But the 400-4V would be essentially the same since Ford didn't quite do that one either.
If you find some place, how 'bout asking if they do one-off's like the "6.6 Liter 4V H.O." in black? And, if/when the Jim Osborne folk get back with me I'll ask similar questions of them.
If you find some place, how 'bout asking if they do one-off's like the "6.6 Liter 4V H.O." in black? And, if/when the Jim Osborne folk get back with me I'll ask similar questions of them.
Thread Starter
|
FTE Legend
Joined: Jul 2010
Posts: 32,875
Likes: 48
From: Northeast, OK
I spoke to the folks at Jim Osborne Reproductions and found this on the 400-4V:
- Custom:
- They are licensed by Ford and probably cannot do that.
- But, I should call back in about 2 weeks to talk to David as he's at Spring Carlysle right now.
- However, if they were to do it it'd probably cost $400 - 500 for a set of 500 of them.
- Do It Yourself: Why not scan in an original, modify it in Photoshop, and take it to someplace and have them print it on Crack & Peel vinyl?
Thread Starter
|
FTE Legend
Joined: Jul 2010
Posts: 32,875
Likes: 48
From: Northeast, OK
Defugalty
I ran into a defugalty with the aluminum heads today. (That's one of Dad's favorite words, so I thought it appropriate here.)
I wanted to mount an alternator on the mock engine, so rounded up the bracket:

It wasn't exactly what I remembered but it has my notes on it on the masking tape. Anyway here's the number, which shows it didn't come from one of these trucks. Ahhh! Now I remember! It was on Rusty and when I "rebuilt" Rusty's engine to put in Dad's truck I swapped brackets as I liked the original style better.

Here's how it mounts to a stock head, with the top bolt being the one that holds the alternator to the bracket:

And, here's where it would want to mount on the Trick Flows - the yellow circles. Does anyone see a problem?

Yeah, that was the back of the engine. Here's the front, and the arrows show where the bolts should go. Turns out the TF's aren't drilled and tapped the same on both ends. So, w/o drilling and tapping new holes, you cannot run this bracket. But, the other side is drilled and tapped for power steering and/or air conditioning.

So, what to do? I'll swap this bracket back from whence it came (Rusty) and put that bracket on Dad's. In fact, here's a shot of that bracket on Rusty. The red arrow shows a hole in the stock head that's completely missing on the TF's, while the yellow arrow to the top right points to where the only hole is that is drilled and tapped on the TF's. And that arrow as well as the other yellow arrow shows the remains of the original mount that was on Dad's after I cut the goal posts off.

I wanted to mount an alternator on the mock engine, so rounded up the bracket:
It wasn't exactly what I remembered but it has my notes on it on the masking tape. Anyway here's the number, which shows it didn't come from one of these trucks. Ahhh! Now I remember! It was on Rusty and when I "rebuilt" Rusty's engine to put in Dad's truck I swapped brackets as I liked the original style better.
Here's how it mounts to a stock head, with the top bolt being the one that holds the alternator to the bracket:
And, here's where it would want to mount on the Trick Flows - the yellow circles. Does anyone see a problem?
Yeah, that was the back of the engine. Here's the front, and the arrows show where the bolts should go. Turns out the TF's aren't drilled and tapped the same on both ends. So, w/o drilling and tapping new holes, you cannot run this bracket. But, the other side is drilled and tapped for power steering and/or air conditioning.
So, what to do? I'll swap this bracket back from whence it came (Rusty) and put that bracket on Dad's. In fact, here's a shot of that bracket on Rusty. The red arrow shows a hole in the stock head that's completely missing on the TF's, while the yellow arrow to the top right points to where the only hole is that is drilled and tapped on the TF's. And that arrow as well as the other yellow arrow shows the remains of the original mount that was on Dad's after I cut the goal posts off.
Post Fiend
Joined: Dec 2007
Posts: 8,521
Likes: 16
From: Lost
Standard EFI has an O2 sensor that will read extra O2, and *think* the system is running lean, therefore richen it up a bit. Lower MPG results.....
Flex-fuel systems have a sensor that can read the ethanol content, and adjust mixture to match, but it still takes a bit more ethanol to do the same job as gasoline, so lower MPG results.
A carb doesn't know the difference, and just adds X amount of fuel at Y airflow/air speed. MPG *shouldn't* be affected, but there is a slight loss of power, so the pedal tends to get depressed a bit more, and lower MPG results......
That, and the federal subsidy that makes ethanol artificially cheaper than gas, rather than more expensive like it *actually* is, adds up to a net loss any way you look at it. Sure, it does help with lower emissions, in the lab. In the real world, not so much......
I will continue to buy as ethanol free fuel as I can, for as long as I can. Of course, my F150 will not be burning any gas in the near future, but should be plenty able to run on pure veggies......
Elder User
Joined: Sep 2013
Posts: 551
Likes: 0
How much clearance is there on the back side Gary? If you have an inch or so I'll give you an option.
Bore out the threads to match the blank hole, make a shouldered "pin" with flats on the head in the lathe that goes through from the front and is about 1/8 inch short of going all the way through the back tab of the bracket. Have the pin drilled and tapped to accept a short grade 8 bolt from the rear to pull it up tight.
It's only needed to pull up any slack and doesn't hold the force of the tension, the shear strength won't be affected.
For the label, 400's are rare here, we just have 351 clevos or small stroked variants, so don't think you need to accommodate us -but thanks for caring
You can get printing done on thick foil stickers, you can then write on them in ballpoint pen with a little bit of force and it leaves a nice permanent impression.
Kind of like the the blueprint engines from AMG or Ford with the GT40 , here's its badge Page 3
Moderator


Joined: Nov 2007
Posts: 22,415
Likes: 92
From: Denver Metro Area, CO

Right, MPG and power decrease a bit, I don't deny that and never did. But the claims I see out here of it rotting out one's gasoline tank, seizing the carb, etc. are pure hogwash.
FTE Stories
Ford Trucks for Ford Truck Enthusiasts

10 Best Ford Truck Engines We Miss the Most!
Joe Kucinski
2026 Shelby F-150 Off-Road: Better Than a Raptor R?
Brett Foote
2027 Super Duty Carhartt Package First Look: 12 Things You NEED to Know!
Michael S. Palmer
10 Most Surprising 2026 Ford Truck Features!
Joe Kucinski
Top 10 Ford Trucks Coming to Mecum Indy 2026
Brett Foote
5 Best / 5 Worst Ford Truck Wheels of All Time
Joe Kucinski
Ford Super Duty: 5 Things Owners LOVE, 5 Things They LOATHE!
Joe Kucinski
Every 2026 Ford Truck Engine RANKED from WORST to FIRST!
Michael S. Palmer
The Best F-150 Deal of Every Trim Level (XL through Raptor)
Joe KucinskiThread Starter
|
FTE Legend
Joined: Jul 2010
Posts: 32,875
Likes: 48
From: Northeast, OK
RW - A new study came out a day or two ago showing that the net effect of ethanol from crop stubble is more pollution than gasoline. Obviously certain contingents are crying foul, but this one was from an unbiased group that pointed out how previous studies have been biased.
Brad - Thanks for the idea, but it will be easier and more correct to use the modified original bracket and put this one back on Rusty. And, I think it looks good as well w/o the goal posts for the air pump.
Brad - Thanks for the idea, but it will be easier and more correct to use the modified original bracket and put this one back on Rusty. And, I think it looks good as well w/o the goal posts for the air pump.
Post Fiend
Joined: Dec 2007
Posts: 8,521
Likes: 16
From: Lost
And, it certainly causes a lot more issues in any vehicle that is left parked for a long period of time. Pure gasoline also causes it's share of issues under these conditions, but ethanol adds more problems, and accelerates the timeframe in which they occur......
RW - A new study came out a day or two ago showing that the net effect of ethanol from crop stubble is more pollution than gasoline. Obviously certain contingents are crying foul, but this one was from an unbiased group that pointed out how previous studies have been biased.
Thread Starter
|
FTE Legend
Joined: Jul 2010
Posts: 32,875
Likes: 48
From: Northeast, OK
Got the NOS DS-II module in from reamer today. Thanks, Ron!
I put a piece of tape over the # and around the wires and blasted it with glass beads at 60 psi to give a consistent natural aluminum look. And then I coated it with acrylic satin clear.
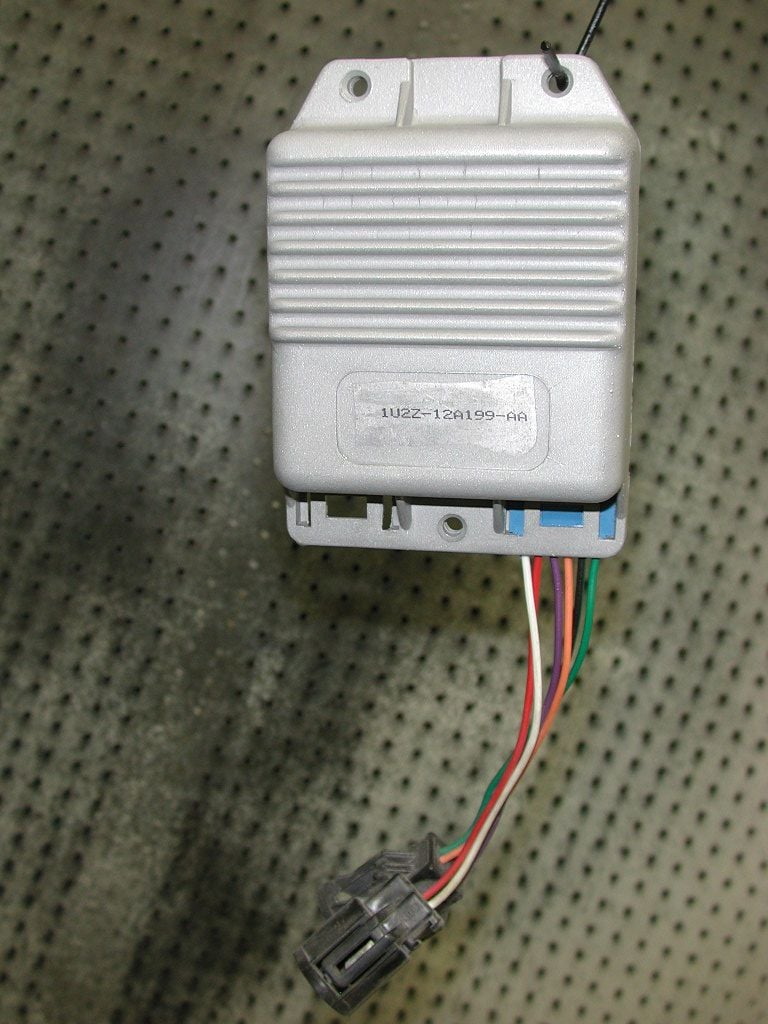
Later I'll cover the # with one of these from Osborne Reproductions. Granted it says it is for a 1983 module, but the catalog says that the same module (D9VZ 12A199-A) was used from 80 - 83 on the non C/A & non-high altitude models. So if it is right for 83 it should be right for 81.

I put a piece of tape over the # and around the wires and blasted it with glass beads at 60 psi to give a consistent natural aluminum look. And then I coated it with acrylic satin clear.
Later I'll cover the # with one of these from Osborne Reproductions. Granted it says it is for a 1983 module, but the catalog says that the same module (D9VZ 12A199-A) was used from 80 - 83 on the non C/A & non-high altitude models. So if it is right for 83 it should be right for 81.
Thread Starter
|
FTE Legend
Joined: Jul 2010
Posts: 32,875
Likes: 48
From: Northeast, OK
Jeremy - Interesting.
All - Went up to see Dad today, so didn't have much shop time. But I did play with some belt tensioning ideas. But first, let me remind your "little gray cells". I'm going with a 130 amp 3G alternator and what I've read says 95 amps is about all you'll get out of a single v-belt. So, I want to go to two belts and use the A/C belt in that role. But, just running the belt from the compressor to the alternator gives little wrap on the compressor and makes a very long span. Brad suggested using an idler to get more wrap on the compressor and shorten the distance.
The first shot shows the spring-loaded automagic tensioner that Bill sent me. Unfortunately I don't think it'll work as it seems to move in the wrong direction - unless I'm missing something. In this shot it is in its quiescent position, which is fully clockwise. But, I need it to move in the direction of the arrow under spring tension.

So, what about the original idler pulley? Here's a shot of it where it would need to be to get the wrap on the compressor, and the clamp bolt is still in the slot at the back. The yellow arrow shows about where it normally rides, and the red arrow shows how the lower lip of the bracket gets closer to the slot - which will be explained in the next pic.

Ok, here's the issue - the bolt/shaft that the pulley rides on protrudes through the idler arm, as shown by the left arrow. And, by protruding it won't let the idler lay flat on the bracket except in that range where the bolt goes below the bracket. But, it could easily be shortened to be flush. Granted, when the idler is replaced in the future that step would have to be done on the new one, but so much else on this truck will be similar so not to worry.
The other problem is that this has a v-pulley and the back of the belt is NOT going to want to ride in there w/o twisting. So, why not put the idler wheel from the automatic tensioner on this one in place of the pulley? Both are mounted on bearings, so that shouldn't be a big issue. Right?

Bottom Line: As usual, I think I've been over-thinking this. Please tell me if you think this will work or not, and why not if not.
All - Went up to see Dad today, so didn't have much shop time. But I did play with some belt tensioning ideas. But first, let me remind your "little gray cells". I'm going with a 130 amp 3G alternator and what I've read says 95 amps is about all you'll get out of a single v-belt. So, I want to go to two belts and use the A/C belt in that role. But, just running the belt from the compressor to the alternator gives little wrap on the compressor and makes a very long span. Brad suggested using an idler to get more wrap on the compressor and shorten the distance.
The first shot shows the spring-loaded automagic tensioner that Bill sent me. Unfortunately I don't think it'll work as it seems to move in the wrong direction - unless I'm missing something. In this shot it is in its quiescent position, which is fully clockwise. But, I need it to move in the direction of the arrow under spring tension.
So, what about the original idler pulley? Here's a shot of it where it would need to be to get the wrap on the compressor, and the clamp bolt is still in the slot at the back. The yellow arrow shows about where it normally rides, and the red arrow shows how the lower lip of the bracket gets closer to the slot - which will be explained in the next pic.
Ok, here's the issue - the bolt/shaft that the pulley rides on protrudes through the idler arm, as shown by the left arrow. And, by protruding it won't let the idler lay flat on the bracket except in that range where the bolt goes below the bracket. But, it could easily be shortened to be flush. Granted, when the idler is replaced in the future that step would have to be done on the new one, but so much else on this truck will be similar so not to worry.
The other problem is that this has a v-pulley and the back of the belt is NOT going to want to ride in there w/o twisting. So, why not put the idler wheel from the automatic tensioner on this one in place of the pulley? Both are mounted on bearings, so that shouldn't be a big issue. Right?
Bottom Line: As usual, I think I've been over-thinking this. Please tell me if you think this will work or not, and why not if not.
Old School Hot Rodder

Joined: Feb 2006
Posts: 6,472
Likes: 11
From: Exmore, VA

You probably are overthinking it. First item, you apparently didn't remember which way that tensioner sits on the 460. It sits inboard of the A/C compressor with the pulley pointing toward the accessories so it pushes down on the belt. If you can switch the flat pulley for a Vee belt one and use it where the original idler sat, it will become an automatic tensioner.
Second item, with a larger, higher output alternator, you can run a bigger pulley which will reduce the force needed to turn it. I did that after burning up two polygroove belts on Darth, I switched from the small diameter pulley that the 1990 F-250 used on the 65 amp 2G alternator to a pulley from a 3.8L Taurus, no more squealing burned up belts.
Third item, look at the system the 460s used, the alternator through 1987 was low mounted and driven by a dedicated belt directly from the crank pulley. Other option would be to copy Mopar and use dual alternator/water pump belts sort of like the 460s did for the power steering pump.
Thread Starter
|
FTE Legend
Joined: Jul 2010
Posts: 32,875
Likes: 48
From: Northeast, OK
Bill - Thanks. Yes, I'd forgotten how the tensioner mounted on a 460. Looks like this one won't work, but the pulley might well. However, I think I'll take your tensioner into O'Reilly's and see if they have it's mirror image. Ron, the manager, might know.
On the pulley, I'll remember the larger pulley idea. But, I'm going to have to take into consideration the new-to-be crank pulley. Remember that the M/400's stock pulley's two front grooves are different sizes. So I have to junkyarding to do as I know the small-blocks had a pulley that has same-sized grooves. But, they'll be a different diameter than the existing grooves, so that'll mean the ratio will already be different. I'll have some math to do.
On the third point, I may be missing something. My alternator mounts low like the 460's since the AIR pump originally went above it, and the alternator does have a dedicated belt. The one shared with the A/C will be additional but it'll be much longer. So I can't do the dual belts.