When you click on links to various merchants on this site and make a purchase, this can result in this site earning a commission. Affiliate programs and affiliations include, but are not limited to, the eBay Partner Network.
That didn't look like a Y-Block that you pulled out; was that a 335 series? Are you rebuilding that one, or going back to a 292?
Unfortunately I do not have any 292's left but it has a 302 my dad was starting a conversion. I know. The 302 is so standard its boring but I did spice it up with 289 heads, 11:1 compression etc...
At least it wont be milk-crate boring. It was intended to be a race motor and I have it onhand for my build. My apologies to the purists in the crowd (I am kind of excited about the higher HP, RPM range and power to weight ratio though).
[QUOTE=Red60;19074220 My apologies to the purists in the crowd[/QUOTE]
Hey, it is a Ford in a Ford. Using what you have is always cool. Now tearing apart a totally fine truck to make it "different", but the same as other darksiders, that is where I would take exception. While I appreciate the work and effort and art it takes to make a custom, not my cup of tea. But hey, that is why they make both chocolate and vanilla! Enjoy your own truck your own way.
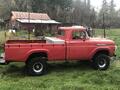
Not making much progress, bogged down with the rear shocks not matching whats offered for 1960 F250! I need longer shocks than what the parts guys come up with. They suspect due to a lift but I don’t see spacers or evidence of aftermarket lift kit. Spent an hour looking in their book to find a setup to match my configuration... praying the KYB’s ordered work as intended. Specs:
perch to bolt on my truck no load is 19.5”
top is 3/8” stud
bottom is eye loop 5/8” bore 1.25” wide
BMC
Front brakes & shocks done Passengers side Rear shock lower mount bushing still stuck on 1.25” shoulder 0.625” OD
Last edited by Red60; Jan 24, 2020 at 07:26 PM.
Reason: Forgot pics
Testing the gages shows they work fine. Book says 3vdc approximately full scale and yessir! Small victories but more in rear view Fuel gage is most valuable. At least the indicator itself checks out as operational. A picture of my test apparatus Not sure but maybe I will use the factory temperature indicator. I did buy a triple gage set...
Does anyone know why the drake drums have 3 bolts holding it to the axle/spindle? I have had to heat and impact driver them to remove. Big pain and am considering deleting them but want to know why they are used before I make that decision. Anyone know? Or even more important, what is the issue with leaving them off?
BMC Three flathead countersunk bolts hold drum to axles. Why are these needed?
Testing the gages shows they work fine. Book says 3vdc approximately full scale and yessir! Small victories but more in rear view Fuel gage is most valuable. At least the indicator itself checks out as operational. A picture of my test apparatus Not sure but maybe I will use the factory temperature indicator. I did buy a triple gage set...
BMC
I see it looks kind of rough on the back of the speedo. When I redid mine, I neglected to keep/find the little red plastic lens that goes over the high beam indicator light. Without it, that little lite would be quite annoying shinning in my eyes. It took me a while to find something the right thickness to replace it with but sure am glad I did! I think I used a piece of broken tail light lens and taped it in place.
I see it looks kind of rough on the back of the speedo. When I redid mine, I neglected to keep/find the little red plastic lens that goes over the high beam indicator light. Without it, that little lite would be quite annoying shinning in my eyes. It took me a while to find something the right thickness to replace it with but sure am glad I did! I think I used a piece of broken tail light lens and taped it in place.
Thanks for the tip. The highbeam slot is covered
. The instrument cluster is getting a cleanup and overhaul
Nice to work on Cardboard shields (standard issue) I dont need the idiot lights anymore but will retain them un the absence of a better use of the hole... Real glass real metal Cleaned up respectable. Leaving the original paint
Next week I'm into wiring verification. This part is hardest for me because I’m partially color blind. I also dislike standing on my head trying to see where it disappears and reappears. My beautiful bride helps me (1hr intervals) find the correct colors as they travel through the firewall/harness/pillars etc so thats a bonus. Taking lots of pics but not sure they would be intelligible posted here...
Pics of the drivers rear... looks like I am replacing the rear bearings while it’s open! They show wear and some small scoring so I would regret having to go back later. Looks like the seal is leaking on everything. Brake pads are soaked. Manual adjust only Axle next
Im spending plenty of time cleaning and fixing bullet connectors. I decided to replace all the electrical switches a since they look pretty used and corroded. For example the whole back of the ignition switch fell off the metal section connected to the dash! The light switch interior light dimmer ceramic was broken and the dimmer switch frozen solid. I need to figure out if I can replace or rebuild my two speed heater switch (recirculating style). Does anyone have a DIY to repair the stock switch? Reason I ask is LMC does not carry the 1959-1960 heater switch (but does the 61-63 lever style go figure). I also struck out on ebay. Did anyone cross this bridge without putting an aftermarket two speed switch under the dash??? PLEASE HELP!
Can't help with switch but welcome to the club. These series trucks are the least popular so many specific parts not produced by aftermarket vendors. LMC is great but according to their catalog there are no 350's or larger. I have to hope my parts are same as the 150 and 250. Or get ford numbers before ordering.
This Hennessey Takes the Expedition Tremor's Off-Roading Capability to the Next Level
Slideshow: The VelociRaptor Expedition gains a lift, upgraded suspension, Brembo brakes, and trail-ready equipment while retaining the stock 440-horsepower EcoBoost V6.
Rezvani's Latest Post-Apocalyptic Monster Is a Ford F-150 Raptor Underneath
Slideshow: Called the Fortress, the 850-horsepower pickup combines Raptor underpinnings with military-inspired features, survival equipment, and a starting price of $285,000.