


Project TGM
Fleet Mechanic

Joined: Dec 2006
Posts: 1,925
Likes: 10
From: Phoenix, AZ
Oh I love new tools! How much was the impact wrench? And is that air or electric powered? I think they would come in super handy, but then again, it's not easy to fit in all the places I may need it. I always use a metal pipe as a pry bar I put around my wrenches and it has come in super handy, however I would like to upgrade now!
Anyways good luck with when you start it. You should probably get it done tomorrow so we can all see the pictures and walk-through you are going to post .
.
Anyways good luck with when you start it. You should probably get it done tomorrow so we can all see the pictures and walk-through you are going to post
.
Thread Starter
|
Post Fiend
Joined: Nov 2011
Posts: 8,908
Likes: 1
From: Algona, Washington
Hehe thanks Bubba, it was $75 before tax and it is pneumatic. I wouldn't trust electric ones, it seems like they would wear out too quickly. I also tend to use an old floor jack handle and a wrench in those tough situations and i plan to continue doing that even with an impact gun. It's easier than firing up the compressor and dealing with the hose when i can already have the nut loosened by then.
I plan to start tomorrow after i make my last run to Autozone to get my last lugnut. I had a bad egg and it was too small. That should be pretty early in the morning then i got all day to fart around with the hubs. I doubt it will happen but, i hope to have both done before tomorrow. There is a mustang picnic thing my parents are going to with their mustang and i want to drive TGM out there. It's makes for a good support vehicle.
I plan to start tomorrow after i make my last run to Autozone to get my last lugnut. I had a bad egg and it was too small. That should be pretty early in the morning then i got all day to fart around with the hubs. I doubt it will happen but, i hope to have both done before tomorrow. There is a mustang picnic thing my parents are going to with their mustang and i want to drive TGM out there. It's makes for a good support vehicle.
Thread Starter
|
Post Fiend
Joined: Nov 2011
Posts: 8,908
Likes: 1
From: Algona, Washington
Alrighty well, i would like to say that i am halfway through the first side. I have the old disc brake off, the studs banged out (i used a claw hammer and it worked fine) and the hub separated from the disc. So far the hardest part was getting those dirty rotten Allen head bolts out.. I damn near stripped most of them. I also didn't think about buying that special tool that Ford has to get the inner nut off. Luckily my neighbor had one he is letting me borrow. Now i have to get the bearing stuff out. I got the outermost out but the race is stuck in there, and the inner one i have no clue on how to remove.
At the moment i am taking a lunch break, i am on this 500 calorie diet thing so if i don't eat i start to get kinda dizzy... After lunch though i plan to continue fiddling with it till i figure out how the bearings come out.
As for the hubs, i guess they are an earlier model than normal ones cause there is a gear type thing that is attached with 4 springs to the inside of the hub. Hard to explain but the pics will show it.
Till then see ya.
Post Fiend
Joined: Sep 2006
Posts: 14,325
Likes: 14
From: Island Southeast Alaska
Yer doin just fine Dylan. Just go slow and remember how it came apart. Sometimes the inner race and seal is hard to get off. I have had luck smashing on them with a soft hammer. NOT a claw hammer as it is to hard and a piece will fly into yer eye or hand. I know this well my friend. Please borrow a soft hammer from yer friend. I have even cut them off with a torch. But hitting them hard seems to swell them than a dent puller with a J hook bangs them right off. Is yer tool box growing yet? Ya just can't have to many tools (or friends with tools). That goes for Guns, Trucks, Cars and girl friends as well to name a few . Just don't over tighten the spindle nut when ya put it back together. Better to be a little loose than a tad to tight. If to tight the brg gets hot than the grease runs out and a very sad day happens.
 Wish I was there to help. I have done this so many times I can see the whole thing in my head. I am coming down there soon (before the snow, November at the latest) And would very much like to meet up with ya.
. Just don't over tighten the spindle nut when ya put it back together. Better to be a little loose than a tad to tight. If to tight the brg gets hot than the grease runs out and a very sad day happens. Wish I was there to help. I have done this so many times I can see the whole thing in my head. I am coming down there soon (before the snow, November at the latest) And would very much like to meet up with ya.
Thread Starter
|
Post Fiend
Joined: Nov 2011
Posts: 8,908
Likes: 1
From: Algona, Washington
Thanks Rich, come november i will have to make a meet and greet int he wafte chapter. I tried to set up weekly ones but that proved to be too difficult with the distance of driving.
Anywho, guess who has 2 thumbs and 1 new set of passenger side studs... This guy! One side down, one to go. Boy was it a long day though... Oh and Rich, i FINALLY understand with you were talking about with packing bearings. It only take pulling the hub apart twice to get it right eh? I had everything done and was going to start putting the locking mech back together but my neighbor stopped me. He asked if i packed the bearings and i said yes, and he asked how i did it so i showed him. Then he told me i did it wrong so i had to pull the whole disc and hub back off, pull the bearings and he showed me how to pack them. Pretty much the way you described. THEN, i seem to recall SOMEONE telling me that if the old bearing races were un damaged that they would stay in. Whoever that was was incorrect, sorry no dice. I had to hammer out the old races and hammer in the new ones.
How i did it was using a long flat tip and a claw hammer. I tapped it in 4 spots until it fell out. Then i put the new races in and stacked the old one in top of that and used the same hammer and a soft aluminum punch looking thing to tap the new ones in nice and snug. Everything worked out ok. Then i tightened the spindle nuts, and fought with that stupid spacer to get it lined up with the peg, then tightened the other one. My only concern now is it seems to be kind of difficult to rotate the tire. It has no slack in it and with the caliper off it seems to be hard to turn BUT my neighbor looked online and said the outter spindle nut has to be torqued to 175 ftlbs or around there. I probably got it to 130 maybe, the tool kept slipping. I don't know if it is too tight or if it is correct. With the brake pads on it makes it that much harder to spin.
Anyways onto the pics. I don't know how many i can post to 1 thread and i have 27 of them so i will break it up into multiple posts.
Here is the stuff before i started

Dirty old hub and disc with the stupid broken studs

Ok so, though it was unconventional how i got the stubborn allen bolts off was with the allen wrench, then i tapped them a bit with a hammer to help get deeper

Then i used a pair of channel locks to get the leverage to loosen them. Sure there are easier ways but this is what i had, and i couldn't think of a better way.

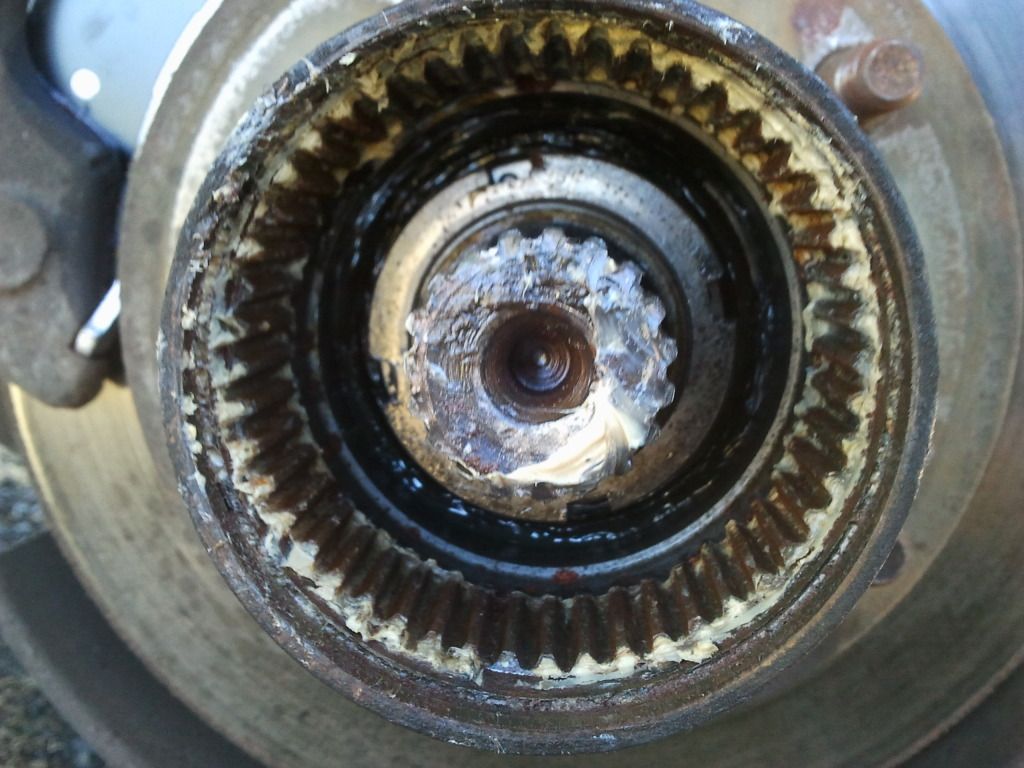
After getting the little suckers out, my hub came out in 2 parts. The lock and the other piece that i don't know the name to

I found it odd that the gear was attached to the lock on the hub... I was hoping to have it come apart to paint it but it was too much of a hassel so i left it as it is.

Here is that part i don't know the name to, we will call it "that greasy thing"

Here is the spindle and his nuts. Pain in the **** to deal with them in the hub tube...
Here is the outer, inner nuts and the spacer. The inner one has the little post on it to lock into the washer and prevent it from loosening itself. Pretty good idea if you ask me.

To be continued.
Anywho, guess who has 2 thumbs and 1 new set of passenger side studs... This guy! One side down, one to go. Boy was it a long day though... Oh and Rich, i FINALLY understand with you were talking about with packing bearings. It only take pulling the hub apart twice to get it right eh? I had everything done and was going to start putting the locking mech back together but my neighbor stopped me. He asked if i packed the bearings and i said yes, and he asked how i did it so i showed him. Then he told me i did it wrong
so i had to pull the whole disc and hub back off, pull the bearings and he showed me how to pack them. Pretty much the way you described. THEN, i seem to recall SOMEONE telling me that if the old bearing races were un damaged that they would stay in. Whoever that was was incorrect, sorry no dice. I had to hammer out the old races and hammer in the new ones.How i did it was using a long flat tip and a claw hammer. I tapped it in 4 spots until it fell out. Then i put the new races in and stacked the old one in top of that and used the same hammer and a soft aluminum punch looking thing to tap the new ones in nice and snug. Everything worked out ok. Then i tightened the spindle nuts, and fought with that stupid spacer to get it lined up with the peg, then tightened the other one. My only concern now is it seems to be kind of difficult to rotate the tire. It has no slack in it and with the caliper off it seems to be hard to turn BUT my neighbor looked online and said the outter spindle nut has to be torqued to 175 ftlbs or around there. I probably got it to 130 maybe, the tool kept slipping. I don't know if it is too tight or if it is correct. With the brake pads on it makes it that much harder to spin.
Anyways onto the pics. I don't know how many i can post to 1 thread and i have 27 of them so i will break it up into multiple posts.
Here is the stuff before i started
Dirty old hub and disc with the stupid broken studs
Ok so, though it was unconventional how i got the stubborn allen bolts off was with the allen wrench, then i tapped them a bit with a hammer to help get deeper
Then i used a pair of channel locks to get the leverage to loosen them. Sure there are easier ways but this is what i had, and i couldn't think of a better way.
After getting the little suckers out, my hub came out in 2 parts. The lock and the other piece that i don't know the name to
I found it odd that the gear was attached to the lock on the hub... I was hoping to have it come apart to paint it but it was too much of a hassel so i left it as it is.
Here is that part i don't know the name to, we will call it "that greasy thing"
Here is the spindle and his nuts. Pain in the **** to deal with them in the hub tube...
Here is the outer, inner nuts and the spacer. The inner one has the little post on it to lock into the washer and prevent it from loosening itself. Pretty good idea if you ask me.
To be continued.
Thread Starter
|
Post Fiend
Joined: Nov 2011
Posts: 8,908
Likes: 1
From: Algona, Washington
Next episode.
Here is the hub separated from the disc, now i understand how the studs hold it together.

I am fairly sure this is the outer bearing... It is pretty beat up but still rolls around.

You can see the race is in ok condition, no scratches and it doesn't look like they are scorched too badly.

I figured out on my own that in order to get the inner bearing out you had to remove the seal back there

So, in the process of removing that seal i think that was when i took lunch and ran up to oriellys to get 2 new seals. Now that i had one to match next to the new one i could assure that they would screw up. AZ didn't have seals.

I decided to let my back rest a bit by cleaning up the hub a bit. There was a lot of rust on it and it look simply terrible.

For those TGM fans, here is the old vs new. They seem to be pretty close in thickness but i like the new ones more

Oh snap! Look at that sexy thing!

Got the (improperly) packed inner bearing in and the new seal hammered down. Little did i know...

Next page captain!
Here is the hub separated from the disc, now i understand how the studs hold it together.
I am fairly sure this is the outer bearing... It is pretty beat up but still rolls around.
You can see the race is in ok condition, no scratches and it doesn't look like they are scorched too badly.
I figured out on my own that in order to get the inner bearing out you had to remove the seal back there
So, in the process of removing that seal i think that was when i took lunch and ran up to oriellys to get 2 new seals. Now that i had one to match next to the new one i could assure that they would screw up. AZ didn't have seals.
I decided to let my back rest a bit by cleaning up the hub a bit. There was a lot of rust on it and it look simply terrible.
For those TGM fans, here is the old vs new. They seem to be pretty close in thickness but i like the new ones more
Oh snap! Look at that sexy thing!
Got the (improperly) packed inner bearing in and the new seal hammered down. Little did i know...
Next page captain!
Thread Starter
|
Post Fiend
Joined: Nov 2011
Posts: 8,908
Likes: 1
From: Algona, Washington
Final chapter of the story.
Look over there! what is that.. OH! it's a brand new stud

I used the "Nuts" method to do this. Since i couldn't fin more than 1 washer that would fit

Looks good don't it?

A sneak preview of the almost final product.

So, my neighbor told me a little tip where once you think you got the spindle nuts on you put a tire on and put 2 lugs in then wiggle it. If it has play, you need to tighten it more. Seems like a good trick

So after tearing it all back down again to re-pack the bearings i decided pictures weren't needed and since my step-dad was now out "helping" me he doesn't like when i "screw around" taking pictures

Anyways. Thats about it. I think Encho made a much better write up on how to do this but whatever, this is more of a story than a write up Sorry for having to make 3 posts but i figured it would be easier on the website to upload 9 pics per post vs 27 all at once...
Long story short (yeah right) the jobs is half way over. 1 more side and i will be done. Though i have a feeling the passenger side will need to be readjusted to be a bit looser. I don't know for sure.
I don't plan to take to many pictures tomorrow on the driver side since i covered the whole job here BUT, i will get a before and after pic.
Till then
P.S. The reason i used the lugnut method is because i didn't want the outer bearing to fall out when i flip it to hammer the new ones in there. IT seems to have worked well.
Look over there! what is that.. OH! it's a brand new stud
I used the "Nuts" method to do this. Since i couldn't fin more than 1 washer that would fit
Looks good don't it?
A sneak preview of the almost final product.
So, my neighbor told me a little tip where once you think you got the spindle nuts on you put a tire on and put 2 lugs in then wiggle it. If it has play, you need to tighten it more. Seems like a good trick
So after tearing it all back down again to re-pack the bearings i decided pictures weren't needed and since my step-dad was now out "helping" me he doesn't like when i "screw around" taking pictures
Anyways. Thats about it. I think Encho made a much better write up on how to do this but whatever, this is more of a story than a write up
Sorry for having to make 3 posts but i figured it would be easier on the website to upload 9 pics per post vs 27 all at once...Long story short (yeah right) the jobs is half way over. 1 more side and i will be done. Though i have a feeling the passenger side will need to be readjusted to be a bit looser. I don't know for sure.
I don't plan to take to many pictures tomorrow on the driver side since i covered the whole job here BUT, i will get a before and after pic.
Till then
P.S. The reason i used the lugnut method is because i didn't want the outer bearing to fall out when i flip it to hammer the new ones in there. IT seems to have worked well.
Post Fiend
Joined: Sep 2006
Posts: 14,325
Likes: 14
From: Island Southeast Alaska
Dylan with the brake off the rotor needs to spin free. If not it is to tight. As for the spacer with the holes in it if it don't fit over the peg one way just turn it over. Or back the spindle nut off a hair to line it up. Remember a little loose is okay. Snug is okay as well as it will wear in with new brg's a LITTLE. Ya won't go 10 miles with it to tight but could run years with a little slop. As for the outer lock nut just get it as tight as ya can. 130 is plenty. It's the inner one that sets the brg load.
FTE Stories
Ford Trucks for Ford Truck Enthusiasts

Top 6 Best Deals Available on New Fords & Lincolns Right Now
Brett Foote
This Hennessey Takes the Expedition Tremor's Off-Roading Capability to the Next Level
Verdad Gallardo
Top 10 Fords at 2026 Carlisle Ford Nationals
Joe Kucinski
3 Best / 3 Worst Parts of Modern Ford Ownership
Brett Foote
10 Amazing Upgrades That Solve Common Ford Truck Owner Headaches
Pouria Savadkouei
Every 2026 Ford Engine Explained
Brett Foote
10 Ugly Ford Trucks That We Still Kinda Love
Joe Kucinski
10 Things Every Truck Owner NEEDS (2026 Edition)
Michael S. Palmer
Rezvani's Latest Post-Apocalyptic Monster Is a Ford F-150 Raptor Underneath
Verdad GallardoThread Starter
|
Post Fiend
Joined: Nov 2011
Posts: 8,908
Likes: 1
From: Algona, Washington
Alright thanks for clarifying that, i might go back into it tomorrow and loosen it just a hair then. Maybe slop some more grease in there. I don't plan to drive it till i know for sure it is safe so i have time.
Thread Starter
|
Post Fiend
Joined: Nov 2011
Posts: 8,908
Likes: 1
From: Algona, Washington
Alrighty.. The job is done. Though i did learn a lot while doing it, i don't want to do it again... I got some pictures.
Before i pulled it apart

Ha ha funny story.. I stripped out 2 studs. Luckily the old ones were undamaged and only needed some cleaning up. From then on we hammered the rest in.

All put back together

Ready to roll

On the studs, i was using the lugnut + washer deal, but it turns out that didn't work this time around... I stripped out 2 studs and they weren't even fully seated. Me and my step-dad too a long punch i got from my old work and hammered the others in. We picked the 2 best studs from the old ones that weren't too mushroomed from hammering. We cleaned up the threads a bit then hammered them in. It surprisingly worked out well.
The driverside hub doesn't look AS good as the passenger side, mainly because i didn't let the paint dry completely and when i was finished with everything i used some brake cleaner to get the grease off.. Little did i know it was taking some paint with it. It still looks better than before though.
I hope everything stays good and greased and i don't have to do this again any time soon.
After driving it to AutoZone to but my neighbor a new spindle nut socket (i kinda messed his up) i made sure the hubs weren't getting hot and the wheels weren't moving when i pulled outwards on them. I have a feeling i did pretty well on this one
EDIT: also i went back into the passenger side and relieved some of the stress on the brearings. It rolled a lot better when i had the calipers off.
Before i pulled it apart
Ha ha funny story.. I stripped out 2 studs. Luckily the old ones were undamaged and only needed some cleaning up. From then on we hammered the rest in.
All put back together
Ready to roll
On the studs, i was using the lugnut + washer deal, but it turns out that didn't work this time around... I stripped out 2 studs and they weren't even fully seated. Me and my step-dad too a long punch i got from my old work and hammered the others in. We picked the 2 best studs from the old ones that weren't too mushroomed from hammering. We cleaned up the threads a bit then hammered them in. It surprisingly worked out well.
The driverside hub doesn't look AS good as the passenger side, mainly because i didn't let the paint dry completely and when i was finished with everything i used some brake cleaner to get the grease off.. Little did i know it was taking some paint with it. It still looks better than before though.
I hope everything stays good and greased and i don't have to do this again any time soon.
After driving it to AutoZone to but my neighbor a new spindle nut socket (i kinda messed his up) i made sure the hubs weren't getting hot and the wheels weren't moving when i pulled outwards on them. I have a feeling i did pretty well on this one
EDIT: also i went back into the passenger side and relieved some of the stress on the brearings. It rolled a lot better when i had the calipers off.


Thread Starter
|
Post Fiend
Joined: Nov 2011
Posts: 8,908
Likes: 1
From: Algona, Washington
Haha yes Brett i do like the fact that i did it myself and that it wasn't as complicated as i originally thought. As for saving money.. I am pretty sure i spent quite a bit... Definitely over $200 thats for sure... But that plus labor to do it at a shop would have been insane..
At least now i know how to pack bearings properly
At least now i know how to pack bearings properly
Thread Starter
|
Post Fiend
Joined: Nov 2011
Posts: 8,908
Likes: 1
From: Algona, Washington
On top of everything, i now have a question. If i were to remove my front driveline would it help or harm the truck? Since i had the part time transfer case as far as i know the driveline is always spinning right? This causes the front tires to have power which means i have no steering in the snow... If i can get all the power to the rear wheels instead then it might be better. Besides i can't use 4wd since my gears are goofed up.
Pretty much what i want to know is since i have this style of transfer case, will removing the front driveline help at all?
Pretty much what i want to know is since i have this style of transfer case, will removing the front driveline help at all?
Thread Starter
|
Post Fiend
Joined: Nov 2011
Posts: 8,908
Likes: 1
From: Algona, Washington
Well hopefully soon TGM will be able to start getting more fixes, i have a job interview for an Oreillys store that is about 20 minutes out from me. Hopefully the interview goes well so i can start raking in some cash.