


V/Modified B codes, step-by-step
Thread Starter
|
Cargo Master

Joined: Jun 2008
Posts: 2,923
Likes: 33
From: Sacramento Area
Thread Starter
|
Cargo Master
Joined: Jun 2008
Posts: 2,923
Likes: 33
From: Sacramento Area
Are you sure it's without that bottom leaf? The center spring pack bolt goes through it, so to get it without would be very unusual - they would have to take it apart to get that bottom leaf off...

Senior User
Joined: Jan 2006
Posts: 157
Likes: 0
From: Gary, IN
That's what was reported. They came off the truck with 800 miles for a lift. For whatever reason the overload was removed. Figure I could get 'em for a steal and mod at my convenience. Haven't had much luck in my area finding used.
Hope to have the set for around $250 practically new. Got a line on Hellwig rear bar also. Hopefully I'll have a nice riding vehicle for under $400 when it's all said and done. That included getting new U-bolts. Already have Rancho 9000XL's on there. Just hope my poor spring haven't caused premature wear.
Hope to have the set for around $250 practically new. Got a line on Hellwig rear bar also. Hopefully I'll have a nice riding vehicle for under $400 when it's all said and done. That included getting new U-bolts. Already have Rancho 9000XL's on there. Just hope my poor spring haven't caused premature wear.
Super Moderator


Joined: May 2004
Posts: 29,380
Likes: 118
From: Central Coast of CA

It was this post:
https://www.ford-trucks.com/forums/6...ml#post5095806
https://www.ford-trucks.com/forums/6...ml#post5095806
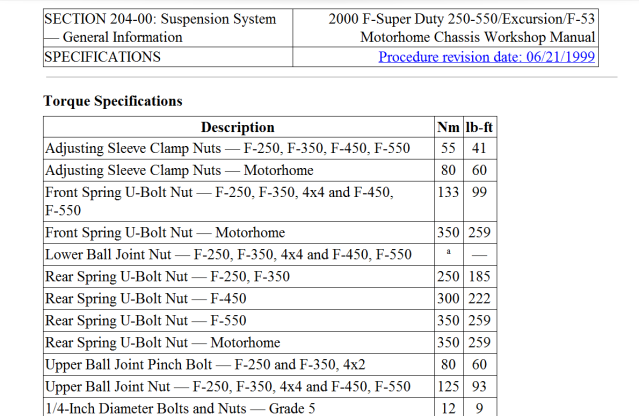
I have other resources now. Here's info I uploaded to my Google doc page: Torque specs for 2000 F series trucks and Excursions - https://docs.google.com/document/d/1..._J9NG1p2w/edit
Here's a small screen grab of the doc:
Stewart
Moderator
Joined: Jul 2010
Posts: 12,055
Likes: 1,559
From: Media PA
And I had the other version of the B codes, with both a top and bottom overload leaf. As you can see the stock B code (top spring in photo) has both, the bottom (thick) one you will want as Robert said but if you have the top (thin) one it has to be removed along with that little 1" block that separates it from the rest of the pack.
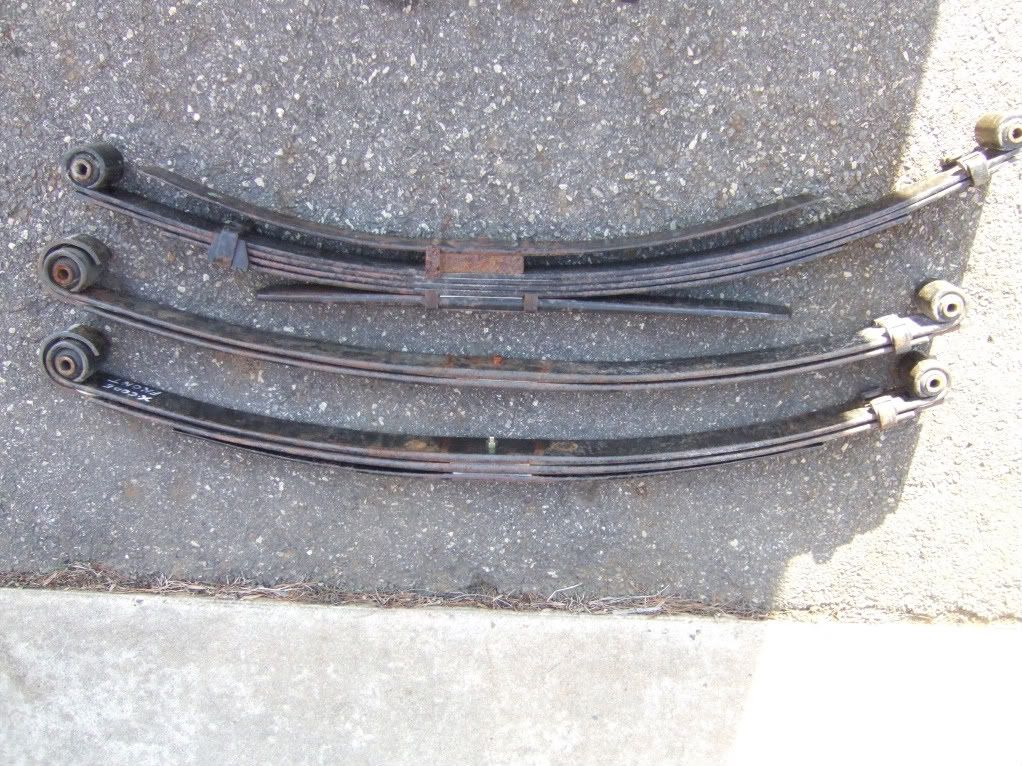
I didn't have many toys as a kid so I have to play now. The center spring in the photo is my X code front as it came stock, the bottom spring in the pic is the other X code with that top B code overoad leaf (the one that has to come off) added to it. Firms up the ride a little bit and gives another 1/2" or so of lift.
Thread Starter
|
Cargo Master
Joined: Jun 2008
Posts: 2,923
Likes: 33
From: Sacramento Area
And I had the other version of the B codes, with both a top and bottom overload leaf. As you can see the stock B code (top spring in photo) has both, the bottom (thick) one you will want as Robert said but if you have the top (thin) one it has to be removed along with that little 1" block that separates it from the rest of the pack.
EX40...see if he can take a pic of the springs and e-mail or text it to you...
FTE Stories
Ford Trucks for Ford Truck Enthusiasts

Top 10 Fords at 2026 Carlisle Ford Nationals
Joe Kucinski
3 Best / 3 Worst Parts of Modern Ford Ownership
Brett Foote
10 Amazing Upgrades That Solve Common Ford Truck Owner Headaches
Pouria Savadkouei
Every 2026 Ford Engine Explained
Brett Foote
10 Ugly Ford Trucks That We Still Kinda Love
Joe Kucinski
10 Things Every Truck Owner NEEDS (2026 Edition)
Michael S. Palmer
Rezvani's Latest Post-Apocalyptic Monster Is a Ford F-150 Raptor Underneath
Verdad Gallardo
Top 10 Most Expensive Ford Trucks Ever Sold on Bring a Trailer
Joe Kucinski
2027 Ford Super Duty Buyer's Guide (Every Model, Engine, & Package)
Brett FooteSenior User
Joined: May 2007
Posts: 476
Likes: 0
From: Central Florida
WOW.....what a difference! and man that was a workout! My front end was almost 37" driveway to top of wheel well....now it's 40 1/4" and the ride is so much better! I have not taken it very far yet; I have a road I drive everyday that would bounce the hell out of the truck....looking forward to driving it tomorrow.....hopefully with a smile on my face! I have not confirmed with the guy I got the springs from which code they were, but they came off an '04 4x4 4dr F350 6.0 diesel.......hopefully talk to him tomorrow.
I do have to say I could not have imagined doing this upgrade w/o removing the bumper....I would suggest anybody planning this job to do that! Also, not sure if this was the right way or not.....but when installing the new springs I connect the rear shackle first (bolt loose w/ nut) then my axle shifted (like most I assume) so it was one heck of a work out trying to get the pin lined up. I got both pins lined up (each side) w/ the jack supporting the axle, but I had to use another jack on the back of the differential (4x4) to rotate the axle a little because it also twisted. Then I snugged the u-bolts to hold everything together. Now I started working on the front eye bolt; with a little jack pressure and a pry bar I was able to get the bolt in.
I started about 10:30am and I got most everything taken apart by 11:30/12pm when my helper showed up and we had everything back together by 3:30/4pm.
Again....THANK YOU to all those who have paved the way for us a little late in the game!
Thread Starter
|
Cargo Master
Joined: Jun 2008
Posts: 2,923
Likes: 33
From: Sacramento Area
Also, not sure if this was the right way or not.....but when installing the new springs I connect the rear shackle first (bolt loose w/ nut) then my axle shifted (like most I assume) so it was one heck of a work out trying to get the pin lined up. I got both pins lined up (each side) w/ the jack supporting the axle, but I had to use another jack on the back of the differential (4x4) to rotate the axle a little because it also twisted. Then I snugged the u-bolts to hold everything together. Now I started working on the front eye bolt; with a little jack pressure and a pry bar I was able to get the bolt in.
We then used jacks to compress the springs, and used the OEM jack between the jack stand holding the frame up (placed the jack stand just aft of the aft front spring shackle) and the sway bar link (at an angle)...opening up that jack slid the axle forward to line up the spring pack bolt with the axle.
I didn't have the "twist" problem you had with the axle, but that jack solution sounded like it made quick work of fixing it.
My axle shifted (to the rear), so if I had to do it again, I'd use straps to tie the axle to the jacks, then chock the jacks so they couldn't roll fore or aft...that (I think) would have kept the axle in the same spot relative to the frame, and since the V codes and stock springs both have 6" of arc uncompressed, IN THEORY they should have lined right back up.
Senior User
Joined: May 2007
Posts: 476
Likes: 0
From: Central Florida
I think your strapping the axle idea might work; mine shifted aft and to the passenger side....not sure why but it did.
As was mentioned before somewhere....don't over think this procedure.....the basic steps are laid out and everything comes together as your doing it.....by the way this is the first time I've ever dropped and axle or replaced leaf springs so if I can do it anybody can.....lol
Thread Starter
|
Cargo Master
Joined: Jun 2008
Posts: 2,923
Likes: 33
From: Sacramento Area
I wonder if it's the order you do them in...bumping the jacks slightly, etc. that causes the axle to slip one way or the other?
