


'79 tinker thread
Thread Starter
|
Cargo Master
Joined: Oct 2010
Posts: 2,339
Likes: 32
From: Lost In a Pit of Despair
Fabbed up a mounting bracket for the CB radio. My welding still sucks, but at least it holds.


(sorry about bad pic quality)
Also been working on installing a vacuum and oil pressure gauge, both mechanical. The oil has been a nightmare. I was working on both at the same time, and I had the sending unit out of the back of the block because I was going to t in to keep electrical and also have mechanical. I finished the vacuum, so I figured I'd start the engine. Derp on me, I didn't remember that there was a hole in my block where the sending unit should have gone. 30 seconds later, I realized what happened, and there went 5 quarts of oil
I won't do that again... But I got them both finished today. Oil pressure is at 75 psi at 1500 rpm, which I think is normal.
-Jameson
Thread Starter
|
Cargo Master
Joined: Oct 2010
Posts: 2,339
Likes: 32
From: Lost In a Pit of Despair
Messing around, bringing truck up front so I can start working on it
Driving F250 - YouTube
Mostly for my own reference for how the exhaust sounds before I start doing work on the interior
Driving F250 - YouTube
Mostly for my own reference for how the exhaust sounds before I start doing work on the interior
Thread Starter
|
Cargo Master
Joined: Oct 2010
Posts: 2,339
Likes: 32
From: Lost In a Pit of Despair
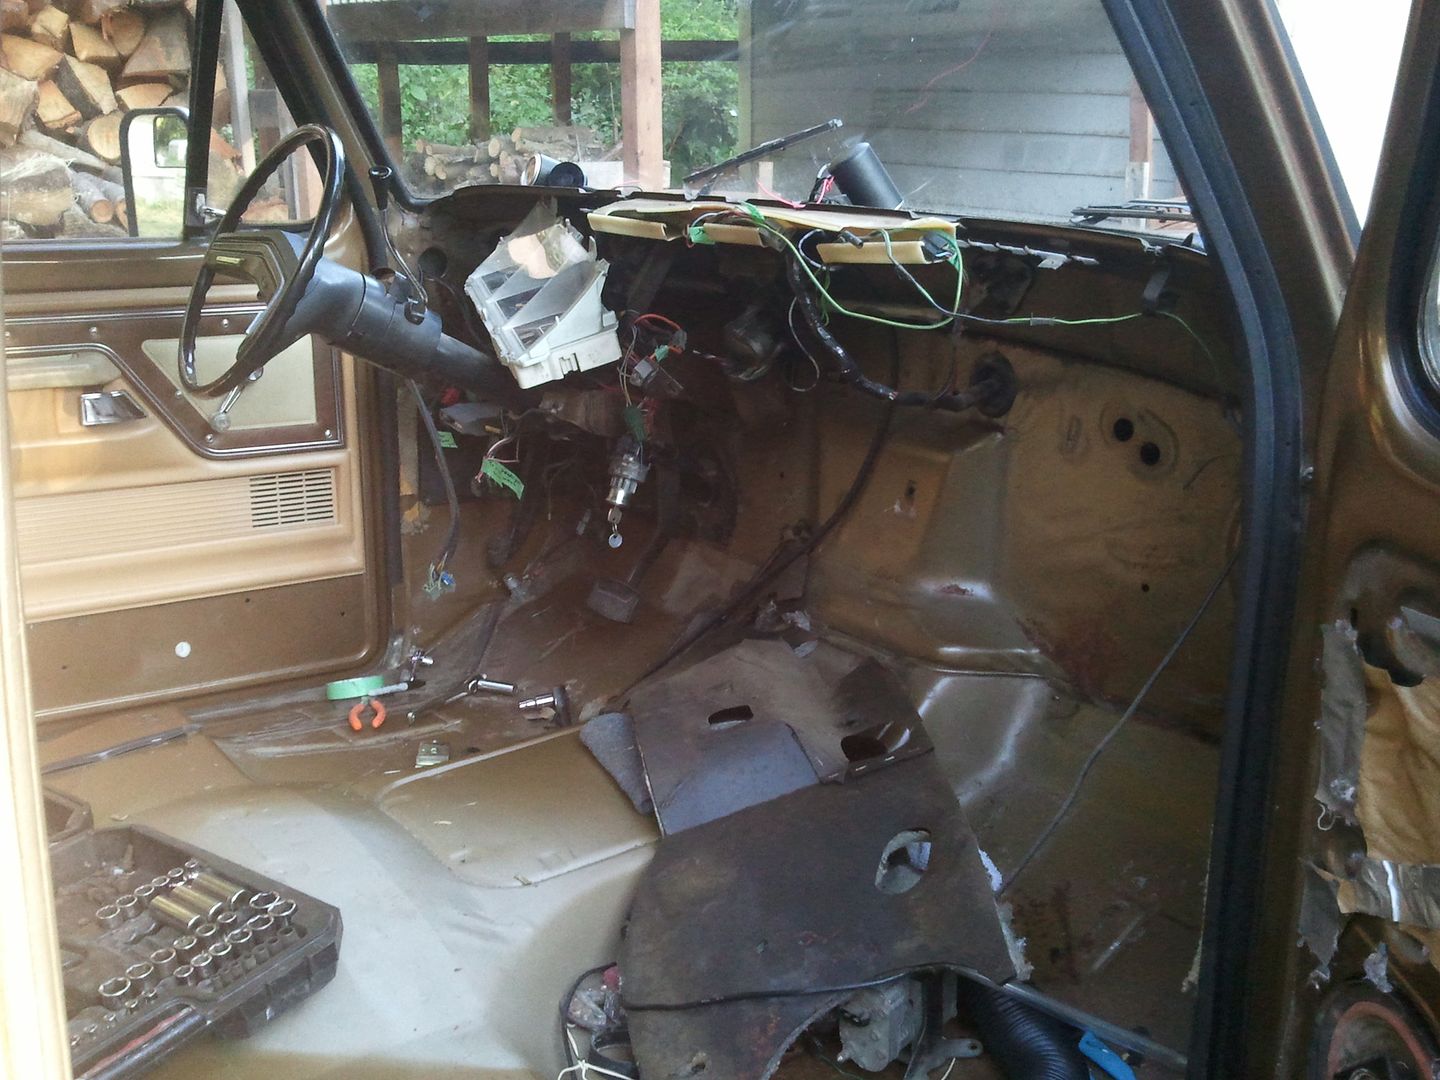
Moving quickly the past few days, got a good chunk of the interior out. Only things left are whatever remains behind the dash, and the essentials to move the truck around (pedals, steering wheel, ignition, ect.)
For the most part, there is no rust. Under the carpet is good, behind the panels is also good. I have to replace the front passenger floor pan because the leaky heater core caused a nice spot of rust. It's a little too soft to ignore.


Bad picture of dash apart

Fancy aftermarket A/C. This one looks done really well. Everything stays nicely tucked up behind the dash. The only odd thing is there was nothing strapping it to the firewall. That whole unit just rested up against the dash...


Taking the front seat to a friend who is a professional furniture builder in the next few days. He's going to donate the material, and only charge me for half the labor because I am going to help him with the assembly. Ideally I will restuff the seat and install heated seat things, but we'll see how my wallet likes that
-Jameson
For the most part, there is no rust. Under the carpet is good, behind the panels is also good. I have to replace the front passenger floor pan because the leaky heater core caused a nice spot of rust. It's a little too soft to ignore.
Bad picture of dash apart
Fancy aftermarket A/C. This one looks done really well. Everything stays nicely tucked up behind the dash. The only odd thing is there was nothing strapping it to the firewall. That whole unit just rested up against the dash...
Taking the front seat to a friend who is a professional furniture builder in the next few days. He's going to donate the material, and only charge me for half the labor because I am going to help him with the assembly. Ideally I will restuff the seat and install heated seat things, but we'll see how my wallet likes that
-Jameson
Thread Starter
|
Cargo Master
Joined: Oct 2010
Posts: 2,339
Likes: 32
From: Lost In a Pit of Despair
Been a while since I've posted here..
I have been making good headway on the truck. I have the interior almost stripped bare, leaving just the things essential to move the truck around. (tip: don't use a plastic lawn chair in place of the seat when the truck needs moving... It likes to slip at the most inopportune moments)
Last night

Started working on the front seat as well. The guy helping me is donating all the material to me, and will be teaching me how to sew it all up. To keep costs down and avoid having to buy material, the colors on the seat will be inverted, so the dark brown will be the main color and the cream color will be the narrow bands. The seat also won't have the piping on it, but all the seams will be done in the leather style (double seam). Foam is in good condition, so it won't need replacing.
This is the style

Start

Marked up..

Drivers side of seat all removed (second dark brown strip is off, just not shown)

When I got the heater core housing out, and the heater core itself out, I found out where the leak was coming from. Both in and out tubes had the brazing break off, so the tubes were all loose.

-Jameson
I have been making good headway on the truck. I have the interior almost stripped bare, leaving just the things essential to move the truck around. (tip: don't use a plastic lawn chair in place of the seat when the truck needs moving... It likes to slip at the most inopportune moments)
Last night
Started working on the front seat as well. The guy helping me is donating all the material to me, and will be teaching me how to sew it all up. To keep costs down and avoid having to buy material, the colors on the seat will be inverted, so the dark brown will be the main color and the cream color will be the narrow bands. The seat also won't have the piping on it, but all the seams will be done in the leather style (double seam). Foam is in good condition, so it won't need replacing.
This is the style
Start
Marked up..
Drivers side of seat all removed (second dark brown strip is off, just not shown)
When I got the heater core housing out, and the heater core itself out, I found out where the leak was coming from. Both in and out tubes had the brazing break off, so the tubes were all loose.
-Jameson
Logistics Pro

Joined: Aug 2003
Posts: 4,701
Likes: 6
It is looking really good. You are lucky to have started with such a nice truck. I always seem to start with junk.
We just took a family vacation and went over to Whidbey Island. Really nice place. I enjoyed the ferry ride. Makes me want to just ride the ferrys all over the place over there.
We just took a family vacation and went over to Whidbey Island. Really nice place. I enjoyed the ferry ride. Makes me want to just ride the ferrys all over the place over there.
Thread Starter
|
Cargo Master
Joined: Oct 2010
Posts: 2,339
Likes: 32
From: Lost In a Pit of Despair
Finished up the uncovering of the seat this evening. Didn't have much time to do anything else today


Here are the two vinyls I have to work with.. Haven't decided if I will be doing cloth where your rear goes or not.

I also have been disassembling the wiring harness inside the cab, but I now have to hook most of it back up, plus a seat, seatbelts, and instrument cluster by Wednesday so we can take it to a local body shop to get estimates on work
I got lucky on the purchase. When were you out here? Should've said something. I could have given you some tips on places to go  I hear often from people that they really enjoy the ferry ride when they come to visit.. We use it so much, and I've never not had the ferry, so it's not that special to me
  But don't let me rain on your parade. Hope you had a good time out here, and some nice weather
-Jameson
Here are the two vinyls I have to work with.. Haven't decided if I will be doing cloth where your rear goes or not.
I also have been disassembling the wiring harness inside the cab, but I now have to hook most of it back up, plus a seat, seatbelts, and instrument cluster by Wednesday so we can take it to a local body shop to get estimates on work
It is looking really good. You are lucky to have started with such a nice truck. I always seem to start with junk.
We just took a family vacation and went over to Whidbey Island. Really nice place. I enjoyed the ferry ride. Makes me want to just ride the ferrys all over the place over there.
We just took a family vacation and went over to Whidbey Island. Really nice place. I enjoyed the ferry ride. Makes me want to just ride the ferrys all over the place over there.
I hear often from people that they really enjoy the ferry ride when they come to visit.. We use it so much, and I've never not had the ferry, so it's not that special to me But don't let me rain on your parade. Hope you had a good time out here, and some nice weather -Jameson
Thread Starter
|
Cargo Master
Joined: Oct 2010
Posts: 2,339
Likes: 32
From: Lost In a Pit of Despair
So it's been a few days, and I haven't had much time to do stuff. Got everything we needed hooked back up in the cab so we could take it down to get an estimate on some body work. $400 is a bit of a big pill to swallow, so I might try my hand at glassing the part that I need.
I did mostly minor "housework" today because my knees are giving me trouble after a small backpacking trip this last weekend. Cleaned the rust off and polished the two rear center caps, still have to do the fronts. Pulled the hitch receiver back off to continue sandblasting it, and pulled the rear bumper to get an idea of the mount system for making a custom bumper. I've been thinking along the lines of simple but functional, sort of like the one co425 did.
Looking into a possible axle tube problem.. Looks like both side have slipped out a bit..?

Jameson
I did mostly minor "housework" today because my knees are giving me trouble after a small backpacking trip this last weekend. Cleaned the rust off and polished the two rear center caps, still have to do the fronts. Pulled the hitch receiver back off to continue sandblasting it, and pulled the rear bumper to get an idea of the mount system for making a custom bumper. I've been thinking along the lines of simple but functional, sort of like the one co425 did.
Looking into a possible axle tube problem.. Looks like both side have slipped out a bit..?
Jameson
Thread Starter
|
Cargo Master
Joined: Oct 2010
Posts: 2,339
Likes: 32
From: Lost In a Pit of Despair
I've noticed this has turned into more of a build thread.. Didn't expect to be doing this much to my truck, but things just kind of snowballed
Waiting on some less inclement weather to do any major work. Finished with stitch ripping on one of the seat backs, so I'll be starting on making patterns soon for the bottom and back. Found a dark color fabric for the very inside of the seat, a brown duckcloth.
Browsing through the local recycle yard, I seemed to find every size of tube steel except for 4x6. I found 5x3, 6x6, 3x9, and 4x12. To avoid having to buy 4x6, I think I'll use the 6x6 steel and flatten out some surface welds on it. I plan on having the license plate in the middle with lamps on either side, clevis loops on either side of that, some rear fogs wired into the reverse light relay and a toggle, and loops for trailer safety chains on the underside. The 6x6 also gives me enough forward distance to get 2 of the bolts for the hitch receiver though the bumper. Might have to block the rears to get them down at the same level though...
Because my welding still isn't at its best, I don't want to trust it to hold the bumper on to the smaller square steel that slips inside the frame to mount it. I was searching around my parts truck, and I noticed that the pieces that mount the inner fenderwells to the firewall have a nice, small, 3 hole mount surface. I trimmed one to fit inside the frame, removed the inside supports (huge PITA), and cleaned it up. I will add some support inside that will be out of the way of bolts, and some plate steel on the bottom and rear. Fits nicely inside the frame, and leaves a nice flat mating surface with holes to attach the bumper.


-Jameson
Waiting on some less inclement weather to do any major work. Finished with stitch ripping on one of the seat backs, so I'll be starting on making patterns soon for the bottom and back. Found a dark color fabric for the very inside of the seat, a brown duckcloth.
Browsing through the local recycle yard, I seemed to find every size of tube steel except for 4x6. I found 5x3, 6x6, 3x9, and 4x12. To avoid having to buy 4x6, I think I'll use the 6x6 steel and flatten out some surface welds on it. I plan on having the license plate in the middle with lamps on either side, clevis loops on either side of that, some rear fogs wired into the reverse light relay and a toggle, and loops for trailer safety chains on the underside. The 6x6 also gives me enough forward distance to get 2 of the bolts for the hitch receiver though the bumper. Might have to block the rears to get them down at the same level though...
Because my welding still isn't at its best, I don't want to trust it to hold the bumper on to the smaller square steel that slips inside the frame to mount it. I was searching around my parts truck, and I noticed that the pieces that mount the inner fenderwells to the firewall have a nice, small, 3 hole mount surface. I trimmed one to fit inside the frame, removed the inside supports (huge PITA), and cleaned it up. I will add some support inside that will be out of the way of bolts, and some plate steel on the bottom and rear. Fits nicely inside the frame, and leaves a nice flat mating surface with holes to attach the bumper.
-Jameson
FTE Stories
Ford Trucks for Ford Truck Enthusiasts

3 Best / 3 Worst Parts of Modern Ford Ownership
Brett Foote
10 Amazing Upgrades That Solve Common Ford Truck Owner Headaches
Pouria Savadkouei
Every 2026 Ford Engine Explained
Brett Foote
10 Ugly Ford Trucks That We Still Kinda Love
Joe Kucinski
10 Things Every Truck Owner NEEDS (2026 Edition)
Michael S. Palmer
Rezvani's Latest Post-Apocalyptic Monster Is a Ford F-150 Raptor Underneath
Verdad Gallardo
Top 10 Most Expensive Ford Trucks Ever Sold on Bring a Trailer
Joe Kucinski
2027 Ford Super Duty Buyer's Guide (Every Model, Engine, & Package)
Brett Foote
Top 10 Ford Truck Tragedies
Joe KucinskiThread Starter
|
Cargo Master
Joined: Oct 2010
Posts: 2,339
Likes: 32
From: Lost In a Pit of Despair
Got one side done. Will be held in with 3 bolts, 2 on the side and one on the bottom that will also mount the hitch receiver. In these pictures, the second hole has not been drilled on the side. Getting through the frame was a pita The mount is now all cleaned up and painted.


Top and back is boxed in using 1/4 inch steel. Gonna pick up some argon gas to help clean up my welds a bit. I have been using flux core wire, but I still get a ton of slag..
-Jameson
The mount is now all cleaned up and painted. Top and back is boxed in using 1/4 inch steel. Gonna pick up some argon gas to help clean up my welds a bit. I have been using flux core wire, but I still get a ton of slag..
-Jameson
Thread Starter
|
Cargo Master
Joined: Oct 2010
Posts: 2,339
Likes: 32
From: Lost In a Pit of Despair
Only just now starting on the other side. While working on a different welding project, I figured out why my welds have been so *****ty. I've been welding to cold
 I had been going with about 50 amps and a wire feed speed of 3.. I bumped the power to 160 amps and speed to 7, and now everything is beautiful and holds wonderfully.
 Hit up a local recycle yard for some steel for the bumper, and the on I spotted last time was still there (6x6x.25), but had a nice curve to it. Too much to try and hide
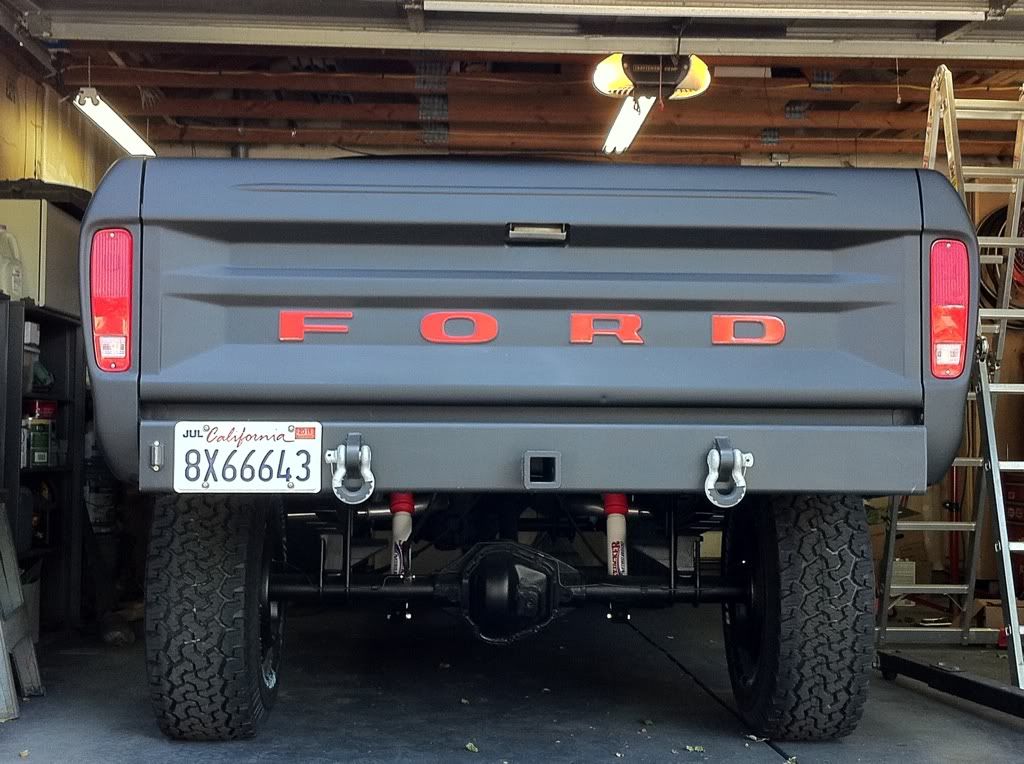
Made a stop by Pick n pull the last time I was in the area, and managed to get a lower tailgate trim (one that says ford) with no scratches or dents. Paid $12 for it, and replaces the dented one that I have. Also scored a pop out window set for the supercab windows for $14 each including the glass. I might have damaged the passenger side hinges on the way out, so I'll have to look into that.
Thread Starter
|
Cargo Master
Joined: Oct 2010
Posts: 2,339
Likes: 32
From: Lost In a Pit of Despair
Unhooked the helper springs on the back last night to see if it would help soften the ride a bit. It did, and lowered the truck a half inch in the back. Got me to thinking what would happen if I tightened them down all the way. What I got was a 2.5 inch lift in the back
Unhooked

From the top of the tire to the top of the wheel well arch

Tightened down to about 90%


Now looking into making drop brackets for the front I beams. Working on pulling them off my parts truck for prototypes.
Unhooked
From the top of the tire to the top of the wheel well arch
Tightened down to about 90%
Now looking into making drop brackets for the front I beams. Working on pulling them off my parts truck for prototypes.
Thread Starter
|
Cargo Master
Joined: Oct 2010
Posts: 2,339
Likes: 32
From: Lost In a Pit of Despair
Got the other bumper mount boxed in, just needing to drill the mount holes. I was thinking of going 6x6 on the tube, but I think it would look kind of funny sticking out so far. Made up a wood sub for making sure everything is level before I drill out the holes for the drivers side mount. I plan on keeping my hitch receiver separate, and the one I have sticks out too far (for a 4 inch thickness) and is too low down. If I move the mounts back on the frame, I loose the spare tire. Until I have a in bed mount done, its gonna stay underneath. I'll just have some cutting and welding to do.

Thread Starter
|
Cargo Master
Joined: Oct 2010
Posts: 2,339
Likes: 32
From: Lost In a Pit of Despair
Finished getting the wiring harness, steering column, pedals, and vents out. Ordered up a gallon of Rustmort, which will be split up between the cab and the bed. I'll be painting over it with black on the inside, which will then be covered by sound proofing on the firewall, floor, roof, and backside, then padding and carpet on the floor, and carpet up the back and sides to the window line. Can't decide if I want to go with brown carpet or grey. Got some samples on order from Stock Interiors. When I carpet, I think I'll just lay it down and mold it myself instead of buying a molded one.
Considering pulling the engine and transmission out (seeings how the truck isn't going anywhere and half of the crap is already disconnected from the engine), and doing a through clean of the engine compartment, paint the inner fenders, gunk the suspension and steering gear to get all the baked on crap off, paint the transmission, and put a coating on the drivers side of the firewall to help insulate. Gotta run all this by my dad though, because he insists on monitoring everything I do on this truck until I turn 18
Pictures in a few days
Jameson
Moderator


Joined: Jul 2011
Posts: 6,513
Likes: 669
From: Sioux Falls Area

Not sure you would be intrested in the idea or not, but you could change out your hitch for one that does not mount so low.
Curt's hitch for our trucks has a pretty nice fitment where the crossbar mounts up behind the bumper, and the drawbar tube fits pretty tight underneath.
i don't want to clog your thread up with any of my pics, so here's a link or two to get an idea of how it might look on your truck:
https://www.ford-trucks.com/forums/p...ictureid=96954
https://www.ford-trucks.com/forums/p...ictureid=75903
If you were closer i'd give you a heck of a deal on the spare one i have sitting in the box, but shipping would kill me. i think you can get one brand new for about 75 bucks shipped to your door.
just a thought.
Got the other bumper mount boxed in, just needing to drill the mount holes. I was thinking of going 6x6 on the tube, but I think it would look kind of funny sticking out so far. Made up a wood sub for making sure everything is level before I drill out the holes for the drivers side mount. I plan on keeping my hitch receiver separate, and the one I have sticks out too far (for a 4 inch thickness) and is too low down. If I move the mounts back on the frame, I loose the spare tire. Until I have a in bed mount done, its gonna stay underneath. I'll just have some cutting and welding to do.