When you click on links to various merchants on this site and make a purchase, this can result in this site earning a commission. Affiliate programs and affiliations include, but are not limited to, the eBay Partner Network.
Tighten A - D first, then do the rest... probably crisscrossing as you go. The manual isn't clear when X, Y, and Z get torqued down, but it is clear that A - D go first.
It mentions using an adhesive to keep the gasket in place? Would help prevent squishing it out and possibly tearing the bolt holes.
15-18 ft-lbs!!!
Last edited by mark1986F150; Sep 5, 2018 at 03:48 PM.
Reason: added rest of procedure
Thanks for that, Mark.
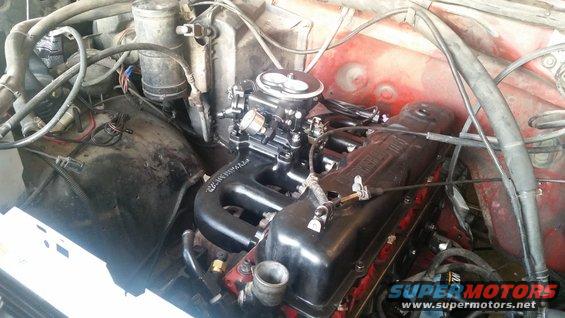
I now have it installed, and it seems like it went on really well and torqued down nicely. I guess we'll see once I fill it with oil and fire it back up.
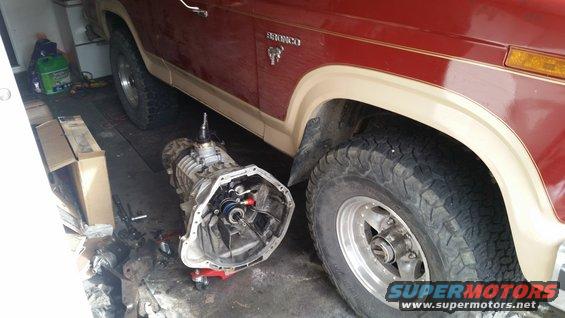
First off, as some of you know, my '81 was totaled last year. I bought it back and put it in the garage. In March, I started stripping everything out of it.
In the mean time, I purchased a really nice 1985 Eddie Bauer Bronco that came with a 302 and an AOD transmission.
Finally, I had an opportunity to do a full engine/transmission swap on it. Our lease on our car was up, and we went in a month early, and traded it for another vehicle. However, since we had a month left, we got to keep both vehicles (which gave us a 3rd vehicle). So, basically, for the last month, my second part time job has been swapping out the 302 and AOD for my 300, and a manual transmission.
However, I decided to do some changes! First, I went with a ZF5 transmission, which I had professionally rebuilt before installing.
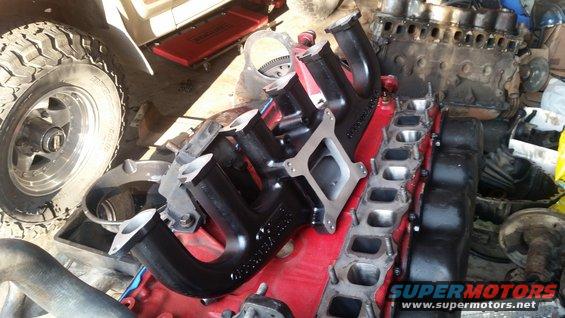
Next, I have simply had my fill of carburetors. I think they're fun, and I enjoyed tinkering with them, but for a vehicle I drive every day, it was frustrating always trying to get them just right. I'd get close sometimes and other times they'd have bogs, or lean spots that weren't there the day before, and I was just tired of it. So! I decided to try out Holley's new Sniper EFI.
I did some research and was continually confirmed that the smaller 2bbl "2300" style setup was the way to go. It's rated up to 350 hp and is 580cfm. Two injectors vs. four also will give it finer control on a "smaller" engine. For the swap, I needed to do away with the Offenhauser DP and get an open plenum C intake and use a 2bbl adapter.
Since the 302 in '85 was fuel injected, I already had the high pressure fuel pump and return lines installed into the vehicle, which made a lot of the process much easier.
I just needed to do a little converting from those lines to the AN fuel lines used on the EFI and I was good to go.
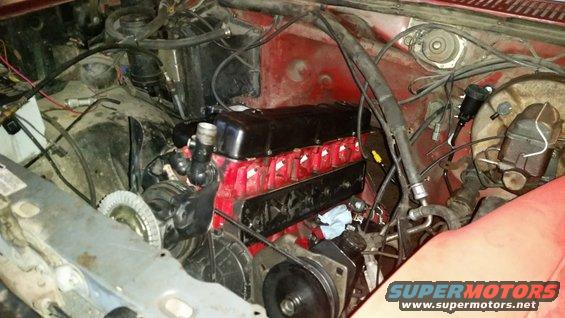
So, after a month of daily work, I finally got to fire it up! I love all the readouts that the EFI's handheld unit has.
I still have a few tweaks with the clutch pedal I have to do before I can drive it, but it's finally ready to go.
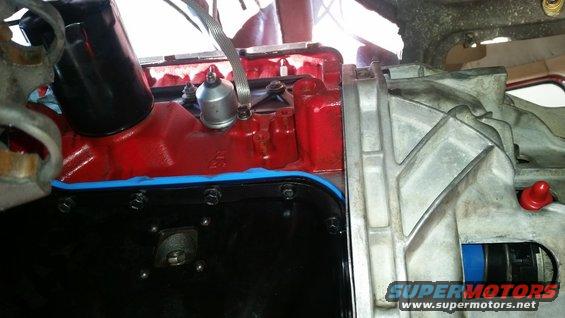
On another note though.... a new gasket did NOT fix the oil leak!! It leaks just as bad as it did before, which is pretty significant. After about 10 - 15 minutes of idling, I had a good 4" puddle on the floor. I just don't know what to do and am extremely frustrated over it. Any ideas??
Thanks for posting the videos of the Holley Sniper in action. Looks like the way to go.
Nice job all the way around!
I had the same problem with the one piece gasket.
I went back to the multi piece pan gasket along with Permatex "The right stuff" and no more oil leaks.
Thanks!
It's been a ton of work.
Basically an automatic to a manual swap, a V8 to an I6 swap, and an MPFI to TBI swap, all in one go.
I'm kinda beat!
Interesting on your issues with the 1 piece gasket. I don't understand why. It just seems like the superior gasket setup.
However, my results have not been good.
When you went back to the 4 piece gasket with Permatex, did you have any issues with the lack of raised ridges around the bolt holes?
Justin, When you changed to the 1 piece oil pan gasket, did you get a new oil pan? Did you grind smooth the raised areas on the pan? I have replaced the original oil gasket on my 1986 4.9L with the blue 1 piece and all leaks disappeared. I am wondering if your oil pan is tweaked?
My oil pan was a brand new replacement and came without ridges. I suppose it could have a manufacturing defect, but it's not one that was visible in any way. After the gasket was installed, everything looked nice and solid and in place.
That's why I have wondered if maybe it was even the rear main seal (it drips right down the back and comes down the spacer plate between the engine/transmission). But, that just seems unlikely.
Be sure your valve cover has not been distorted around the bolt holes so as to prevent even clamping force.
Put a large long deep well socket against the top side of each hold down bolt hole. tap the surrounding metal from the bottom side of the valve cover to flatten out the cover surface. Clean surfaces with solvent. Assemble with a new cork gasket and red silicone film on the surface(s) of the gasket.
It's definitely not the valve cover, as it was dripping last night after I drove it, and it was dry all around all sides of the head.
The valve cover and the lifter cover got brand new gaskets with silicone a few weeks ago, so they're fresh and tight. And I've also flattened the areas around the bolt holes with a socket to help with that, so it's pretty flat.
I'll start checking down a little lower. I'd love it if it was just some oil galley plug or the like.
Be sure your valve cover has not been distorted around the bolt holes so as to prevent even clamping force.
Put a large long deep well socket against the top side of each hold down bolt hole. tap the surrounding metal from the bottom side of the valve cover to flatten out the cover surface. Clean surfaces with solvent. Assemble with a new cork gasket and red silicone film on the surface(s) of the gasket.
Rezvani's Latest Post-Apocalytic Monster Is a Ford F-150 Raptor Underneath
Slideshow: Called the Fortress, the 850-horsepower pickup combines Raptor underpinnings with military-inspired features, survival equipment, and a starting price of $285,000.