Engine Rebuild Part 2
#661
 09-18-2017, 01:42 PM


Alrighty, an update.
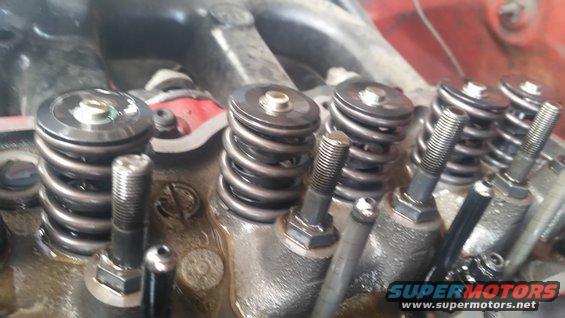
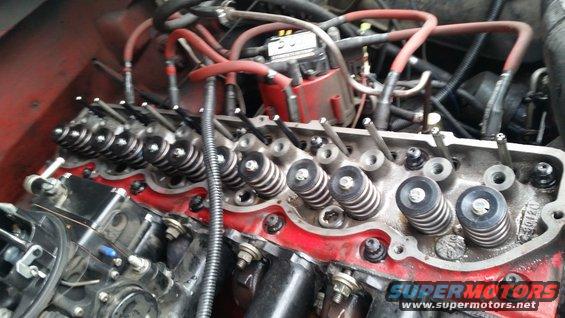
Due to my little ordering mistake, it took nearly 3 weeks to get the correct ones back in hand. Then, last weekend I went backpacking (super fun taking the Bronco out and putting it through some serious paces. It did amazing). So finally, a month later than expected, I got the roller rockers installed. They are NICE. The engine is noticeably smoother and just feels freer as it spins up. And, last but not least, it's nice and quiet. It sounds sooooo nice.
The other awesome bit. Harland Sharp rockers DO fit under the stock valve cover. I had zero fitment issues! And there's room to spare. Maybe it's just that so many use Chevy rockers? The push rods were also darn near perfect, too, so I didn't have to change anything.
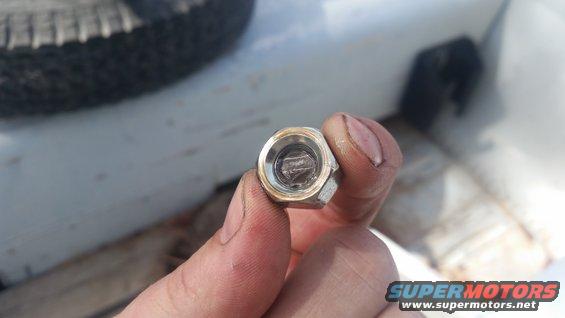
Now one thing that was alarming is that I had two broken studs when I removed the stamped steel rockers. The tips came off and stuck in the nuts.
I have some hardened ones on order that I'll be swapping in here soon. Anyone have any thoughts on why they could have broken? My machinist said that they usually break at the base if they're going to break, not up at the nut.

Due to my little ordering mistake, it took nearly 3 weeks to get the correct ones back in hand. Then, last weekend I went backpacking (super fun taking the Bronco out and putting it through some serious paces. It did amazing). So finally, a month later than expected, I got the roller rockers installed. They are NICE. The engine is noticeably smoother and just feels freer as it spins up. And, last but not least, it's nice and quiet. It sounds sooooo nice.
The other awesome bit. Harland Sharp rockers DO fit under the stock valve cover. I had zero fitment issues! And there's room to spare. Maybe it's just that so many use Chevy rockers? The push rods were also darn near perfect, too, so I didn't have to change anything.
Now one thing that was alarming is that I had two broken studs when I removed the stamped steel rockers. The tips came off and stuck in the nuts.
I have some hardened ones on order that I'll be swapping in here soon. Anyone have any thoughts on why they could have broken? My machinist said that they usually break at the base if they're going to break, not up at the nut.
#662
09-18-2017, 08:47 PM
Fleet Mechanic
#663
09-18-2017, 09:34 PM
Lead Driver
**WARNING**
AB! Please, do not drive your engine with those studs. I had the same problem and nearly sucked a valve. If one of those lets go while you're driving it will sound like a machine gun went off, and that can't be good.
My friend, please don't risk that fantastic engine. Any speed shop will have ARP studs for a SBC that will fit. Look at the photo in my signature. Those are ARP SBC studs.
You should let your machinist know about those studs. Don't throw them at him unless it's dark and he can't see it's you. Ha ha.
#664
09-19-2017, 10:06 AM

#665
09-19-2017, 10:54 AM
**WARNING**
AB! Please, do not drive your engine with those studs. I had the same problem and nearly sucked a valve. If one of those lets go while you're driving it will sound like a machine gun went off, and that can't be good.
My friend, please don't risk that fantastic engine. Any speed shop will have ARP studs for a SBC that will fit. Look at the photo in my signature. Those are ARP SBC studs.
You should let your machinist know about those studs. Don't throw them at him unless it's dark and he can't see it's you. Ha ha.
AB! Please, do not drive your engine with those studs. I had the same problem and nearly sucked a valve. If one of those lets go while you're driving it will sound like a machine gun went off, and that can't be good.
My friend, please don't risk that fantastic engine. Any speed shop will have ARP studs for a SBC that will fit. Look at the photo in my signature. Those are ARP SBC studs.
You should let your machinist know about those studs. Don't throw them at him unless it's dark and he can't see it's you. Ha ha.
I hear you, friend. I was nervous about that from the get-go. I had to drive it yesterday since I got rear ended and needed to take it down to a body shop to be evaluated. I never revved it over 2000.
Right now my wife and I are carpooling until I get the new studs in. I went in and went over the whole thing with my machinist. He was a bit perplexed (especially with where they broke), but we ordered up some higher performance ones to just swap out all 12.
I'd hate to have another break while driving.
#666
09-19-2017, 04:39 PM
Elder User
yep I think the new stud with a more gradual contour on the shank will be much more forgiving, and last a lot longer. sharp turns or surface transitions are generally the first place fracture or failure like to propagate.
on a lighter note...congrats on the new rockers. they look great! sounds like a blast to drive. can't wait to get to my build this winter. I'm knee deep in a 69 swb f100 frame at the moment...so my 85 is currently on the back burner.
Keep us posted please sir!
on a lighter note...congrats on the new rockers. they look great! sounds like a blast to drive. can't wait to get to my build this winter. I'm knee deep in a 69 swb f100 frame at the moment...so my 85 is currently on the back burner.
Keep us posted please sir!
#667
09-19-2017, 04:58 PM
Thanks! Yeah, I'm psyched to get those studs in there and get to driving it a bit harder and see how it feels.
I still think it's pretty cool that the Harland Sharps fit under the stock valve cover.
Understandable on the studs. However, I do find it odd that they broke off up at the tip where the nut is, and not at the base.
Although, I think that's actually a good sign. If it broke off at the base, that would mean that the entire rocker arm setup is rocking back and forth, which wiggles the whole stud and would mean some bad geometry, or the like.
Since the break is is at the fulcrum, to me that is indicative of stress from the fulcrum itself (which is held in place by the nut), so it's just from some bad quality studs.
#669
09-20-2017, 11:50 AM
Lead Driver
The studs my machinist installed broke at the same place. I replaced them with ARP studs as the ones in the photo, and have not had a problem since.
Is the machinist paying for the new ones?
Too bad I did not note which studs broke. It would be interesting to see if they were the same same that broke on your engine. If so, what would that say about the 300 valve train? and the forces exerted?
Is the machinist paying for the new ones?
Too bad I did not note which studs broke. It would be interesting to see if they were the same same that broke on your engine. If so, what would that say about the 300 valve train? and the forces exerted?
#670
09-21-2017, 11:12 AM
Alright, back on the road.
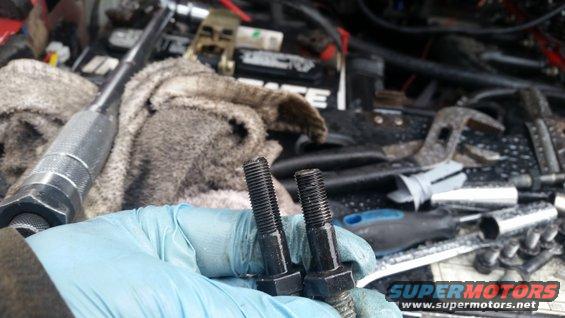
The hardened studs (made of Chromoly 8740) came in yesterday. They also have the widened radius at the base.
Also, here's one of the ones that broke. Both of them broke at the same spot. Cyl 4 intake, cyl 5 exhaust.
So, last night did NOT go as planned. I knew that the rocker studs hit water, so I was careful to drain some out before removing them. The rear ones were lower than the front (I have a slightly tilted driveway that made it even more so), so I slowly loosened the rear stud and waited to see if a little coolant seeped out. Once it did, I tightened it, cleaned up the coolant, and then drained the radiator a little more. Well, once the rear was low enough that no coolant came out, I removed the stud. Coolant was about 1/4" below the hole.
Next, I took the front most stud out since I figured all was well. Apparently it wasn't because as soon as the stud came out, a 4" tall geyser or coolant shot out of the rear stud hole and all over the engine and down into the crank case....
Went and bought 12 quarts of oil. Drained the engine (lots of coolant came out first), filled it again, ran it for 15 minutes, and then drained and filled it again. Blech. But, worth it to know that it's cleaned out.
And for anyone who needs proof that the studs hit water:

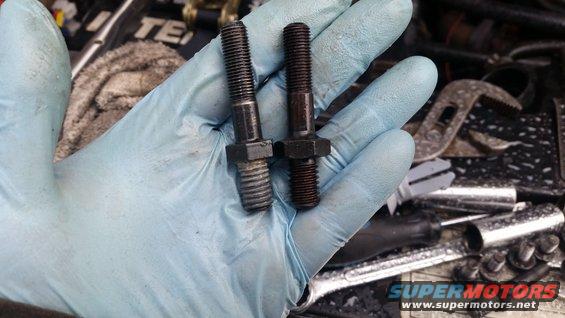
But, at the end of the day, I got all the studs removed:
New studs put in with thread sealer. Rocker arms installed and adjusted and all is well.
Onward!
The hardened studs (made of Chromoly 8740) came in yesterday. They also have the widened radius at the base.
Also, here's one of the ones that broke. Both of them broke at the same spot. Cyl 4 intake, cyl 5 exhaust.
So, last night did NOT go as planned. I knew that the rocker studs hit water, so I was careful to drain some out before removing them. The rear ones were lower than the front (I have a slightly tilted driveway that made it even more so), so I slowly loosened the rear stud and waited to see if a little coolant seeped out. Once it did, I tightened it, cleaned up the coolant, and then drained the radiator a little more. Well, once the rear was low enough that no coolant came out, I removed the stud. Coolant was about 1/4" below the hole.
Next, I took the front most stud out since I figured all was well. Apparently it wasn't because as soon as the stud came out, a 4" tall geyser or coolant shot out of the rear stud hole and all over the engine and down into the crank case....
Went and bought 12 quarts of oil. Drained the engine (lots of coolant came out first), filled it again, ran it for 15 minutes, and then drained and filled it again. Blech. But, worth it to know that it's cleaned out.
And for anyone who needs proof that the studs hit water:
But, at the end of the day, I got all the studs removed:
New studs put in with thread sealer. Rocker arms installed and adjusted and all is well.
Onward!
#671
09-28-2017, 10:24 PM

Motor build
I absolutely love your engine build. I read and reread multi times. Would it be possible for a list of parts with part numbers that you used.Lot of pages to go thru and well keep losing what page parts are on. Hope you don't mind but I would love to build same basic engine. PLEASE take it as a compliment.... There would be a few differences in builds. I have a Clifford dual 38/38 weber intake and carbs. Not sure about the webers yet but gonna try them since I have them. If they are a problem then I will go with 2 autolite 2100 2v carbs . Also got clifford shorty headers . My whole exhaust was rotted and well not worth replacing just to replace again in near future. I agree with your thought tho if i had a good exhaust. why redo all now especially paying out for the engine build. you can always do the exhaust after the fact. at a later time when cash flow in a better situation.
But as said I love your build. The thought and insight. Basic the same GOALS for a Dependable PRACTICAL street-able machine built for pump gas and longevity as I desire myself.
Once again thanks for sharing the rebuild with all
But as said I love your build. The thought and insight. Basic the same GOALS for a Dependable PRACTICAL street-able machine built for pump gas and longevity as I desire myself.
Once again thanks for sharing the rebuild with all
#672
10-03-2017, 10:12 AM
Hi nhford300!
Thanks for the compliments on the build.
So far, I'm really pleased with it. Still working on getting the carb tuning just right, but it pulls HARD and feels a lot bigger than it is.
I'll dive into my notes and see if I can get some part numbers, but for starters:
Block:
Stock crankshaft (but ground, polished, and balanced)
Early era connecting rods for the 0.912" wristpin (1965-ish) + ARP bolts
H653CP pistons (19cc from a Ford 351)
Erson 270321 camshaft
Head:
Locally port and polished for higher flow and ground for larger valves
Studs pulled, ground down, and threaded for screw in studs.
ARP hardened rocker studs
Harland Sharp roller rocker arms
S.I. enlarged valves
I don't remember the exact springs, but have it written down somewhere.
Each push rod measured to the valve/rocker and ordered from Trend Performance
I'm sure I'm forgetting some things, but that's a start.
I know Photobucket ruined all my pictures, and I still have it in the back of my mind to reupload them somewhere and swap them all out, but I still haven't.
If you need pics, let me know. Or, I think you can just go look at them all on photobucket by following the links.
#673
10-11-2017, 09:12 PM
Hey Thanks a parts list would be a GREAT help ! Part numbers with be even greater . I am planning my build as we speak. Thinking finding a used motor to rebuild then just swap it in when done. My truck is a 86 so debating a 83 year and down engine. I figured the headwork (porting ) was the longest wait period. Machine shop the rest of engine as well.
Its been a rough year. family member passed and had a few health issues of my own. So had limited time to work on my truck. figured would have it running by May, but life happens. But the GOOD news is I just fired up for the first time today. Duraspark II conversion. Clifford 38/38 dual carbs and intake and shorty headers. (my exhaust was toast) both cab corners, small floor patch, steering gearbox. new leaf springs and frame mounts. other things too but this is your thread. I wasn't able to start working on it till august so just glad it running. be putting it away another week or 2 to have parking for the winter here. Anyways as I said love your build and planning same thing. buying few things one at a time as $$$ permits. hoping find a good used motor on the cheap to tear into.
Ya photobucket really bites. lots of good info lost now. hard to read and understand with out seeing what is being described.
I know still dialing in carb , but how's the MPG so far ?
Thanks again Phil
#675
10-17-2017, 03:19 PM
I found that building one on the side and then swapping it in really helped me be patient and just do it right. If my vehicle was down the entire time and waiting for an engine, I would have gotten impatient.
Is there a reason you're looking for an '83 down? About the only thing I could think of that would be different would be the clutch linkage if you want to keep a mechanical clutch. I don't recall if the '84+ block has a threaded hole for the pivot ball. But otherwise, the main differences were in the ignition and fuel system, which isn't block/head related.
I'm sorry to hear about how rough the year has been. My wife's been fighting cancer for almost a year now, so I can relate. Keep marching forward though.
Sounds like you currently have a nice build going on with yours. I would suggest that you start a new thread to document it, that way it doesn't get lost in here and you have fresh eyes on it if you need help and have questions.
For posting pictures, Free photo, video, forum, and club hosting for enthusiasts | SuperMotors.net still allows for free uploading and hosting. Basically, anywhere your picture is hosted (as long as it's online and not your home computer), you put them in an IMG tag.
Like: {IMG} http://locationofyourpicture.jpg {/IMG}
However, instead of {}, use square brackets: [].
I had to use curly brackets or it'd try to actually make an image out of it and you couldn't see it.
Hope that helps!