



Gloria: OBS build thread
Hotshot


Joined: Dec 2005
Posts: 14,380
Likes: 609
From: evansville in
Yea..I thought -4 but now I'm questioning that ?!?!?
Postmaster
Joined: Dec 2012
Posts: 2,604
Likes: 3
From: Fort Polk Louisiana
Glad to hear about the build coming along! I saw that! I'm not too worried though, I'm not in a giant hurry for the parts I ordered from him either. Gotta say, I know what you mean with money leaving the bank for it all!
Thread Starter
|
Senior User
Joined: Mar 2007
Posts: 256
Likes: 0
Well Guys,
Here goes an update before I fall behind on the pics. The box from riffraff shows up on Friday , after that, progress should be fast and furious.
Anyways, I've slogged through perhaps the slowest and most frustrating aspect of all this. Ive been cleaning for a week essentially.
These will serve as a rough before hand baseline set of photos..


Then I went and plucked out the valve train components. This is my first time getting into any of this, a good friend of mine said these really should be put back into their original location.

And injectors came out. These got sent off and are on their way back now! Came out really nicely, this is a veggi oil truck so I had to send them in to make sure they could be used for a build, but they checked out alright and was told they looked really good, so very happy with that.

There she is getting stripped down slowly.

(PS, the BEST 14.99 ive spent on this project was a bag of microfiber towels from Costco. At first I was hesitant to use them, but when I realized there is like 40 of them in the bag, I started grabbing a new one for every job (AKA every injector when I shipped them). Pretty sure it has saved me money vs blasting through rolls of paper towel that rip and fiber up everywhere).
Next came the headstuds.

^Thats a really expensive layout of bolts . Its kinda ludicrous when you lay them out like that and realize they cost more than half a G.
Anyways, the ARP's come with generous sample packs of the torque lube stuff you are supposed to use now, it's very messy, use gloves (or put finger prints all over your girlfriends house for a few hours after completing job, even after washing your hands... ask me how I know).
The torque spec from FORD a final torque of 95 FT/LB's. This is done through 3 stages, and the final stage uses a different pattern than the first two. (These patterns can be found online easily enough, and the instructions from ARP include both of them as well).
How I opted to do it after reading up some:
1. I replaced each bolt one at a time following the pattern used in stages 1/2 (its a center-out theme), and torqued to the factory spec of 95 FT/Lbs. This will hold the head on just as tight as they ever were.
2. The final Torque spec for ARP is 125 Ft/Lbs. So after I had done each one of the 18 studs described in 1, I went through and torqued to 125 Ft/LBs using the 2nd torquing pattern (this is a bottom to top in rows theme).
3. After that, I waited 24 hours for things to settle and set (remember the gasket has never been this tight at this point). Then I set my torque wrench to 127 Ft/Lbs and re torqued according to step 2. I pretty much didnt get any movement on this step, just a couple bolts moved a pubic hair.
Repeat for the other head, and you are done. This isnt a 45 minute job, at least it wasnt for me. I wanted to make sure each thread/washer had enough torque lube and I wasnt missing a bolt/rushing, so it probly took 2.5 hours per head. That said, honestly guys, if this head gasket ever has a problem, wow... I dont know what I would do, buy a chevy?. 125 is TIGHT, and there is headstud every 3 inches or less it seams in every direction. 18 bolts is a lot of clamping power...
Here they are, you'll need a 12pt socket to install. Not that glamorous but look carefully, they are in there.

After that, it was cleaning time, and boy did I clean. I'll shamelessly admit, that I eventually sacrificed a spare head for my Sonicare Electric toothbrush to assist in cleaning the nooks and crannies around the engine . The Girlfriend wasnt too pleased I was using a 150 dollar toothbrush to clean, but not too mad. She even helped a bit one night !

Got the oil cooler separated, thanks for the help on that, I beat it with a rubber mallet and it came apart.

And after several nights of degreaser, wire wheeling, purple power, repeat, etc etc... This is the one picture I seem to have of it cleaned up before any paint went on it.

I used a DA sander to rough up areas I had access too as well. Any paint that was still around essentially survived a knotted wire wheel, a DA sander, or me sanding with a foam block, so I felt alright painting over what was left. I dont think it will last, but oh well, better than it was. I wasnt bringing this thing down to the bare block, so I did the best I could.
Here goes an update before I fall behind on the pics. The box from riffraff shows up on Friday
, after that, progress should be fast and furious. Anyways, I've slogged through perhaps the slowest and most frustrating aspect of all this. Ive been cleaning for a week essentially.
These will serve as a rough before hand baseline set of photos..


Then I went and plucked out the valve train components. This is my first time getting into any of this, a good friend of mine said these really should be put back into their original location.

And injectors came out. These got sent off and are on their way back now! Came out really nicely, this is a veggi oil truck so I had to send them in to make sure they could be used for a build, but they checked out alright and was told they looked really good, so very happy with that.

There she is getting stripped down slowly.

(PS, the BEST 14.99 ive spent on this project was a bag of microfiber towels from Costco. At first I was hesitant to use them, but when I realized there is like 40 of them in the bag, I started grabbing a new one for every job (AKA every injector when I shipped them). Pretty sure it has saved me money vs blasting through rolls of paper towel that rip and fiber up everywhere).
Next came the headstuds.

^Thats a really expensive layout of bolts
. Its kinda ludicrous when you lay them out like that and realize they cost more than half a G. Anyways, the ARP's come with generous sample packs of the torque lube stuff you are supposed to use now, it's very messy, use gloves (or put finger prints all over your girlfriends house for a few hours after completing job, even after washing your hands... ask me how I know).
The torque spec from FORD a final torque of 95 FT/LB's. This is done through 3 stages, and the final stage uses a different pattern than the first two. (These patterns can be found online easily enough, and the instructions from ARP include both of them as well).
How I opted to do it after reading up some:
1. I replaced each bolt one at a time following the pattern used in stages 1/2 (its a center-out theme), and torqued to the factory spec of 95 FT/Lbs. This will hold the head on just as tight as they ever were.
2. The final Torque spec for ARP is 125 Ft/Lbs. So after I had done each one of the 18 studs described in 1, I went through and torqued to 125 Ft/LBs using the 2nd torquing pattern (this is a bottom to top in rows theme).
3. After that, I waited 24 hours for things to settle and set (remember the gasket has never been this tight at this point). Then I set my torque wrench to 127 Ft/Lbs and re torqued according to step 2. I pretty much didnt get any movement on this step, just a couple bolts moved a pubic hair.
Repeat for the other head, and you are done. This isnt a 45 minute job, at least it wasnt for me. I wanted to make sure each thread/washer had enough torque lube and I wasnt missing a bolt/rushing, so it probly took 2.5 hours per head. That said, honestly guys, if this head gasket ever has a problem, wow... I dont know what I would do, buy a chevy?. 125 is TIGHT, and there is headstud every 3 inches or less it seams in every direction. 18 bolts is a lot of clamping power...
Here they are, you'll need a 12pt socket to install. Not that glamorous but look carefully, they are in there.

After that, it was cleaning time, and boy did I clean. I'll shamelessly admit, that I eventually sacrificed a spare head for my Sonicare Electric toothbrush to assist in cleaning the nooks and crannies around the engine
. The Girlfriend wasnt too pleased I was using a 150 dollar toothbrush to clean, but not too mad. She even helped a bit one night !
Got the oil cooler separated, thanks for the help on that, I beat it with a rubber mallet and it came apart.

And after several nights of degreaser, wire wheeling, purple power, repeat, etc etc... This is the one picture I seem to have of it cleaned up before any paint went on it.

I used a DA sander to rough up areas I had access too as well. Any paint that was still around essentially survived a knotted wire wheel, a DA sander, or me sanding with a foam block, so I felt alright painting over what was left. I dont think it will last, but oh well, better than it was. I wasnt bringing this thing down to the bare block, so I did the best I could.
Thread Starter
|
Senior User
Joined: Mar 2007
Posts: 256
Likes: 0
So the first thing to tackle was the oil pan. Mine was in great shape, very minimal surface rust, so I am keeping it in place. For the oil pan, I am using an epoxy paint made by Mastercoat. I wanted to try something other than POR15 a while back, and came across this stuff. Anyways Im really happy with it, the primer is epoxy based and will seal all by itself. But when you mix up the paint (satin black in this case), holy smokes look out, the smell of this stuff is FIERCE. I always get reminded of Anchorman, "its made from bits of real panther, so you know it's good", pretty much analogous to this, "its made from bits of real Satin, so you know it works."
Primer is a tame aluminum metallic colour, pretty decent looking all by itself (in fact Im leaving the front cover just done in this primer).


And a few of the accessories got this primer too..

Then the epocy black went on. Took the shop about 3 days to air out after this, Im not joking.

Once it had set up for a few days and was hard enough that I was confident tape would pull any off, I got it taped up for spraying.


First coat of primer


Second heavier coat of primer.


And after the colour. After reading OldWoodsDiesels forum, I was actually a big fan of the cast Iron he went with. I was originally planning an all aluminum theme, but since most of my piping is getting wrapped with black exhaust wrap, I decided to the monochrome theme with aluminum accents. So thanks OldWoodsDiesel, I like you setup!!
This is VHT Cast Iron Grey.


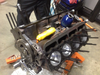
I still need to paint the exhaust manifolds with higher temp paint, but I wanted to put a couple pieces on to give you guys a sneak peak of how its roughly going to look. Still some stuff that needs to go on, so dont worry I think it'll still come together a bit more..


Primer is a tame aluminum metallic colour, pretty decent looking all by itself (in fact Im leaving the front cover just done in this primer).


And a few of the accessories got this primer too..

Then the epocy black went on. Took the shop about 3 days to air out after this, Im not joking.

Once it had set up for a few days and was hard enough that I was confident tape would pull any off, I got it taped up for spraying.


First coat of primer


Second heavier coat of primer.


And after the colour. After reading OldWoodsDiesels forum, I was actually a big fan of the cast Iron he went with. I was originally planning an all aluminum theme, but since most of my piping is getting wrapped with black exhaust wrap, I decided to the monochrome theme with aluminum accents. So thanks OldWoodsDiesel, I like you setup!!
This is VHT Cast Iron Grey.


I still need to paint the exhaust manifolds with higher temp paint, but I wanted to put a couple pieces on to give you guys a sneak peak of how its roughly going to look. Still some stuff that needs to go on, so dont worry I think it'll still come together a bit more..


Postmaster
Joined: Mar 2004
Posts: 3,897
Likes: 9
Look great. Now after doing the head studs imagine doing it in the truck  . It's not how I did mine but I give everyone credit for hanging over that rad trying to torque them down.
I'm not gonna lie it looks more impressive when the heads are off though lol

. It's not how I did mine but I give everyone credit for hanging over that rad trying to torque them down. I'm not gonna lie it looks more impressive when the heads are off though lol

Thread Starter
|
Senior User
Joined: Mar 2007
Posts: 256
Likes: 0
^I wanted to do that in a perfect world, but also didnt want to do a complete teardown/my head gaskets are good and glued down right now. Looks sweet! Do you do new piston?
FTE Stories
Ford Trucks for Ford Truck Enthusiasts

3 Best / Worst Features Of The 2025+ Ford Expedition
Brett Foote
10 Ways Ford is LOSING to the Competition
Joe Kucinski
Top 6 Best Deals Available on New Fords & Lincolns Right Now
Brett Foote
This Hennessey Takes the Expedition Tremor's Off-Roading Capability to the Next Level
Verdad Gallardo
Top 10 Fords at 2026 Carlisle Ford Nationals
Joe Kucinski
3 Best / 3 Worst Parts of Modern Ford Ownership
Brett Foote
10 Amazing Upgrades That Solve Common Ford Truck Owner Headaches
Pouria Savadkouei
Every 2026 Ford Engine Explained
Brett Foote
10 Ugly Ford Trucks That We Still Kinda Love
Joe Kucinski
Postmaster
Joined: Mar 2004
Posts: 3,897
Likes: 9
I did. Complete rebuild .030 over. I had in cylinder that I think had a fight with some debris. If it wasn't for that I would have done head studs just like you did.
Post Fiend
Joined: Dec 2010
Posts: 10,121
Likes: 3
From: Orrville, Ohio
That looks great! It really does. I like the color scheme a lot.
The only suggestion I would make is that I wouldn't leave any of the primer exposed (you mentioned leaving the front cover in primer). Even if you like the color, I would topcoat it with a paint that is designed as a topcoat in the same or a similar color. Primer isn't made to stand up to the abuse that a topcoat enamel is. I think eventually you'll regret leaving it in primer if you go that route. You've done the hard work now, I'd finish the job and apply a top coat.
The only suggestion I would make is that I wouldn't leave any of the primer exposed (you mentioned leaving the front cover in primer). Even if you like the color, I would topcoat it with a paint that is designed as a topcoat in the same or a similar color. Primer isn't made to stand up to the abuse that a topcoat enamel is. I think eventually you'll regret leaving it in primer if you go that route. You've done the hard work now, I'd finish the job and apply a top coat.

Laughing Gas

Joined: Jul 2007
Posts: 900
Likes: 1
From: Cross Lanes, WV

Looks great, Andrew... I totally agree with what you said about the ARP studs. I did mine the same way.. If yours leak, you can have the satisfaction knowing that I will be right there with ya. Oh, I especially agree with you about the PRICE! Just doesn't make sense to me.


