When you click on links to various merchants on this site and make a purchase, this can result in this site earning a commission. Affiliate programs and affiliations include, but are not limited to, the eBay Partner Network.
You were able to put grooves in it too! How'd you do that? Sure looks factory.
I appreciate you showing me your work. I have a standard cab too. I put a vacuum gauge in the right hand circle. In the left hand circle, I put an oil pressure gauge.
It was so cold in the cab in winter. So I put a 1/32" rubber mat on the entire floor. Under the seat I put a full piece of 4" thick foam rubber. On top of the thin rubber, I measured and cut some rugs I had saved. For the dash, I taped two pieces of paper board together. (One piece was too short). Then, I measured, cut and trimmed the paperboard to fit real close, (no gaps). Once I was happy with the pattern...I put the pattern on the rug. I then marked the rug with a magic marker. Cut out the marks...then I took out the hot air vent circles that spread the hot air for the windshield. If you ever move the hot air flex tubes...they are Very fragile! Especially right at the dash. Once the vent tubes were out of the way, I put the rug on the dash. I marked from the bottom with the magic marker. Cut the two holes out. Then, I backed out the screws on the pass. & drivers side...put the rug in place, put the the screws back in, tightened them down...purr fect. I'll take some pics. I'll need my wife to send them to you...I am not real skilled in that area. That'll have to be in the afternoon.
I also put some rug over the gas tank.The temp was much better this past winter, The rug on the dash will help the inside temp in summer. I mean the sun cannot warm that up.
I see where a dash replacement from a company are really expensive. I'd rather use my $ to buy what I cannot make.
Do you have a 6 or an 8 for an engine?
Better stop fur now, Best, Pete
hey Pete. The grooves were done using a piece of an emory board as a sanding block for sand paper and patiently working with it. It took three rounds of filler and sanding to get it. The motor is a 300 6. The rebuild is chronicled in this thread.
my cab was cold as well. I sealed everything and now the heat will put you out. I also put a shutoff valve on the heater hose for the summer.
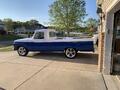
Been a while since I updated anything on here. I like to think that dad would approve of where the truck has headed so far. I finally got ahold of the clips for the trim (thanks to an awesome member on this forum) and decided to go ahead an put it on. The truck is a driver at this point and it'll be a couple of years probably before I can paint it. I got tired of seeing the holes in the side. I'll straighten and polish the trim once it comes back off for paint. I also had to do something about the rear view mirrors. They were 77ish that dad put on there. They were worn out and the passenger side one always looked at the ground, driver side would look down pretty quick after adjustment. They were also blocking the wing windows from opening and I wasn't keen on the look of them. These new ones will stay unless I opt for factory ones, but honestly I like these because they are just a little different. The price was right at $32 for the pair on the bay. The next thing will hopefully be getting the steel wheels on. We are getting ready for kid #2 to go to college this fall in addition to other things, so tires have been on the back burner for now. Hopefully within the next month or so funds will free up.
Hi jjriley, Yes, your new mirrors are really... just right...as Goldy Locks once said. My mirrors are terrible things. They need to be changed one day. Good of you to help your young ones to get more lernin'. They will forever appreciate your sacrifices.
Yes, your dad is approving of where the truck is, and how you are going with it too.
I have been putting new aluminum crossmembers behind my '65's cab this summer. I am drilling and bolting the whole thing. I should send a few pics. My wife is able to do that. Maybe tomorrow before she goes to Hot-lanta Ga.
Welp, better stop fur now,
Best, Pete
Jjriley, it’s looking good, keep it up, the college thing may slow stuff down but I really think it worked out best in my situation because it allowed me planning time and ample time to focus on the small things that were getting set aside for larger items. It looks good.
Thanks guys. Another milestone moment yesterday that changed the look a ton. The steel wheels are on and man she looks sharp. I haven’t talked to so many people about this truck since I brought it home. Amazing what some wheels will do. I found the tires locally for a steal, brand new and white walls to boot. So stoked.
Time for the quarterly update as my progress has slowed a bit, but I'm still making improvements on it as I go. Since paint is a while away, I decided to try to wetsand and buff out the paint just to see what could be accomplished. I found 1500 was taking too much paint, but 3000 on a sanding block worked great at getting rid of the oxidation. I then used a buffing compound on a wool pad and then turtle wax on a foam pad. For comparison, look inside the bedside wall. The entire truck looked like that at one point. She shined up like a newish penny and I'm happy with it for now and I am ok waiting on paint. Over the weekend I got a chance to put in the master cylinder I have had for a couple of weeks. The brakes no longer require a pump or two to stop and there is no leakage from the master anymore which is awesome. Not sure what will be next, but I'll put it up here when it happens. Thanks to those who have followed for this past year.
Lookin good. Have you got a hood hinge problem, or just need an adjustment?
Thank you.
Both sets of the hinges I have are loose and kick the rear up. Rdixiemiller had suggested some shimming solutions that may bring it down, but I just haven't had a chance to try yet.
Understand the time problem. I've been in garden and canning mode lately.
My ton feels neglected. I got the hubs back from the machine shop 6-8 weeks ago.
.....I decided to try to wetsand and buff out the paint just to see what could be accomplished. I found 1500 was taking too much paint, but 3000 on a sanding block worked great at getting rid of the oxidation. I then used a buffing compound on a wool pad and then turtle wax on a foam pad.
jjriley97,
LOOKING GOOD, MY FRIEND!
Are you using an orbital sander or is it all by hand & elbow grease?
Rezvani's Latest Post-Apocalytic Monster Is a Ford F-150 Raptor Underneath
Slideshow: Called the Fortress, the 850-horsepower pickup combines Raptor underpinnings with military-inspired features, survival equipment, and a starting price of $285,000.