


front Spring hangers
Post Fiend
Joined: Jul 2006
Posts: 6,948
Likes: 44
Your solution is a clean, very clean alternative to just throwing a hunk of steel under the frame (much like my temp set up under the orange truck, notice how temps seem to become permanent with my junk?) and will be a better deal than some other stuff I have seen. You take the time to do fine work, and the end result is proof. I was pleased with the work that you had done with the steering box, and the seat rails. Looks real nice.
Incorperating this cross piece with the frame and using stock stuff like the hangers can keep costs low which is nice and still provides a strong platform. Eager to see it complete.
Incorperating this cross piece with the frame and using stock stuff like the hangers can keep costs low which is nice and still provides a strong platform. Eager to see it complete.
Lead Driver
Joined: May 2007
Posts: 6,993
Likes: 15
From: Costa Mesa, CA
Thanks - but it's still tiny. *edit* - you must ahve fixed it - cuz it's bigger now.
I just don't get it, the original was black lines on white - VERY easy to see/read. The thumbnail shows fine in photobucket but when you click on it to blow it up it doesn't work
The pic does seem to be working when I pull up my crew build thread on both here and cummins-forum.com via firefox...
I just don't get it, the original was black lines on white - VERY easy to see/read. The thumbnail shows fine in photobucket but when you click on it to blow it up it doesn't work
The pic does seem to be working when I pull up my crew build thread on both here and cummins-forum.com via firefox...
Cargo Master


Joined: May 2009
Posts: 2,587
Likes: 47
From: Eagle River, AK
Thanks - but it's still tiny. *edit* - you must ahve fixed it - cuz it's bigger now.
I just don't get it, the original was black lines on white - VERY easy to see/read. The thumbnail shows fine in photobucket but when you click on it to blow it up it doesn't work
The pic does seem to be working when I pull up my crew build thread on both here and cummins-forum.com via firefox...
I just don't get it, the original was black lines on white - VERY easy to see/read. The thumbnail shows fine in photobucket but when you click on it to blow it up it doesn't work
The pic does seem to be working when I pull up my crew build thread on both here and cummins-forum.com via firefox...
Posting Guru
Joined: Apr 2006
Posts: 1,218
Likes: 0
From: Fl
I am no where near the fabricator like these guys. But mine was quick (kinda) and cheap. And It has held up very well. I really should have made it drop down a little more to kick up my pinion a little higher...but as the saying goes you learn from your mistakes... and hell Ive learned alot! 
Welded supports inside, and boxed it
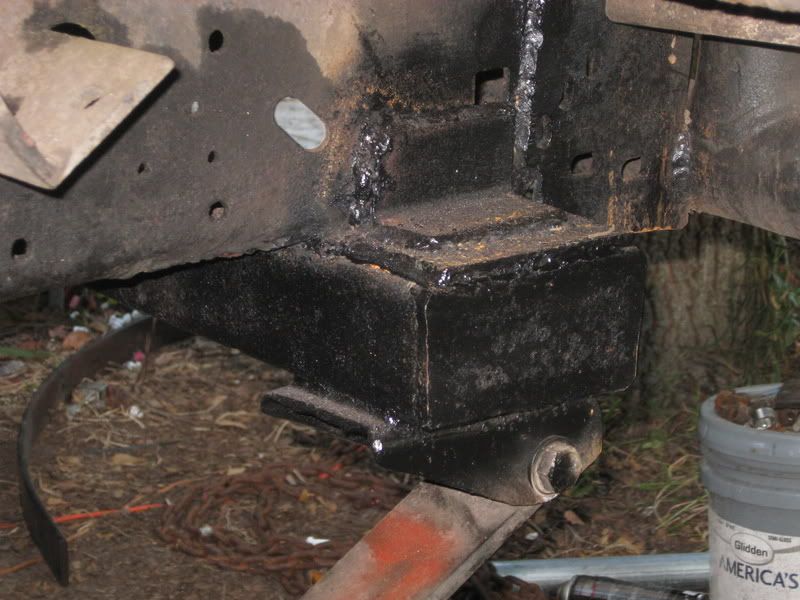
Welded supports inside, and boxed it
Post Fiend
Joined: Jul 2006
Posts: 6,948
Likes: 44
I am no where near the fabricator like these guys. But mine was quick (kinda) and cheap. And It has held up very well. I really should have made it drop down a little more to kick up my pinion a little higher...but as the saying goes you learn from your mistakes... and hell Ive learned alot!
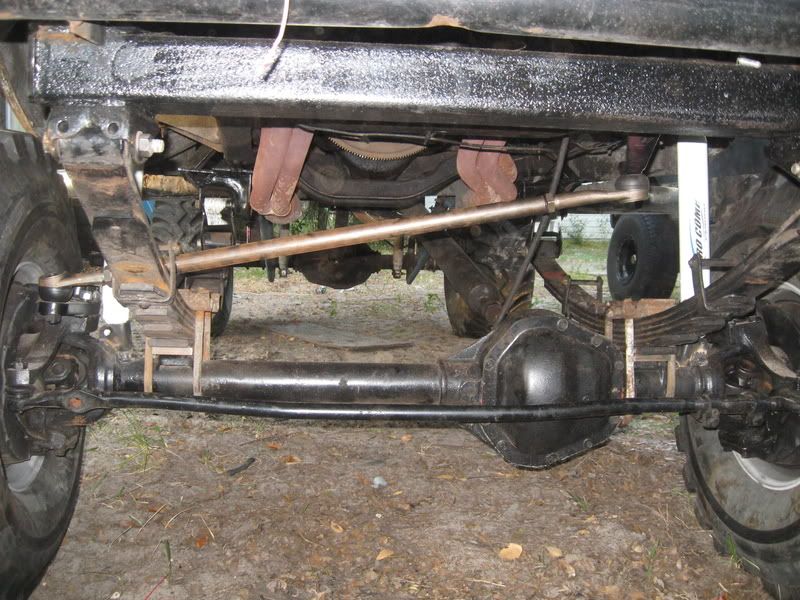
Steering looks nice. If I may suggest, you can bend the TRE's in a press to keep those angles a little more in line. The TRE will last longer this way and you run less risk of popping the ball out of the cup if you extend the suspension too far.
The other option is to run a steering arm that is raised. That is a flat arm. Nice arm that uses nice fasteners by the way (did I sell that to you, too many beers keeps me from remebering. I probably did not as I would have recommended the 3 inch raised unit for your truck).
I like to use those studs and tapered inserts. Looks like thats what you have.
Anywaym the raised arm helps reduce these angles and is better than placing a block under the steering arm.
Anyway, that looks pretty good.
Thread Starter
|
Senior User
Joined: Mar 2009
Posts: 242
Likes: 0
From: Astoria Oregon
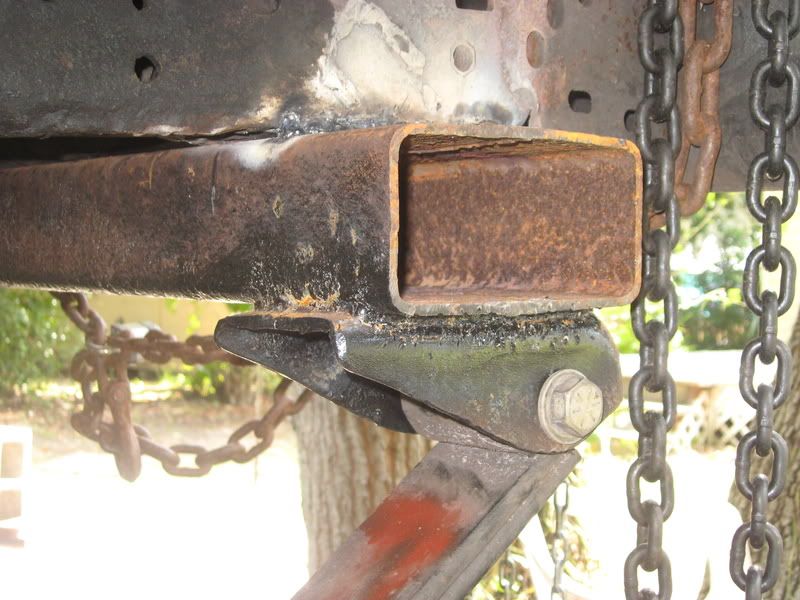
haha yes if you look very close i can see it . lol when i loaded this page i saw your first picture just fine ? :P ? didnt see any red X.. but it looks like a great set up.. as far as ed's question goes.. im really not looking for a bunch of lift from this set up.. but realy im replacing the old rusted out cross member type thing that originally ran across the front of the fame and riveted in to the spring hangers. by doing this it gave me 3 great recovery points . a heavy duty look.. and it looks pretty bad *** as well.. even though they dont do anything to help the structure i did weld on some flame gussets diamond plating.......yes yes i know chrome doesnt get you home.. but compared to the rusty piece of steal that came off of it...(this seems like a pretty nice option) ill try and get some pics up soon.. good luck with your crew 
Posting Guru
Joined: Apr 2006
Posts: 1,218
Likes: 0
From: Fl
Steering looks nice. If I may suggest, you can bend the TRE's in a press to keep those angles a little more in line. The TRE will last longer this way and you run less risk of popping the ball out of the cup if you extend the suspension too far.
The other option is to run a steering arm that is raised. That is a flat arm. Nice arm that uses nice fasteners by the way (did I sell that to you, too many beers keeps me from remebering. I probably did not as I would have recommended the 3 inch raised unit for your truck).
I like to use those studs and tapered inserts. Looks like thats what you have.
Anywaym the raised arm helps reduce these angles and is better than placing a block under the steering arm.
Anyway, that looks pretty good.
When i originally bought the steering arm, I didnt think it was going to be this high or I would have bought the raised one. I would prefer replacing the arm rather than bending the TRE's.
It does work for now though, it isnt the best, but it far better than alot of rigs ive seen lately. I seen a truck the other day in the woods that made some of the trucks on the scary steering website look good! I wish I had a camera with me.... We can start by saying it has a "custom" 9" body lift made by 1 1/2" pipe welded onto the frame.....

FTE Stories
Ford Trucks for Ford Truck Enthusiasts

10 Things Every Truck Owner NEEDS (2026 Edition)
Michael S. Palmer
Rezvani's Latest Post-Apocalyptic Monster Is a Ford F-150 Raptor Underneath
Verdad Gallardo
Top 10 Most Expensive Ford Trucks Ever Sold on Bring a Trailer
Joe Kucinski
2027 Ford Super Duty Buyer's Guide (Every Model, Engine, & Package)
Brett Foote
Top 10 Ford Truck Tragedies
Joe Kucinski
AEV FXL Super Duty - the Super Duty Raptor Ford Doesn't Make
Brett Foote
Lobo Vs Lobo: Proof the F-150 Lobo Should Be Even Lower!
Michael S. Palmer
Ford's 2001 Explorer Sportsman Concept Looks For a New Home
Verdad Gallardo
10 Best Ford Truck Engines We Miss the Most!
Joe KucinskiLead Driver
Joined: May 2007
Posts: 6,993
Likes: 15
From: Costa Mesa, CA
Well I guess it's good timing for this thread as I just started my front cross member last night.
I won't be able to finish it until late next week or after as my buddy that does all my cnc cutting and bending is on vacation, but I will get started on building the device from the infamous red X pic...
Here was the start from last night. Man i HATE rivets I started by grinding them then hitting with a flap wheel to clean up and then to a hammer. I quickly went to the plasma the head off then hammer out method...


You can see some of the materials for the new cross member under the old one

I won't be able to finish it until late next week or after as my buddy that does all my cnc cutting and bending is on vacation, but I will get started on building the device from the infamous red X pic...
Here was the start from last night. Man i HATE rivets
I started by grinding them then hitting with a flap wheel to clean up and then to a hammer. I quickly went to the plasma the head off then hammer out method...You can see some of the materials for the new cross member under the old one
Thread Starter
|
Senior User
Joined: Mar 2009
Posts: 242
Likes: 0
From: Astoria Oregon
i know exactly what your going through.. i had to do the exact same thing in pretty much the same order.. lol the rivets can me nasty!! and when you have a layer of rust like me it makes things worse.. but were both at the same step so i wish us both luck. lol
Post Fiend
Joined: Sep 2006
Posts: 5,181
Likes: 3
From: Across from the neighbors

I wish i had better pics of my front hangers. THe frame of my 2wd crew is the same as your 4wd steve. I just boxed it square on the ends and made hangers. Kinda wish i had it to do over after ive saw a few other designs.