


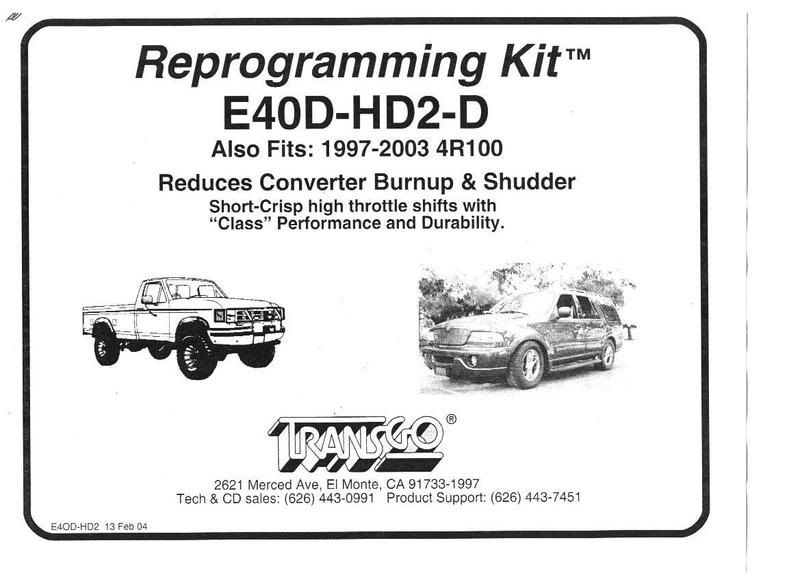
TransGo E4OD-HD2-D Install Article
Thread Starter
|
Post Fiend
Joined: Feb 2006
Posts: 11,892
Likes: 2
From: Middle Tennessee
TransGo E4OD-HD2-D Install Article
This is my attempt, with what I have, at a writeup to hopefully clear up how simple the TransGo install can be despite the instructions, which leave a bit to be desired.
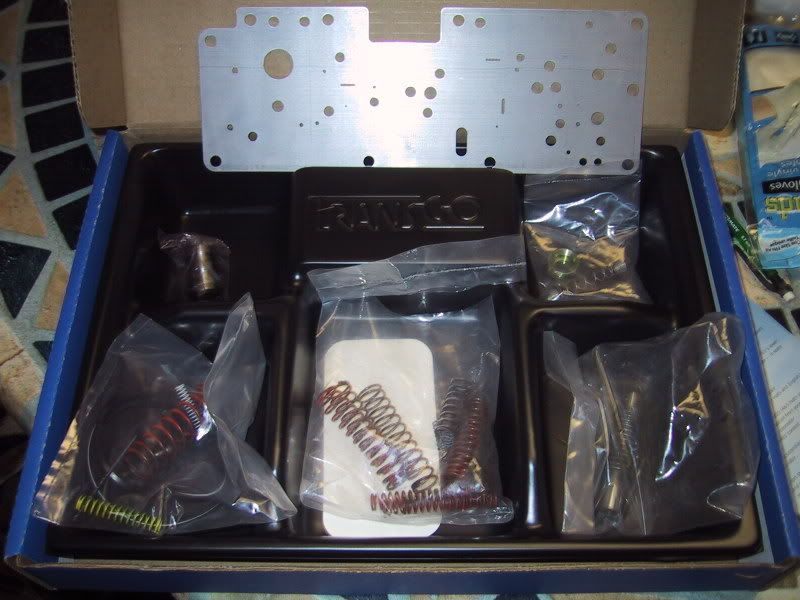
There are several kits available on Ebay. There is the tugger, this one, and a cheaper version I would not fool with. Now, the Transgo kit includes more than I used. The BTS VB uses a Transgo plate and most likely the same parts from what I have heard, and that was pretty reliable info.
For the R&R of the pan and VB go to Guzzles site or view the Transgo link.
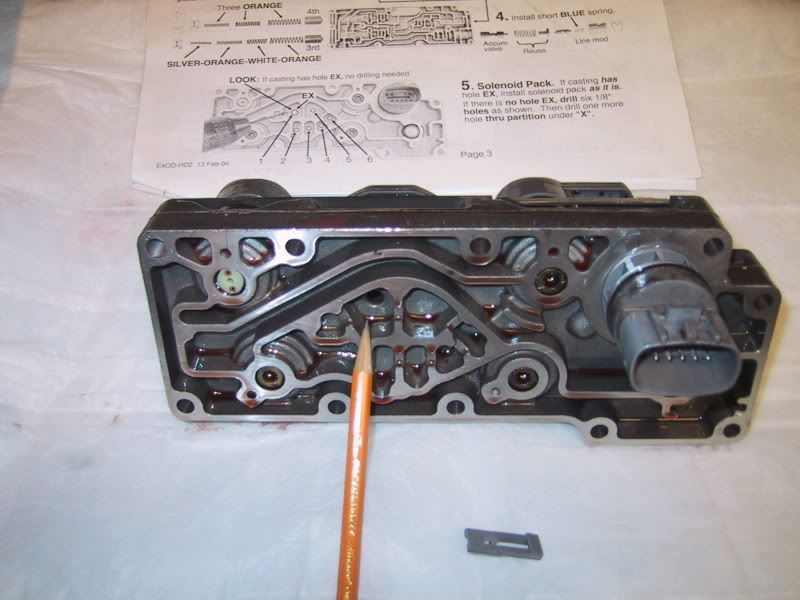
Before we go, I used Valvoline full synthetic Mercon V I got from O'Reilly for $3.99/qt. Here we go, here's the instructions with some notes:
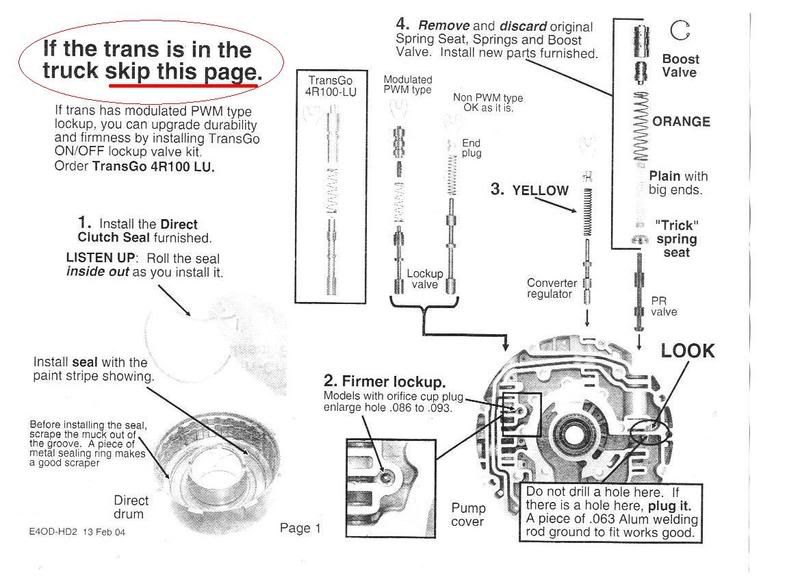

Whew. Those instruction rock eh? Pics to folow.
There are several kits available on Ebay. There is the tugger, this one, and a cheaper version I would not fool with. Now, the Transgo kit includes more than I used. The BTS VB uses a Transgo plate and most likely the same parts from what I have heard, and that was pretty reliable info.
For the R&R of the pan and VB go to Guzzles site or view the Transgo link.
Before we go, I used Valvoline full synthetic Mercon V I got from O'Reilly for $3.99/qt. Here we go, here's the instructions with some notes:
Whew. Those instruction rock eh? Pics to folow.
Thread Starter
|
Post Fiend
Joined: Feb 2006
Posts: 11,892
Likes: 2
From: Middle Tennessee
OK, moving on. We see the instructions and they leave something to be desired. We look at the video from Transgo that I wish I had seen before breaking my locking tab on the solenoid pack connecter, but I digress. There is no plate in the video. There is no fooling with the main VB gasket.
Again, here is the kit:
This is going to take a few posts and a bit, so please hold the comments until I get finished. Thanks.
Again, here is the kit:
This is going to take a few posts and a bit, so please hold the comments until I get finished. Thanks.
Thread Starter
|
Post Fiend
Joined: Feb 2006
Posts: 11,892
Likes: 2
From: Middle Tennessee
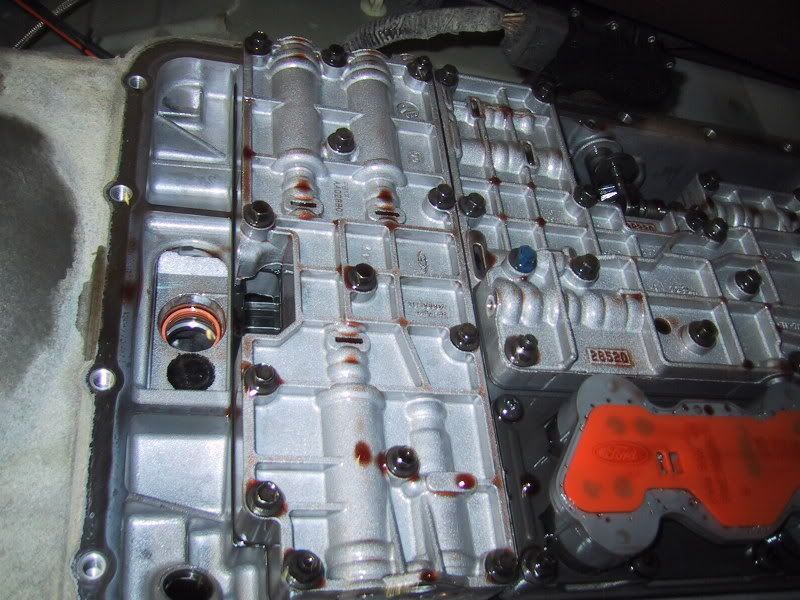
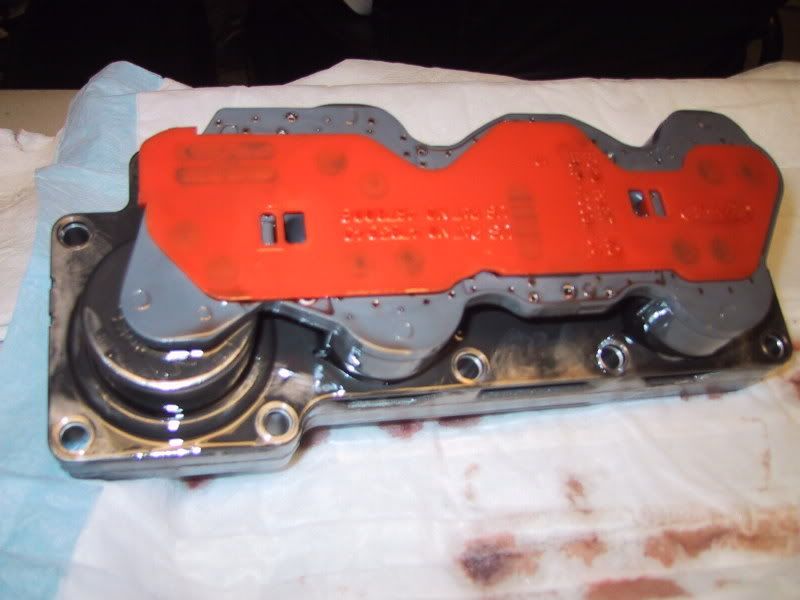
The biggest item we are concerned with is the accumulator valve body located in the front. There are writeups and videos of the removal of the pan and VB so I will not belabor that. Here is a pic of the tranny with the pan and pickup/filter removed:
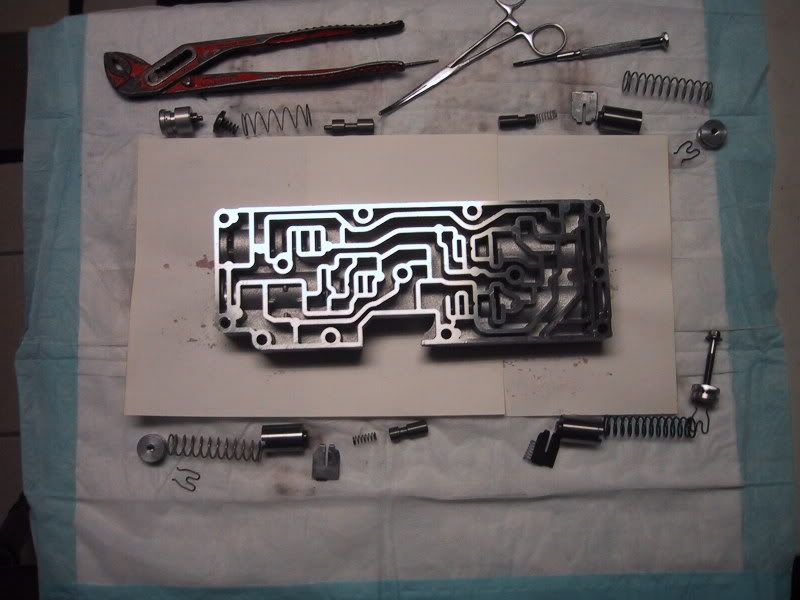
You will want to get the accumulator VB out and take the parts out. Use the bolt like the Transgo video suggests. I had to find that out. When you pull it all out it looks like this:
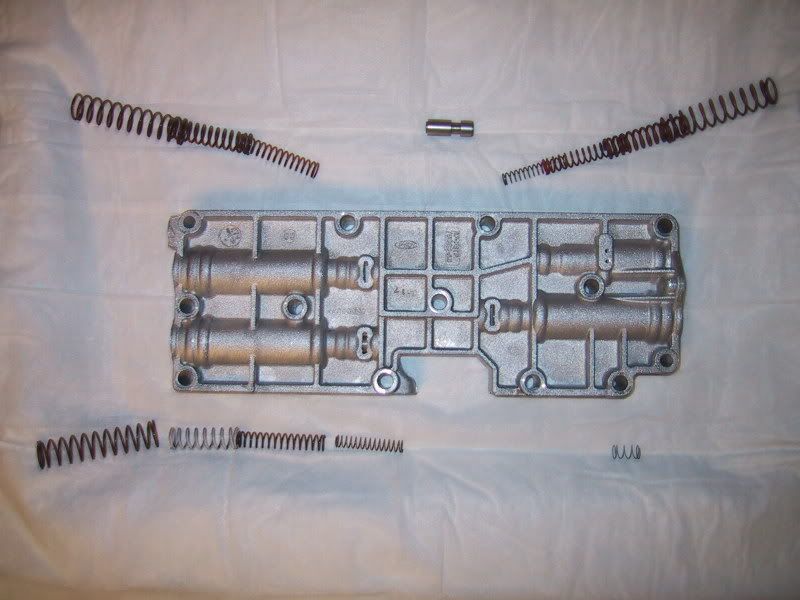
So, clean out the bores, VB and I like to use Brake Parts cleaner by the case. From the kit, these are the replacement parts and where they will go:
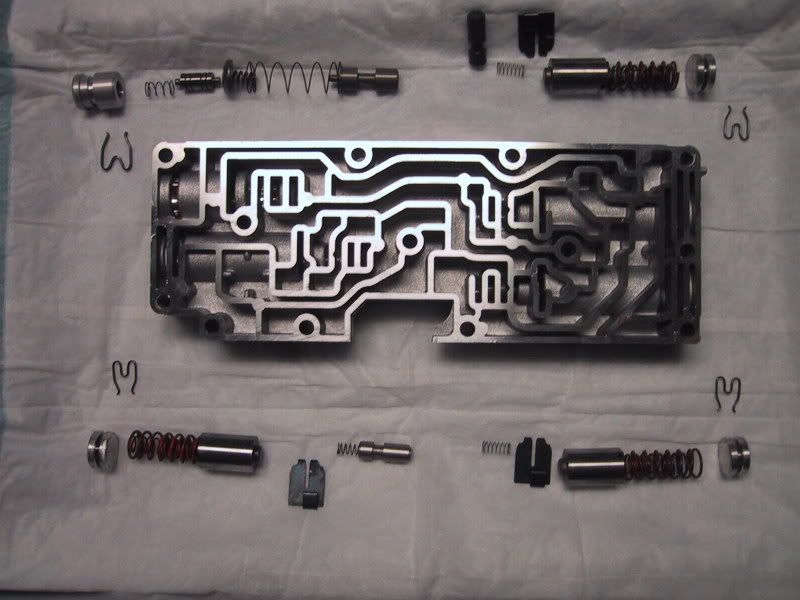
And this is how the pistons etc looked before they went in (note the VB is flipped over now) after a light lubing with Mercon V:
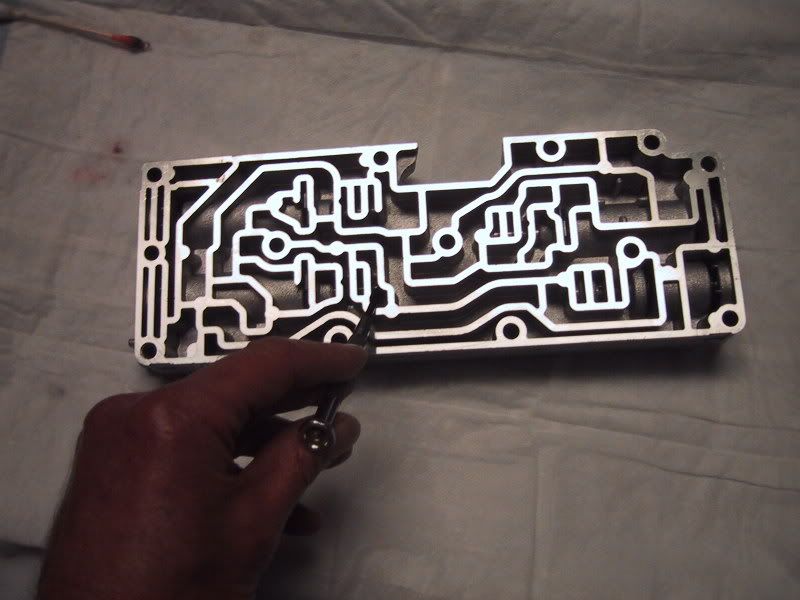
Now, before installing, you need to check the pistons and springs for correct operation to be sure they are not binding. This is easily done with a jeweler's screwdriver or equivalent:
Basically make sure the piston moves freely and snaps back smartly. Not ready to install the accumulator just yet. Next post.
You will want to get the accumulator VB out and take the parts out. Use the bolt like the Transgo video suggests. I had to find that out. When you pull it all out it looks like this:
So, clean out the bores, VB and I like to use Brake Parts cleaner by the case. From the kit, these are the replacement parts and where they will go:
And this is how the pistons etc looked before they went in (note the VB is flipped over now) after a light lubing with Mercon V:
Now, before installing, you need to check the pistons and springs for correct operation to be sure they are not binding. This is easily done with a jeweler's screwdriver or equivalent:
Basically make sure the piston moves freely and snaps back smartly. Not ready to install the accumulator just yet. Next post.
Thread Starter
|
Post Fiend
Joined: Feb 2006
Posts: 11,892
Likes: 2
From: Middle Tennessee
So, if we follow along with the lame instruction sheet, we need to pull down the Solenoid pack which uses a combination of torx head and bolts. See video for size. I believe it was #27 Torx and like 10 mm but don't quote me. Now, if you have a 5" exhaust, you will not see the connector which is outside the tranny above the pan. You can barely even get your hands on it once you realize you fubared something. At any rate, it does not have a heat shield like the video shows, rather a protective sheathing. I broke my locking tab, whoopdidoo. Well it was a PITA getting it back on so do it right.
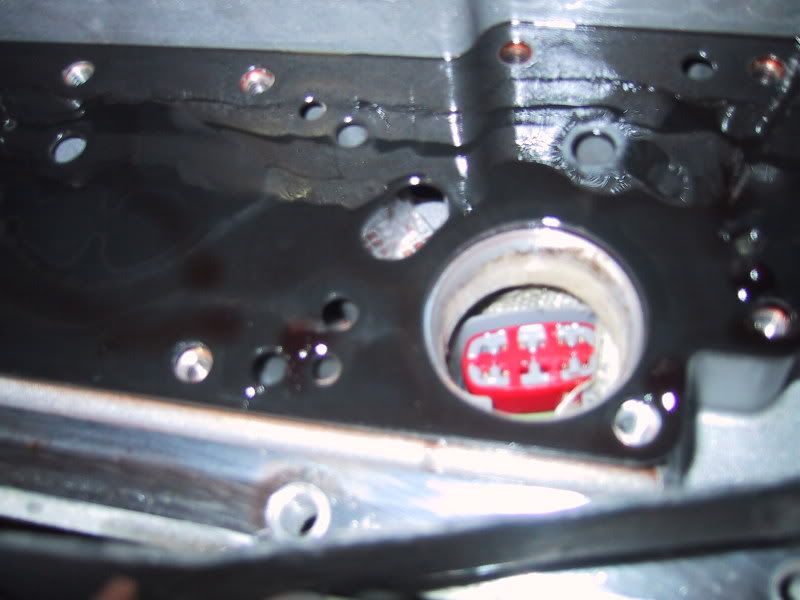
Here's a pic of the solenoid pack connecter after I broke the tab prying the pack off. Bottom looking up. Goes right out the top and an Oring is the only seal there, Clever eh?
So here is the solenoid pack. It had a lot of crud on it for some reason.
At any rate, clean it off well and look for the hole EX, mine had it so I reinstalled it, what a waste.
See the broken tab? Also, notice that not only does it have the hole but the body itself is relieved where you would drill. Makes you wonder what Ford may have learned from Transgo eh?
Up next, drilling the plate.
Thread Starter
|
Post Fiend
Joined: Feb 2006
Posts: 11,892
Likes: 2
From: Middle Tennessee
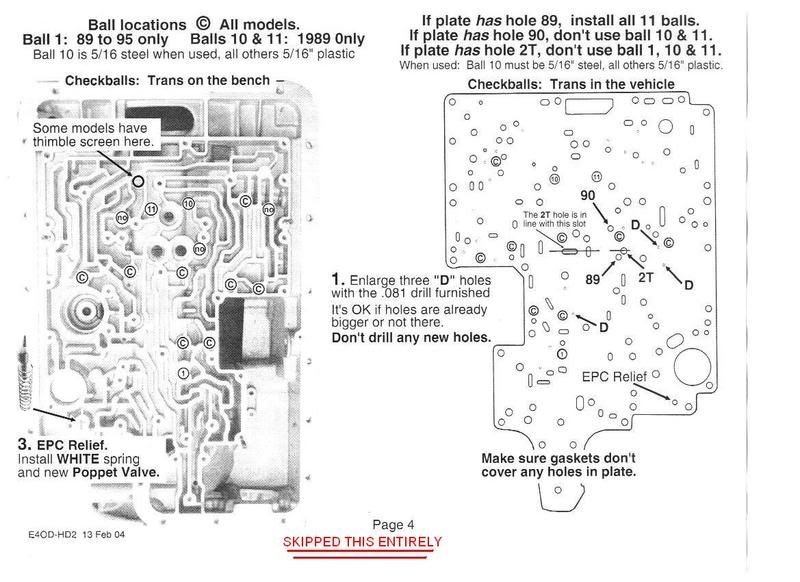
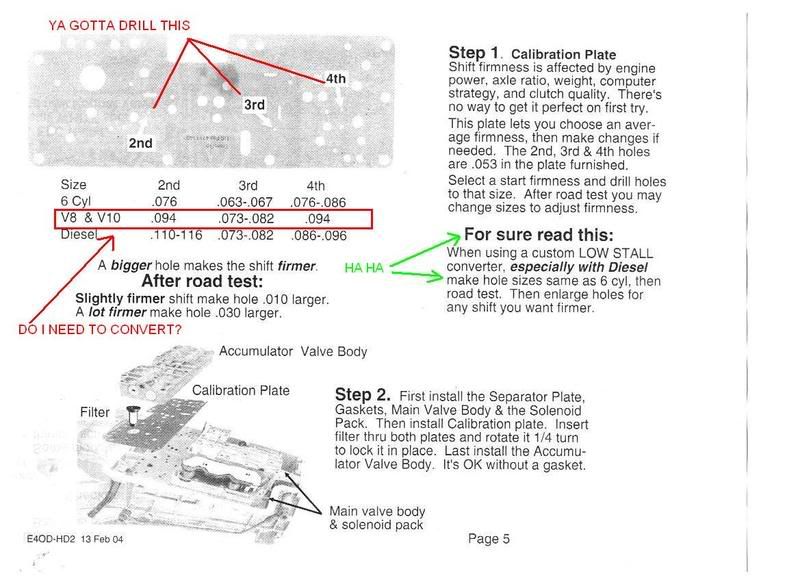
Ok, let's bring it home. The solenoid pack went back in, but before we install the accumulator VB, we need to drill the plate. Refer to the instructions I posted earlier. Now, it is a bit confusing when it shows one value for diesel engines then goes on to say " For sure read this", then recommends drilling for a 6 cyl if you have a high stall convertor. WTH is that?? I drilled for the V8 & V10 setting having a stock convertor. With tuning, it is almost too firm at times.
Anyway, these are the holes you will be drilling. You decide. I elected to "middle ground" and if it was not enough, I could drill them out larger. So far so good.

Finally, I recommend flushing the tranny now and replacing the fluid with a good Mercon V Synthetic. Cardboard is your friend here. Mark Kovalsky did a good writeup on the flush sequence and I used that procedure.

It appears that I cannot post any more pics but it was only going to be a pic of the mess on cardboard under the truck. So that is what I did and I am open to comments from others who have done this or questions. Thanks all and hope this helps.
OK, something has happened and I cannot link my pics on Photobucket. I will rectify this ASAP.
Edit: I had to post the last pics to my gallery just to get them to work. They are lame and testament to why I usually don't do that.
Anyway, these are the holes you will be drilling. You decide. I elected to "middle ground" and if it was not enough, I could drill them out larger. So far so good.
Finally, I recommend flushing the tranny now and replacing the fluid with a good Mercon V Synthetic. Cardboard is your friend here. Mark Kovalsky did a good writeup on the flush sequence and I used that procedure.
It appears that I cannot post any more pics but it was only going to be a pic of the mess on cardboard under the truck. So that is what I did and I am open to comments from others who have done this or questions. Thanks all and hope this helps.
OK, something has happened and I cannot link my pics on Photobucket. I will rectify this ASAP.
Edit: I had to post the last pics to my gallery just to get them to work. They are lame and testament to why I usually don't do that.
Thread Starter
|
Post Fiend
Joined: Feb 2006
Posts: 11,892
Likes: 2
From: Middle Tennessee
WOW, all the pics have vanished. It's a mystery????
You know what, I spent a lot of time on this. I am very unhappy. I am done for tonight. Someone can eat a bowl of you know what for this. I hope it is a photobucket thing but I wonder. Once posted I thought the pics were here.
You know what, I spent a lot of time on this. I am very unhappy. I am done for tonight. Someone can eat a bowl of you know what for this. I hope it is a photobucket thing but I wonder. Once posted I thought the pics were here.
Trending Topics
Lead Driver


Joined: Jun 2003
Posts: 8,298
Likes: 24
From: Damon (South East Texas)
FTE Stories
Ford Trucks for Ford Truck Enthusiasts

10 Best Ford Truck Engines We Miss the Most!
Joe Kucinski
2026 Shelby F-150 Off-Road: Better Than a Raptor R?
Brett Foote
2027 Super Duty Carhartt Package First Look: 12 Things You NEED to Know!
Michael S. Palmer
10 Most Surprising 2026 Ford Truck Features!
Joe Kucinski
Top 10 Ford Trucks Coming to Mecum Indy 2026
Brett Foote
5 Best / 5 Worst Ford Truck Wheels of All Time
Joe Kucinski
Ford Super Duty: 5 Things Owners LOVE, 5 Things They LOATHE!
Joe Kucinski
Every 2026 Ford Truck Engine RANKED from WORST to FIRST!
Michael S. Palmer
The Best F-150 Deal of Every Trim Level (XL through Raptor)
Joe KucinskiElder User
Joined: Sep 2005
Posts: 641
Likes: 1
From: Delta B.C.
That is one great write up!!!! Thanks for taking the time to do that!!! I know when I was looking for info on the tugger ki, there was NOTHING like this out there!!!
FWIW....
The tugger kit only includes one new steel line reg valve for 1-2 shift... Part number E4-VL-LR3 is the transgo part number for the steel valve kit ( as noted on the instructions ) I would HIGHLY recommend replacing them all..
I chose the Sonnax 36948-09K valves for my 3 and 4 line reg valves... They are supposed to provide a "firmer shift"
I also went with the Sonnax 36948-18K spring kit since it is a touch firmer than Transgo springs, and the Sonnax kit includes clip spacer to prevent the reg valve from over cycling...
http://www.sonnax.com/instructions/36948-09K-IN.pdf
Some really good reading there too.
I wanted to go with a solid shift too, so I drilled 2, 3, and 4 to .125 (1/8") on the tugger plate... I also installed a .500 line mod valve...
Just some more info to add to the pot!!!
Bob
Post Fiend
Joined: Feb 2007
Posts: 14,541
Likes: 2
From: Dallas-Ft. Worth
I went ahead and did the Main VB mods as well with mine (mine was the "2nd type"). My accumulator *did not* have the slot, so I had to drill that one. Makes me seriously wonder now if I have the "hole at EX" in my solenoid pack. Since I was a "girly man", and didn't break my connector, I never pulled it off. I'm not curious enough to drop the pan again, though. I'll have a look at it on the next fluid change.
I'll go ahead and scan my instructions in as well. They were TOTALLY different than the ones Mike has! Maybe between the two plus this thread, we can have an easy option for those that want to do these mods themselves.
BTW, I drilled my plate with the closest standard SAE bit I had that fit between the range for the diesel engine. Then hogged it out a little by rotating & angling the drill, and de-burred it with a 3/8ths bit.


