


400 Refresh
Thread Starter
|
Logistics Pro
Joined: May 2010
Posts: 4,436
Likes: 19
From: Regina, Saskatchewan

400 Refresh
Hey fellas,
Looking for some advice on my 400 motor refresh before I get too far with it.
My truck specs are in my signature, and so is my build thread with LOTS of pictures.
I've got a D7TE-A2B 400 motor, pulled from my 1979 F250... awaiting some new parts on the engine stand.
Basic plans for the refresh (not in any specific order):
1) Replace timing chain with a double roller (no idea what's in there, but I'm betting it's stock)
2) Re-gasket everything from oil pan to carb
3) Replace water pump
4) Degrease, strip old paint, throw some new paint on everything
5) Replace freeze/expansion plugs + heater cores
6) Replace rear main seal (currently leaking, but only a few drips at a time)
7) Reassemble with new hardware where possible
Put it back into the truck + drive it for the rest of the summer.
Without getting too mod-heavy (oiling mods, new bearings, etc), what else should I be doing to refresh the motor?
Oil pressure was good in the truck (based on the old stock gauges), it ran decent (wouldn't idle down properly, but the distributor didn't have its vacuum advance hooked up properly)... otherwise it's a decent motor from what I can tell.
Just looking for advice on things I may have missed for the refresh or stuff I can do that's simple that won't require a ton of time/effort.
My Mission: to reassemble the motor with fresh parts + drive it for the remainder of summer (why I don't want mod-heavy stuff this time around).
Suggestions, comments, opinions, & bashing my methods is welcomed!
FTE Legend


Joined: Jul 2010
Posts: 32,875
Likes: 48
From: Northeast, OK
I started to say that while you have it out you ought to rebuild it. But then I realized that I plan to do the same as you to the 460 in Big Blue since that engine leaks like a sieve but runs perfectly. So, I don't have a problem with your approach.
However, the oil pans on these trucks frequently leaked at the rivets holding the dip stick adapter on. So while you have the pan off you might drill those rivets and re-seal the adapter. My adapter is cast so I tapped it and used Loctite on the threads.
If you have a dial indicator you could check the lift on the cam to ensure the lobes aren't flat. But other than that it sounds like a good plan.
Thread Starter
|
Logistics Pro
Joined: May 2010
Posts: 4,436
Likes: 19
From: Regina, Saskatchewan
I started to say that while you have it out you ought to rebuild it. But then I realized that I plan to do the same as you to the 460 in Big Blue since that engine leaks like a sieve but runs perfectly. So, I don't have a problem with your approach.
However, the oil pans on these trucks frequently leaked at the rivets holding the dip stick adapter on. So while you have the pan off you might drill those rivets and re-seal the adapter. My adapter is cast so I tapped it and used Loctite on the threads.
If you have a dial indicator you could check the lift on the cam to ensure the lobes aren't flat. But other than that it sounds like a good plan.
However, the oil pans on these trucks frequently leaked at the rivets holding the dip stick adapter on. So while you have the pan off you might drill those rivets and re-seal the adapter. My adapter is cast so I tapped it and used Loctite on the threads.
If you have a dial indicator you could check the lift on the cam to ensure the lobes aren't flat. But other than that it sounds like a good plan.
I knew I was missing a few things on my list - the oil pan is definitely one of them. It leaks quite badly at the rivets (which I was surprised to see it was riveted when I cleaned the grease off). You suggest loctite on the plate as well? I was thinking I would use something like Permatex Aviation Gasket Maker or some appropriate RTV that's highly oil resistant.
For #2, you mean to take the cam out of the motor and check its lobes?
Or do you mean to simply measure at the lifter with the dial indicator?
Thread Starter
|
Logistics Pro
Joined: May 2010
Posts: 4,436
Likes: 19
From: Regina, Saskatchewan
I haven't mentioned this yet.. but figured I would give some additional background on why I don't want to do a full rebuild just yet.
Here are my compression numbers from my build thread:
Compression on the driver side: Maximum of 140 psi, minimum of 135 psi (across all cylinders)
Compression on the passenger side: Maximum of 140 psi, minimum of 132 psi (across all cylinders)
The only issue I could find as to why it wouldn't idle correctly was because the arm on the vacuum advance (shown below) was not connected at all. The photo below was after I reconnected the vacuum modulator arm, and found a broken e-clip within the dizzy housing.

One last piece of information... when I connected the vacuum gauge to the back of the intake, I was pulling 19.X inches of mercury at idle (even though it was idling slightly high at the time because of the distributor vacuum advance issue I had not yet found).
I would call that a "healthy" motor by my standards... but some of you might have a different opinion which I would like to hear.
Here are my compression numbers from my build thread:
Compression on the driver side: Maximum of 140 psi, minimum of 135 psi (across all cylinders)
Compression on the passenger side: Maximum of 140 psi, minimum of 132 psi (across all cylinders)
The only issue I could find as to why it wouldn't idle correctly was because the arm on the vacuum advance (shown below) was not connected at all. The photo below was after I reconnected the vacuum modulator arm, and found a broken e-clip within the dizzy housing.
One last piece of information... when I connected the vacuum gauge to the back of the intake, I was pulling 19.X inches of mercury at idle (even though it was idling slightly high at the time because of the distributor vacuum advance issue I had not yet found).
I would call that a "healthy" motor by my standards... but some of you might have a different opinion which I would like to hear.

Junior User
Joined: Jul 2015
Posts: 67
Likes: 0
I think the only comment I have is that the reluctor wheel on that distributor looks pretty crusty and I'd definitely be looking to replace that and the distributor pickup just as a matter of principle. Otherwise, it sounds like the bottom end is in good shape and the valves are sealing well enough, but it might still be worthwhile to do a leakdown test and see if there are any hidden issues (don't know if there are any that a compression test wouldn't catch).
FTE Legend
Joined: Jul 2010
Posts: 32,875
Likes: 48
From: Northeast, OK
Here's how I did it on Dad's 400: https://www.ford-trucks.com/forums/1...l#post15742208. But you might have to go back a page or two in order to see everything I did.
As for the cam, don't remove it. Just check on each rocker to see that you have basically the same lift, which indicates the lobes are fine.
And, I agree that a leakdown test is warranted. In fact, I plan to do that on Big Blue's 460 when I pull it, even though the engine has just been rebuilt. A leakdown test beats a compression test significantly. I had an engine running very poorly that a compression test said was fine. But then I ran a leakdown test I found a blown headgasket and bad valves.
Thread Starter
|
Logistics Pro
Joined: May 2010
Posts: 4,436
Likes: 19
From: Regina, Saskatchewan
Here's how I did it on Dad's 400: https://www.ford-trucks.com/forums/1...l#post15742208. But you might have to go back a page or two in order to see everything I did.
As for the cam, don't remove it. Just check on each rocker to see that you have basically the same lift, which indicates the lobes are fine.
And, I agree that a leakdown test is warranted. In fact, I plan to do that on Big Blue's 460 when I pull it, even though the engine has just been rebuilt. A leakdown test beats a compression test significantly. I had an engine running very poorly that a compression test said was fine. But then I ran a leakdown test I found a blown headgasket and bad valves.
As for the cam, don't remove it. Just check on each rocker to see that you have basically the same lift, which indicates the lobes are fine.
And, I agree that a leakdown test is warranted. In fact, I plan to do that on Big Blue's 460 when I pull it, even though the engine has just been rebuilt. A leakdown test beats a compression test significantly. I had an engine running very poorly that a compression test said was fine. But then I ran a leakdown test I found a blown headgasket and bad valves.
Your research will pay off for me, so big reps to you cause you deserve it. Thanks!
EDIT: Apparently I need to spread the love a little more. Your reps will come later when I'm allowed to give them LOL
Trending Topics
FTE Legend
Joined: Jul 2010
Posts: 32,875
Likes: 48
From: Northeast, OK
FTE Stories
Ford Trucks for Ford Truck Enthusiasts

Top 6 Best Deals Available on New Fords & Lincolns Right Now
Brett Foote
This Hennessey Takes the Expedition Tremor's Off-Roading Capability to the Next Level
Verdad Gallardo
Top 10 Fords at 2026 Carlisle Ford Nationals
Joe Kucinski
3 Best / 3 Worst Parts of Modern Ford Ownership
Brett Foote
10 Amazing Upgrades That Solve Common Ford Truck Owner Headaches
Pouria Savadkouei
Every 2026 Ford Engine Explained
Brett Foote
10 Ugly Ford Trucks That We Still Kinda Love
Joe Kucinski
10 Things Every Truck Owner NEEDS (2026 Edition)
Michael S. Palmer
Rezvani's Latest Post-Apocalyptic Monster Is a Ford F-150 Raptor Underneath
Verdad GallardoThread Starter
|
Logistics Pro
Joined: May 2010
Posts: 4,436
Likes: 19
From: Regina, Saskatchewan
Update time (without pictures for now).
1) One of the cam bearings is in really bad shape - metal flakes in the bottom of the pan and you can visually see the bearing is damaged (possibly walked out??)
2) Distributor won't budget - I cracked the housing trying to pry it out today. I've tried lots of heat, and had it soaking with PB Blaster for the past 4 weeks... Might have to let a machine shop look at removing it.
3) The cam lobe closest to the bad cam bearing looks like it's also damaged... several other areas on the cam look like they have seen better days (brown staining, uneven wear on lobes, etc).
So..... long story short... I think I'm sending my block off to a machine shop to have new cam bearings + cam installed.
Might also have the shop look at my crank + rods + bearings as well while they're at it.
Once I get some pictures up, you'll see what I mean. Wasn't a great day today, but glad I caught this stuff before too much damage was done.
Opinions? Comments? Suggestions?
Thread Starter
|
Logistics Pro
Joined: May 2010
Posts: 4,436
Likes: 19
From: Regina, Saskatchewan
Im definitely a fan of the oiling system mods, just want to know what makes those bearings different from the stock ones. I'm guessing the oil slot in the middle of them is widened to accommodate the oiling mod?
Stock main bearings can still be used after the oiling mod, correct?
Junior User
Joined: Jul 2015
Posts: 67
Likes: 0
For the distributor, try using a pipe wrench on the lower part of the housing and simply trying to get it to turn. Once it turns, it should make it a lot easier to pull out. I had to do something similar on my '79 to get it loosened up enough to try and adjust the timing, which put me in a good position when I had to remove it a few months later.
Thread Starter
|
Logistics Pro
Joined: May 2010
Posts: 4,436
Likes: 19
From: Regina, Saskatchewan
For the distributor, try using a pipe wrench on the lower part of the housing and simply trying to get it to turn. Once it turns, it should make it a lot easier to pull out. I had to do something similar on my '79 to get it loosened up enough to try and adjust the timing, which put me in a good position when I had to remove it a few months later.
Wish me luck! Won't be until Tuesday night that I get back at it. Pics from the previous post coming soon.
Thread Starter
|
Logistics Pro
Joined: May 2010
Posts: 4,436
Likes: 19
From: Regina, Saskatchewan
Just posted in my build, so I thought I would copy-paste to here to give an update...
Things ain't looking so good!
1) Some sort of bearing shattered inside the block (thinking cam bearing - see post below)
2) Broke off an easy-out in a snapped exhaust head bolt... oh joy!
3) Can't make the distributor budge.... and I broke the top of the dizzy housing prying on it with a long crow bar!
In summary... not a good weekend for my motor "refresh"....
COPIED FROM MY BUILD THREAD.
More progress with a few surprises.
So here's basically where we started again. Pulled the intake after removing the oil pressure sending unit.

Distributor has been soaking for another week yet... this makes it week 4 that its been soaking... And it's still stuck!!!!!

Double check TDC before pulling the harmonic balancer off.

Pulled timing cover.

OEM Nylon cam timing gear and OEM crank timing gear. They will get replaced with a Cloes Double Roller set. You'll also notice by this point that I'm not on TDC... I was 1 full rotate off of TDC, so I corrected that immediately.

Talk about stretch!

TDC corrected.

And now for the next surprise... I pulled the pan to find metal chuncks!!! ARG!!!


More chunks in the pan! CRAP!
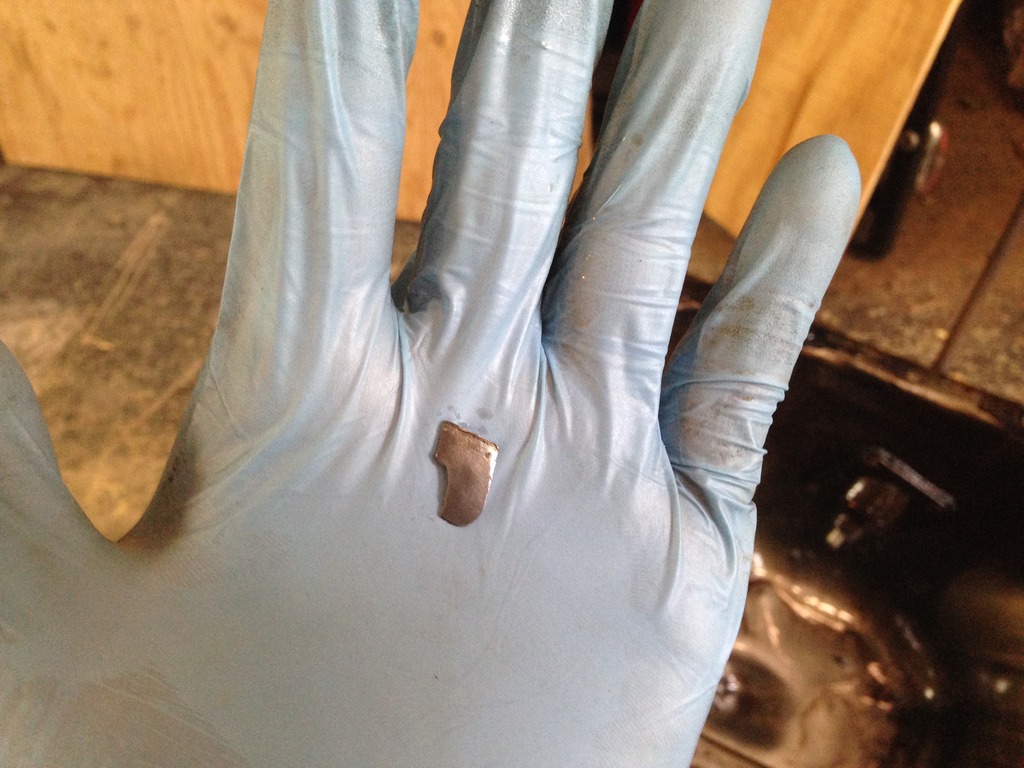
Pulled out the largest piece I could find to photograph. It's about the size of a dime.
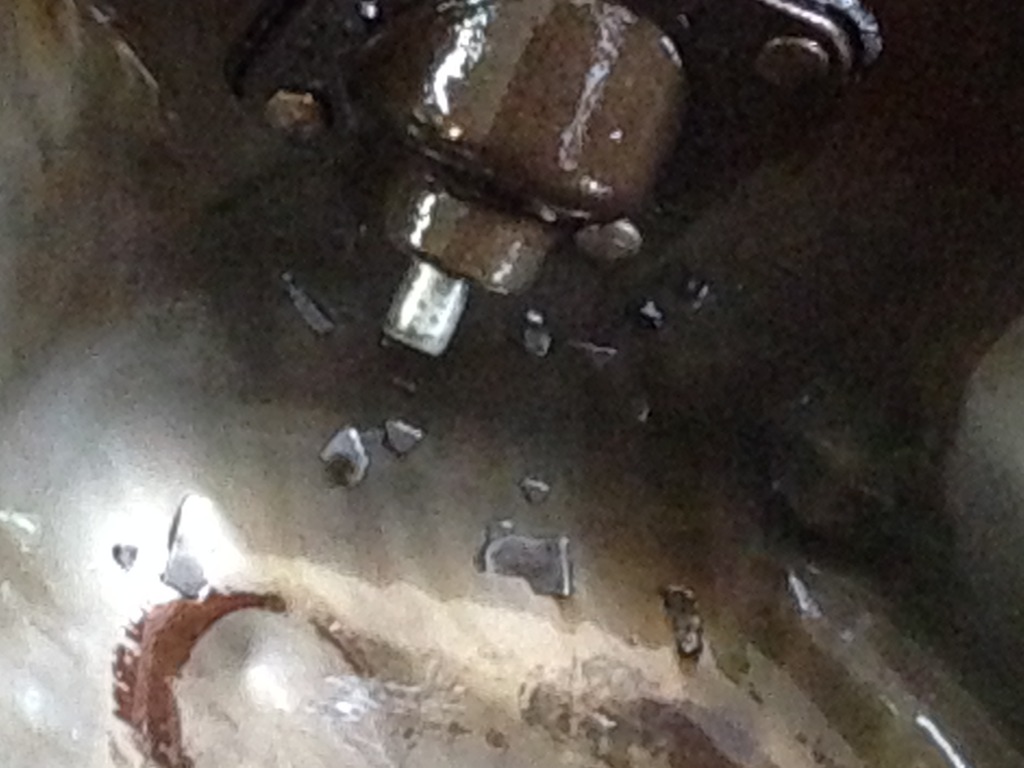
After further investigation looking for the source of the metal chunks, I found what looked to be a "walked-out" cam bearing and subsequent failure near/under Main bearing #3.
Well... I'm glad I pulled the pan now, cause this looks like my motor may be toast!

Note the shards of cam bearing sticking out of its home at the top of the photo... Also take note of the "finger print" that the shards of bearing left on the cam lobe (bottom of the adjacent cam lobe).

After all that jazz... I turned the motor upside down to try and hammer on the bottom of the distributor after plenty of heat... NO DICE!
How could the day get any worse do you ask? Well... stay seated...
I was drilling a pilot hole for an easy-out. Got the 1/8" hole drilled, dead center, no problems...
Pounded the easy-out into the remnants of the exhaust head bolt, began to rotate, and SNAP! Easy-out broke off flush with my pilot hole...
GOOD GRIEF! What a weekend!!!!
Things ain't looking so good!
1) Some sort of bearing shattered inside the block (thinking cam bearing - see post below)
2) Broke off an easy-out in a snapped exhaust head bolt... oh joy!
3) Can't make the distributor budge.... and I broke the top of the dizzy housing prying on it with a long crow bar!
In summary... not a good weekend for my motor "refresh"....
COPIED FROM MY BUILD THREAD.
More progress with a few surprises.
So here's basically where we started again. Pulled the intake after removing the oil pressure sending unit.
Distributor has been soaking for another week yet... this makes it week 4 that its been soaking... And it's still stuck!!!!!
Double check TDC before pulling the harmonic balancer off.
Pulled timing cover.
OEM Nylon cam timing gear and OEM crank timing gear. They will get replaced with a Cloes Double Roller set. You'll also notice by this point that I'm not on TDC... I was 1 full rotate off of TDC, so I corrected that immediately.
Talk about stretch!
TDC corrected.
And now for the next surprise... I pulled the pan to find metal chuncks!!! ARG!!!
More chunks in the pan! CRAP!
Pulled out the largest piece I could find to photograph. It's about the size of a dime.
After further investigation looking for the source of the metal chunks, I found what looked to be a "walked-out" cam bearing and subsequent failure near/under Main bearing #3.
Well... I'm glad I pulled the pan now, cause this looks like my motor may be toast!
Note the shards of cam bearing sticking out of its home at the top of the photo... Also take note of the "finger print" that the shards of bearing left on the cam lobe (bottom of the adjacent cam lobe).
After all that jazz... I turned the motor upside down to try and hammer on the bottom of the distributor after plenty of heat... NO DICE!
How could the day get any worse do you ask? Well... stay seated...
I was drilling a pilot hole for an easy-out. Got the 1/8" hole drilled, dead center, no problems...
Pounded the easy-out into the remnants of the exhaust head bolt, began to rotate, and SNAP! Easy-out broke off flush with my pilot hole...
GOOD GRIEF! What a weekend!!!!