


 Great job ! Thanks


My Ford 300 Engine Build
Thread Starter
|
Postmaster
Joined: Nov 2012
Posts: 2,806
Likes: 8
From: Langley, BC
My Ford 300 Engine Build
When I first bought the truck, I immediately had the V8 swap mentality... and then I got to really like driving the truck... and then I got to really like pushing the engine to its limits... and then I wanted more. Eventually, the engine needed to come out for a re-seal at minimum, but that's not how I am. I am really good at overdoing things, and that's what I'm doing with this. Here's my progress so far. I will update as I go. At some point soon it will be at the machine shop to get worked on.
Attachment 287629
Attachment 291146
Attachment 287768
Attachment 291147
Attachment 290545
The head weighed 75lb, and it was stuck on there really good. With it unbolted and the hoist lifting more than the weight of the head, it still took a fair bit of prying to get it off.
Attachment 291148
I labelled all the pushrods for reinstallation later, but I've now realized that I wasted my time as not only will I be needing different lengths, but I'm also switching out to 3/8" pushrods.
Attachment 291149
My block had the C6AE casting, which I'd never noticed before. So, concerned, I had to settle my worries and confirm that I had a 300. I did. I was happy.
Attachment 291150
I searched long and hard to find myself a 240 head. I don't live anywhere near a wrecking yard with anything pre-EFI era so it was actually a really big deal for me to find one. I put it through an electrolysis bath and it came out great. It's bleached look here is from the WD40 that was sprayed on it to get the water out.
However, when I pulled my head off the engine, I discovered that it actually already had a 240 head. It was a bittersweet moment. I was always looking forward to slapping on a 240 head to see what difference it would make. Turns out I already knew.
Attachment 291151
I bought these oversized valves from SI Valves as per a recommendation by a user on this forum. They're well made as far I can tell.
Attachment 291152
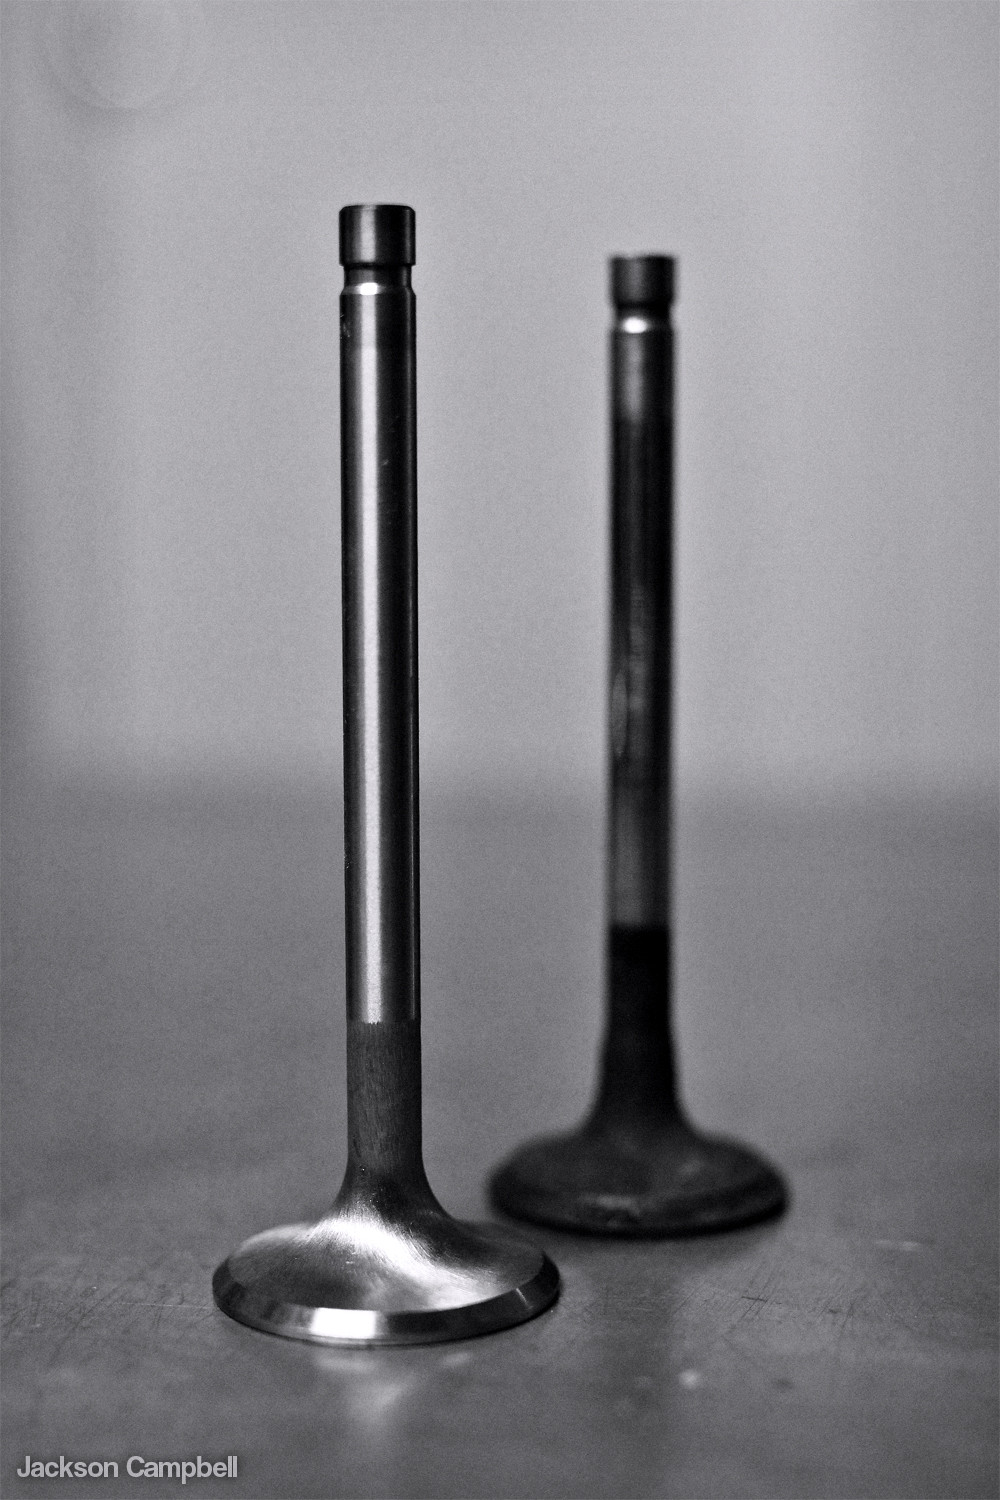
Here they are compared to an OEM valve out of my junkyard head. Quite a big difference. I probably should've gone up to a 2.02" valve as it has better flow up to 0.400" valve lift over the 1.94", but that's just me nitpicking. I'll survive.
Attachment 291153
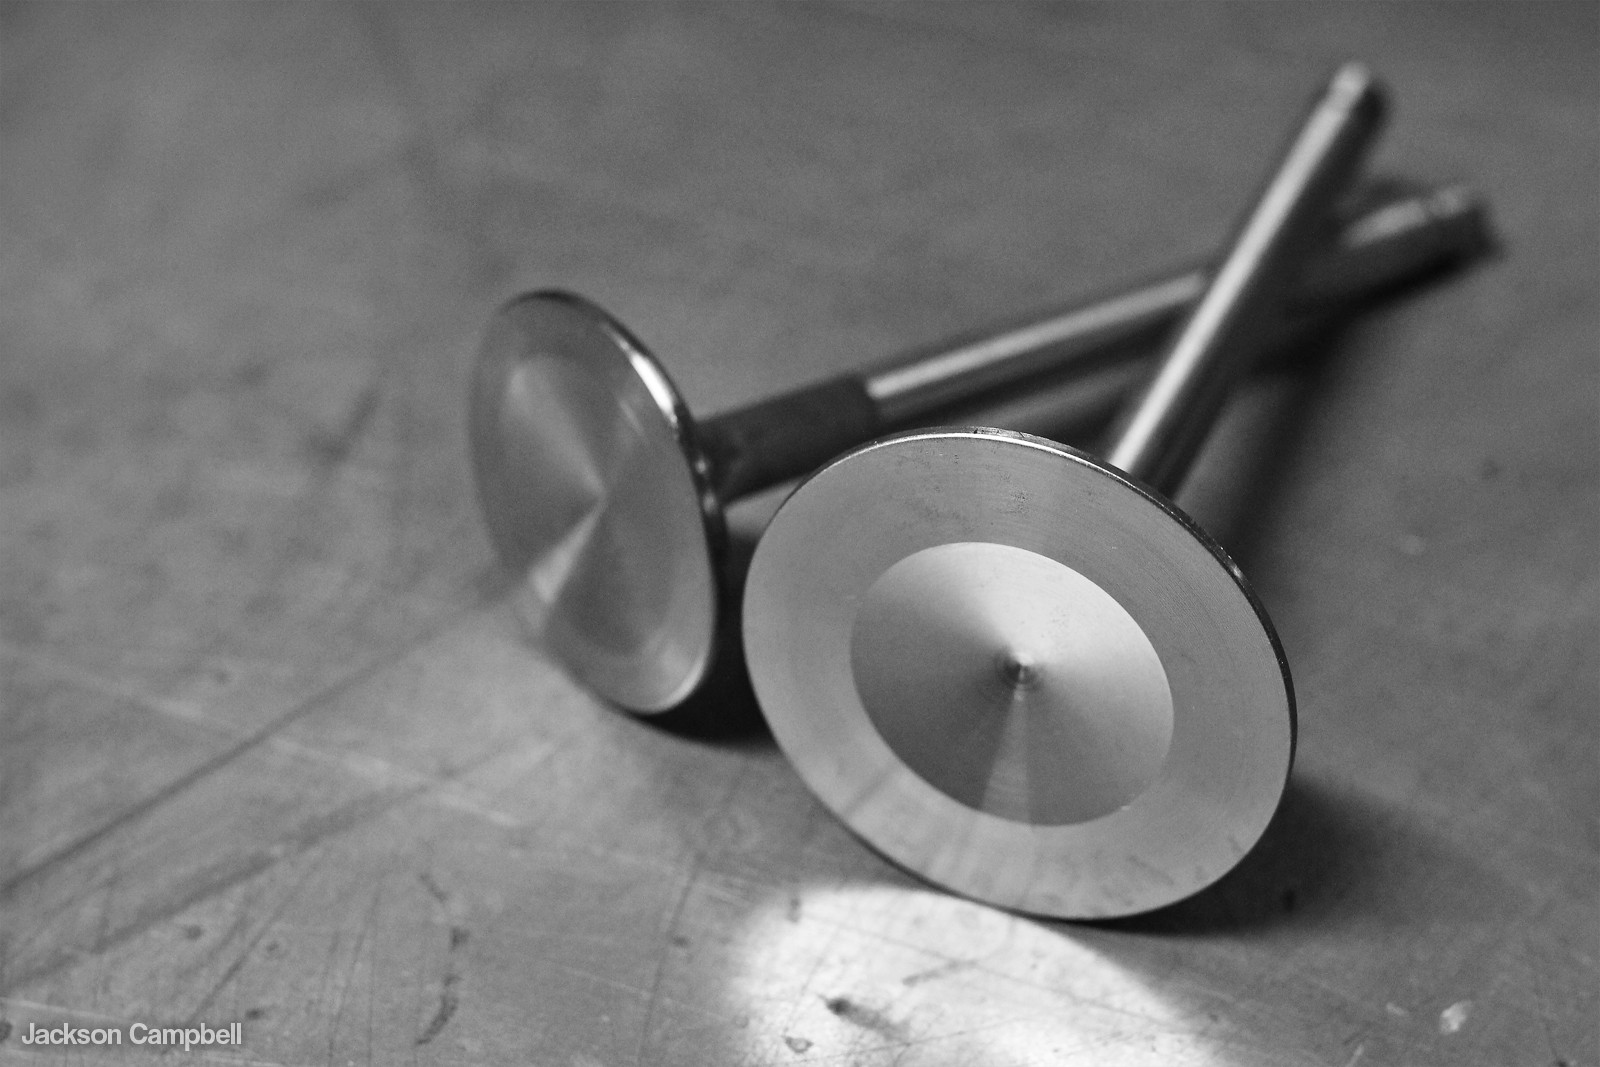
In my recent post, I explained that SI actually discontinued their oversized valves for the 300, so I was forced to buy small block Chevy 1.60" exhaust valves. They're the same other than the 4.911" length. The Ford length is 4.810". I'll make them work.
Attachment 291154
Just goes to show how thousandths matter.
Attachment 291155
Perspective aside, you can see they're a bit taller.
They look sexy as hell together though!
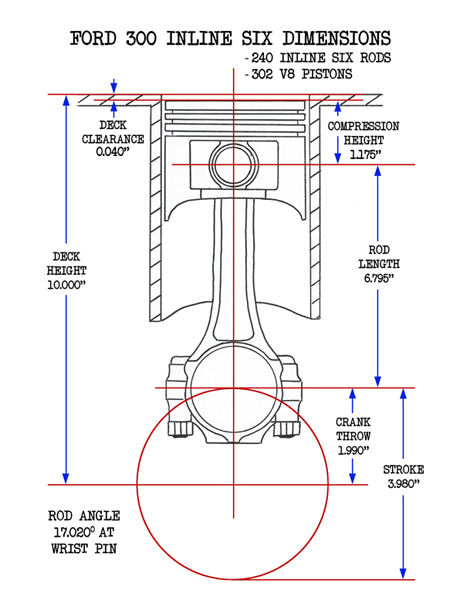
Anyway, onto the bottom end. I got 240 rods for the engine, as this not only allows for a better rod length to stroke ratio or rod angle, which means less piston side loading and therefore less wear on the pistons and the cylinders, but their added length (6.795") compared to a 300 rod (6.210") allows the use of a smaller, lighter piston, (the pistons I ordered only weigh 386g each) which means easier high-RPM. The only downside to this is theoretical, in that with the longer rod it will take longer and also not last as long for the explosive forces of the compression stroke to have maximum leverage on the crankshaft, and since torque is measured by (force) x (distance), I will theoretically not have as much torque as I could've with the shorter 300 rods. What I mean by this is that with a short rod, it doesn't take as much downward piston travel for the rod to kick out at 90 degrees to the crank and apply leverage. Because it doesn't take as long for it to do this, the action starts earlier and therefore lasts longer. That being said, this engine is getting built up for power. I'm not going to notice this effect.
Attachment 291158
Here's a diagram I drew up of it. Should you go this route, you'll need small block Ford pistons meant for a 331/347 stroker as those have the smaller ~1.170" compression height. If you go with the early C5AE casting 240 rods like I did, the ones without the piston oil hole, you'll need pistons with a wrist pin diameter of 0.912". The C5AE rods are stronger. The C8AE oil-hole rods are prone to failure at the oil hole in high horsepower/high stress applications.
And this is what I'm left with.
I have much more for in stock for this engine. Stay tuned to find out. I will make every attempt I can at teaching as I go and also answering any questions you guys may have.
Attachment 287629
Attachment 291146
Attachment 287768
Attachment 291147
Attachment 290545
The head weighed 75lb, and it was stuck on there really good. With it unbolted and the hoist lifting more than the weight of the head, it still took a fair bit of prying to get it off.
Attachment 291148
I labelled all the pushrods for reinstallation later, but I've now realized that I wasted my time as not only will I be needing different lengths, but I'm also switching out to 3/8" pushrods.
Attachment 291149
My block had the C6AE casting, which I'd never noticed before. So, concerned, I had to settle my worries and confirm that I had a 300. I did. I was happy.
Attachment 291150
I searched long and hard to find myself a 240 head. I don't live anywhere near a wrecking yard with anything pre-EFI era so it was actually a really big deal for me to find one. I put it through an electrolysis bath and it came out great. It's bleached look here is from the WD40 that was sprayed on it to get the water out.
However, when I pulled my head off the engine, I discovered that it actually already had a 240 head. It was a bittersweet moment. I was always looking forward to slapping on a 240 head to see what difference it would make. Turns out I already knew.
Attachment 291151
I bought these oversized valves from SI Valves as per a recommendation by a user on this forum. They're well made as far I can tell.
Attachment 291152
Here they are compared to an OEM valve out of my junkyard head. Quite a big difference. I probably should've gone up to a 2.02" valve as it has better flow up to 0.400" valve lift over the 1.94", but that's just me nitpicking. I'll survive.
Attachment 291153
In my recent post, I explained that SI actually discontinued their oversized valves for the 300, so I was forced to buy small block Chevy 1.60" exhaust valves. They're the same other than the 4.911" length. The Ford length is 4.810". I'll make them work.
Attachment 291154
Just goes to show how thousandths matter.
Attachment 291155
Perspective aside, you can see they're a bit taller.
They look sexy as hell together though!
Anyway, onto the bottom end. I got 240 rods for the engine, as this not only allows for a better rod length to stroke ratio or rod angle, which means less piston side loading and therefore less wear on the pistons and the cylinders, but their added length (6.795") compared to a 300 rod (6.210") allows the use of a smaller, lighter piston, (the pistons I ordered only weigh 386g each) which means easier high-RPM. The only downside to this is theoretical, in that with the longer rod it will take longer and also not last as long for the explosive forces of the compression stroke to have maximum leverage on the crankshaft, and since torque is measured by (force) x (distance), I will theoretically not have as much torque as I could've with the shorter 300 rods. What I mean by this is that with a short rod, it doesn't take as much downward piston travel for the rod to kick out at 90 degrees to the crank and apply leverage. Because it doesn't take as long for it to do this, the action starts earlier and therefore lasts longer. That being said, this engine is getting built up for power. I'm not going to notice this effect.
Attachment 291158
Here's a diagram I drew up of it. Should you go this route, you'll need small block Ford pistons meant for a 331/347 stroker as those have the smaller ~1.170" compression height. If you go with the early C5AE casting 240 rods like I did, the ones without the piston oil hole, you'll need pistons with a wrist pin diameter of 0.912". The C5AE rods are stronger. The C8AE oil-hole rods are prone to failure at the oil hole in high horsepower/high stress applications.
And this is what I'm left with.
I have much more for in stock for this engine. Stay tuned to find out. I will make every attempt I can at teaching as I go and also answering any questions you guys may have.
Thread Starter
|
Postmaster
Joined: Nov 2012
Posts: 2,806
Likes: 8
From: Langley, BC
Thanks, boys. Wouldn't have been able to do it without the collective intelligence of people such as yourselves. I should have my pistons in sometime soon. They're special order so I have to wait for the store to get them in. They're nice and fancy forged aluminum.  The pistons and the SBC valves were actually the first things I'd bought locally for my truck. It's usually significantly cheaper for me to order out of the States and import it.
The pistons and the SBC valves were actually the first things I'd bought locally for my truck. It's usually significantly cheaper for me to order out of the States and import it.
Posting Guru
Joined: Mar 2013
Posts: 1,294
Likes: 0
Trending Topics
Thread Starter
|
Postmaster
Joined: Nov 2012
Posts: 2,806
Likes: 8
From: Langley, BC
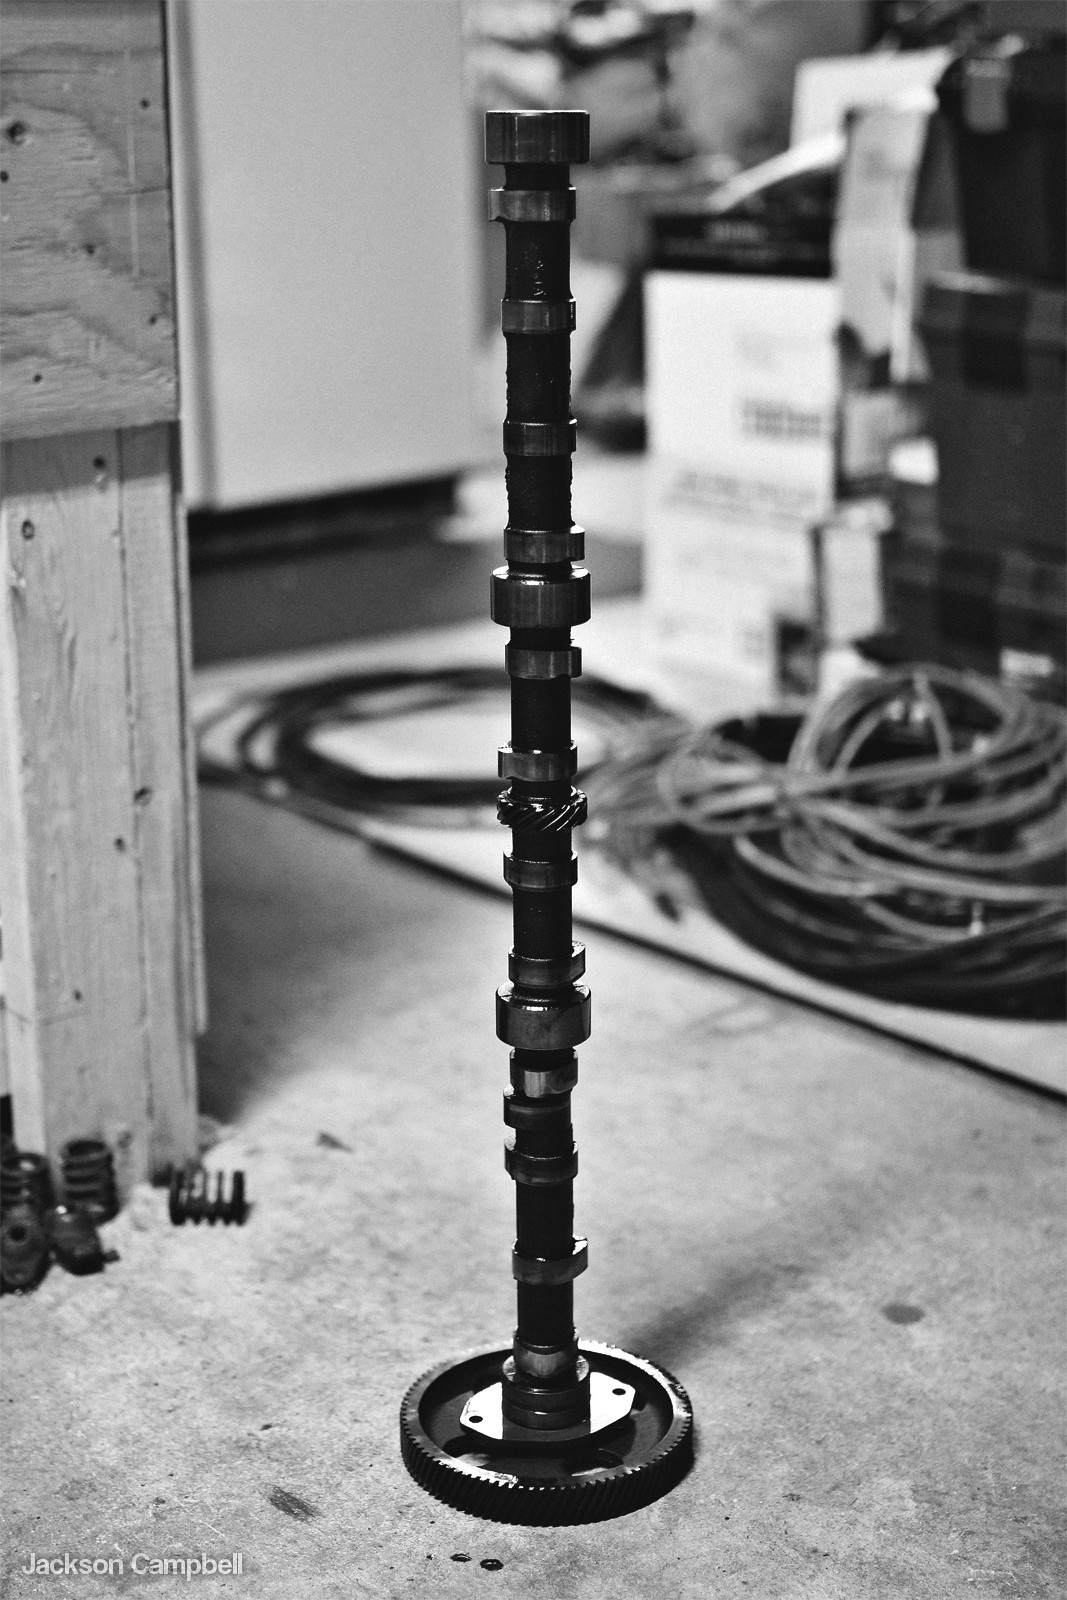
Found something a bit interesting today. My cam gear is metal, not nylon like I expected it to be. It does say FoMoCo on it and I seriously doubt this engine has ever had someone messing around with its internals. This is indicative to a heavy duty 300. Wouldn't that be a nice surprise to have the forged crank!

FTE Stories
Ford Trucks for Ford Truck Enthusiasts

10 Things Every Truck Owner NEEDS (2026 Edition)
Michael S. Palmer
Rezvani's Latest Post-Apocalytic Monster Is a Ford F-150 Raptor Underneath
Verdad Gallardo
Top 10 Most Expensive Ford Trucks Ever Sold on Bring a Trailer
Joe Kucinski
2027 Ford Super Duty Buyer's Guide (Every Model, Engine, & Package)
Brett Foote
Top 10 Ford Truck Tragedies
Joe Kucinski
AEV FXL Super Duty - the Super Duty Raptor Ford Doesn't Make
Brett Foote
Lobo Vs Lobo: Proof the F-150 Lobo Should Be Even Lower!
Michael S. Palmer
Ford's 2001 Explorer Sportsman Concept Looks For a New Home
Verdad Gallardo
10 Best Ford Truck Engines We Miss the Most!
Joe KucinskiThread Starter
|
Postmaster
Joined: Nov 2012
Posts: 2,806
Likes: 8
From: Langley, BC
Pulled the camshaft out. For those who don't know, the procedure to remove the camshaft out of a Ford 300 is to pop off the timing cover, rotate the engine until the timing marks line up, remove the fuel pump, turn the engine upside down, remove the two 1/2" camshaft thrust plate bolts which will be behind two of the four holes in the camshaft gear, and then pull the cam out. It shouldn't be stuck in there. Just be careful to not smash the lobes into anything upon removal. Slow and steady.
Thread Starter
|
Postmaster
Joined: Nov 2012
Posts: 2,806
Likes: 8
From: Langley, BC
I had the engine upside down, pulled the rod caps off, and then tapped on the studs with the wooden handle of a hammer and had my hand underneath to catch the piston and guide it out. It's always a good habit to lay everything out exactly how it was in the block.
Attachment 291117
And then the crank. I knew it would be heavy so for extra assurance I had my dad help me take it out to limit the chances of damaging anything. I put it on the bathroom scale. 70 pounds! Another surprise was the main cap bolts. They came out with a sucking noise as if there was a seal, and sure enough there was. Almost 50 years old and the bolts still have assembly lube on them. Amazing.
Attachment 291118
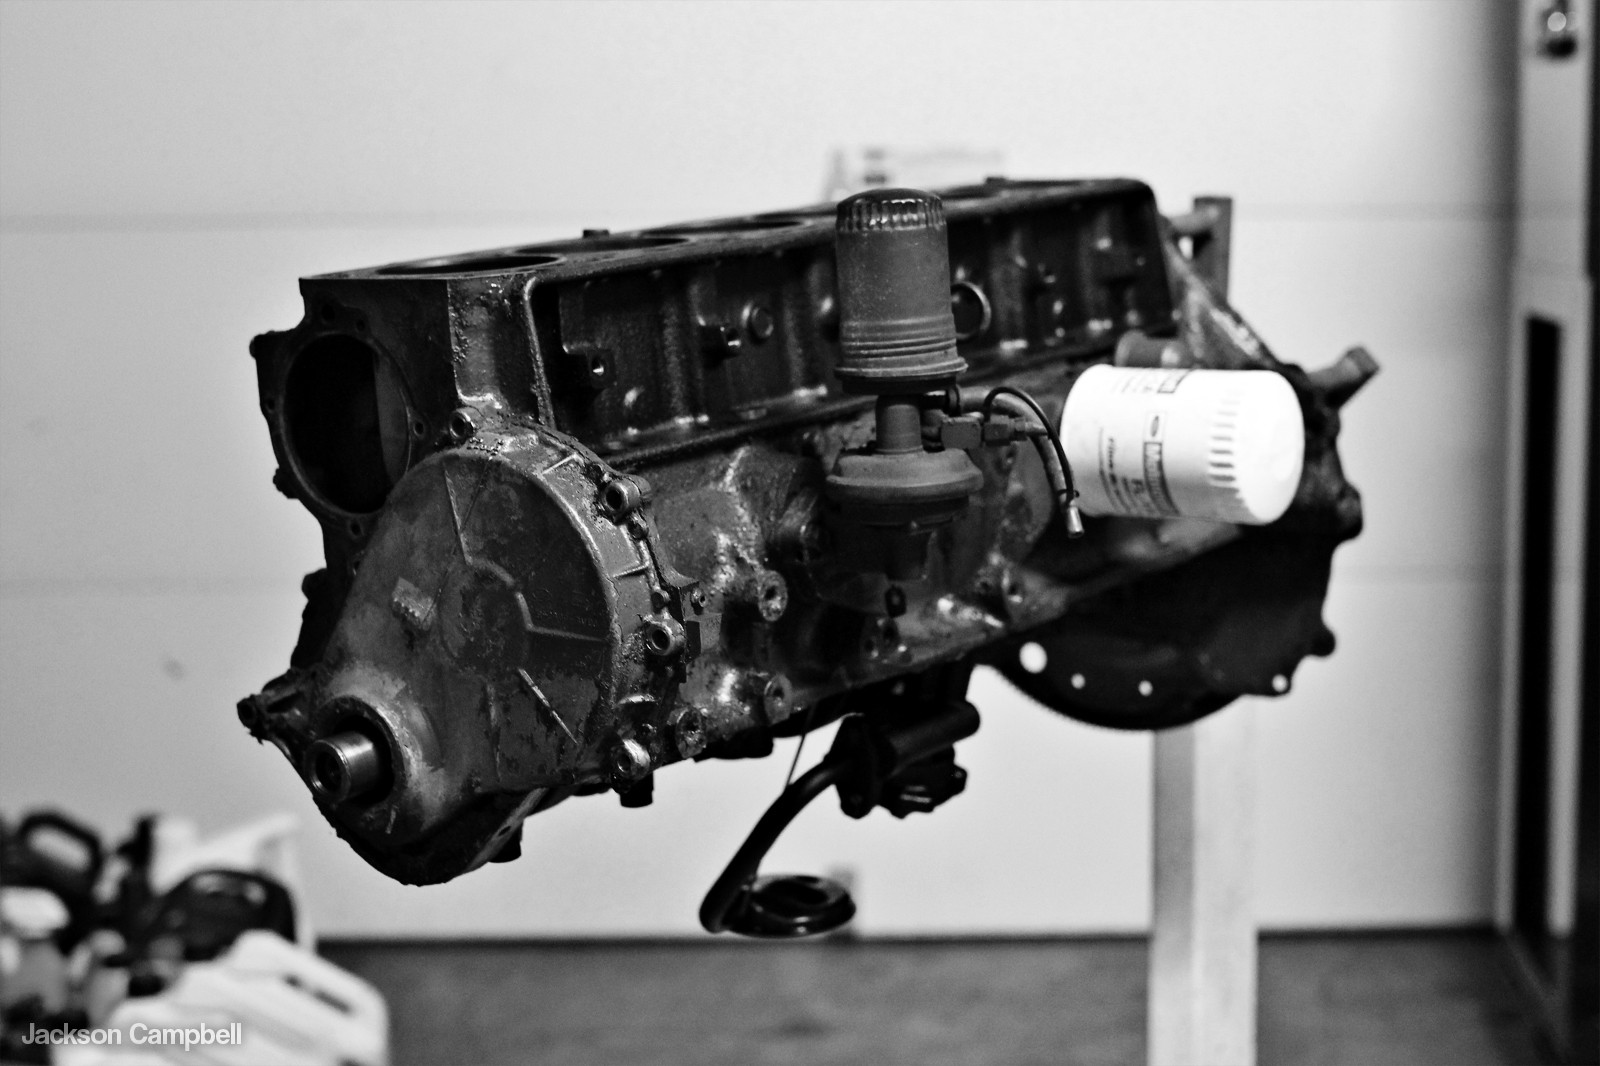
And now I'm left with a block. I hope to have my friend come over and help me take it off the stand so I can take it to the machine shop to have it hot tanked.
Attachment 291119
Attachment 291117
And then the crank. I knew it would be heavy so for extra assurance I had my dad help me take it out to limit the chances of damaging anything. I put it on the bathroom scale. 70 pounds! Another surprise was the main cap bolts. They came out with a sucking noise as if there was a seal, and sure enough there was. Almost 50 years old and the bolts still have assembly lube on them. Amazing.
Attachment 291118
And now I'm left with a block. I hope to have my friend come over and help me take it off the stand so I can take it to the machine shop to have it hot tanked.
Attachment 291119
Thread Starter
|
Postmaster
Joined: Nov 2012
Posts: 2,806
Likes: 8
From: Langley, BC
Just took the block to a machine shop to get hot tanked. I wanted to get a vibe for what the place was like before I started trusting him with everything else. I should get it back Tuesday. So far I think the shop is an okay place.