


WickidPissa Build Thread
Thread Starter
|
Elder User
Joined: Mar 2013
Posts: 844
Likes: 0
From: Dirty Water
WickidPissa Build Thread
So I bought my 2004 F250 Lariat Supercab Long Bed back in June of 2012. Got it out of Vermont with 68k miles on it - pretty low for 8 years old. Pretty bone stock too, aside from a trailer brake controller.
I figured it was due time for a build thread.
This photo a buddy took in the work parking lot:

With goals to make it similar to a HD edition, I got a black & billet grill:

Then tinted the windows (I know a guy - free!):

Then added the HD headlights:

In that last picture you can also see the smoked side mirror lights, and smoked LED roof lights.
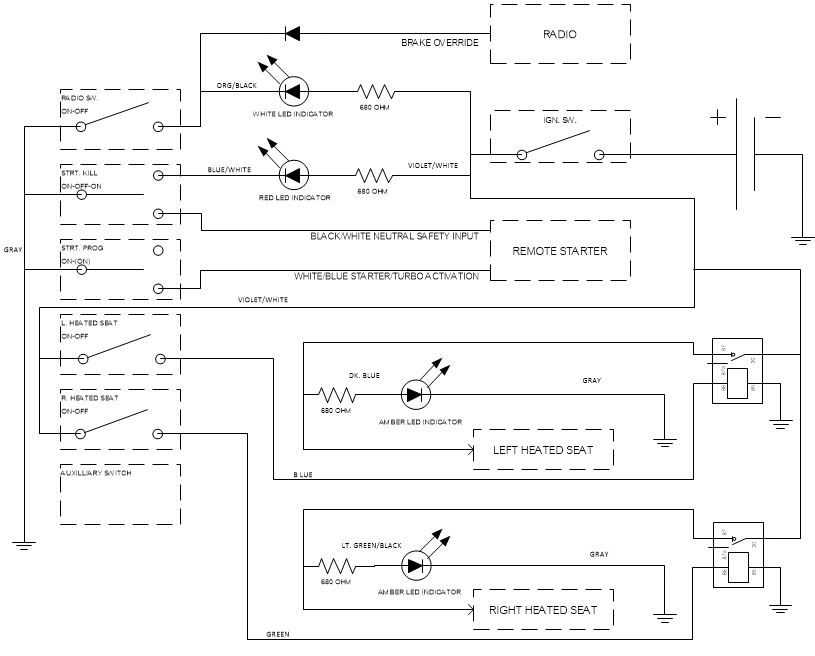
I bought a "plug and play" bixenon HID kit (4300k), but it was immediately apparent that it was a cheap wiring kit. They had some sort of "control module", but it was garbage. High-beams didn't work (and the HB indicator showed as dim, and bright when beams were on - BAD), the fog lights never worked... Clearly some sort of design flaw or bad ground internally. So I hacked it apart, made my own on paper, and wired it into the factor harness. This scares some people (cutting into factory harnesses) but mine's out of warranty and I know what I'm doing. Everything is soldered, heat shrink tubed, and re-wrapped in matching conduit. I even gave the ballasts the krylon touch satin black. If you didn't know they weren't factory, you'd never be able to tell.
Here's the schematic if anyone wants to make their life simpler when doing a bixenon kit. I went with bixenon because these trucks have 9007 dual filament bulbs, and HID is only one light source. That's why I had to diode isolate HB and LB into one feed - so the bulb stays on whether the MFS is on high or low (unlike stock where it shuts off the lows when you switch to highs).

Soon, I'll be vinyl wrapping the front bumper, to look like this:

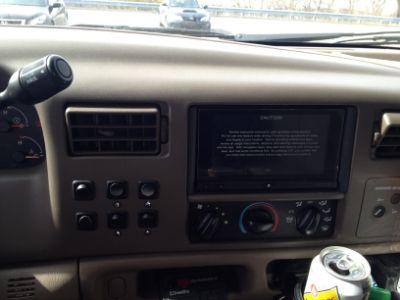
In addition, I've installed a Pioneer AppRadio (basically an iPhone 4/4S accessory), super cheap from Crutchfield. It's a pretty awesome touchscreen double-din, with Nav, Netflix, Pandora, you name it. Basically anything the phone can do, the radio can do.
I also installed a Viper SmartStart remote starter - overall pretty easy on this truck, given the amount of spare room under the dash, and how easy the ignition switch harness was to access. Pretty neat toy to be able to start it with the phone, but not totally necessary I suppose. Great for work though, since I can't see it start.
I figured it was due time for a build thread.
This photo a buddy took in the work parking lot:
With goals to make it similar to a HD edition, I got a black & billet grill:
Then tinted the windows (I know a guy - free!):
Then added the HD headlights:
In that last picture you can also see the smoked side mirror lights, and smoked LED roof lights.
I bought a "plug and play" bixenon HID kit (4300k), but it was immediately apparent that it was a cheap wiring kit. They had some sort of "control module", but it was garbage. High-beams didn't work (and the HB indicator showed as dim, and bright when beams were on - BAD), the fog lights never worked... Clearly some sort of design flaw or bad ground internally. So I hacked it apart, made my own on paper, and wired it into the factor harness. This scares some people (cutting into factory harnesses) but mine's out of warranty and I know what I'm doing. Everything is soldered, heat shrink tubed, and re-wrapped in matching conduit. I even gave the ballasts the krylon touch satin black. If you didn't know they weren't factory, you'd never be able to tell.
Here's the schematic if anyone wants to make their life simpler when doing a bixenon kit. I went with bixenon because these trucks have 9007 dual filament bulbs, and HID is only one light source. That's why I had to diode isolate HB and LB into one feed - so the bulb stays on whether the MFS is on high or low (unlike stock where it shuts off the lows when you switch to highs).
Soon, I'll be vinyl wrapping the front bumper, to look like this:
In addition, I've installed a Pioneer AppRadio (basically an iPhone 4/4S accessory), super cheap from Crutchfield. It's a pretty awesome touchscreen double-din, with Nav, Netflix, Pandora, you name it. Basically anything the phone can do, the radio can do.
I also installed a Viper SmartStart remote starter - overall pretty easy on this truck, given the amount of spare room under the dash, and how easy the ignition switch harness was to access. Pretty neat toy to be able to start it with the phone, but not totally necessary I suppose. Great for work though, since I can't see it start.
Thread Starter
|
Elder User
Joined: Mar 2013
Posts: 844
Likes: 0
From: Dirty Water
So, now that all the exterior mods I have are covered, it's time to address those pesky little 6.0 issues that everyone seems to be having.
With 84k on the clock right now, I figured now is as good a time as any. A buddy checked OASIS, and I found that nothing had been addressed yet.
On the list (purchased over the weekend):
ARP Studs
OEM Gaskets
OEM Oil Cooler
EGR Delete w/ solid up-pipe
DIY Coolant Filter (more about that in a bit)
SCT Tuner
6.4 Banjo bolts
HFCM Drain Plug
"Blue spring" FPR kit
I also got:
A used K&N FIPK (nevermind, thanks acf6!!)
Quad pillar gauge pod with Boost, EGT, Trans Temp, and Fuel Pressure
I'll be going with a matching overhead pod with matching Coolant Temp, Coolant Pressure, and Oil Temp soon.
Should be fun installing all this with my father over one of the coming weekends. He works at a dealership, has a lift, and a buttload of tools. Not to mention 40 some odd years of experience that trumps mine anyday.
More to come on the engine mods soon...
Thread Starter
|
Elder User
Joined: Mar 2013
Posts: 844
Likes: 0
From: Dirty Water
DIY Coolant Filter:
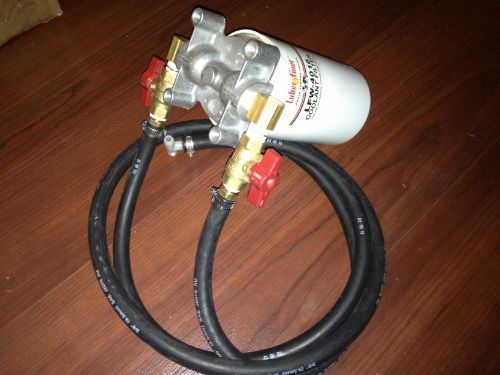
As for the DIY coolant filter, I bought a Volvo truck filter head (Volvo P/N 3974041), plumbing from AutoZone, all fittings from Home Depot, with ball valves. Once assembled, the whole thing will get a coat of satin black to sort of blend it in. I'm a guy who likes a clean looking engine, not one cluttered with blue hoses, brass parts, chrome parts, colored parts, etc. Unless they add gobs of power, they should look subtle IMO. No need to have a filter housing look as if it adds 400 HP.
All totaled, I spent $98, including 2 filters. Best offer on eBay from Sinister was $139. Some other guy had one for $136. Since I practically live at Autozone and Home Depot already (my favorite stores), I enjoyed piecing one together myself, in the name of saving a few bucks.
I'll take some pictures of what I have so far and upload them later. Unlike the kits, Mine will be mounted up on the driver's side fender, near the P/S reservoir and the booster.
Boring now without pictures, I know.
All I need to do now is make a bracket... I may get fancy there.
Pics of the filter head from ebay:
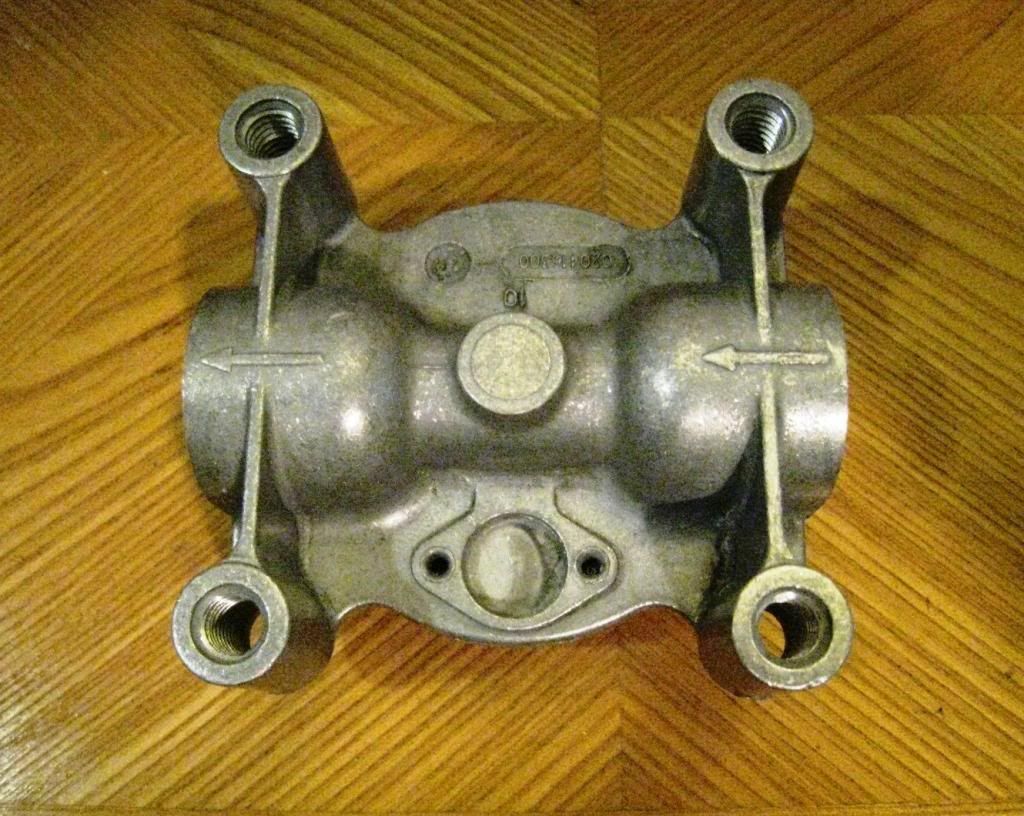
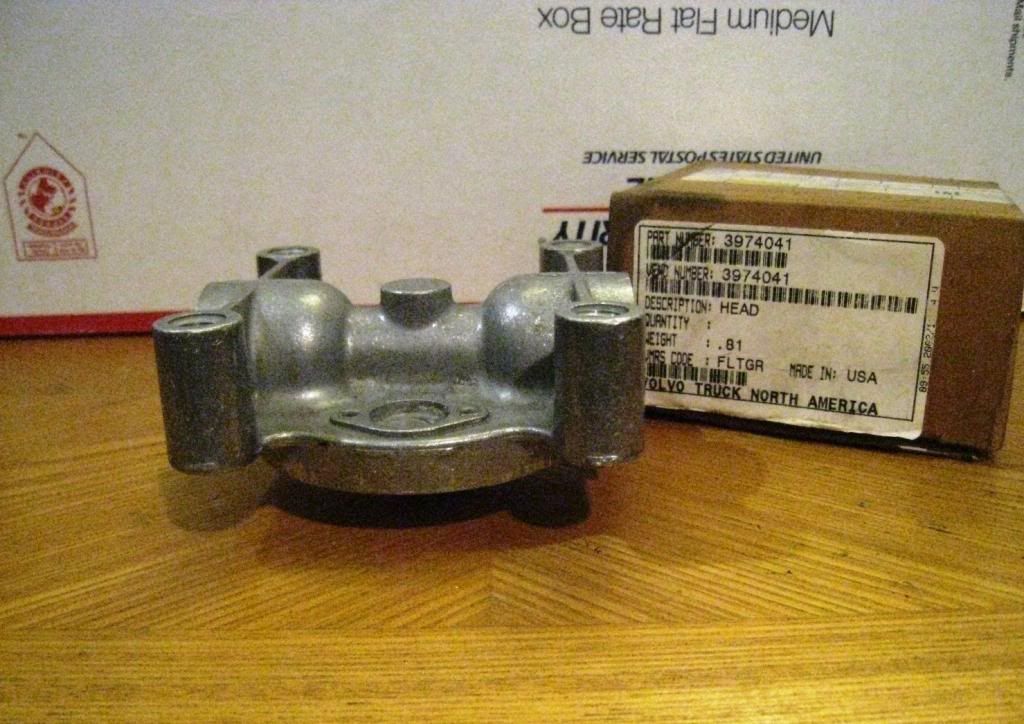
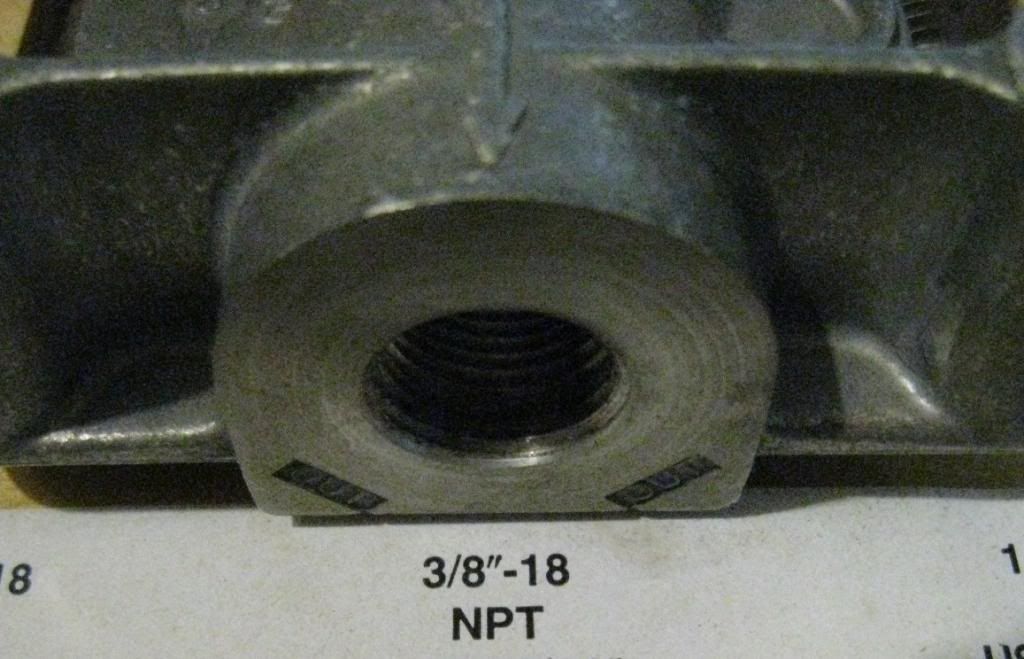
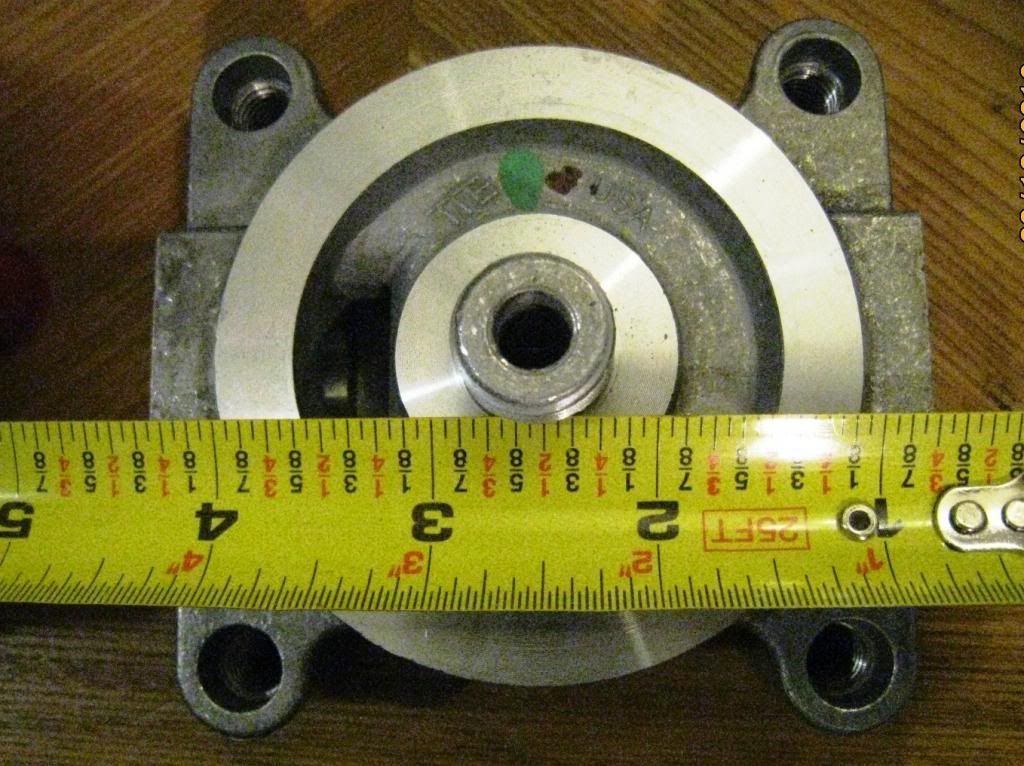
Thread Starter
|
Elder User
Joined: Mar 2013
Posts: 844
Likes: 0
From: Dirty Water
Seriously? What's wrong with them?
EDIT:
Found this: https://www.ford-trucks.com/forums/1...r-in-take.html
Seems like it won't do anything for performance, whatsoever... I come from the N/A gas world, and I've always had good luck with them. But it seems that stock is more than enough for what I need. I did regularly clean the MAF whenever I had one though, it's just part of regular maintenance when you own one. I guess I'm just so used to N/A, gas, and having stock air boxes that restrict flow.
Thanks for the tip... hopefully someone outbids me. Worst case scenario I buy it, clean it, and re-sell it at a profit.
Post Fiend
Joined: Aug 2010
Posts: 13,710
Likes: 5
From: Manchester, CT

They are "ok" on a gasser, but with the amount of air a turbo diesel sucks in, they cannot filter it. You can run it, but expect to be replacing a turbo sooner than later
Trending Topics
Thread Starter
|
Elder User
Joined: Mar 2013
Posts: 844
Likes: 0
From: Dirty Water
Point taken - I'll be sticking with the stock box. Out of curiosity, why does it F with the turbo to the point of needing replacement?
FTE Stories
Ford Trucks for Ford Truck Enthusiasts

10 Things Every Truck Owner NEEDS (2026 Edition)
Michael S. Palmer
Rezvani's Latest Post-Apocalyptic Monster Is a Ford F-150 Raptor Underneath
Verdad Gallardo
Top 10 Most Expensive Ford Trucks Ever Sold on Bring a Trailer
Joe Kucinski
2027 Ford Super Duty Buyer's Guide (Every Model, Engine, & Package)
Brett Foote
Top 10 Ford Truck Tragedies
Joe Kucinski
AEV FXL Super Duty - the Super Duty Raptor Ford Doesn't Make
Brett Foote
Lobo Vs Lobo: Proof the F-150 Lobo Should Be Even Lower!
Michael S. Palmer
Ford's 2001 Explorer Sportsman Concept Looks For a New Home
Verdad Gallardo
10 Best Ford Truck Engines We Miss the Most!
Joe KucinskiPost Fiend
Joined: Aug 2010
Posts: 13,710
Likes: 5
From: Manchester, CT
It lets too much dirt/dust/etc get by and it "dusts" the compressor wheel, and lets dust get through the engine
Stock intake is good to about 500HP. Only reason i have ever considered changing it is because its such a pain to remove lol
Stock intake is good to about 500HP. Only reason i have ever considered changing it is because its such a pain to remove lol
Thread Starter
|
Elder User
Joined: Mar 2013
Posts: 844
Likes: 0
From: Dirty Water
Wow, good info... Thanks man.
Impressive that Motorcraft filters are better than K&N. I get that impression with all Motorcraft parts - oil filter, fuel filters, etc... Everyone says they're better than aftermarket, so it makes sense that the same goes for the air filter.
Impressive that Motorcraft filters are better than K&N. I get that impression with all Motorcraft parts - oil filter, fuel filters, etc... Everyone says they're better than aftermarket, so it makes sense that the same goes for the air filter.
Thread Starter
|
Elder User
Joined: Mar 2013
Posts: 844
Likes: 0
From: Dirty Water
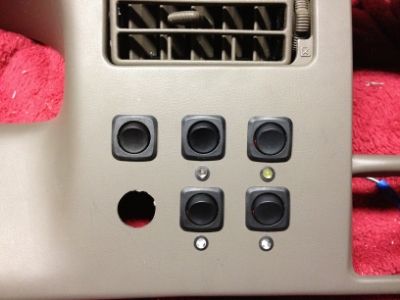
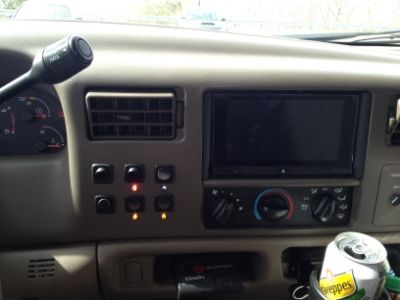
Dash switches...
Almost forgot about my dash switches... I added a few to make life simpler. I hate the rocker switches that come free with crap - and I hate things that don't look like they belong. But I love functionality and clean looks.
So I settled on these switches from a local electronics supply store. 6 switches, a few resistors, a couple diodes, a couple relays, some wire, solder, shrink tubing, and time...
Left to right, top to bottom:
The heated seat switches have their own relay and are wired into the stock seats with one wire, in between the stock relay and heater. With the factory switch OR my switch on, my amber LED indicator comes on. IMO the factory switch location is useless, since you can't easily tell if it's on - and the indicator is in a stupid place where you can't see it without taking your eyes WAY off the road. Poor design, I've hated it since I bought the truck and first used the seats. If it was a stock rocker switch, it would have been better since you could feel switch position. Impossible with a push-on, push-off switch. This is way better IMHO.
If you're curious:
Almost forgot about my dash switches... I added a few to make life simpler. I hate the rocker switches that come free with crap - and I hate things that don't look like they belong. But I love functionality and clean looks.
So I settled on these switches from a local electronics supply store. 6 switches, a few resistors, a couple diodes, a couple relays, some wire, solder, shrink tubing, and time...
Left to right, top to bottom:
- Momentary - Remote Starter Turbo Timer Activator
- ON-ON - Remote Starter Kill (down is on the the LED, up is on to enable the starter). Essentially with the switch down, the red LED comes on and the neutral safety switch input for the starter is open, disabling it.
- ON-ON - Radio Brake Override - Wired the same as the last one, with a white LED. Up, the radio thinks you're parked and the LED is on. Down, no Netflix, no light. Normally I'd just wire to ground, but Pioneer caught on to that. Now you have to apply the brake, release, and apply again. There was a fix online with a relay off the amp remote wire, but it didn't work most of the time.
- Empty right now, for future use (like strobes when I finally get a plow)
- Left Heated Seat
- Right heated seat
The heated seat switches have their own relay and are wired into the stock seats with one wire, in between the stock relay and heater. With the factory switch OR my switch on, my amber LED indicator comes on. IMO the factory switch location is useless, since you can't easily tell if it's on - and the indicator is in a stupid place where you can't see it without taking your eyes WAY off the road. Poor design, I've hated it since I bought the truck and first used the seats. If it was a stock rocker switch, it would have been better since you could feel switch position. Impossible with a push-on, push-off switch. This is way better IMHO.
If you're curious:
Thread Starter
|
Elder User
Joined: Mar 2013
Posts: 844
Likes: 0
From: Dirty Water
Either way, I won't be using it. Not worth the risk IMO. The seller wouldn't let me back out, so I'm just going to get it, clean it, and re-sell it.
Anyone want to buy one?? (lol)

Thread Starter
|
Elder User
Joined: Mar 2013
Posts: 844
Likes: 0
From: Dirty Water
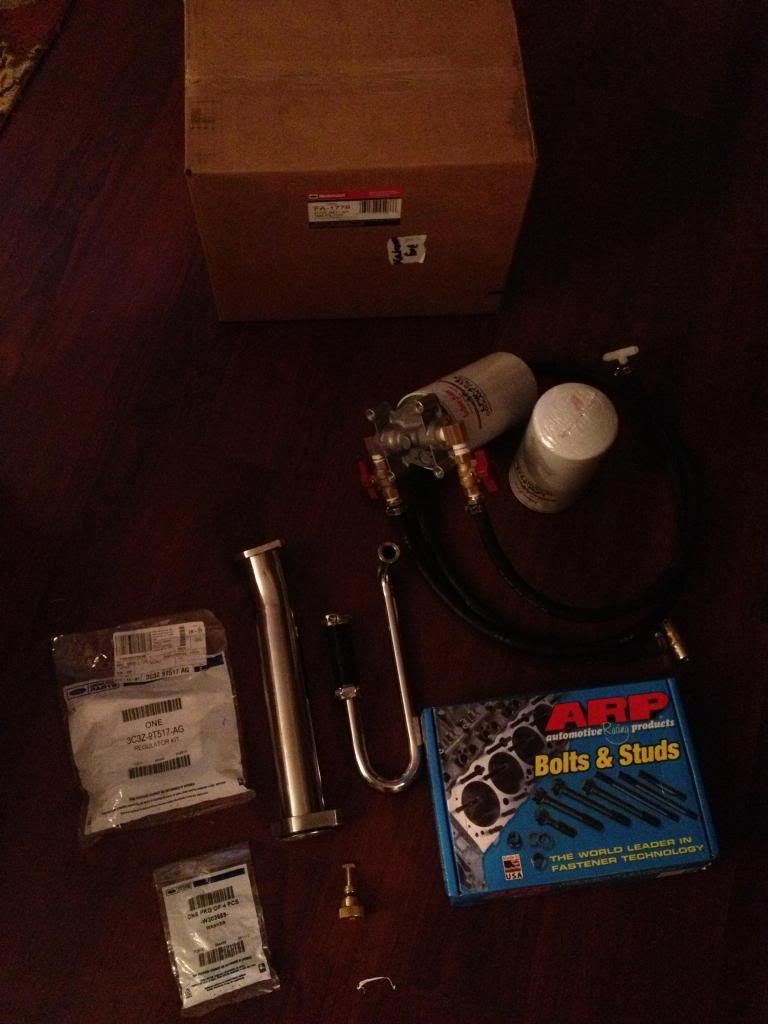
Another few boxes of awesome arrived yesterday.
In hand:
All OEM gaskets
ARP studs (those are some SERIOUS looking hardware)
DIY Coolant filter (came out pretty awesome)
EGR delete kit
SCT tuner
6.4 Banjo Bolts
Blue Spring FPR kit
HFCM drain plug (and new filters - it's that time again)
Air filter (ditched the K&N as per some good advice here)
Still waiting on:
Oil Cooler
Gauges
Some weatherproof connectors to add to brake controller and gauge wires, for easier cab removal - only $10 online, why not?
Thread Starter
|
Elder User
Joined: Mar 2013
Posts: 844
Likes: 0
From: Dirty Water
DIY Coolant Filter update:
Got all the parts, assembled it. Definitely needs that coat of black I mentioned, but totally functional, with ball valves. (gas valves, but ok for water up to like 100PSI, and several hundred degrees).

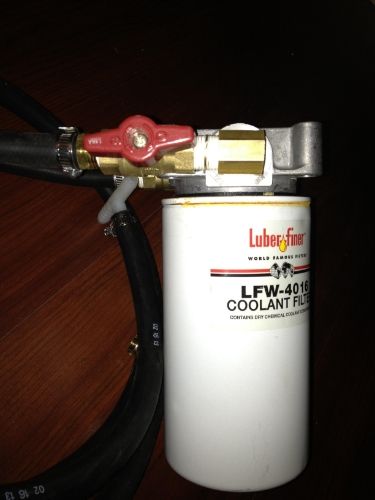
Going here: (left of the reservoir)
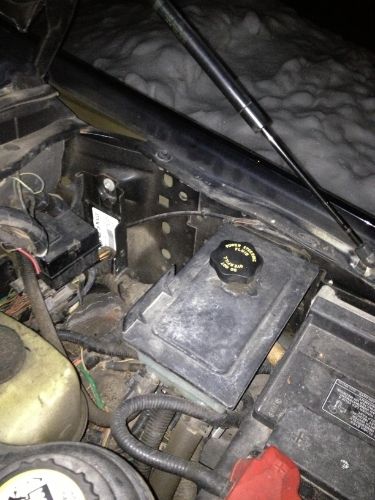
Got all the parts, assembled it. Definitely needs that coat of black I mentioned, but totally functional, with ball valves. (gas valves, but ok for water up to like 100PSI, and several hundred degrees).
Going here: (left of the reservoir)