

 .
.

Effii gets rebuilt
Farkall User
Joined: Mar 2010
Posts: 800
Likes: 1
From: Slade Point, Australia

Larf's

Thread Starter
|
Senior User
Joined: Mar 2007
Posts: 238
Likes: 0
From: Australia
It was typical diesel chatter initially but I've started it a couple of times since and not as much chatter more nice V8 exhaust rumble, which is what I was hoping for.
So I think just sitting for twelve months the injectors may have been a little slow.
I'll investigate a new set once I've got it driveable, which will probably mean a new ip also.
Thread Starter
|
Senior User
Joined: Mar 2007
Posts: 238
Likes: 0
From: Australia
You can always tell the southerners in the winter time. All the locals have jumpers on when it gets below 20 and the southerners are still running around in shorts and singlets saying how hot it is, at least for their first year up here.

Thread Starter
|
Senior User
Joined: Mar 2007
Posts: 238
Likes: 0
From: Australia
Every thing I've see on here led me to the same with regards to the idi and it's so simple.

FTE Leadership Emeritus


Joined: May 2004
Posts: 18,787
Likes: 30
From: Melbourne, Aus

I meant to ask earlier - what (if any) requirements do you queenslanders need to do for an Engine Swap? Engine-ear's cert?
I know in Vic the process is easier if you can prove that the vehicle came with that engine as an option (I am not sure if they would take the fact that it is available in the US as an option).
I know in Vic the process is easier if you can prove that the vehicle came with that engine as an option (I am not sure if they would take the fact that it is available in the US as an option).
Thread Starter
|
Senior User
Joined: Mar 2007
Posts: 238
Likes: 0
From: Australia
I meant to ask earlier - what (if any) requirements do you queenslanders need to do for an Engine Swap? Engine-ear's cert?
I know in Vic the process is easier if you can prove that the vehicle came with that engine as an option (I am not sure if they would take the fact that it is available in the US as an option).
I know in Vic the process is easier if you can prove that the vehicle came with that engine as an option (I am not sure if they would take the fact that it is available in the US as an option).
My understanding is that this has been standardised Australia wide.
An LA-1 substitue engine does not require engineering where the replacement engine is available as an option.
According to Queensland transport website F100-F350 can have upto a 7.5 litre engine.
So no engineering cert required, but it still requires a mod plate which can only be provided by an approved engineer.
However a certificate may still be required for insurance, I have not been able to get a straight answer on this. The response I did get was if it's registered it's ok.
Thread Starter
|
Senior User
Joined: Mar 2007
Posts: 238
Likes: 0
From: Australia
Week begining Monday 23rd September
Well it's more wiring, wiring, wiring this week.
So it's all complete except for the stop light switch and the aircon.
I'm going to look at changing the stop light switch to one from a XA/B/C falcon as with the current switch it's erractic. Works correctly when you first press the pedal but as you continue to press the pedal it turns on and off. The falcon one simply turns on when the pedal is pressed and stays on until you release the pedal totally. It is not attached to the pedal and pivot but totally separate and more reliable.
I need to source a new thermo relay for the aircon which means changing the wiring loom for the aircon. Current one uses a separate pot and controller. The only one I can find has the pot integrated into the controller.
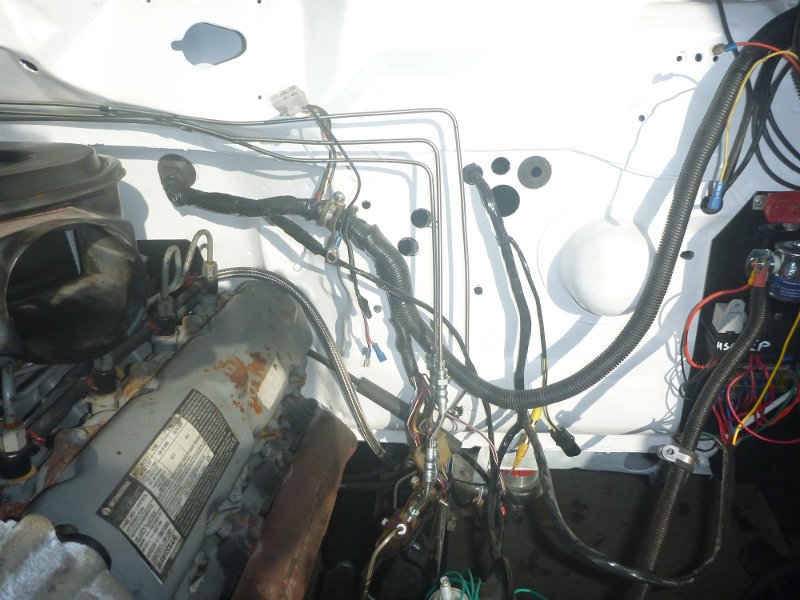
Left side of engine bay.

Interior behind dash.

Installed the carpet in the interior, still need to install the gearlever and boot.

So it's all complete except for the stop light switch and the aircon.
I'm going to look at changing the stop light switch to one from a XA/B/C falcon as with the current switch it's erractic. Works correctly when you first press the pedal but as you continue to press the pedal it turns on and off. The falcon one simply turns on when the pedal is pressed and stays on until you release the pedal totally. It is not attached to the pedal and pivot but totally separate and more reliable.
I need to source a new thermo relay for the aircon which means changing the wiring loom for the aircon. Current one uses a separate pot and controller. The only one I can find has the pot integrated into the controller.
Left side of engine bay.
Interior behind dash.
Installed the carpet in the interior, still need to install the gearlever and boot.
FTE Stories
Ford Trucks for Ford Truck Enthusiasts

Top 6 Best Deals Available on New Fords & Lincolns Right Now
Brett Foote
This Hennessey Takes the Expedition Tremor's Off-Roading Capability to the Next Level
Verdad Gallardo
Top 10 Fords at 2026 Carlisle Ford Nationals
Joe Kucinski
3 Best / 3 Worst Parts of Modern Ford Ownership
Brett Foote
10 Amazing Upgrades That Solve Common Ford Truck Owner Headaches
Pouria Savadkouei
Every 2026 Ford Engine Explained
Brett Foote
10 Ugly Ford Trucks That We Still Kinda Love
Joe Kucinski
10 Things Every Truck Owner NEEDS (2026 Edition)
Michael S. Palmer
Rezvani's Latest Post-Apocalyptic Monster Is a Ford F-150 Raptor Underneath
Verdad GallardoThread Starter
|
Senior User
Joined: Mar 2007
Posts: 238
Likes: 0
From: Australia
Week begining Monday 30th September 2013
Installed the gearlever and boot. Installed the drivers seat, this is from a ZJ Fairlane and I've had them in Effii since we bought it. They are very comfortable for long distance touring.
Installed the remaining brake and clutch hardlines from the master cylinders to the chassis.
Installed the lines for the power steering and hydroboost.

Installed the serpentine belt.

I need to make or buy some separators for the hydroboost and brake and clutch hard lines.
Bled the clutch, brakes and power steering.
Had an issue with the clutch slave cylinder. I had two from the original purchase one is the heavy duty type with the bleed valve which I installed first. Could not get the clutch to release with this as the master cylinder is too small. So installed the other one which is the one without a bleed valve. Installed this and the clutch worked straight away. Remember I'm using a vacuum power master from a Nissan GQ/GU Patrol. If I want to use the big slave cylinder I'll have to modify the master. My partner can use this clutch without the vacuum boost which is a big difference compared to the original cleveland clutch.
All this led to this:
First time Effii has moved under it's own power since last December.
Brakes and clutch are good steering is precise as it was before.
Bigger drive once I've finished and added the radiator support.
Started cleaning up the radiator support.
Before shots:
Rear

Front

After photos next week as it was late sunday when I got to this point. I've got a couple of minor weld repairs to be done on this as well as a little panel beating.
Installed the remaining brake and clutch hardlines from the master cylinders to the chassis.
Installed the lines for the power steering and hydroboost.
Installed the serpentine belt.
I need to make or buy some separators for the hydroboost and brake and clutch hard lines.
Bled the clutch, brakes and power steering.
Had an issue with the clutch slave cylinder. I had two from the original purchase one is the heavy duty type with the bleed valve which I installed first. Could not get the clutch to release with this as the master cylinder is too small. So installed the other one which is the one without a bleed valve. Installed this and the clutch worked straight away. Remember I'm using a vacuum power master from a Nissan GQ/GU Patrol. If I want to use the big slave cylinder I'll have to modify the master. My partner can use this clutch without the vacuum boost which is a big difference compared to the original cleveland clutch.
All this led to this:
First time Effii has moved under it's own power since last December.
Brakes and clutch are good steering is precise as it was before.
Bigger drive once I've finished and added the radiator support.
Started cleaning up the radiator support.
Before shots:
Rear
Front
After photos next week as it was late sunday when I got to this point. I've got a couple of minor weld repairs to be done on this as well as a little panel beating.
FTE Leadership Emeritus
Joined: May 2004
Posts: 18,787
Likes: 30
From: Melbourne, Aus
Had an issue with the clutch slave cylinder. I had two from the original purchase one is the heavy duty type with the bleed valve which I installed first. Could not get the clutch to release with this as the master cylinder is too small. So installed the other one which is the one without a bleed valve. Installed this and the clutch worked straight away. Remember I'm using a vacuum power master from a Nissan GQ/GU Patrol. If I want to use the big slave cylinder I'll have to modify the master. My partner can use this clutch without the vacuum boost which is a big difference compared to the original cleveland clutch.
Thread Starter
|
Senior User
Joined: Mar 2007
Posts: 238
Likes: 0
From: Australia
Also the hydraulic line is not long enough with the change to right hand side, this would be an easy fix if the end connectors were readily available. I did find them online when I started but can't find them again at the moment.
It should be possible to use the original ZF5 master slave setup just need to modify the mounting bolts and line.
I'll get a photo hopefully today.
Thread Starter
|
Senior User
Joined: Mar 2007
Posts: 238
Likes: 0
From: Australia
Also it would be possible to use the original cleveland master cylinder but it may require the use of the heavy duty slave for the ZF5 as it's larger diameter but same stroke length as the ZF5 master.
Thread Starter
|
Senior User
Joined: Mar 2007
Posts: 238
Likes: 0
From: Australia
Here's some comparison of the original cleveland and the ZF5 master clutch cylinders. The black one is the ZF5.


Differences are the mounting hole locations, the hyraulic line connection and the size of the eye of the actuating rod. The rod length from the firewall mount to the eye centre is the same.

This is the heavy duty clutch slave cylinder. You can see where the fitting goes at the right hand end. The pin on the side is the retaining pin for the fitting.
It should be possible to use the original cleveland hydraulic cylinder with the ZF5 slave cylinder. You would need to check the travel to ensure you don't blow out the slave. Despite my previous post, the travel of the cleveland master is less than the ZF5 (only a couple of mm) but it is larger diameter. This leads me to suspect that the smaller ZF5 slave cylinder would be needed.
You would still need the fitting at the slave cylinder.
I used the original stainless steel braided line at the slave cylinder with aeroflow -an4 fittings to the hard line from the master cylinder, left centre of the photo.

I had seen connectors for the ZF5 master and slave to -an4 somewhere but have not been able to find them again.
Differences are the mounting hole locations, the hyraulic line connection and the size of the eye of the actuating rod. The rod length from the firewall mount to the eye centre is the same.
This is the heavy duty clutch slave cylinder. You can see where the fitting goes at the right hand end. The pin on the side is the retaining pin for the fitting.
It should be possible to use the original cleveland hydraulic cylinder with the ZF5 slave cylinder. You would need to check the travel to ensure you don't blow out the slave. Despite my previous post, the travel of the cleveland master is less than the ZF5 (only a couple of mm) but it is larger diameter. This leads me to suspect that the smaller ZF5 slave cylinder would be needed.
You would still need the fitting at the slave cylinder.
I used the original stainless steel braided line at the slave cylinder with aeroflow -an4 fittings to the hard line from the master cylinder, left centre of the photo.
I had seen connectors for the ZF5 master and slave to -an4 somewhere but have not been able to find them again.
Thread Starter
|
Senior User
Joined: Mar 2007
Posts: 238
Likes: 0
From: Australia
I was just looking back at my first post in this thread and started looking at the stages i'd planned to do.
So thought I'd post an update on these.
1. Cleanup new chassis, including any bits that need to be replaced/repaired, holes drilled etc for the engine mounts, transfer case mount, suspension lift.
Done
2. Paint the chassis with POR15.
Done
3. Do the 2in suspension lift.
Done
4. New fuel (feed and return) and brake hardlines and stainless braided flexlines.
Done
5. Put the idi, ZF, transfer case etc in the chassis.
Done
6. Driveshafts rebuilt for length and strength.
Actually not required. Originals fit without modification.
7. Lift off cab and tray.
Done
8. Repaint cab and do rust repairs (fixes PO bodgy job).
Done
9. Transfer cab and tray to the new chassis.
Cab done. Doors, guards, bonnett, radiator support and tray still to be done.
10. Transfer the dana 44 air locker and 9in Detroit Tru Track to the new chassis.
Done
11. Replace vacuum brake booster with hydraboost and overhaul complete brake system.
Done
12. Add d-gas system.
Not done. Need to investigate.
13. Pull all usable parts off old chassis.
Partially done, those parts I'm reusing.
14. Get rid of (sell?) any unused parts.
Not done
----------------------------------------------------------------------
My program at the moment is that the next four weeks will be
Radiator support
Doors
Guards
Bonnett
all of these are bare metal strip and repaint.
Then
Finish installing interior.
Put tray back on, need to make new supports for this.
Sandblast and powder coat wheels, put on Wranger MT/R's.
I'm expecting that this will be the end of the rebuild but I've still got some mods to complete. All associated with the tray. Shorten the tray by 300mm. Dual spare wheel carriers. Auxilary battery(ies). Air compressor. Water tank. Tool boxes.