New tutorial: Welding 101, theory and practice.

Fleet Owner


Joined: Jul 2004
Posts: 27,290
Likes: 1,055
From: NM
MIG does produce dangerous fumes, nervous system disorders can result from the manganese in the fumes. Not "toxic" maybe but very bad for you. A guy on the HAMB had some damage from MIG welding in a closed garage for an extended period (another winter-related incident).

Thread Starter
|
Hotshot
Joined: Oct 2004
Posts: 15,882
Likes: 88
From: Durham NC
Where was the manganese? in the filler wire? Common filler wire contains <1.5% manganese. IMHO he would have had to be doing a LOT of welding in a very confined space with no ventilation, a dangerous self created condition.
Here's what wikipedia has to say about it:
Manganism has become an active issue in http://en.wikipedia.org/wiki/Occupational_safety_and_health as it has been the subject of numerous http://en.wikipedia.org/wiki/Product_liability lawsuits against manufacturers of http://en.wikipedia.org/wiki/Arc_welding supplies. In these lawsuits, welders have accused the manufacturers of failing to provide adequate warning that their products could cause welding fumes to contain dangerously high manganese concentrations that could lead welders to develop manganism. Companies employing welders are also being sued, for what colloquially is known as "welders' disease." However, studies fail to show any link between employment as a welder and manganism (or other neurological problems).
I suspect the person on HAMB's problems were caused by what he was welding on (see my warning above) and/or doing a large amount of welding in an unventilated workspace, than on the welding process itself. Was his manganese poisoning confirmed by blood analysis? I myself am not going to get overly concerned about developing manganese poisoning from the relatively minor amount of welding I do. YMMV.
Here's what wikipedia has to say about it:
Manganism has become an active issue in http://en.wikipedia.org/wiki/Occupational_safety_and_health as it has been the subject of numerous http://en.wikipedia.org/wiki/Product_liability lawsuits against manufacturers of http://en.wikipedia.org/wiki/Arc_welding supplies. In these lawsuits, welders have accused the manufacturers of failing to provide adequate warning that their products could cause welding fumes to contain dangerously high manganese concentrations that could lead welders to develop manganism. Companies employing welders are also being sued, for what colloquially is known as "welders' disease." However, studies fail to show any link between employment as a welder and manganism (or other neurological problems).
I suspect the person on HAMB's problems were caused by what he was welding on (see my warning above) and/or doing a large amount of welding in an unventilated workspace, than on the welding process itself. Was his manganese poisoning confirmed by blood analysis? I myself am not going to get overly concerned about developing manganese poisoning from the relatively minor amount of welding I do. YMMV.
Thread Starter
|
Hotshot
Joined: Oct 2004
Posts: 15,882
Likes: 88
From: Durham NC
Checking further: steel contains 8-15% manganese, so welding steel by any method is likely to put manganese fumes into the air. Manganese is also a major component in brown pigment which is used in most dark color paints.
Bottom line: ventilating your work space no matter what you are doing and using protective gear is going to reduce your health risks.
Bottom line: ventilating your work space no matter what you are doing and using protective gear is going to reduce your health risks.
Fleet Owner
Joined: Jul 2004
Posts: 27,290
Likes: 1,055
From: NM
Not sure where you saw that, the <1.5% was correct. I saw several studies refuting the effects of welding fumes causing "manganism", but it did note bad short term effects from inhaling the fumes.
Thread Starter
|
Hotshot
Joined: Oct 2004
Posts: 15,882
Likes: 88
From: Durham NC
From here: Uses of Manganese
Quote:
Manganese is essential in the production of steel and iron and this makes up the most common use of this metal. It improves the workability of the steel when it reaches high temperatures. Adding about 8-15% of manganese also increases the strength of the steel. It is also a vital component of lower cost stainless steels.
Quote:
Manganese is essential in the production of steel and iron and this makes up the most common use of this metal. It improves the workability of the steel when it reaches high temperatures. Adding about 8-15% of manganese also increases the strength of the steel. It is also a vital component of lower cost stainless steels.
Thread Starter
|
Hotshot
Joined: Oct 2004
Posts: 15,882
Likes: 88
From: Durham NC
I'm no steel composition expert, only report what is printed, but it sounds high to me too?
I do still stand by my earlier statement, I'm not very concerned about manganese poisoning while doing casual welding in a well ventilated space, as well as my assertion that the MIG welding process itself does not produce any significant health hazard to those without an above average sensitivity. Any hazardous conditions associated with MIG welding are almost exclusively environmental and controllable.
IMHO this horse is dead and should be put to rest, so as to not dilute this tutorial any more.
I do still stand by my earlier statement, I'm not very concerned about manganese poisoning while doing casual welding in a well ventilated space, as well as my assertion that the MIG welding process itself does not produce any significant health hazard to those without an above average sensitivity. Any hazardous conditions associated with MIG welding are almost exclusively environmental and controllable.
IMHO this horse is dead and should be put to rest, so as to not dilute this tutorial any more.

New User
Joined: Oct 2006
Posts: 7
Likes: 0
ESAB All-State Easy Grind .023 mig wire
I ordered the ESAB Spool Arc Easy Grind .023 mig wire from weldingsupply.com yesterday. It seems it is only available in 11 lb spools now, unless you can locate old stock. My local AirGas store is a local distributor, but they only supply it by special order, and a minimum of two 11 lb spools (too much for me). Weldingsupply.com sold me a single 11 lb spool for $65.89, and shipping to the west coast was $14.18; total = $80.07 I am hopeful it performs as described.
Last edited by ben50f1; Mar 19, 2014 at 04:34 PM. Reason: add info
FTE Stories
Ford Trucks for Ford Truck Enthusiasts

2027 Ford Super Duty Buyer's Guide (Every Model, Engine, & Package)
Brett Foote
Top 10 Ford Truck Tragedies
Joe Kucinski
AEV FXL Super Duty - the Super Duty Raptor Ford Doesn't Make
Brett Foote
Lobo Vs Lobo: Proof the F-150 Lobo Should Be Even Lower!
Michael S. Palmer
Ford's 2001 Explorer Sportsman Concept Looks For a New Home
Verdad Gallardo
10 Best Ford Truck Engines We Miss the Most!
Joe Kucinski
2026 Shelby F-150 Off-Road: Better Than a Raptor R?
Brett Foote
2027 Super Duty Carhartt Package First Look: 12 Things You NEED to Know!
Michael S. Palmer
10 Most Surprising 2026 Ford Truck Features!
Joe Kucinski
Thread Starter
|
Hotshot
Joined: Oct 2004
Posts: 15,882
Likes: 88
From: Durham NC
Reader's question: So my next project on my cab is to repair the large amount of rust on the back cab wall. Im planning on cutting this section out of one of my parts cabs and welding it in place of the rusted section. I know every body suggests to do butt welds, and that is what i have done everywhere else on the cab, but would it be a big deal to do a lap joint or whatever its called? Its going to be out of site behind the bed and be inside the cab so i dont think rust would be a problem with to joint. My main reason for this is because it will be easier to do a lap joint than get the gaps perfect on such a big panel. What does everyone think?
ANSWER:
NO NO NO NO!!!!! You will not be able to correct the heat warpage you are bound to get and it will show FOR EVER. Take the time to do it right. It's not difficult to get a tight fitting joint. Cut an oversized patch out of the donor cab and strip the rust and paint off to clean metal with a Kleen and Strip disk (looks like grey plastic steel wool available at your local big box DIY store pick up a can of dykem layout fluid and an icepick or scratch awl while you are out. also buy a rubber sanding backer disk that fits your angle grinder and a pack of red fiber sanding disks in 50 or 60 grit. The disks are shiny red, stiff but flexible and look like some of the grit fell off. sold singly and in packs of 3 or 5, buy a pack of 3.) Clean off the inside and outside of the cab for at least 4-6" around where you are going to cut. Cut out the cab back first: Spray or brush a thin coat of dykem in a band a couple inches wide where you plan on cutting. Lay out the cut using a yard stick or straight strip of metal held against a couple magnetic welder's triangles, scribing the lines with the icepick or awl. Mark the corners in a curve by marking around a quart paint can. masking tape roll or something about that size. Cut out the rusted panel just inside the scribed line with a thin cutoff disk, portable jig saw with metal cutting blade, electric shear, nibbler or good compound sheet metal hand shears, Just don't use anything that distorts the good metal. Use a red fiber disk to very carefully trim the cut sneaking up on the scribed line. use a drum sander or a fine 1/2 round file to smooth the curved corners.
Now dykem the patch panel and hold it in place with magnets, visegrip welders clamps, and/or a helper and drill an 18" hole thru both panels in the overlap. cleco or pop rivet the two panels together in a couple places, enough so the panels don't push apart while you carefully scribe the patch panel making sure the point of the scribe is tight against the edge of the cutout. Double check the scribe line, if it isn't perfect go over that area with more dykem and rescribe. When you are completely satisfied, remove the clecos or pop rivets. Cut the patch to just outside the scribed line and finish to the line with the fiber disk being very careful to not dig in past the line. HINT: lay the patch panel flat on a workbench or table so the edge you are trimming is hanging over an inch or two and use the portion of the disk that pushes the panel down against the table rather than lifting it. Hold the disk as flat to the line as possible and use a light touch keeping it moving in broad strokes. check the fit by holding the patch in place with welder's magnets straddling the seam and hold a bright light on the back side. Be sure there are no overlaps. Remark and sand as needed.
Set your welder up with 0.023 Easy Grind wire and set the shielding gas flow to 10 - 12 cfm (assuming you are welding indoors away from breezes or drafts such as open windows or doors, fans) with the trigger pressed. Yes, that is about 1/2 the flow rate that most machines and the welding books recommend but trust me it is enough and will save you a lot of expensive gas and make better welds. Set the power and wire speed to the recommended setting for 20ga steel.
Read the following carefully!: to weld the panel in place start at the top center of the panel seam. Clip the wire back with cutters to 1/2" of stick out (NEVER EVER make any tacks on sheet metal without clipping the end of the wire to a clean end!) hold the stinger so it is perfectly perpendicular to the panel in all directions DO NOT TIP IT, you are NOT going to move it from that position! With the machine on but the trigger not pulled, carefully touch the end of the wire to the metal and hold it there by supporting the stinger at the bend with your free hand while it also rests on the panel forming a bridge/support. Move the end of the wire around slightly until you feel it catch on the seam. DO NOT MOVE ANYTHING, DO NOT PUSH ON OR LIFT THE STINGER. squeeze the trigger for 2 seconds (one thousand one, one thousand two) releasing the trigger and lifting the stinger. The metal should have barely turned red, and you should have a perfectly round disk tack weld 1/4" in diameter centered on the seam. Check the back side for penetration, there should be a shallow blister on the back matching the tack on the front, You should not be able to see the seam between the panels within the dot. The darkened heat discoloration should be a perfect ring no more than 1/2"- 5/8" in diameter on both sides. If you did not get good penetration try clipping the wire to 3/8" stick out, or hold the trigger for an additional 1/2 second. If you blew thru, turn the heat down one increment and/or be sure you are not pushing the tip towards the metal and you have freshly clipped the end of the wire. also be sure there is not a gap wider than the wire diameter in the seam where you are welding. More on that later. If the tack is not round or centered over the seam, you did not feel for the seam, hold the wire perfectly vertical and on the seam when you pulled the trigger (there is a natural tendency to jump or lift when the arc starts that must be overcome!) or moved the stinger. (DON'T try to weld one handed, it's not a quick draw contest, use the free hand as a bridge/brace.) DON'T tack or weld without a helmet no matter what you see the clowns on TV doing. Flash burn is not fun and can cause permanent damage. buy a self darkening helmet for 39.99 and USE IT at all times!
If you got a perfect tack, CONGRATULATIONS!!! you've one step closer to becoming a sheet metal welder.
Now, place a magnet across the seam about 8-9" away from the first tack making sure the edges are aligned and not gapping or overlapping. Make another tack 6" from the first and 2" before the magnet. Do a third tack 6" to the other side of the first one. While you wait for them to cool, check the penetration on both new tacks.
This time we will tack in the center of both vertical sides adjusting the patch and clamping it into a perfect fit first. If by chance you can't get the panel to fit perfectly. Sand down the tack out of the first 3 closest to that side near flush on both sides and wiggle the metal until the tack breaks free. use a fine flat file to smooth the tack remnants along the edge of the panel until the patch can be aligned and retack. The 5th and 6th tacks should go at the end of the horizontal seam at the start of the curved corners. Then tack the very ends of the vertical seams. Now do the top of the vertical seams just before the curved corners.
Continue to adjust the alignment as needed and adding tacks between each of the previous tacks, never tacking closer than 6 inches from a previous tack unless that tack has air cool to the point you can comfortably press your bare palm against it and leave it there. The panel should start looking like someone drove 1/4" diameter nails thru the seam. BE PATIENT! avoid the temptation to force cool the welds or place the tacks closer than 6" apart. Have another place to work on or another project to do in between series of tacks. When you start getting enough tacks that they start to close up on each other, overlap the tacks by placing the wire end against the edge of the previous tack disk to be sure you don't leave pin holes.
If you find a spot where there is a gap in the seam wider than the diameter of the filler wire 0.023" DO NOT try to tack across it, it will almost certainly blow out! Instead clip a length of 0.030 filler wire or an 1/8"wide strip of 20ga sheet and slip it into the gap and adjust until it is just slightly about the face of the seam (if using wire hold it against the back side of the seam over the gap with a magnet) and tack the seam right over the filler strip or wire. If the tack does not completely cover and seal the seam place another tack on the side of the filler strip that didn't weld completely.
ANSWER:
NO NO NO NO!!!!! You will not be able to correct the heat warpage you are bound to get and it will show FOR EVER. Take the time to do it right. It's not difficult to get a tight fitting joint. Cut an oversized patch out of the donor cab and strip the rust and paint off to clean metal with a Kleen and Strip disk (looks like grey plastic steel wool available at your local big box DIY store pick up a can of dykem layout fluid and an icepick or scratch awl while you are out. also buy a rubber sanding backer disk that fits your angle grinder and a pack of red fiber sanding disks in 50 or 60 grit. The disks are shiny red, stiff but flexible and look like some of the grit fell off. sold singly and in packs of 3 or 5, buy a pack of 3.) Clean off the inside and outside of the cab for at least 4-6" around where you are going to cut. Cut out the cab back first: Spray or brush a thin coat of dykem in a band a couple inches wide where you plan on cutting. Lay out the cut using a yard stick or straight strip of metal held against a couple magnetic welder's triangles, scribing the lines with the icepick or awl. Mark the corners in a curve by marking around a quart paint can. masking tape roll or something about that size. Cut out the rusted panel just inside the scribed line with a thin cutoff disk, portable jig saw with metal cutting blade, electric shear, nibbler or good compound sheet metal hand shears, Just don't use anything that distorts the good metal. Use a red fiber disk to very carefully trim the cut sneaking up on the scribed line. use a drum sander or a fine 1/2 round file to smooth the curved corners.
Now dykem the patch panel and hold it in place with magnets, visegrip welders clamps, and/or a helper and drill an 18" hole thru both panels in the overlap. cleco or pop rivet the two panels together in a couple places, enough so the panels don't push apart while you carefully scribe the patch panel making sure the point of the scribe is tight against the edge of the cutout. Double check the scribe line, if it isn't perfect go over that area with more dykem and rescribe. When you are completely satisfied, remove the clecos or pop rivets. Cut the patch to just outside the scribed line and finish to the line with the fiber disk being very careful to not dig in past the line. HINT: lay the patch panel flat on a workbench or table so the edge you are trimming is hanging over an inch or two and use the portion of the disk that pushes the panel down against the table rather than lifting it. Hold the disk as flat to the line as possible and use a light touch keeping it moving in broad strokes. check the fit by holding the patch in place with welder's magnets straddling the seam and hold a bright light on the back side. Be sure there are no overlaps. Remark and sand as needed.
Set your welder up with 0.023 Easy Grind wire and set the shielding gas flow to 10 - 12 cfm (assuming you are welding indoors away from breezes or drafts such as open windows or doors, fans) with the trigger pressed. Yes, that is about 1/2 the flow rate that most machines and the welding books recommend but trust me it is enough and will save you a lot of expensive gas and make better welds. Set the power and wire speed to the recommended setting for 20ga steel.
Read the following carefully!: to weld the panel in place start at the top center of the panel seam. Clip the wire back with cutters to 1/2" of stick out (NEVER EVER make any tacks on sheet metal without clipping the end of the wire to a clean end!) hold the stinger so it is perfectly perpendicular to the panel in all directions DO NOT TIP IT, you are NOT going to move it from that position! With the machine on but the trigger not pulled, carefully touch the end of the wire to the metal and hold it there by supporting the stinger at the bend with your free hand while it also rests on the panel forming a bridge/support. Move the end of the wire around slightly until you feel it catch on the seam. DO NOT MOVE ANYTHING, DO NOT PUSH ON OR LIFT THE STINGER. squeeze the trigger for 2 seconds (one thousand one, one thousand two) releasing the trigger and lifting the stinger. The metal should have barely turned red, and you should have a perfectly round disk tack weld 1/4" in diameter centered on the seam. Check the back side for penetration, there should be a shallow blister on the back matching the tack on the front, You should not be able to see the seam between the panels within the dot. The darkened heat discoloration should be a perfect ring no more than 1/2"- 5/8" in diameter on both sides. If you did not get good penetration try clipping the wire to 3/8" stick out, or hold the trigger for an additional 1/2 second. If you blew thru, turn the heat down one increment and/or be sure you are not pushing the tip towards the metal and you have freshly clipped the end of the wire. also be sure there is not a gap wider than the wire diameter in the seam where you are welding. More on that later. If the tack is not round or centered over the seam, you did not feel for the seam, hold the wire perfectly vertical and on the seam when you pulled the trigger (there is a natural tendency to jump or lift when the arc starts that must be overcome!) or moved the stinger. (DON'T try to weld one handed, it's not a quick draw contest, use the free hand as a bridge/brace.) DON'T tack or weld without a helmet no matter what you see the clowns on TV doing. Flash burn is not fun and can cause permanent damage. buy a self darkening helmet for 39.99 and USE IT at all times!
If you got a perfect tack, CONGRATULATIONS!!! you've one step closer to becoming a sheet metal welder.
Now, place a magnet across the seam about 8-9" away from the first tack making sure the edges are aligned and not gapping or overlapping. Make another tack 6" from the first and 2" before the magnet. Do a third tack 6" to the other side of the first one. While you wait for them to cool, check the penetration on both new tacks.
This time we will tack in the center of both vertical sides adjusting the patch and clamping it into a perfect fit first. If by chance you can't get the panel to fit perfectly. Sand down the tack out of the first 3 closest to that side near flush on both sides and wiggle the metal until the tack breaks free. use a fine flat file to smooth the tack remnants along the edge of the panel until the patch can be aligned and retack. The 5th and 6th tacks should go at the end of the horizontal seam at the start of the curved corners. Then tack the very ends of the vertical seams. Now do the top of the vertical seams just before the curved corners.
Continue to adjust the alignment as needed and adding tacks between each of the previous tacks, never tacking closer than 6 inches from a previous tack unless that tack has air cool to the point you can comfortably press your bare palm against it and leave it there. The panel should start looking like someone drove 1/4" diameter nails thru the seam. BE PATIENT! avoid the temptation to force cool the welds or place the tacks closer than 6" apart. Have another place to work on or another project to do in between series of tacks. When you start getting enough tacks that they start to close up on each other, overlap the tacks by placing the wire end against the edge of the previous tack disk to be sure you don't leave pin holes.
If you find a spot where there is a gap in the seam wider than the diameter of the filler wire 0.023" DO NOT try to tack across it, it will almost certainly blow out! Instead clip a length of 0.030 filler wire or an 1/8"wide strip of 20ga sheet and slip it into the gap and adjust until it is just slightly about the face of the seam (if using wire hold it against the back side of the seam over the gap with a magnet) and tack the seam right over the filler strip or wire. If the tack does not completely cover and seal the seam place another tack on the side of the filler strip that didn't weld completely.


Senior User

Joined: Aug 2006
Posts: 218
Likes: 0
From: Cary, NC
I just read through all 12 pages. What a great tutorial, AX!
I've been using my MIG welder for ten years, but this information will help take my results up a notch or two.
The fabric analogy helped me a lot in understanding the effects and cures for weld shrinkage.
I'm going to bookmark this thread until I have enough paper to print it out. ;-)
This should really be a sticky to the top of the forum.
I have a question. Could you just weld a tack or two on the high spots of a patch panel to shrink and pull tight, instead of the OA/hammer/dolly technique? Would a tack weld gather in the surrounding panel?
Thanks!
I've been using my MIG welder for ten years, but this information will help take my results up a notch or two.
The fabric analogy helped me a lot in understanding the effects and cures for weld shrinkage.
I'm going to bookmark this thread until I have enough paper to print it out. ;-)
This should really be a sticky to the top of the forum.
I have a question. Could you just weld a tack or two on the high spots of a patch panel to shrink and pull tight, instead of the OA/hammer/dolly technique? Would a tack weld gather in the surrounding panel?
Thanks!
Thread Starter
|
Hotshot
Joined: Oct 2004
Posts: 15,882
Likes: 88
From: Durham NC
Heat shrink with a torch or shrinking attachment to a stud welder is not difficult to do and more controllable than doing a spot weld which you would not be able to hammer flat without stretching it again so you would turn a pillow into a bag of walnuts.
Thread Starter
|
Hotshot
Joined: Oct 2004
Posts: 15,882
Likes: 88
From: Durham NC
Here's a couple pix that show how to make a butt seam in sheetmetal as described in post 174 (pictures borrowed from MP&C's roof repair tutorial elsewhere on FTE).
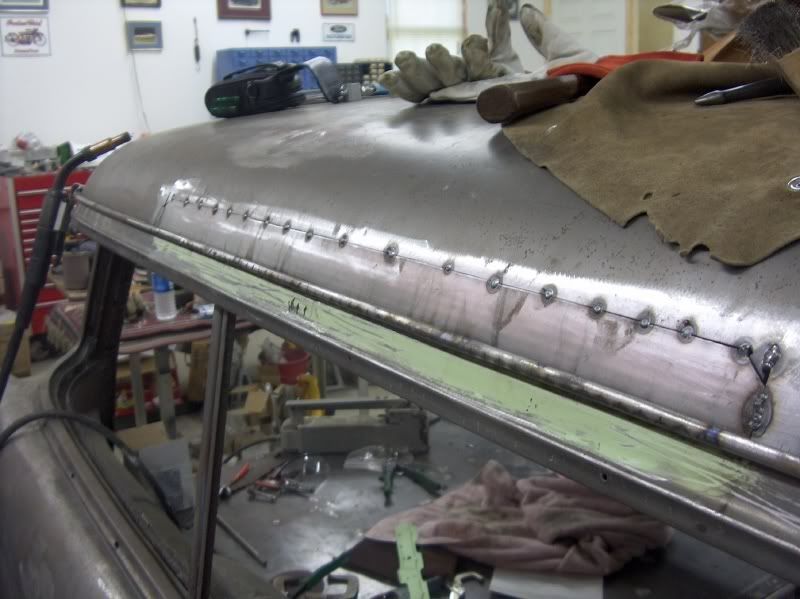
Note the spaced tacks, this is probably after the second pass of tacks The first pass would have been 2x the spacing.
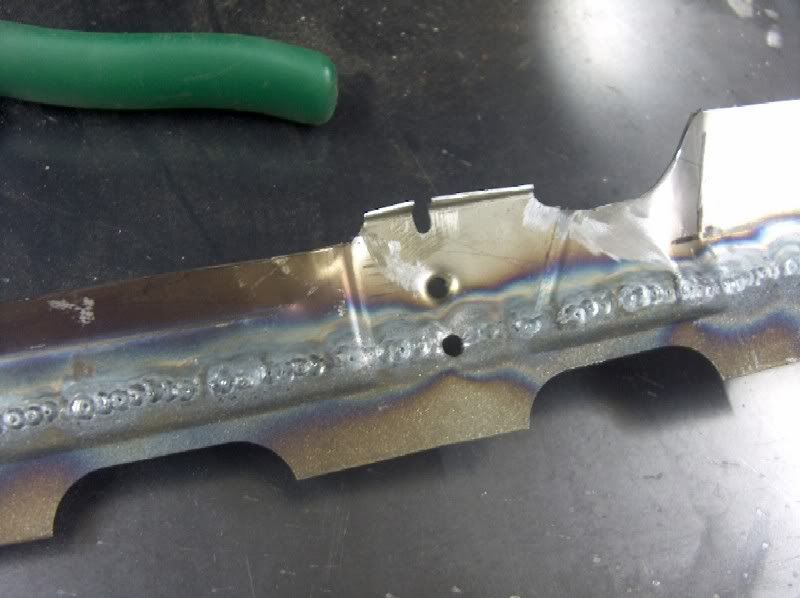
This is what a fully welded butt seam of overlapped spot tacks should look like. Note that the tacks are full penetration not cold beads just gobbed on top the seam. Yes this technique may take several hours to days on a long seam, but notice there is no heat distortion that would take much more time to correct, and metal finishing this seam would require little to no filler to finish.
Note the spaced tacks, this is probably after the second pass of tacks The first pass would have been 2x the spacing.
This is what a fully welded butt seam of overlapped spot tacks should look like. Note that the tacks are full penetration not cold beads just gobbed on top the seam. Yes this technique may take several hours to days on a long seam, but notice there is no heat distortion that would take much more time to correct, and metal finishing this seam would require little to no filler to finish.