When you click on links to various merchants on this site and make a purchase, this can result in this site earning a commission. Affiliate programs and affiliations include, but are not limited to, the eBay Partner Network.
Already a week into the new quarter and I guess time for a new thread! I've been messing with this Studebaker lately, still prepping for motor install. Lots of cleaning, scraping, as well as thinking & ciphering. I keep hoping a big pile of money will fall into my lap to fund all the upgrades that I'd like to do, but that doesn't seem very likely.
Currently undergoing some consideration regarding the transmission mount. The way this setup is designed, the motor mounts are at the very front of the engine, and the transmission mounts are on the side of the bellhousing, so essentially the engine has 4 motor mounts instead of 2, but the rear 2 are on the transmission.
The front motor mounts are known for tearing apart, poor design (rubber gets old and dry-rots, then pulls apart under load). The fix for this is to use the 32 Ford "biscuit style" motor mounts that have a bolt going all the way through. You know regardless of how much the rubber degrades, it is never going to pull apart!
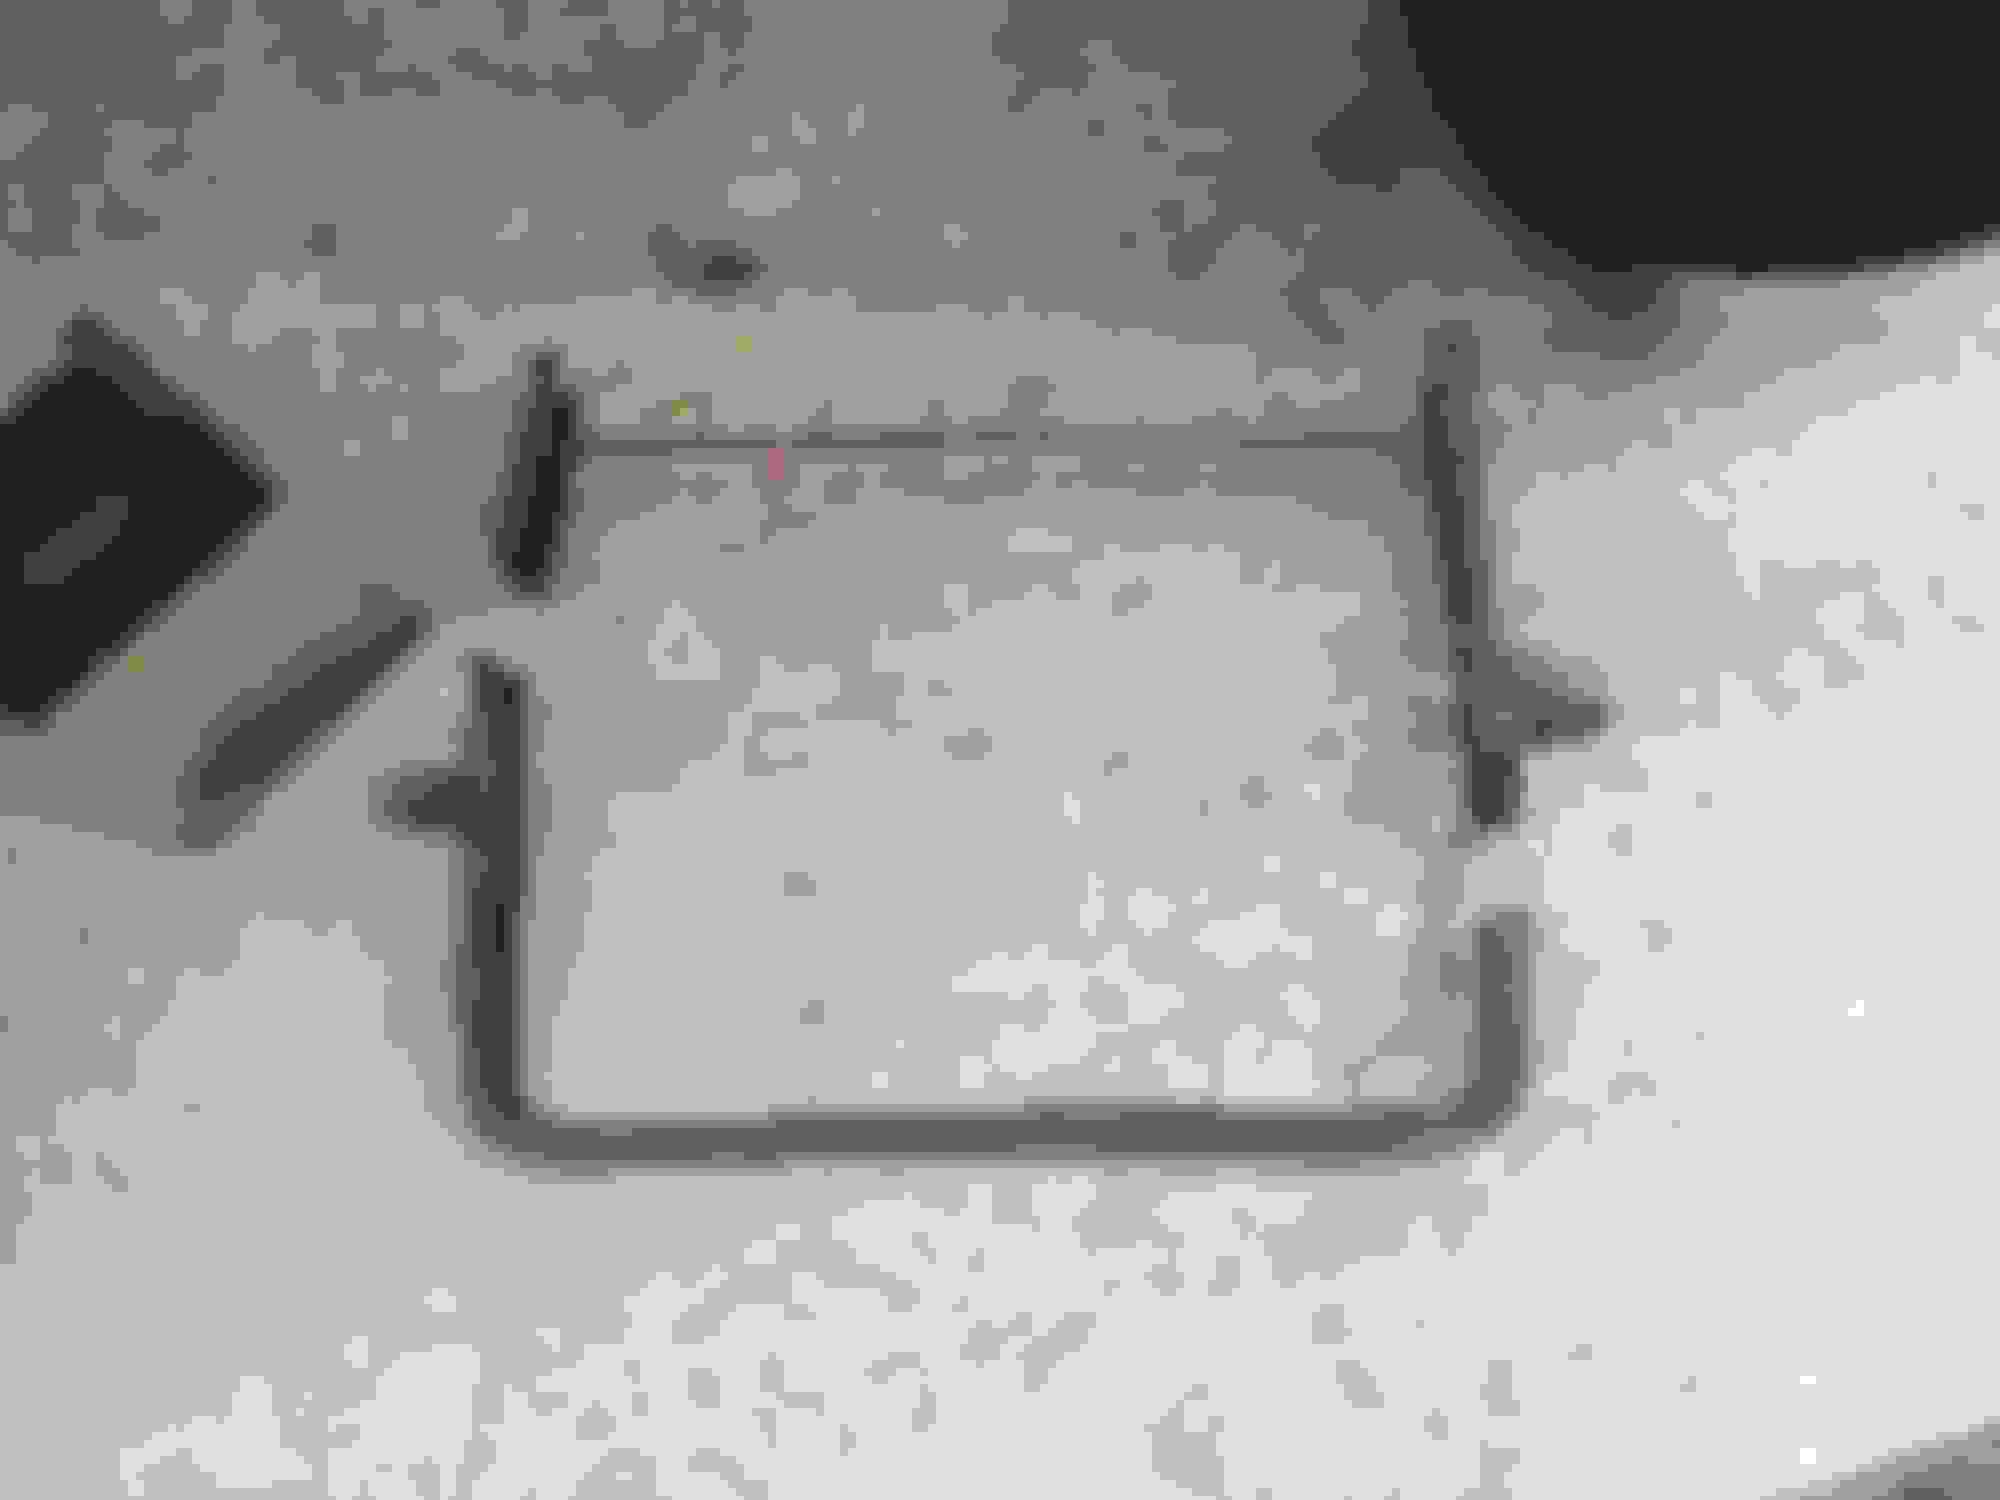
The rear motor mounts (on the transmission) are the same way. Rubber tears right apart. On my engine/trans combo, the rubber was already completely gone, just the metal part of the mount remained. That actually got me to thinking. What if I drilled a hole through it, ran a long 7/16 bolt down through a second set of those biscuit style motor mounts. It would definitely be more secure that way, would never pull apart again. So I cleaned them up and drilled holes through, but now the problem is that once it is in place bolted to the bellhousing, there is no way to get a wrench onto the bolt head. There are 2 ridges for strength that prevent you from reaching it and you only have about 1/2 inch space between the trans anyway.
So I'm interested in any thoughts you may have regarding that. I'd consider welding a bolt on, hogging out 4 "edges" inside the hole to try to catch a carriage style bolt, or modifying a bolt head somehow that would prevent it from turning in either direction once it's in place.
Here are some pics:
You can see there is no rubber left on this mount, half of it is probably still bolted to the crossmember of the donor car. I removed what is left of both mounts, let them sit in a plastic container filled with vinegar for 2 weeks, and just about all the grease grime and rubber came right off. One has already started to re-rust again however. Drilled a pilot hole in each, I was a little off on both and eventually had to use a dremel to make sure the bolt holes were centered correctly. After holes fully drilled to 7/16, testing a couple of different style bolts. Not exactly flush, because the wood block prevents it from sitting correctly, but you get the gist of it. There is no way to reach the head of a bolt once this is on the transmission. This is what new transmission mounts look like. They cost about $75 on ebay, I am thinking I can fabricate something better and stronger for $50 or less. These are the biscuit style motor mounts I mentioned. I bought a set to use for the front mounts, and I think a second set for the transmission mount would work great.
Larry, what is "dewatering"? Like draining a pond or reservoir?
They're replacing alot of utilities on base, electric, water, sewer etc... most of these utilities are at or below the water table. So they're use 6" pumps to lower the water table so they can work in the trenches with out swimming.
Well that ground water has to be filtered, company I work for has that contract. Currently we are filtering at 1 site with 2 others about to kick off. We are already doing 50-60 hours a week... and this one is probably the easiest to keep up with cause they're only 12ish feet deep. Next 2 are going 14' and 20'..... oh and did I mention we would be running all 3 operations at once? 🙄
Already a week into the new quarter and I guess time for a new thread! I've been messing with this Studebaker lately, still prepping for motor install. Lots of cleaning, scraping, as well as thinking & ciphering. I keep hoping a big pile of money will fall into my lap to fund all the upgrades that I'd like to do, but that doesn't seem very likely.
Currently undergoing some consideration regarding the transmission mount. The way this setup is designed, the motor mounts are at the very front of the engine, and the transmission mounts are on the side of the bellhousing, so essentially the engine has 4 motor mounts instead of 2, but the rear 2 are on the transmission.
The front motor mounts are known for tearing apart, poor design (rubber gets old and dry-rots, then pulls apart under load). The fix for this is to use the 32 Ford "biscuit style" motor mounts that have a bolt going all the way through. You know regardless of how much the rubber degrades, it is never going to pull apart!
The rear motor mounts (on the transmission) are the same way. Rubber tears right apart. On my engine/trans combo, the rubber was already completely gone, just the metal part of the mount remained. That actually got me to thinking. What if I drilled a hole through it, ran a long 7/16 bolt down through a second set of those biscuit style motor mounts. It would definitely be more secure that way, would never pull apart again. So I cleaned them up and drilled holes through, but now the problem is that once it is in place bolted to the bellhousing, there is no way to get a wrench onto the bolt head. There are 2 ridges for strength that prevent you from reaching it and you only have about 1/2 inch space between the trans anyway.
So I'm interested in any thoughts you may have regarding that. I'd consider welding a bolt on, hogging out 4 "edges" inside the hole to try to catch a carriage style bolt, or modifying a bolt head somehow that would prevent it from turning in either direction once it's in place.
Here are some pics:
You can see there is no rubber left on this mount, half of it is probably still bolted to the crossmember of the donor car. I removed what is left of both mounts, let them sit in a plastic container filled with vinegar for 2 weeks, and just about all the grease grime and rubber came right off. One has already started to re-rust again however. Drilled a pilot hole in each, I was a little off on both and eventually had to use a dremel to make sure the bolt holes were centered correctly. After holes fully drilled to 7/16, testing a couple of different style bolts. Not exactly flush, because the wood block prevents it from sitting correctly, but you get the gist of it. There is no way to reach the head of a bolt once this is on the transmission. This is what new transmission mounts look like. They cost about $75 on ebay, I am thinking I can fabricate something better and stronger for $50 or less. These are the biscuit style motor mounts I mentioned. I bought a set to use for the front mounts, and I think a second set for the transmission mount would work great.
John
I would weld the bolt in on the top so it cant turn and be done with it.
This is where KISS works really good
You were there with the new rubber mounts
Originally Posted by 77mud
They're replacing alot of utilities on base, electric, water, sewer etc... most of these utilities are at or below the water table. So they're use 6" pumps to lower the water table so they can work in the trenches with out swimming.
Well that ground water has to be filtered, company I work for has that contract. Currently we are filtering at 1 site with 2 others about to kick off. We are already doing 50-60 hours a week... and this one is probably the easiest to keep up with cause they're only 12ish feet deep. Next 2 are going 14' and 20'..... oh and did I mention we would be running all 3 operations at once? 🙄
Do you need life jackets in case the pumps fail
Sound like a busy project.
Dave ----
Larry thanks for explaining that, now it makes sense. It sounds like you are about to be severely understaffed!
Dave what do you think of this idea. I might try to cut a large washer to fit in between the ridges and weld it to the head of a bolt. That way it can't turn, but still easily can wiggle while working it into place.
When trying to put everything in place can that bolt / washer be pushed out of the hole and not reached to get it back through the hole?
Being the bolts will be straight up / down, if I under stand the mounting setup, I don't know how much wiggle you would need?
Look at any other mounts and they dont move, just saying.
I know I would want the bolt coming down from the top so if the nut fell off you still have something to keep it in place sort of.
But what it you were to weld the nut to that top part and run the bolt up from the bottom into the nut?
A little blue lock tight so it will not back out and should be good.
Any bolt you use just make sure it is long enough to get a nut on it, nylock nut would be good from the bottom.
Dave ----
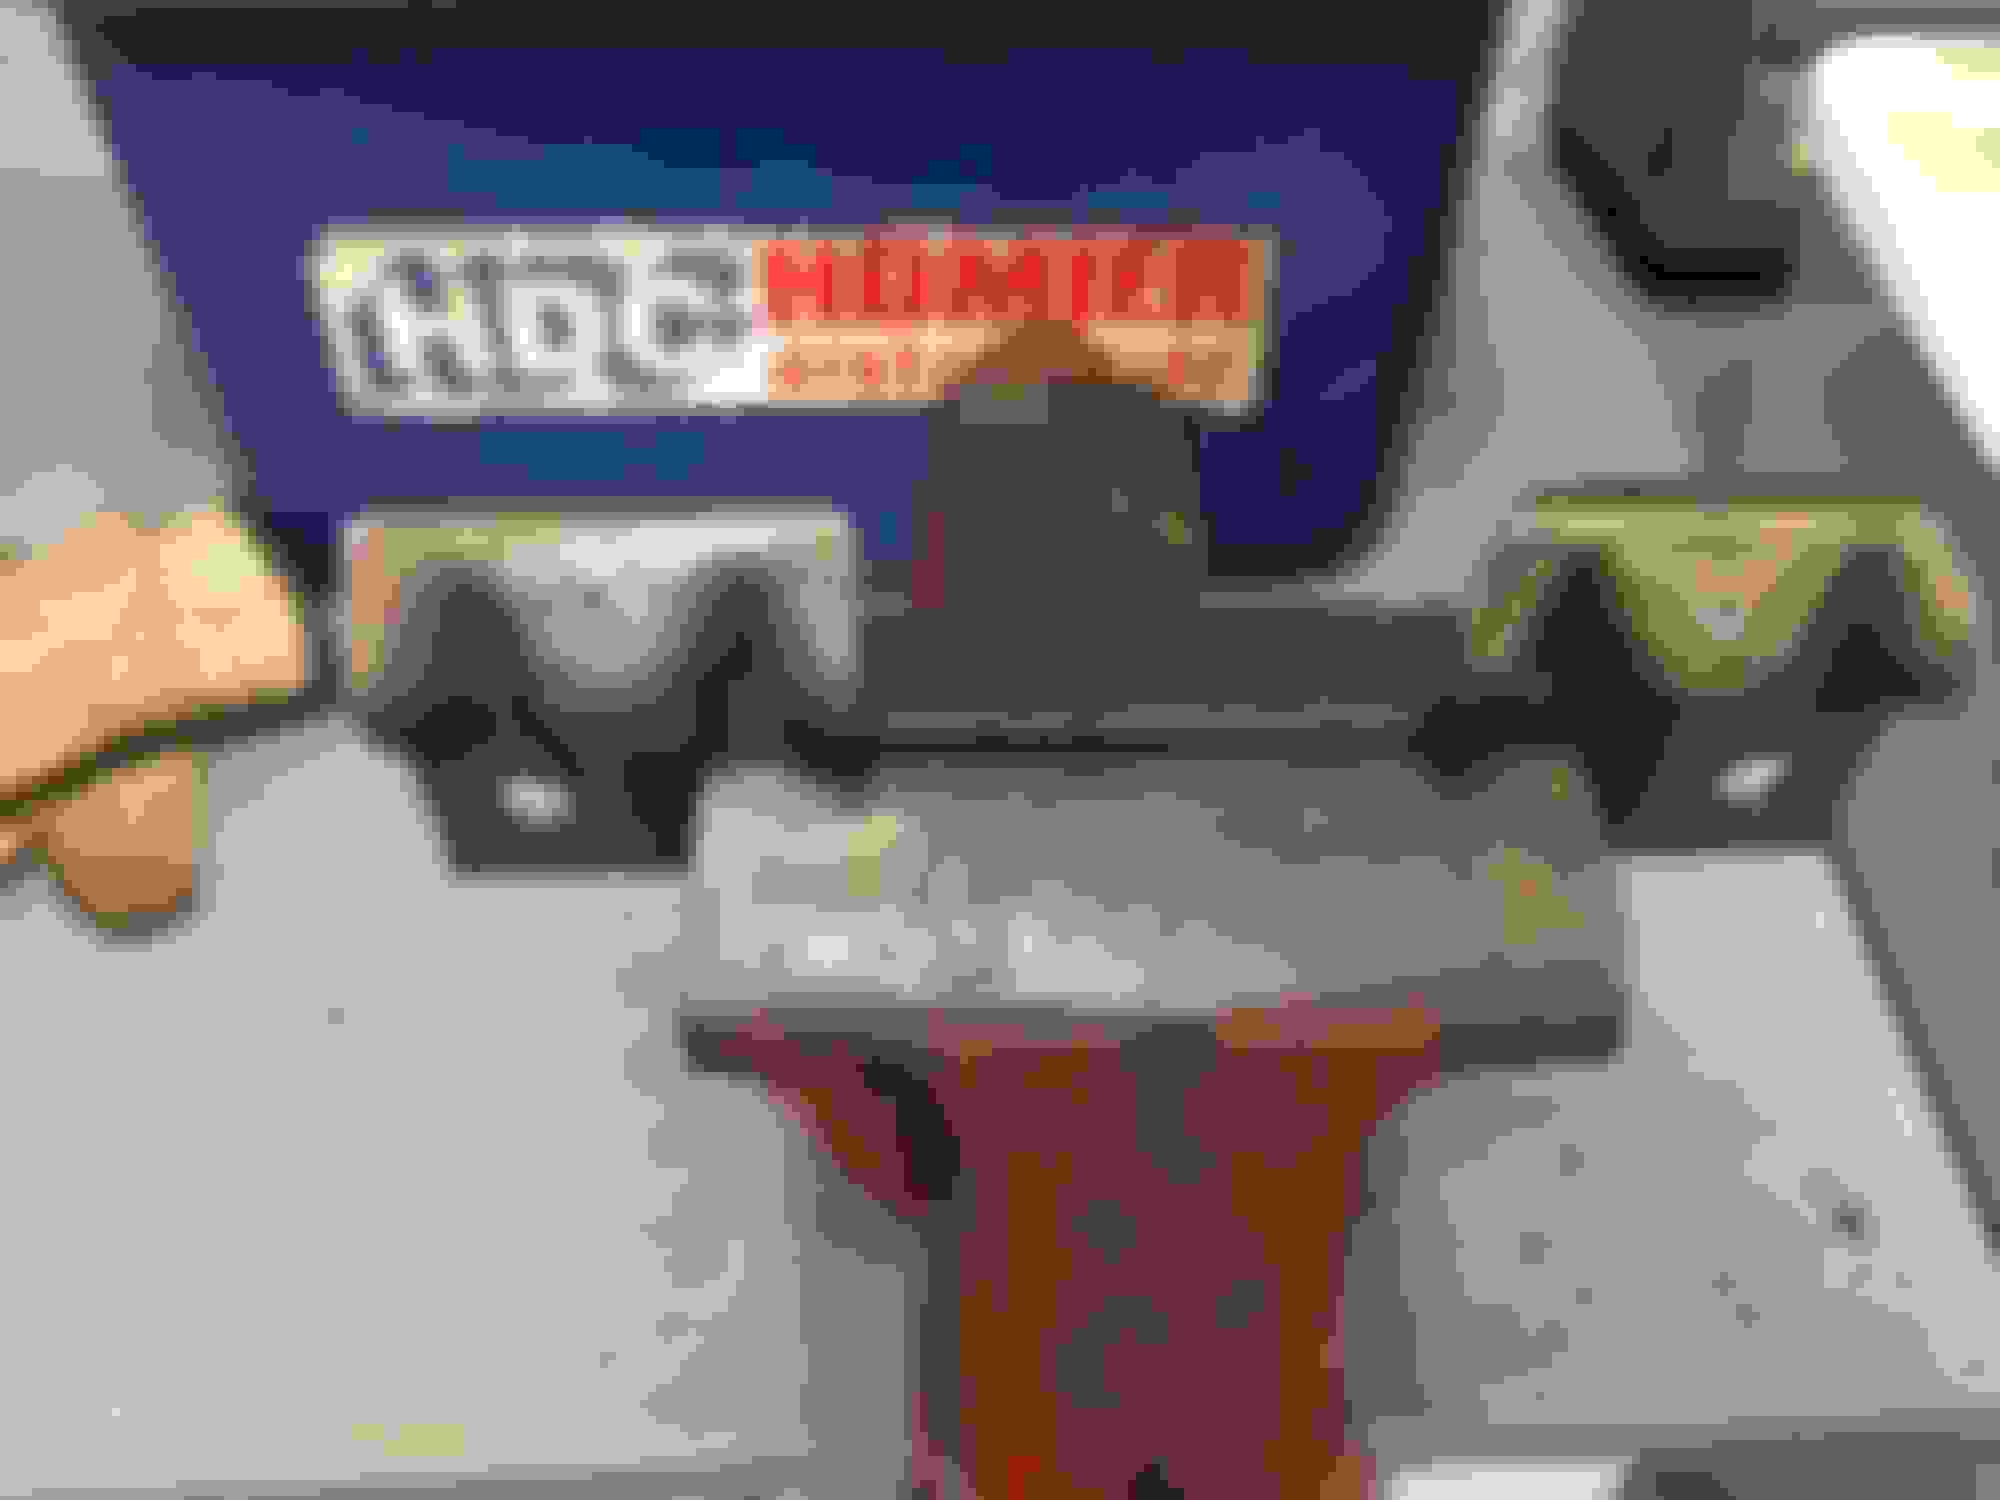
Dave, the 7/16 bolts that came with the motor mount kit have a 5/8 head. Most of my 7/16 bolts have an 11/16 head. But I did find some old 7/16 cylinder head bolts that have a 3/4 head. Feels pretty snug, I will try to finish tinkering with that later and send some pics.
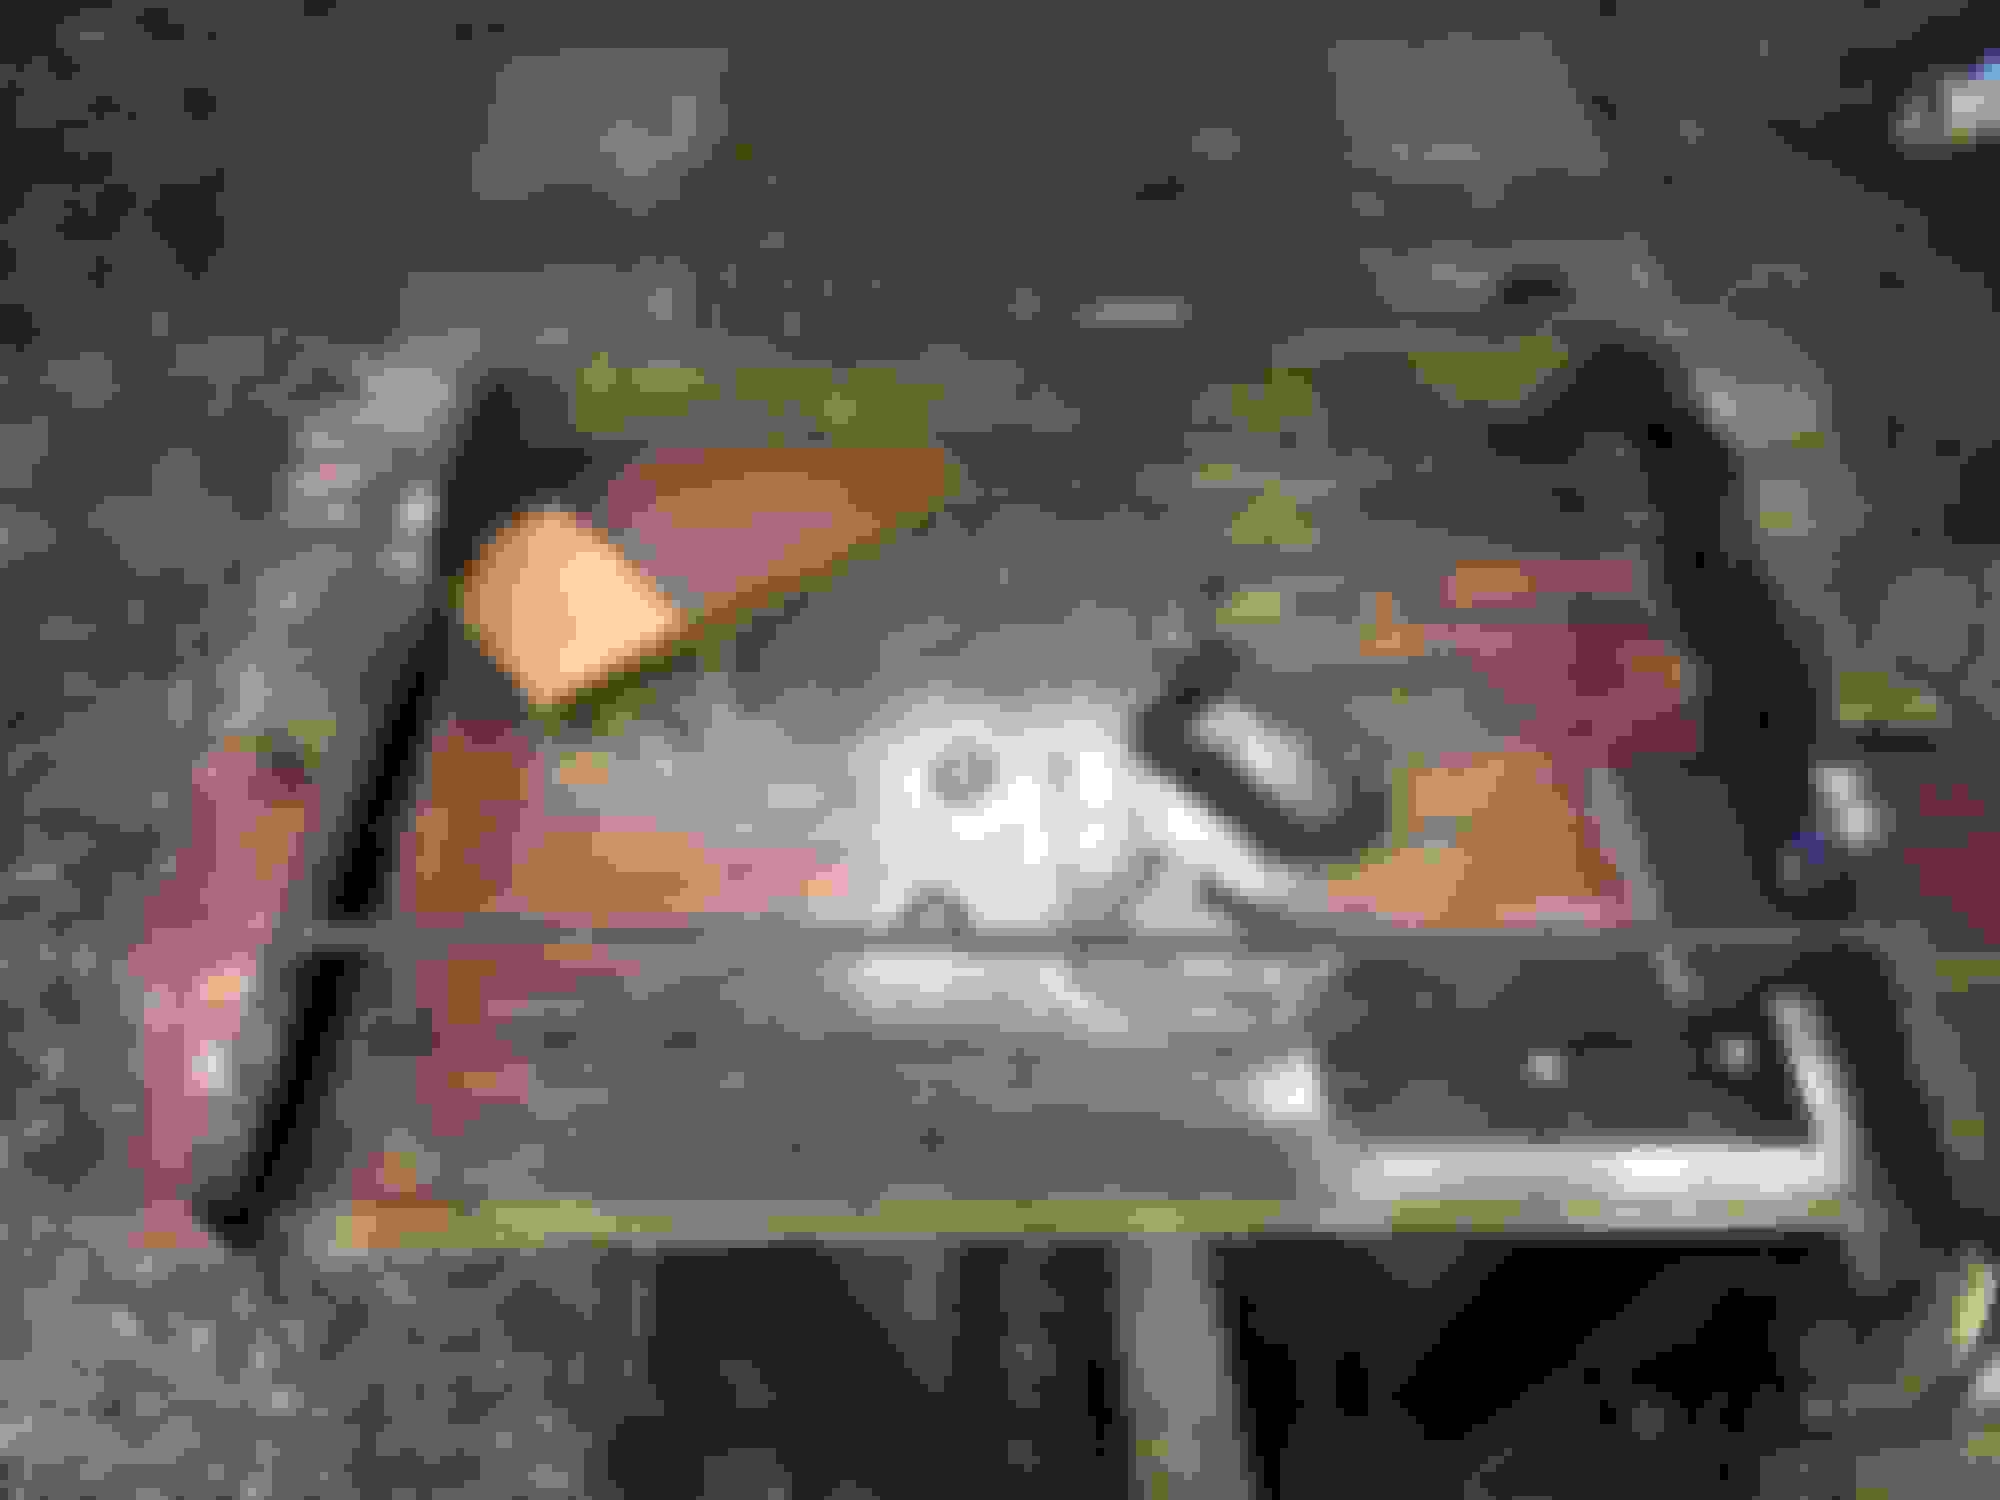
Meanwhile, been fighting this radiator support for a long time. The design is such that not only is it held in place with bolts along the edges, it also has 2 ears at the midpoint that are bolted through the frame and fender. Once you have removed ALL the bolts, you still can't remove the radiator support. You can't slide it backwards because the ear brackets are like angle iron so the vertical part stops from sliding it any further. And you can't slide it forward because the chin valance is in the way. You can't remove the chin valance without removing the bumper, because the hood latch assembly is all part of that (welded on as one piece, not bolted separately). So you get what I am saying: you have to disassemble the front end of the car in order to remove the radiator support! What kind of homelife would you have to have, in order to be so angry and bitter at the world that you would design something as ridiculous as that?
Anyway, it actually felt kind of therapeutic to take a cutoff wheel to it and hack it in half. Amazing how punishing an inanimate object for it's transgressions can make you feel so much better Anyway now I am welding it back together, and will cut those ridiculous ears off the side so it can go in and out as needed.
You can't slide it forward because of the chin valance at the bottom and the angled part of the inner fender structure at the top. You can't slide it backwards because the angle of the mounting ear prevents it. I was a little hesitant because once you hit the power switch on the grinder and that cutoff wheel starting digging it's way through, it is definitely point of no return. It's all over and done in 2 minutes! Sticking it back together, no one ever has to know it's been modified
I was going to say if you could find channel to fit inside the support you could have made it bolt together.
Either 1 or 2 bolts on each side and it is apart or together again.
Dave ----
I first heard of it yesterday on the radio and think only 1 time, think it was 100.7
I also head it today, again only 1 time and early in the morning.
I have been thinking I might also check it out after I do my weekly trash run.
Dave ----
Oh this is the one I emailed you about, and here you already knew about it 2 days ago. lol
Don't know what to expect as it is the 1st time for it, but a lot of people from my club are going. I hope we have shade and something good to eat for lunch!
Well not a lot of shade other than the tent someone brought and it was hot!
I do need to get a chair as I gave mine to the wife for her thing she did today.
I did not check out the food as I was not hungry did anyone check them out?
The Ice Cream on the way home was great.
There was a lot of nice cars & trucks at the show and like me I did not get any pictures
I am also into AMC's and there were 4 of them there, 3 Gremlins and a Hornet AMX and all were AMC power!
I need to get working my Javelin to bring to shows.
Dave ----
I did not see the Hornet AMX, but I only went to the right on main street I didn't go further down to the left. Was it an orange one, as we had an orange one at our show in Smithfield last year?
I checked out 2 trucks, one had a big M on the side and said smokehouse & grill. They had bbq and brisket sandwiches and I was just about to get in line to order there, then figured it wouldn't hurt to at least look at the other truck. It was Nanny-O's and she had catfish poboys and shrimp poboys, and that sounded pretty good to me. So I had a catfish poboy and a coke.
I did take some pics, but just to send Sherry to look at the color.
I think the paint on our Studebaker currently is this shade. Obviously the paint on this 57 Chevy is in much better condition. Neither my wife or I care for that shade though. On a hunch, I sent my wife this pic and yes, she liked this sort of teal color. She said I should ask the owner for the paint code, so I went back and he was gone! Neither owner on either side of where he was parked knew his name. The paint NAPA in Benson wasn't able to find a modern formulation for the original paint code, but mixing "by eye" he came up with a color that is pretty close to what you see here. I sprayed it on an air cleaner lid, and Sherry said it was "too blue". It was just a sample, like half-pint.
The Hornet AMX was to the left on the left side of the street. I know 1 of the Gremlins was down there but now think 2 of the 3 were.
On the color your wife likes on the pick up it may not be a "teal" but a "sea foam" color?
I am trying to think what I have seen "sea foam" used on?
You did say you started in 58 year did they have books going back more say to 50?
Dave ----
Well we found another color code that is very close to what she likes, it is a MOPAR color with paint code KK-1. But it appears to change names every year!
(also I think Dodge / Chrysler / Plymouth each give their own names to the paint codes)
On the door, right before the handle - that is the color she likes.
I think I might go down to NAPA and have them mix me up a small test batch so I can spray some and see how it looks in person. I googled some images of seafoam green, and for the most part I think it is a hair too green. I want her to be happy but damn it took me a lot less time to pick my paint code! This is the paint that NAPA mixed for me by eye, I know it is hard to get the color to show up well on a cell phone pic, but this was not green enough.
Not really powder blue or robin egg blue, but sorta pastel nonetheless, but she likes a little more green mixed in with it.
This Hennessey Takes the Expedition Tremor's Off-Roading Capability to the Next Level
Slideshow: The VelociRaptor Expedition gains a lift, upgraded suspension, Brembo brakes, and trail-ready equipment while retaining the stock 440-horsepower EcoBoost V6.


 Anyway now I am welding it back together, and will cut those ridiculous ears off the side so it can go in and out as needed.