Rob's project - Tan Truck
#1
 07-16-2016, 11:00 PM

Rob's project - Tan Truck
Hello everyone.
This is truck build attempt #2.
After I had a few issues with my shop rebuilt motor, it's time to put it together again and get her back on the road!
My build plan is thus:
1. Base motor is a 1988 7.3, currently bored .030 over.
2. Heads are basically stock; one has oversized stem valves, the other hasn't been rebuilt, but seems to be just fine... aside from some pockmarking in the firing area due to the engine it came off of getting water in it. Eh, it'll probably work.
3. A set of Jan's decompression head gaskets, to increase valve clearance, and hopefully handle more boost.
3. Cam will hopefully be my performance cam, which I bought from Russ/Typ4 but appears to actually be a R&D Stage 1 cam (Note: I've installed 1-tooth-off and the ICL measures out to R&D spec.
4. IP is my RD2-110 IP with slight mods, and a Hypermax Aneroid to limit fueling before turbo boost.
5. Injectors are early R&D stage 1s that I assembled; so far they do a good job.
6. Valve springs - TrickFlow 16910
7. Turbo is Ford F834's custom S360 with a S200 .85 T3 exhaust housing
8. As an experiment, I'm using Hylomar gasket sealant anywhere I normally would have used RTV. We'll see how well it works, but it sure seems like it'll do well.
Now for some pictures:
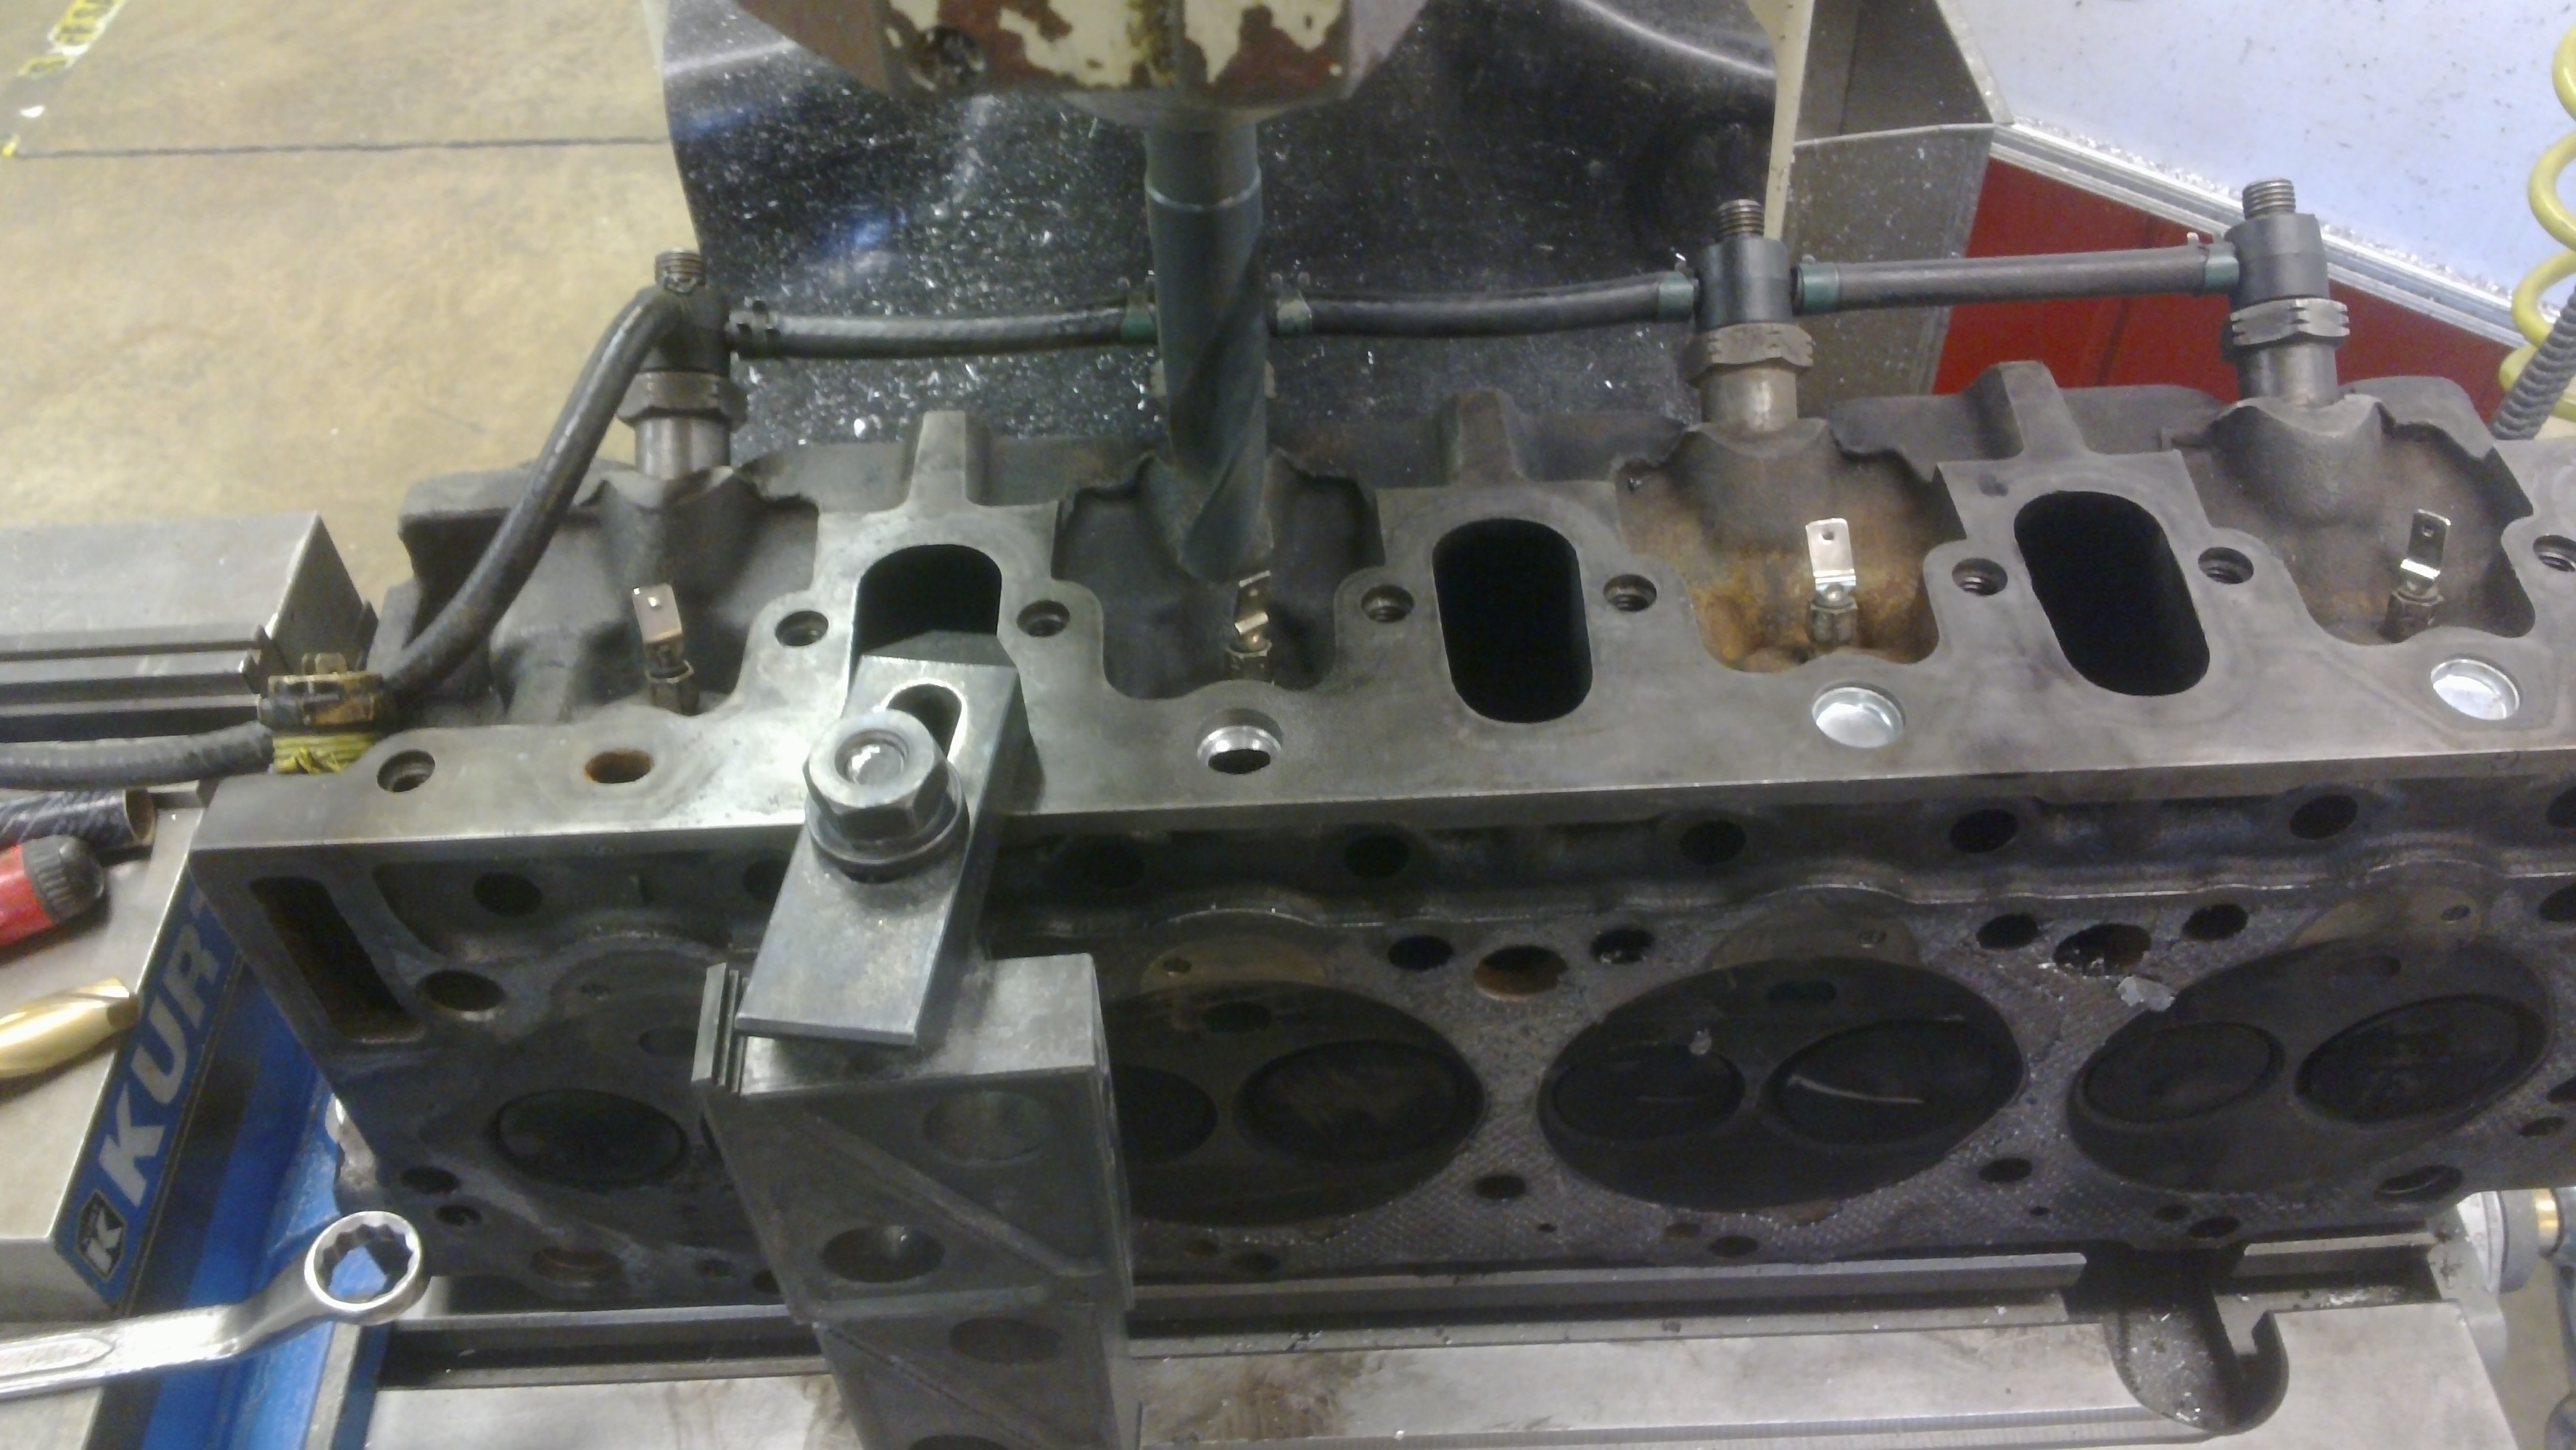
First, in preparation for this build, I decided to block off the head coolant ports which go to the (nonexistent) ports in the intake manifold. Later model heads have plugs pressed into them, but my heads are 88 vintage and don't have them.
Machining time!
I used 45/64 freeze plugs, which I acquired cheaply off ebay.
In order to use them, I first used a 5/8" end mill to bore out a round hole, removing the original oval port. I then used a 45/64 HSS drillbit to drill it out to final size. I coated the bore with RTV, then pressed in the freeze plug with the quill on the mill. They took a bit of force to go in(so they should seal well) but it wasn't a big issue.
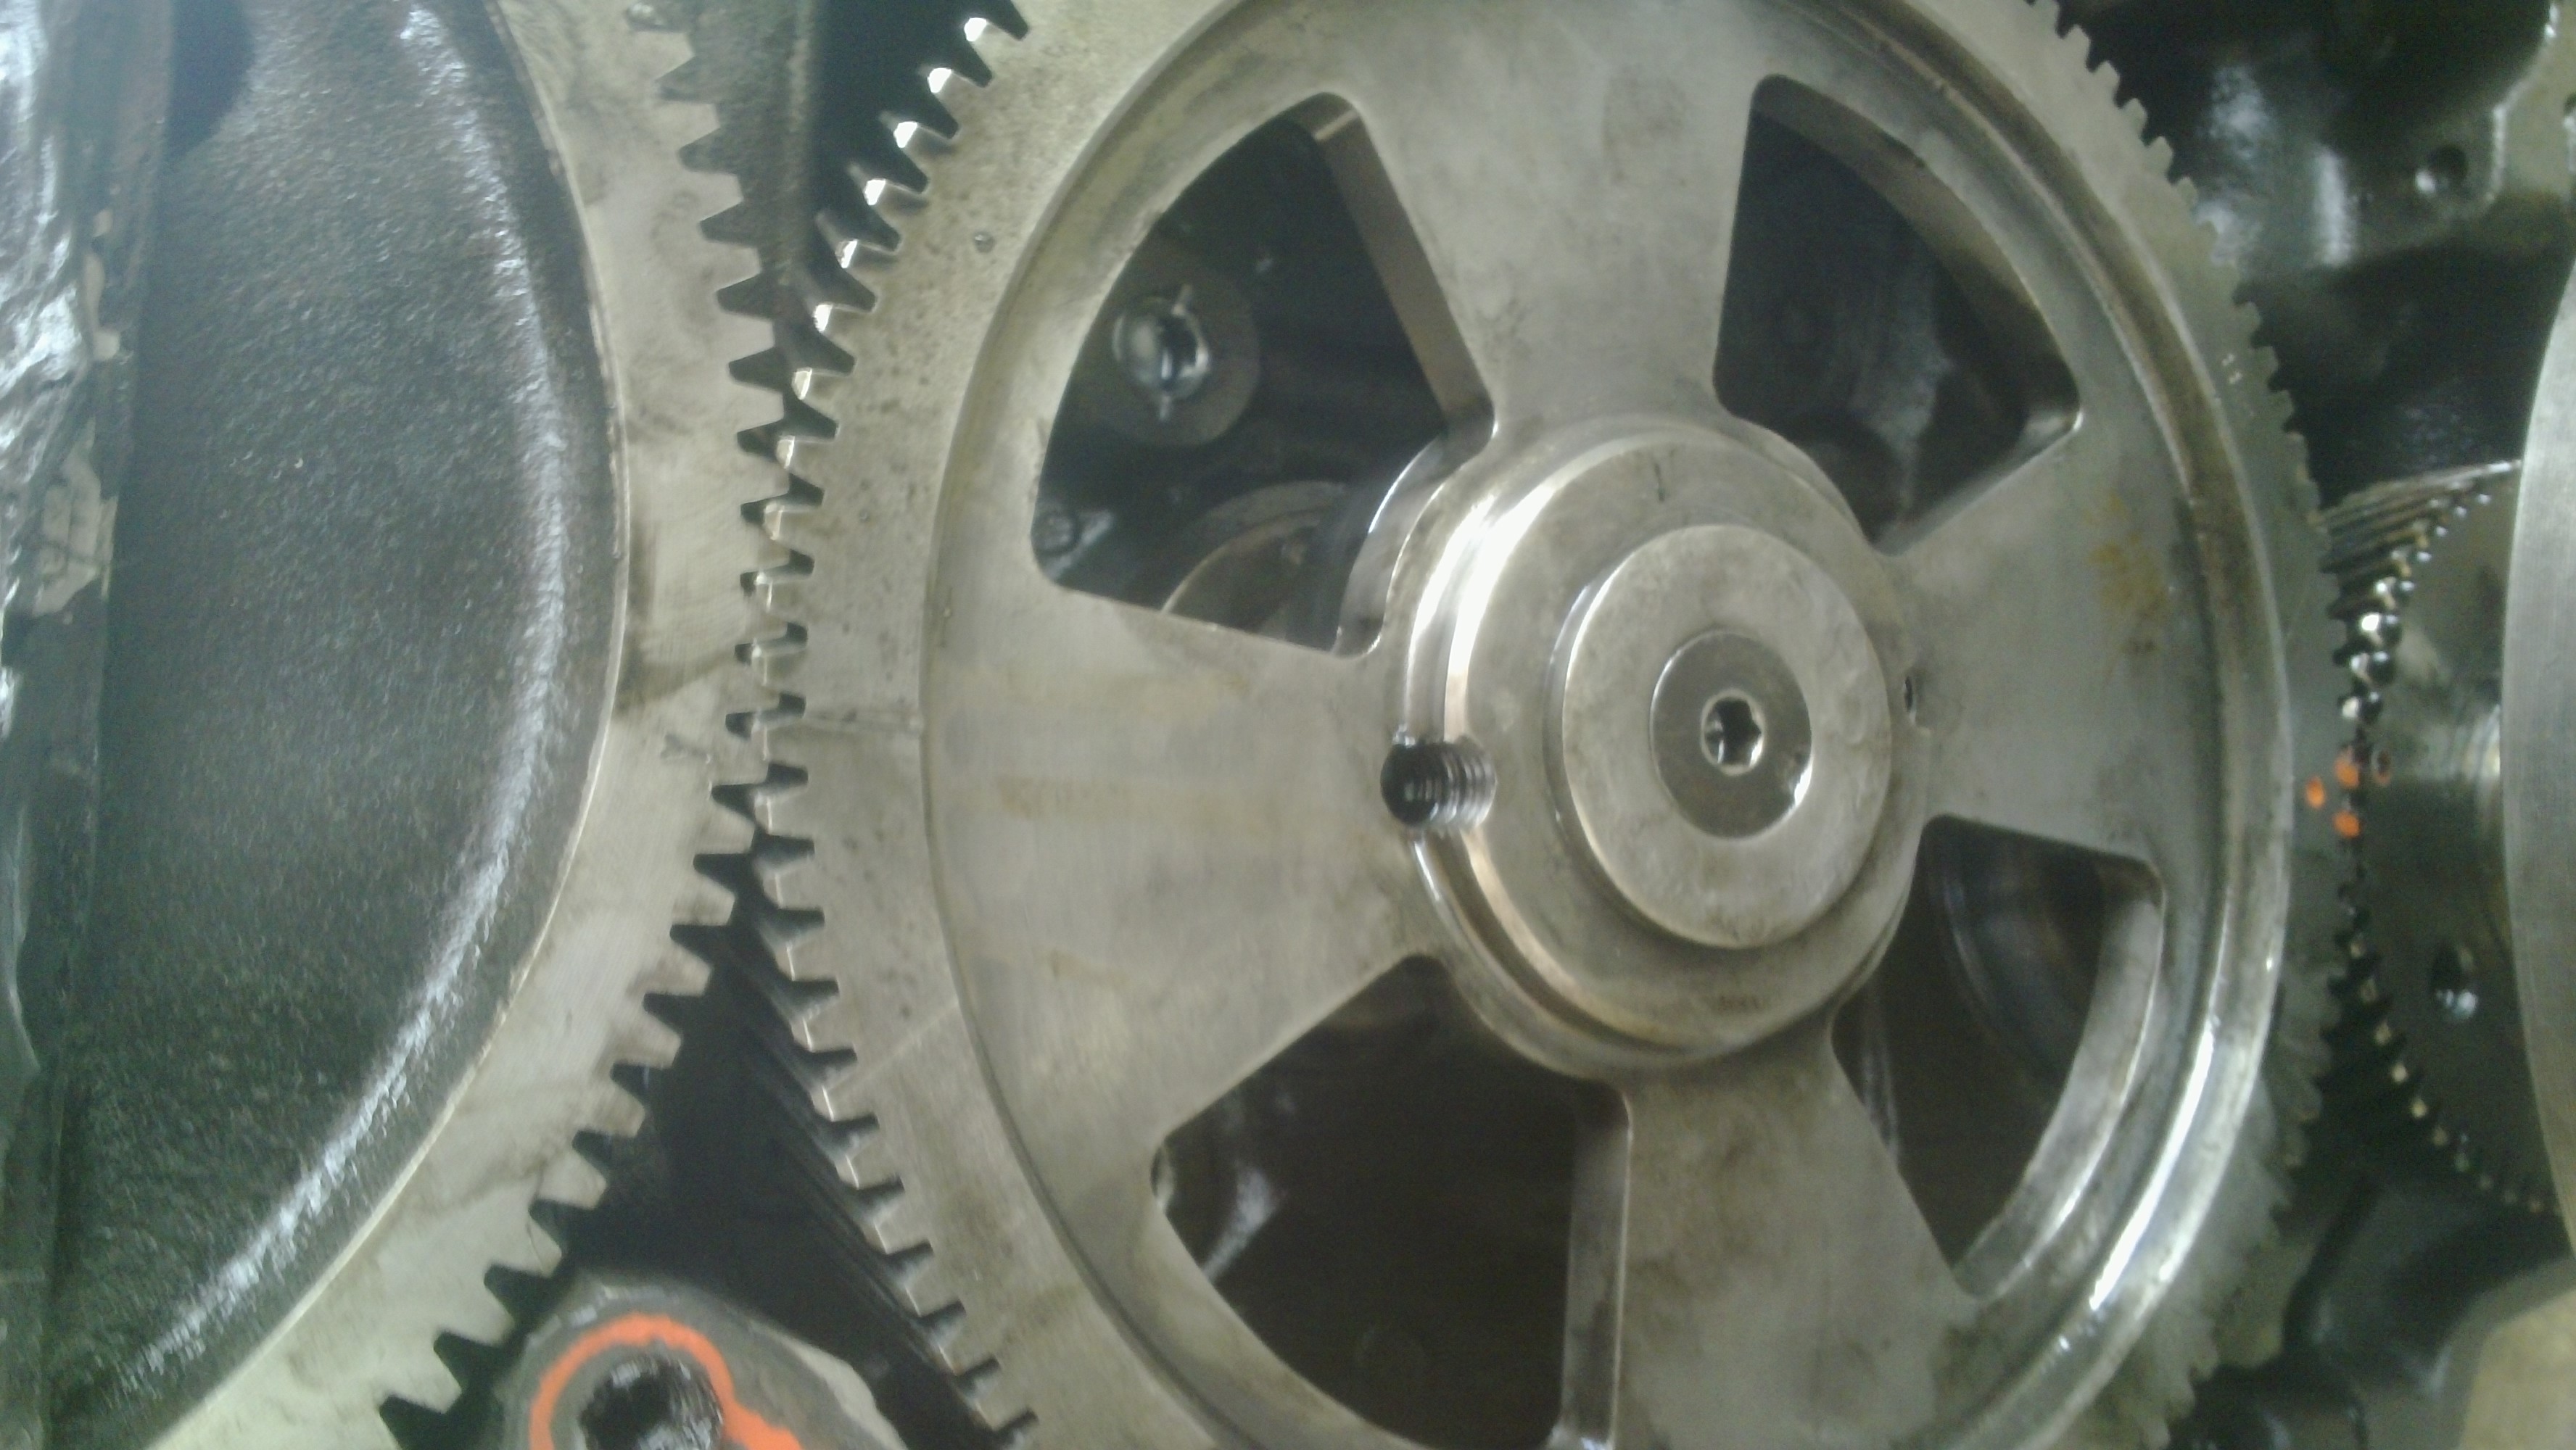
Next up today was to install my new cam. I've had issues in the past with my pump timing being off whenever I remove the cam, so this time I used a grinder to mark the cam gear right below the Y. In theory, there should be another Y on the cam gear, but my gear doesn't seem to have one...
Now, the new cam needed to be installed 1-tooth-off, so that's what I did. You can see the cam-to-crank is off by 1 tooth, and the IP-to-cam is off the same tooth. That should put my IP-to-crank timing correct.
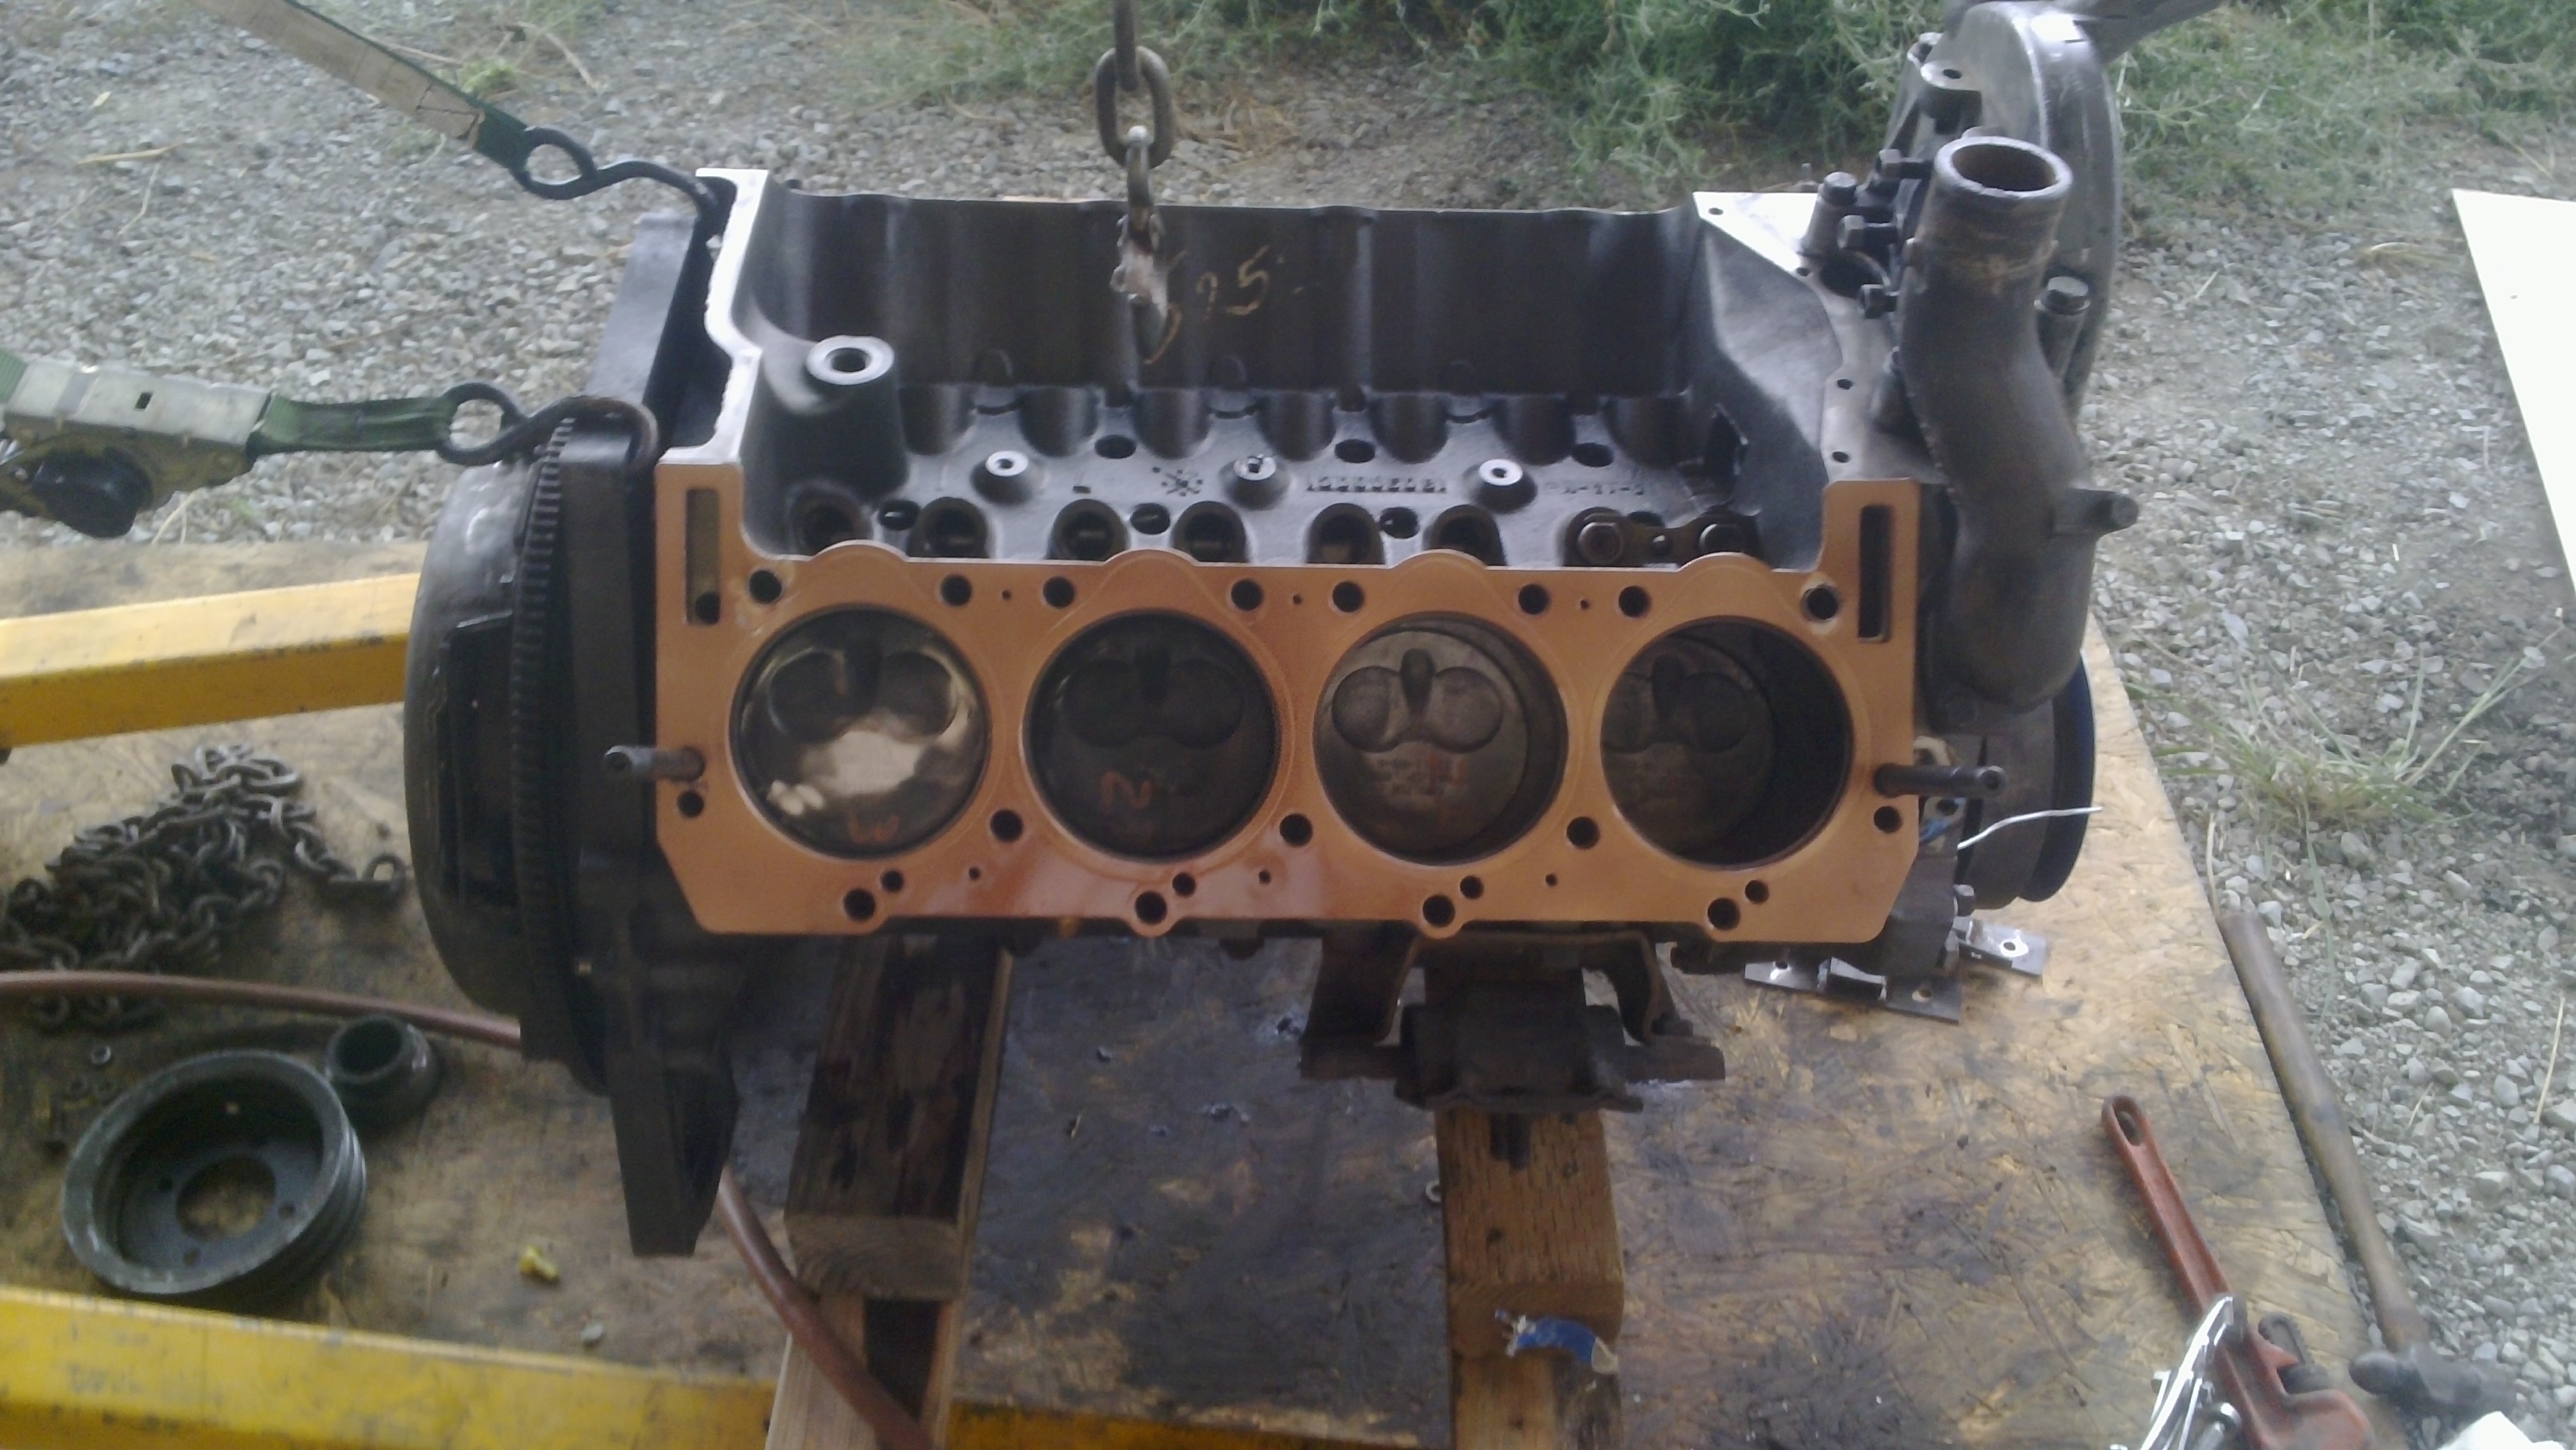
The first of my new headgaskets installed, and copper-coated to provide sealing.
(Yes, I coated both sides).
...I may have gone a bit overboard and decided to just copper-coat the bottom side of the head too, just because.
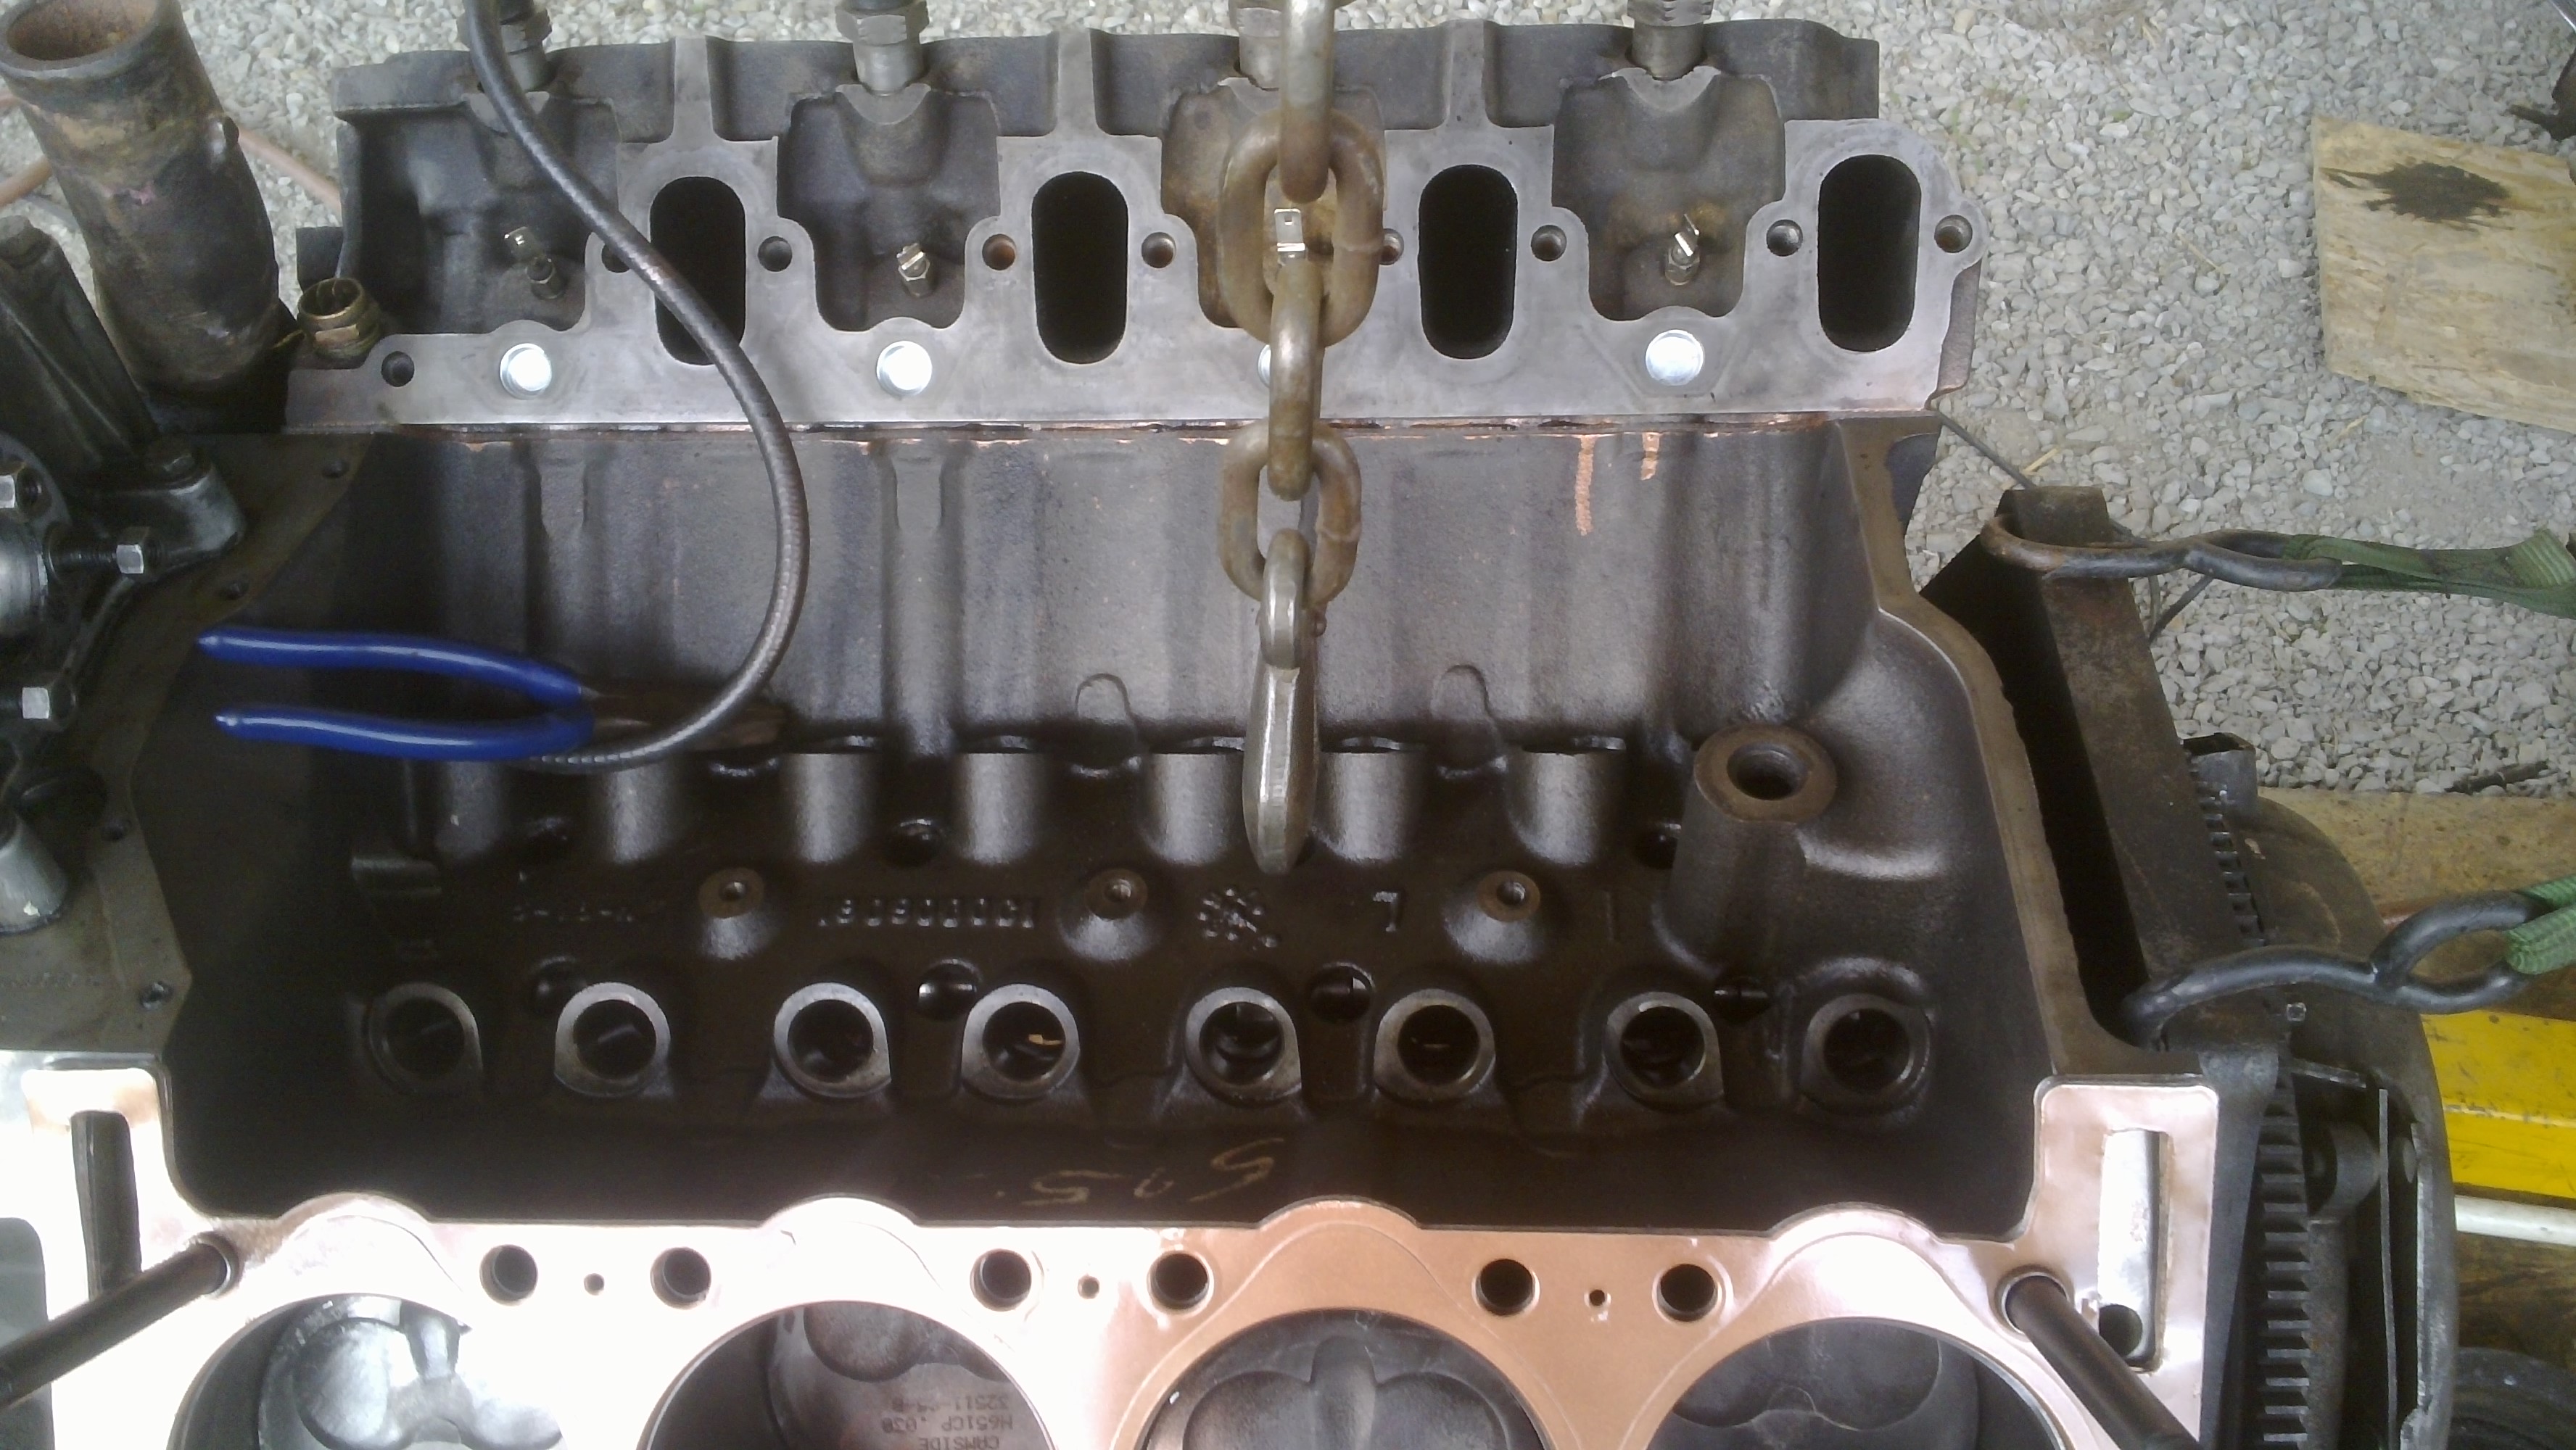
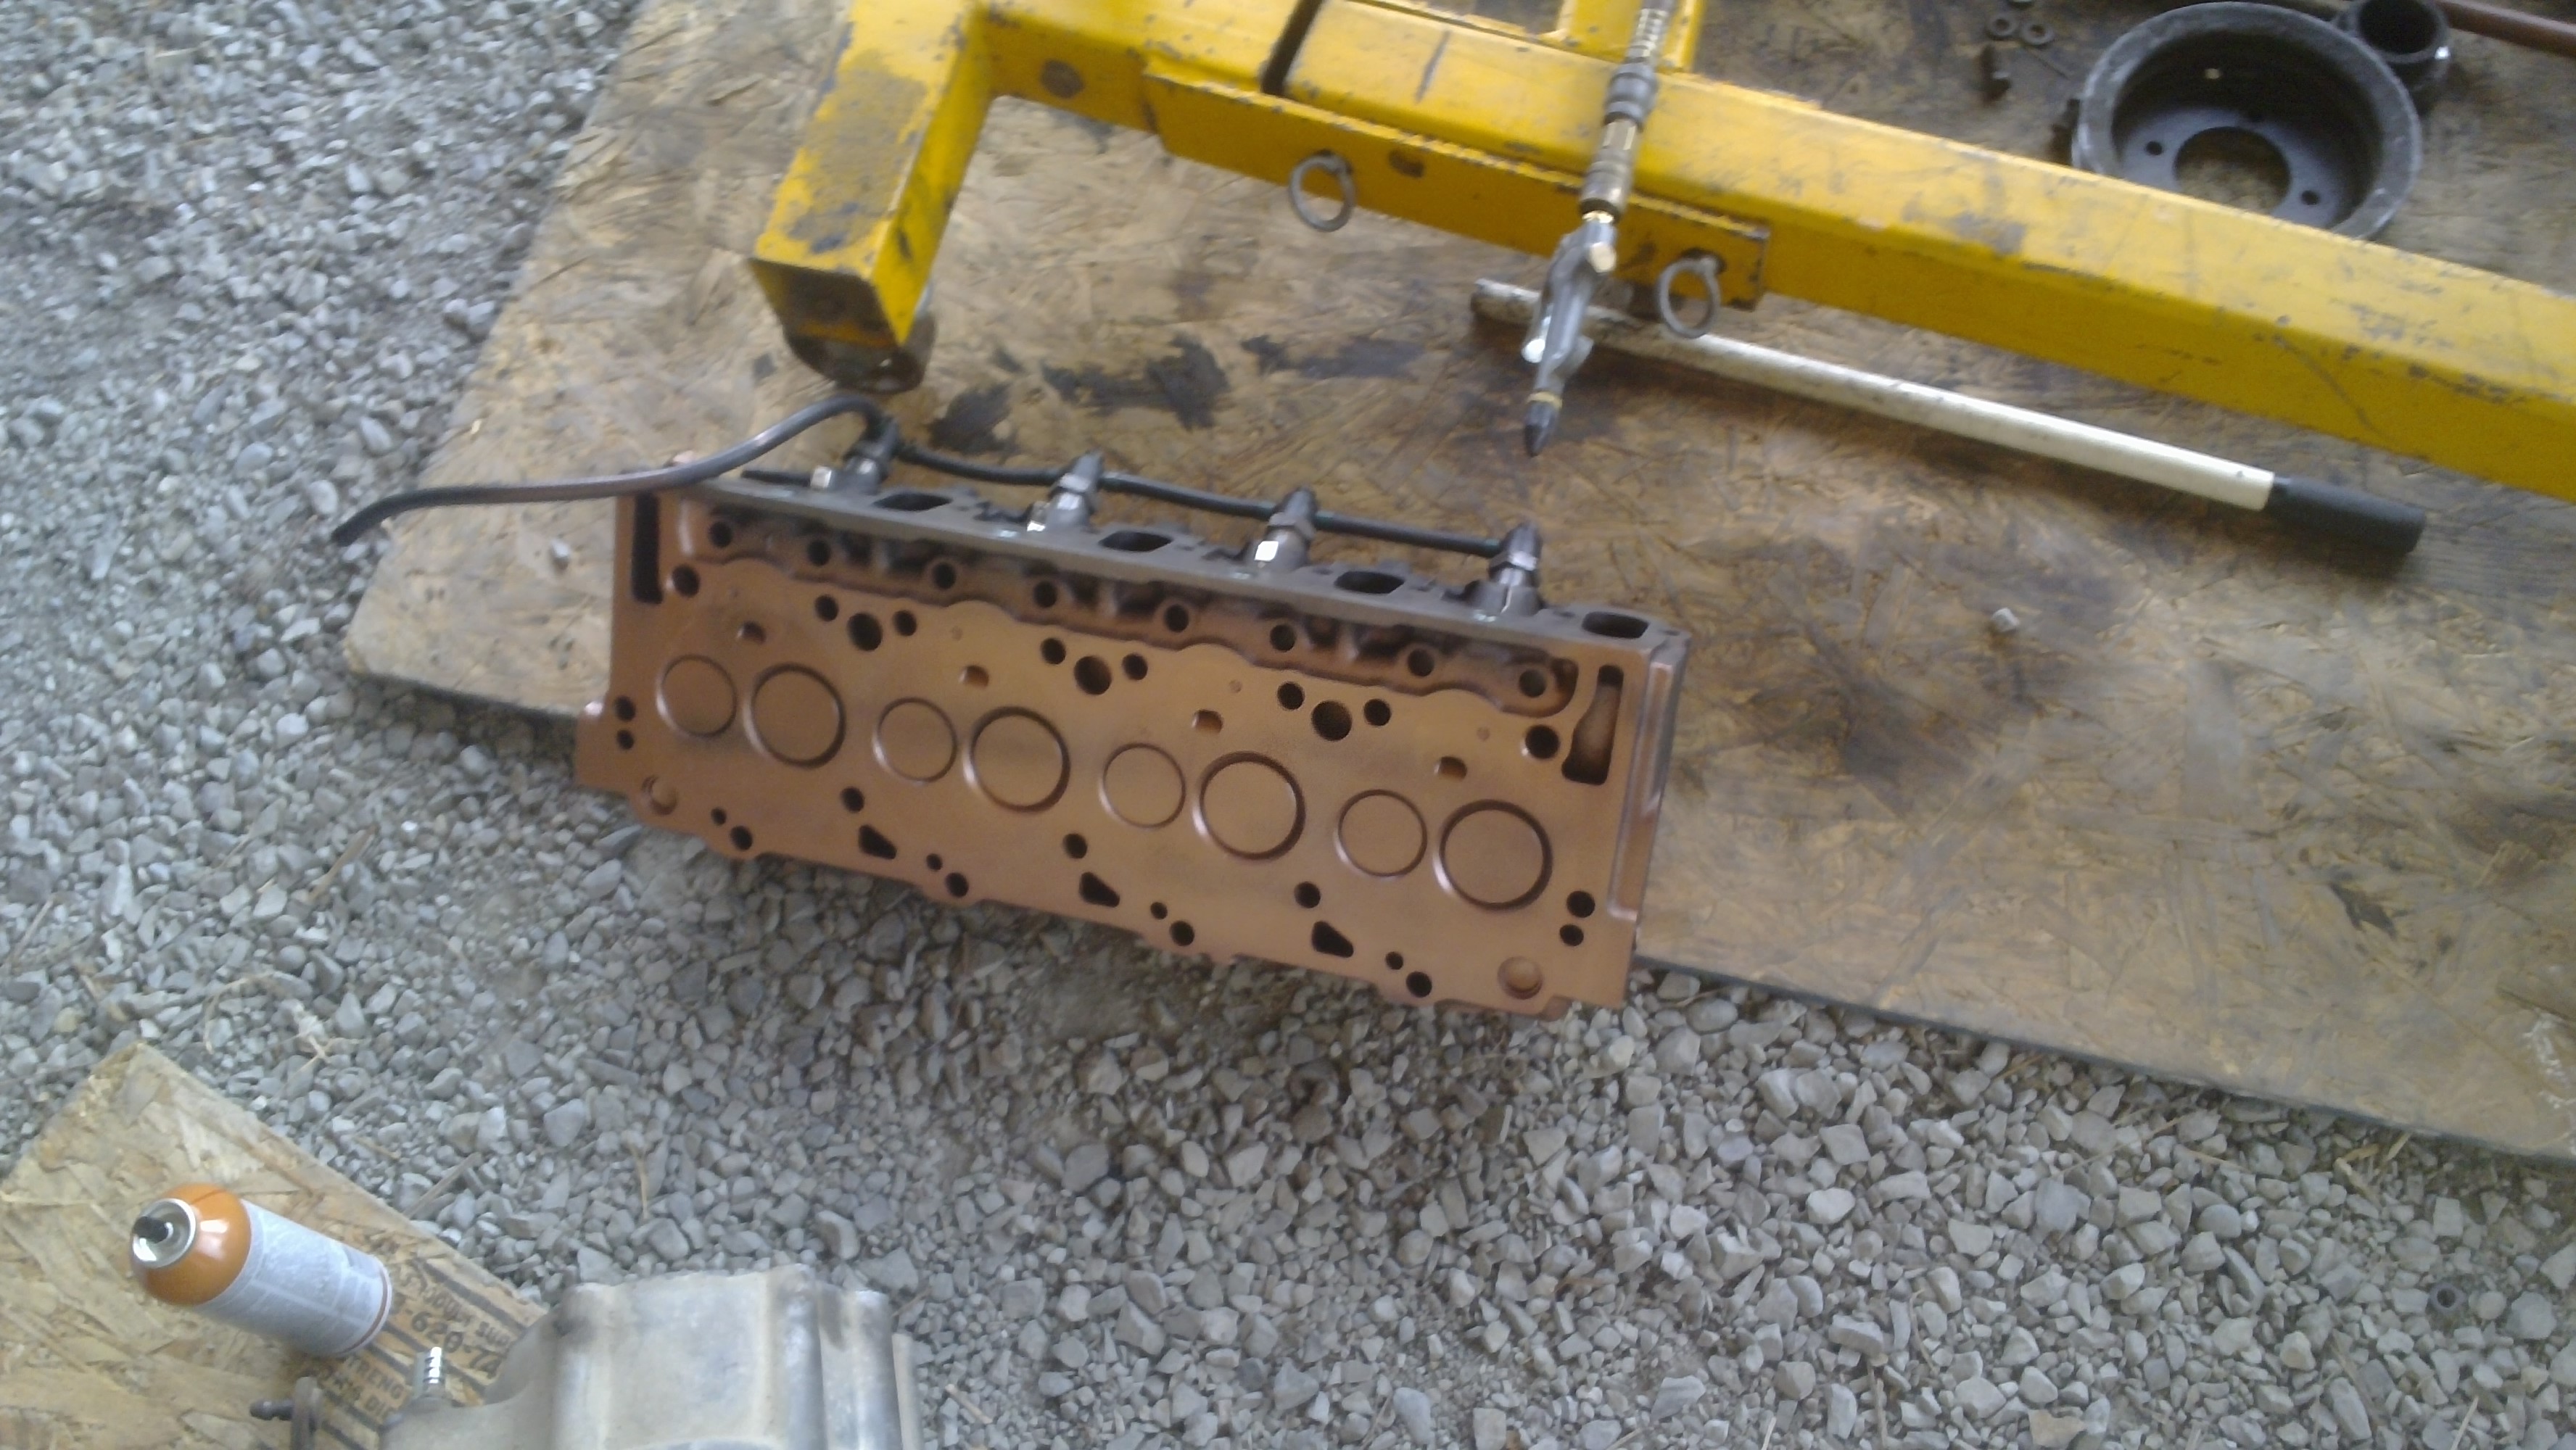
First head installed, second gasket in place.
That gasket is *thick*. It's supposed to be, but it's still interesting.
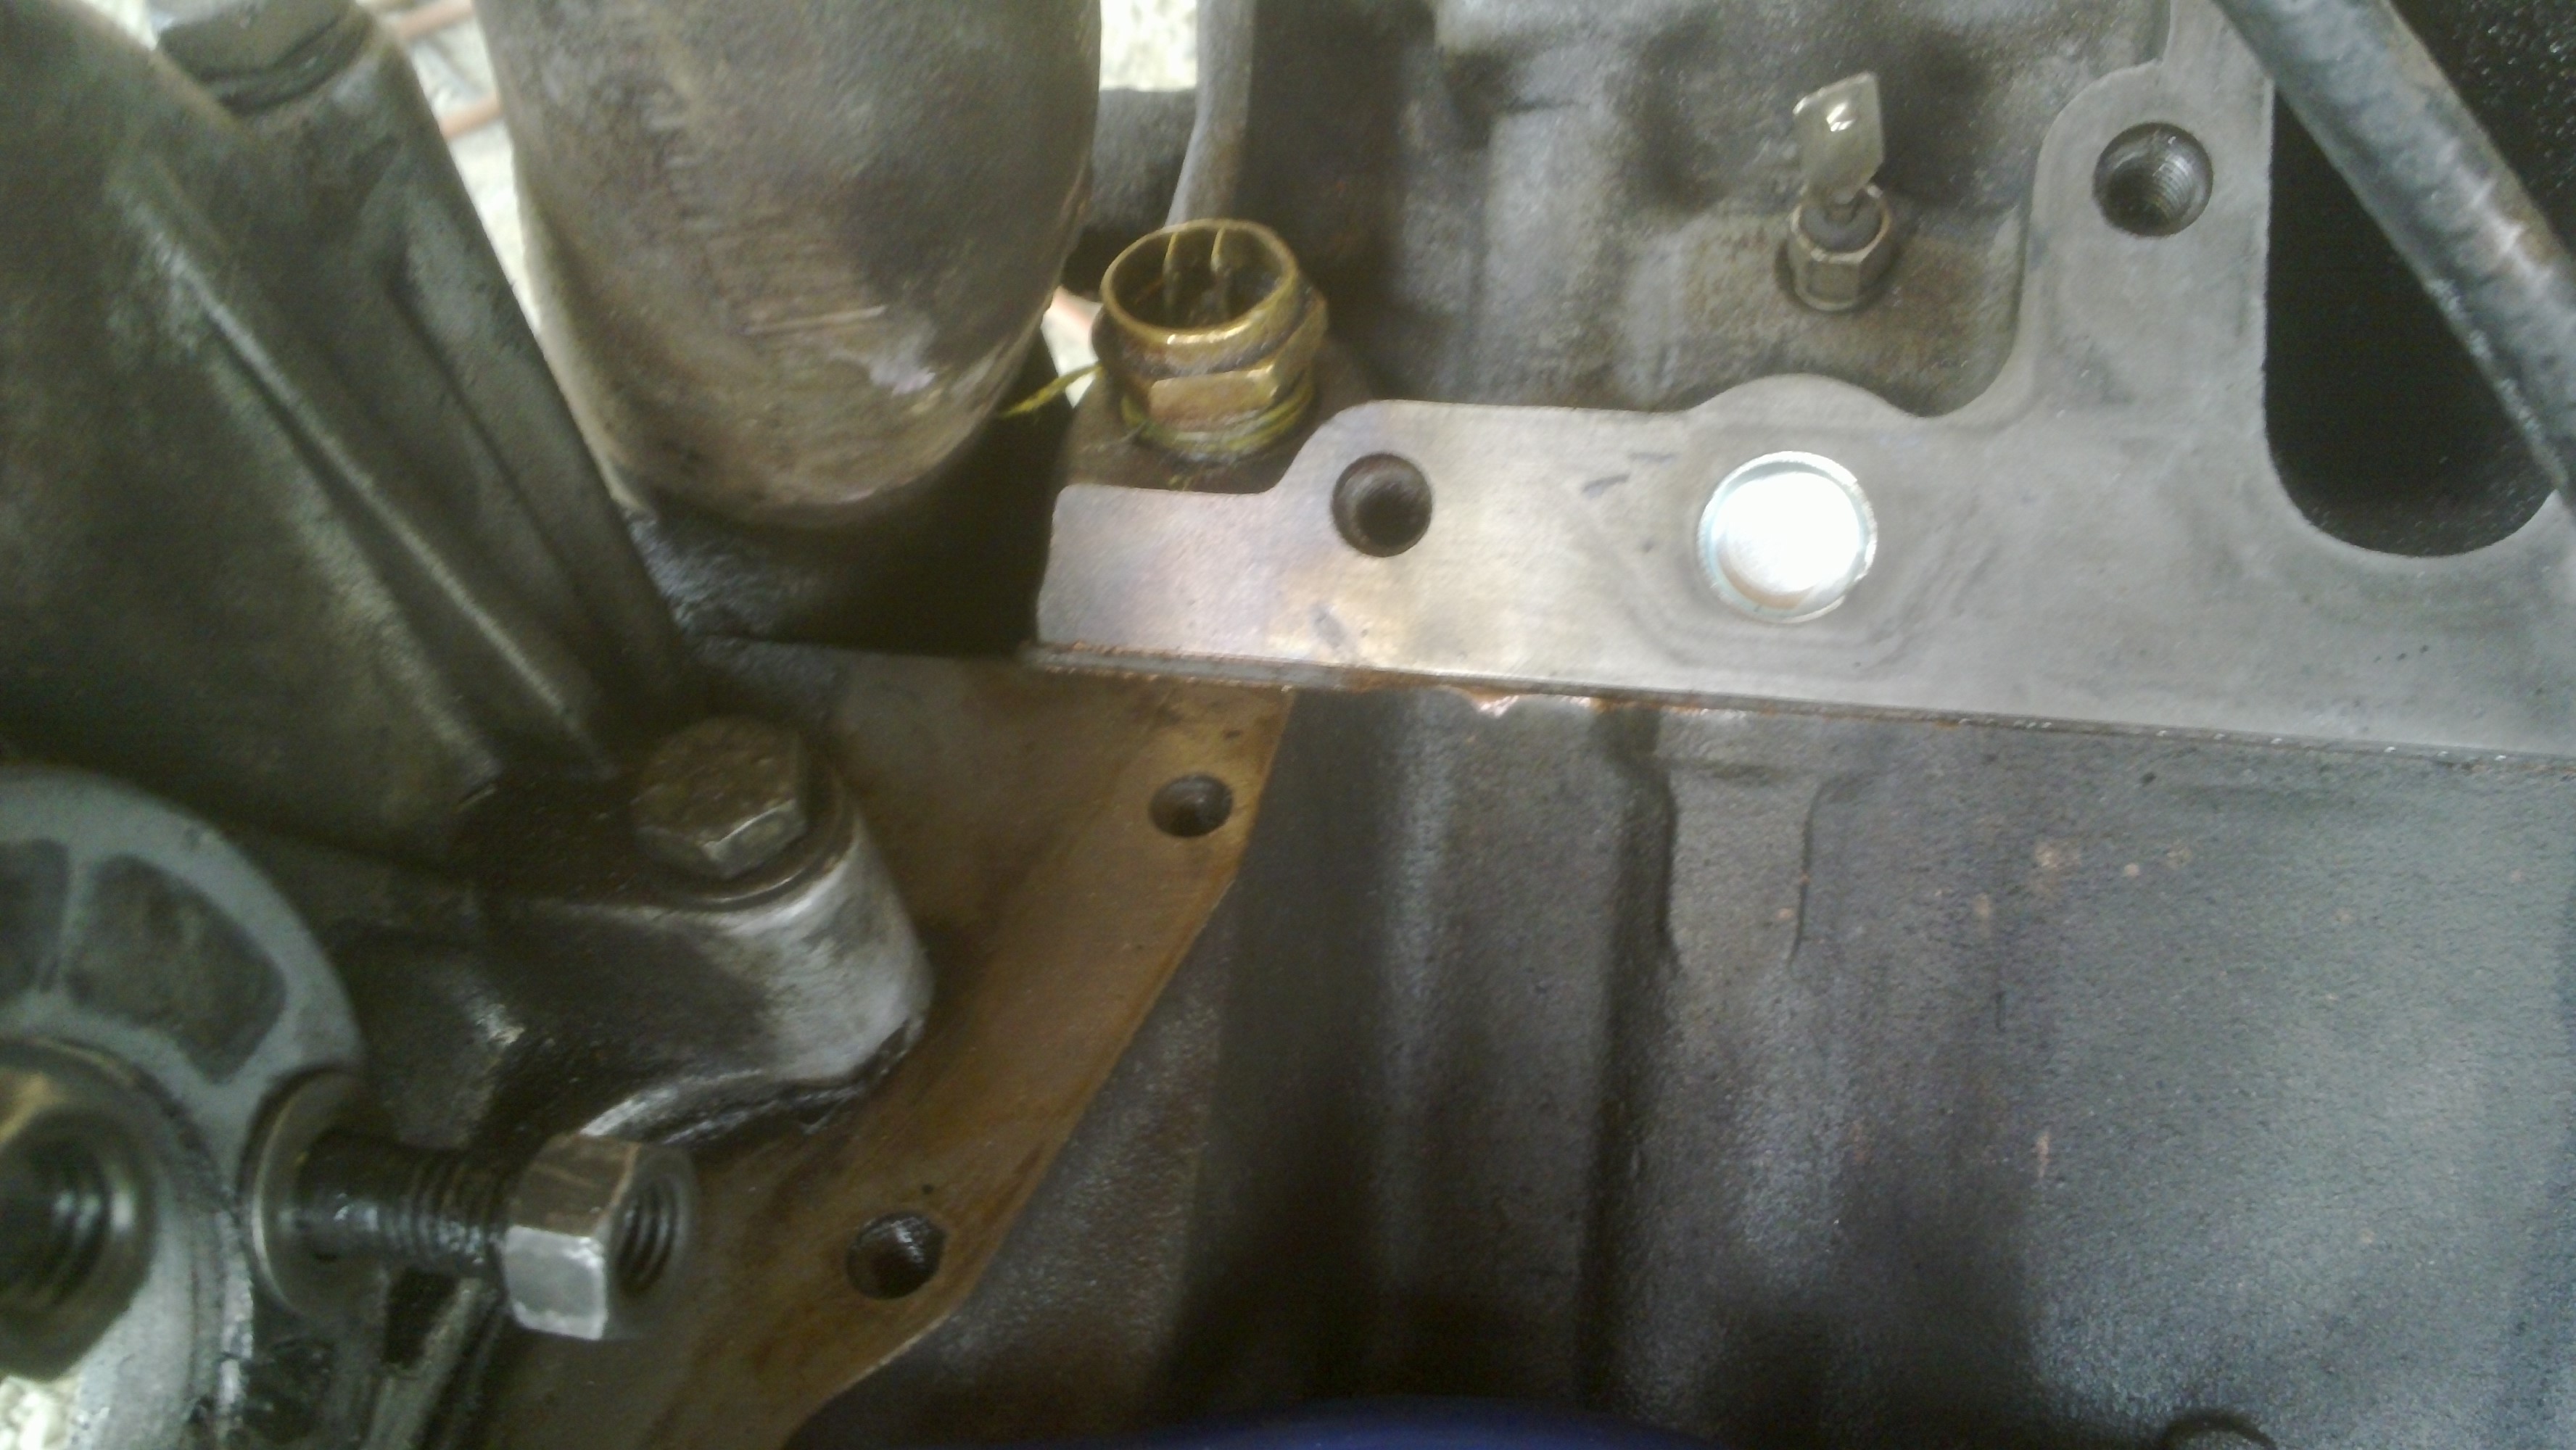
I got the intake manifold on after this; looks like it still bolted up, but it was definitely using up more tolerance than usual, due to the extra thickness.
Tomorrow, I should have more pictures(and more work done).
This is truck build attempt #2.
After I had a few issues with my shop rebuilt motor, it's time to put it together again and get her back on the road!
My build plan is thus:
1. Base motor is a 1988 7.3, currently bored .030 over.
2. Heads are basically stock; one has oversized stem valves, the other hasn't been rebuilt, but seems to be just fine... aside from some pockmarking in the firing area due to the engine it came off of getting water in it. Eh, it'll probably work.
3. A set of Jan's decompression head gaskets, to increase valve clearance, and hopefully handle more boost.
3. Cam will hopefully be my performance cam, which I bought from Russ/Typ4 but appears to actually be a R&D Stage 1 cam (Note: I've installed 1-tooth-off and the ICL measures out to R&D spec.
4. IP is my RD2-110 IP with slight mods, and a Hypermax Aneroid to limit fueling before turbo boost.
5. Injectors are early R&D stage 1s that I assembled; so far they do a good job.
6. Valve springs - TrickFlow 16910
7. Turbo is Ford F834's custom S360 with a S200 .85 T3 exhaust housing
8. As an experiment, I'm using Hylomar gasket sealant anywhere I normally would have used RTV. We'll see how well it works, but it sure seems like it'll do well.
Now for some pictures:
First, in preparation for this build, I decided to block off the head coolant ports which go to the (nonexistent) ports in the intake manifold. Later model heads have plugs pressed into them, but my heads are 88 vintage and don't have them.
Machining time!
I used 45/64 freeze plugs, which I acquired cheaply off ebay.
In order to use them, I first used a 5/8" end mill to bore out a round hole, removing the original oval port. I then used a 45/64 HSS drillbit to drill it out to final size. I coated the bore with RTV, then pressed in the freeze plug with the quill on the mill. They took a bit of force to go in(so they should seal well) but it wasn't a big issue.
Next up today was to install my new cam. I've had issues in the past with my pump timing being off whenever I remove the cam, so this time I used a grinder to mark the cam gear right below the Y. In theory, there should be another Y on the cam gear, but my gear doesn't seem to have one...
Now, the new cam needed to be installed 1-tooth-off, so that's what I did. You can see the cam-to-crank is off by 1 tooth, and the IP-to-cam is off the same tooth. That should put my IP-to-crank timing correct.
The first of my new headgaskets installed, and copper-coated to provide sealing.
(Yes, I coated both sides).
...I may have gone a bit overboard and decided to just copper-coat the bottom side of the head too, just because.
First head installed, second gasket in place.
That gasket is *thick*. It's supposed to be, but it's still interesting.
I got the intake manifold on after this; looks like it still bolted up, but it was definitely using up more tolerance than usual, due to the extra thickness.
Tomorrow, I should have more pictures(and more work done).
#2
07-17-2016, 12:57 PM
Wow. This is turning into quite the epic story and re-re-build. So I am guessing that the valve to piston contact and the lack of spooling was the result of the incorrect cam installation and wrong valve timing? I wonder how Russ ended up with one of Justin's cams  Anyway... are you planning to compensate for the gasket thickness with longer push rods? When Justin and Mark Strock put the thick gaskets in Mark's truck they milled down the rocker bases .037" instead of ordering new push rods. Justin measured Fel-pro gaskets at .073" and the decompression gaskets are .110" which is where he came up with the difference of .037" to mill off. I know the main point was to increase valve clearance, but you don't want the valves to not open far enough either...
Anyway... are you planning to compensate for the gasket thickness with longer push rods? When Justin and Mark Strock put the thick gaskets in Mark's truck they milled down the rocker bases .037" instead of ordering new push rods. Justin measured Fel-pro gaskets at .073" and the decompression gaskets are .110" which is where he came up with the difference of .037" to mill off. I know the main point was to increase valve clearance, but you don't want the valves to not open far enough either...
#3
07-17-2016, 02:44 PM
The same grinder, Delta Cam, makes both. I've heard from my local rebuilder that he's seen some sketchy stuff come through his shop that they ground, but I'd take that with a grain of salt.
Anyway... are you planning to compensate for the gasket thickness with longer push rods? When Justin and Mark Strock put the thick gaskets in Mark's truck they milled down the rocker bases .037" instead of ordering new push rods. Justin measured Fel-pro gaskets at .073" and the decompression gaskets are .110" which is where he came up with the difference of .037" to mill off. I know the main point was to increase valve clearance, but you don't want the valves to not open far enough either...
When I tightened them down last night, nothing seemed loose, so I think it'll work fine.
#4
07-17-2016, 04:41 PM
That I call a progress, he got the gaskets on Thursday and the engine will be running in a week. Robb I hope it will all come out fine and we will finally have some results on the gaskets soon. How did it all go? Any problems with the intake manifolds sealing up?
Now u will be a pioneer, 110 pump and really good turbo from Jonathan, looking forward to hear it run and perform.
Now u will be a pioneer, 110 pump and really good turbo from Jonathan, looking forward to hear it run and perform.
#5
07-17-2016, 05:51 PM
Still a few hours work before it'll actually run, but running by Thursday(1 week) seems well within reason... Provided I don't have to pull the engine due to some failure.
I'm still crossing my fingers with that cam. That's the /only/ thing I'm worried about; everything else should be proven.
The intake manifold went on without issue, but it was close. If the gaskets were thicker, I'd have needed to drill out the bolt holes for more tolerance.
That's part of the reason for the coolant plugs, mind - even if it doesn't seal perfectly, worst case is a boost leak, not a coolant-in-oil problem.
Yeah, that's the idea. I really want to get to a 350-rwhp street rig that can handle a good fraction of that HP for hours towing. As long as I can get the turbo to give me boost, I'm there.

#7
07-17-2016, 08:51 PM

She runs!
Smoking quite a bit; I'll have to check, but I'll bet I'm 1 tooth retarded, despite my best efforts. And that's why I used Hylomar for my sealant!
But chances are, she'll be fully operational soon enough.
Trending Topics
#9
07-18-2016, 03:23 AM


#11
07-18-2016, 07:24 PM
The second half of the video after the splice where you checked the rockers has an audio echo with ~1 second delay. Makes it really tough to hear what is going on with double engine clatter but it does not sound bad. It does not seem like you would be off a whole tooth on the timing but I guess it could be. You are definitely getting close and it sounds like the cam is working this time installed per Stage 1 instructions.
I like to know rather thank think also (we all do) but when you are pioneering new innovations that simply isn't possible. You just have to try your best guess and learn from it... Then you *know something
I like to know rather thank think also (we all do) but when you are pioneering new innovations that simply isn't possible. You just have to try your best guess and learn from it... Then you *know something
#12
07-19-2016, 07:49 PM
So.. Did a bit more work on the engine.
I connected up the turbo, exhaust system, boost side of the intake.
I then installed the radiator, and started adding my bucket of coolant. At about the 4 gallon mark, I thought to myself "Hm, I never reinstalled my coolant temp sensor. I'd better install it soon, before I have a mess."
10 seconds later, coolant starts pouring out of the port. *sigh*.
Anyway, I went to fire it up... nothing. Give it a little ether, and it'll catch for a little bit, then die. Plenty of smoke, plenty of fuel..
I hooked up the glow plugs, and finally, after getting them nice and hot, hit the starter and she fired up.
So I'm guessing the decompression and/or cam timing is being a problem.
Anyway, I'm still getting /some/ smoke, especially on acceleration, and it tics a little.
I can also hear some noise with the valve cover off that I didn't notice before.
I'm going to follow Jan's advice here, and try to shave .030 off the rockers; it's going to be a little hard to shave that off the heads now that they are in the vehicle.
I'm still hoping it'll come together OK once I get some little thing fixed; I really don't want to have to use the old cam or something.
Speaking of which, I need to get cam timing information from Justin, just for comparison.
#13
07-20-2016, 01:22 AM
Anyway... are you planning to compensate for the gasket thickness with longer push rods? When Justin and Mark Strock put the thick gaskets in Mark's truck they milled down the rocker bases .037" instead of ordering new push rods. Justin measured Fel-pro gaskets at .073" and the decompression gaskets are .110" which is where he came up with the difference of .037" to mill off. I know the main point was to increase valve clearance, but you don't want the valves to not open far enough either...
Yes I got your email, no time to sit down and reply, just answering here from cell phone being stuck in traffic jam and watching fist fight couple cars ahead. People are crazy over the vacation period.
#14
07-20-2016, 07:33 AM

Elder User
I have a ferret meter and good timing light i can mail you that you can use for a month or so if you didnt have one. I was always curious if you could mark the crank every 90 degrees and check every injectors timing based on that mark to find an injector that wasnt opening or that was leaking by.
#15
07-20-2016, 10:23 PM
Thing is, I'm pretty sure the injectors are fine. Why? Because I had this exact setup running about 3 weeks ago, when I took it apart. I never even removed the injectors from the heads!
The only things that have changed are:
1. Cam.
2. Decompression gaskets.
As far as pistons, they are stock. And if it's not the gaskets... Then it must be the cam.
But before I just throw the cam on the junk pile, I really want to check the cam timing, to see if I can't fix it by just re-timing the cam-to-crank positioning.
Fuel timing, it already sounds a bit loud and clattery, but also smokes. I'm used to an either/or, not both!
New video:
(still uploading, should be up in a half hour or so from this post)
The only things that have changed are:
1. Cam.
2. Decompression gaskets.
As far as pistons, they are stock. And if it's not the gaskets... Then it must be the cam.
But before I just throw the cam on the junk pile, I really want to check the cam timing, to see if I can't fix it by just re-timing the cam-to-crank positioning.
Fuel timing, it already sounds a bit loud and clattery, but also smokes. I'm used to an either/or, not both!
New video: