


Window visor install w/Pics
Thread Starter
|
Lead Driver
Joined: May 2014
Posts: 6,545
Likes: 13
From: Virginia Beach VA
Window visor install w/Pics
Most every truck has them and over time they begin to come off. Could be installed incorrectly, not good preparation or sun damage and they just begin to leak...
I decided to re-do mine yesterday. My drivers side door was poorly installed and because it was being held in place by the mirror, no hurry to get it done. Previous owner tried to fix it with some sort of glue or something, just basically made a mess.
A couple things are needed to get it done correctly.
1) a set of window visor/shades. I used eBay, $28.99
2) 3M 94, its a primer for 3M double back sticky tape.
3) a square stick with a cut edge, or a small toothbrush sized wire brush
4) Isopropyl Alcohol @ 91% from Target
5) some rags
6) about 2 tablespoons of Butter... yes, butter.
7) a small sponge brush
8) beers of your favorite kind
First, remove the old vents. Start at the back working forward slowly pulling the shade off. I used my thumb, you can even use fishing line (per a video on you tube). It leaves behind a mess like this.
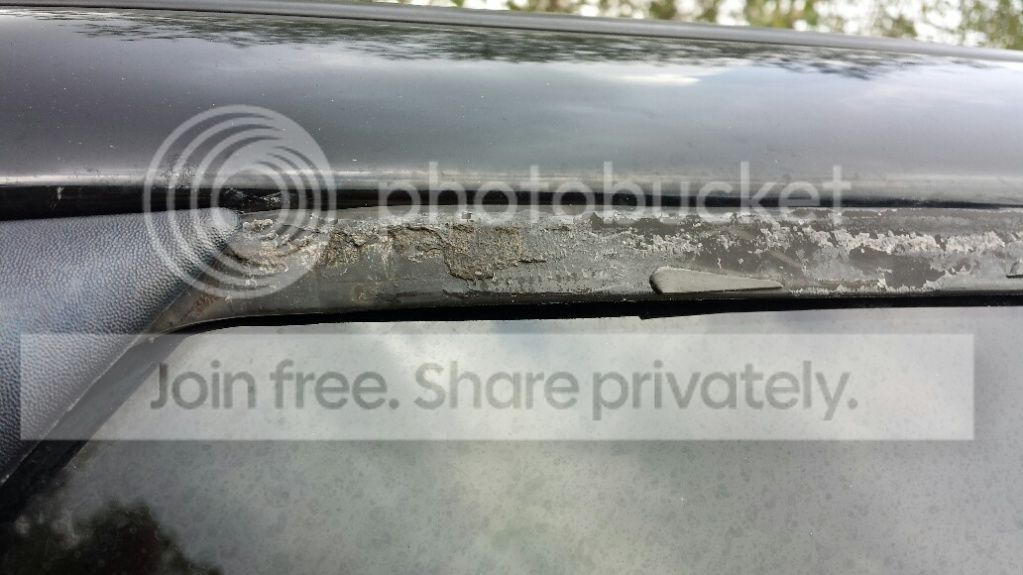
get your stick and using some elbow grease, work the old tape off the rubber. It won't hurt the rubber or the paint. Work slowly, pushing the old stuff along the rubber.
Get the remaining residue with a combination of butter, the stick and alcohol. I'd get it wet with butter, its oily and works great on pitch and 3M tape... The goo-Gone stuff is petroleum based, say's not to use it on rubber. Using lacquer thinner can hurt the paint and paint thinner leaves behind another residue form hard to remove from the rubber.

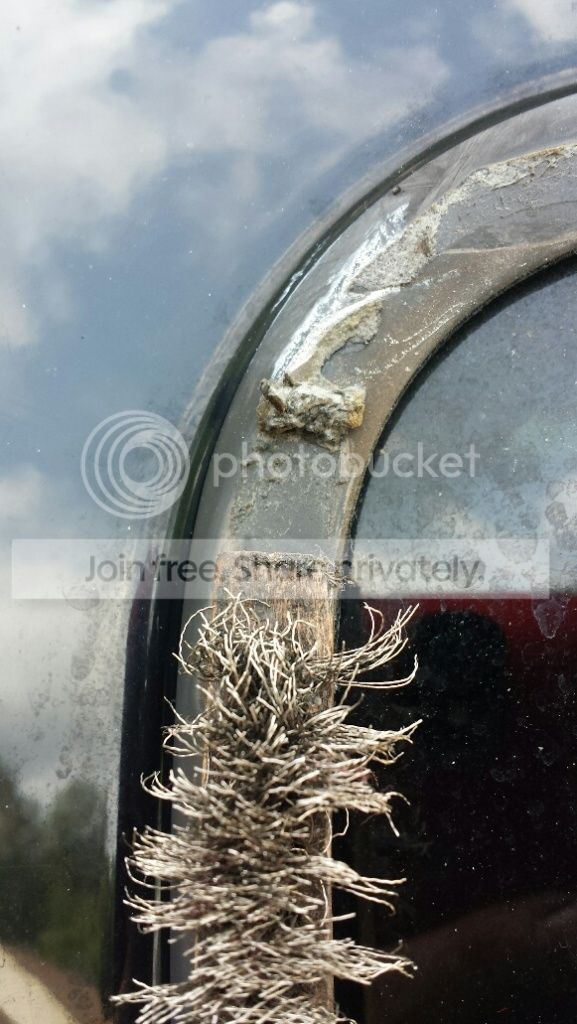
Apply butter, use the stick to scrape it just like removing the tape, wipe with a rag soaked in the alcohol. You'll need to go back and forth several times. The rag would leave behind some lint and it stuck to the residue and then I'd push that along and remove with alcohol. In this picture you can still see some residual residue... it all needs to come off.

Once its all removed

It should look like this, dull, no shiny anything left on the rubber.
Wipe it down with a lint free cloth and alcohol one more time allowing it to dry. Make sure the butter is gone as well. Apply the 3M primer with a brush or a sponge brush like I did. Nice even coat and after drying, a second coat. You can remove the primer with the alcohol, don't worry.

After the primer is dry, don't touch it. Its very sticky by itself and will let the 3M tape do its job. Even a test fit of the visor would almost remove the tape backing. I started in the corner, remove the protective plastic cover and worked my way back putting the visor on. Once installed, I wiped it with alchohol one more time removing the primer not covered by the visor and it cleaned up well.

Final product
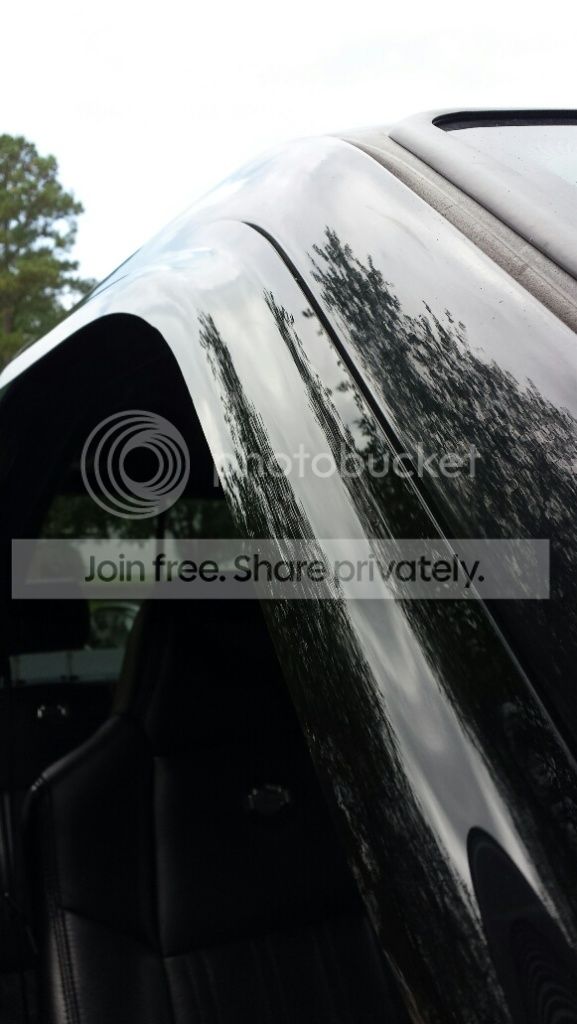
They came out great, are stuck on very good and I expect years of service. Total time was 2 hours. My finger tips are a little sore... but I expect no infection from using the alcohol..
Don't forget, the alcohol will remove the wax from the paint, you'll need to wax it again around the window frame.
sit back and enjoy a ... your visor shades will look great!
I decided to re-do mine yesterday. My drivers side door was poorly installed and because it was being held in place by the mirror, no hurry to get it done. Previous owner tried to fix it with some sort of glue or something, just basically made a mess.
A couple things are needed to get it done correctly.
1) a set of window visor/shades. I used eBay, $28.99
2) 3M 94, its a primer for 3M double back sticky tape.
3) a square stick with a cut edge, or a small toothbrush sized wire brush
4) Isopropyl Alcohol @ 91% from Target
5) some rags
6) about 2 tablespoons of Butter... yes, butter.
7) a small sponge brush
8) beers of your favorite kind
First, remove the old vents. Start at the back working forward slowly pulling the shade off. I used my thumb, you can even use fishing line (per a video on you tube). It leaves behind a mess like this.

get your stick and using some elbow grease, work the old tape off the rubber. It won't hurt the rubber or the paint. Work slowly, pushing the old stuff along the rubber.

Get the remaining residue with a combination of butter, the stick and alcohol. I'd get it wet with butter, its oily and works great on pitch and 3M tape... The goo-Gone stuff is petroleum based, say's not to use it on rubber. Using lacquer thinner can hurt the paint and paint thinner leaves behind another residue form hard to remove from the rubber.

Apply butter, use the stick to scrape it just like removing the tape, wipe with a rag soaked in the alcohol. You'll need to go back and forth several times. The rag would leave behind some lint and it stuck to the residue and then I'd push that along and remove with alcohol. In this picture you can still see some residual residue... it all needs to come off.

Once its all removed

It should look like this, dull, no shiny anything left on the rubber.

Wipe it down with a lint free cloth and alcohol one more time allowing it to dry. Make sure the butter is gone as well. Apply the 3M primer with a brush or a sponge brush like I did. Nice even coat and after drying, a second coat. You can remove the primer with the alcohol, don't worry.

After the primer is dry, don't touch it. Its very sticky by itself and will let the 3M tape do its job. Even a test fit of the visor would almost remove the tape backing. I started in the corner, remove the protective plastic cover and worked my way back putting the visor on. Once installed, I wiped it with alchohol one more time removing the primer not covered by the visor and it cleaned up well.

Final product

They came out great, are stuck on very good and I expect years of service. Total time was 2 hours. My finger tips are a little sore... but I expect no infection from using the alcohol..
Don't forget, the alcohol will remove the wax from the paint, you'll need to wax it again around the window frame.
sit back and enjoy a
... your visor shades will look great!
Elder User
Joined: Oct 2014
Posts: 970
Likes: 1
From: Marietta, GA
Thanks man! I'm going to try the butter/alcohol.
One of mine broke so I ripped them all off and I rubbed and rubbed the adhesive with my thumbs. I learned that was a mistake. Huge blisters on both of them. Lol.
Reps if I could ..
I don't know if I'm going to put more back on or not. But I want the residue off for sure!
One of mine broke so I ripped them all off and I rubbed and rubbed the adhesive with my thumbs. I learned that was a mistake. Huge blisters on both of them. Lol.
Reps if I could ..
I don't know if I'm going to put more back on or not. But I want the residue off for sure!

Laughing Gas
Joined: Nov 2014
Posts: 765
Likes: 5
From: Long Island, NY
Nice job! They look great.
I just removed the ones that came on my truck about 2 or 3 months ago. They were stuck to the paint. It was a big pia to get them off properly. The previous owner used some type of super glue on the front edges to prevent leaks I guess. That was an even more pia.
I replaced them with the kind that go inside the window channel and like them a whole lot better.
Thread Starter
|
Lead Driver
Joined: May 2014
Posts: 6,545
Likes: 13
From: Virginia Beach VA
not sure... I've heard they don't always allow the window to close completely and auto close doesn't seem to work well with them I've read.
in post #3, Brian said he used them.
in post #3, Brian said he used them.
Laughing Gas
Joined: Nov 2014
Posts: 765
Likes: 5
From: Long Island, NY
I had the "stick on" version on the F-350 and still have them on my Malibu.
I like the "in channel" the best.
YMMY, just MHO.
Trending Topics
Elder User
Joined: Oct 2004
Posts: 585
Likes: 1
From: Ct.
FTE Stories
Ford Trucks for Ford Truck Enthusiasts

Top 10 Fords at 2026 Carlisle Ford Nationals
Joe Kucinski
3 Best / 3 Worst Parts of Modern Ford Ownership
Brett Foote
10 Amazing Upgrades That Solve Common Ford Truck Owner Headaches
Pouria Savadkouei
Every 2026 Ford Engine Explained
Brett Foote
10 Ugly Ford Trucks That We Still Kinda Love
Joe Kucinski
10 Things Every Truck Owner NEEDS (2026 Edition)
Michael S. Palmer
Rezvani's Latest Post-Apocalyptic Monster Is a Ford F-150 Raptor Underneath
Verdad Gallardo
Top 10 Most Expensive Ford Trucks Ever Sold on Bring a Trailer
Joe Kucinski
2027 Ford Super Duty Buyer's Guide (Every Model, Engine, & Package)
Brett FooteThread Starter
|
Lead Driver
Joined: May 2014
Posts: 6,545
Likes: 13
From: Virginia Beach VA
it's the oil that does the trick.... Wesson oil may work. I used butter because it was controllable and not all over the place.... plus I already knew it worked like Goo Gone, just not petroleum based to ruin the rubber.
Lead Driver


Joined: Feb 2011
Posts: 8,241
Likes: 155
From: L.A. (Lower Alabama)

These go on without glue. I got some for my wife's car. Nice quality and easy install. The ones on my truck are glued on 
WeatherTech Side Window Deflectors, Rain Guards, Wind Deflectors | WeatherTech.com
WeatherTech Side Window Deflectors, Rain Guards, Wind Deflectors | WeatherTech.com


Hotshot

Joined: Dec 2003
Posts: 15,369
Likes: 121
From: Stuttgart, Ar

These go on without glue. I got some for my wife's car. Nice quality and easy install. The ones on my truck are glued on
WeatherTech Side Window Deflectors, Rain Guards, Wind Deflectors | WeatherTech.com
WeatherTech Side Window Deflectors, Rain Guards, Wind Deflectors | WeatherTech.com

Thread
Thread Starter
Forum
Replies
Last Post
sandymane
1987 - 1996 F150 & Larger F-Series Trucks
10
Jan 1, 2018 03:33 PM