


E Van Door Panel Removal
Thread Starter
|
Fleet Owner


Joined: Aug 2010
Posts: 21,255
Likes: 1,656
From: Reynoldsburg, Ohio
E Van Door Panel Removal
Originally posted in the Van Forums, thought it might be helpful here too:
The following was performed on an '03 E250, Power Window & Power Door Locks (PW & PDL). Apart from removing the window crank on standard window regulators this is common for model years 1992 through at least 2008. Later years may be the same or similar however I have no direct experience with those models.
The exact order of the first steps isn't important though---this becomes apparent as we proceed. Left door is shown but procedure is similar for the right side as well.
Everything done here can certainly be accomplished with dedicated auto upholstery tools but they don't need to be expensive. Used here is the Lisle #35400; cheap, readily available at most auto part retailers or online. Fact is a good metal kitchen spoon would work.
Onward then............
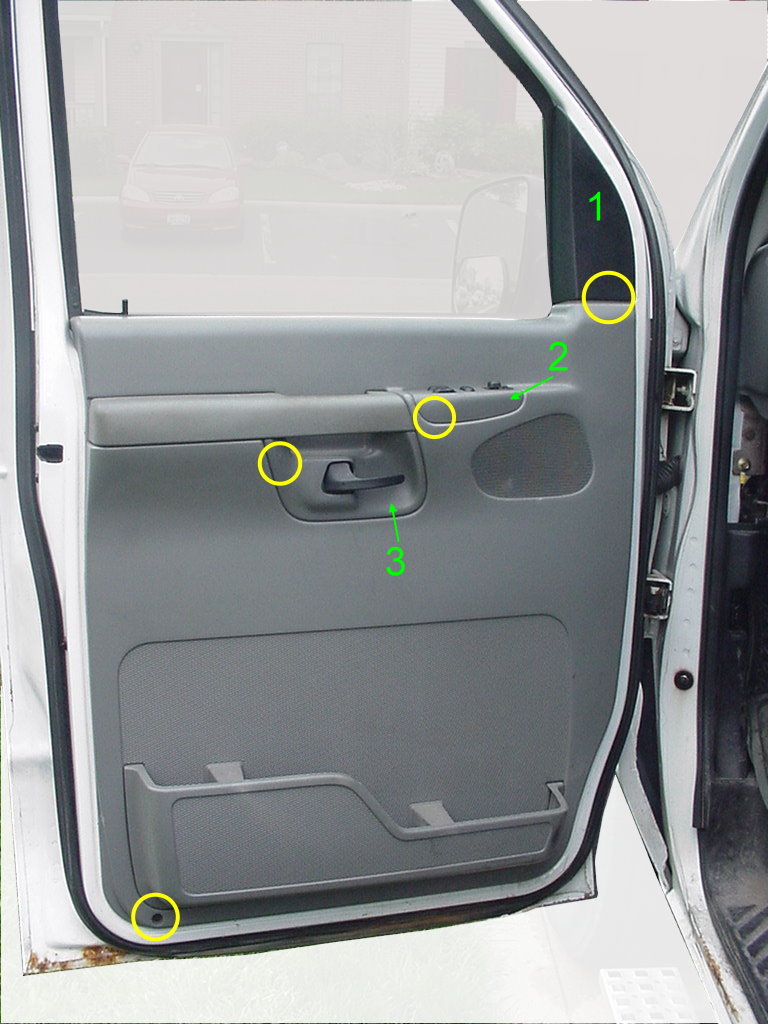
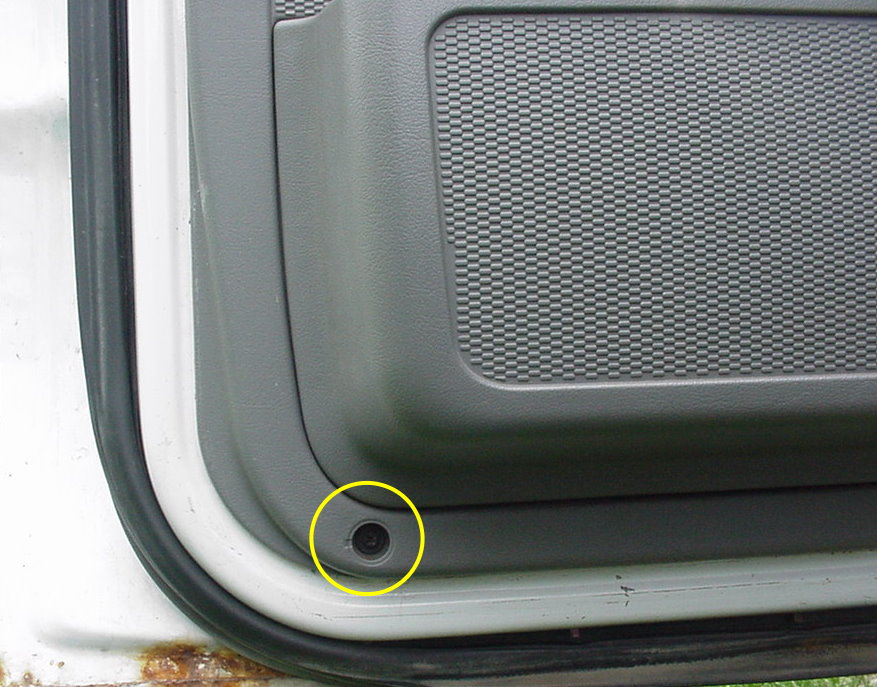
Fully assembled door, yellow outlines denote four (4) screws that need to be removed, access first requires removal of three interior trim pieces numbered in green:
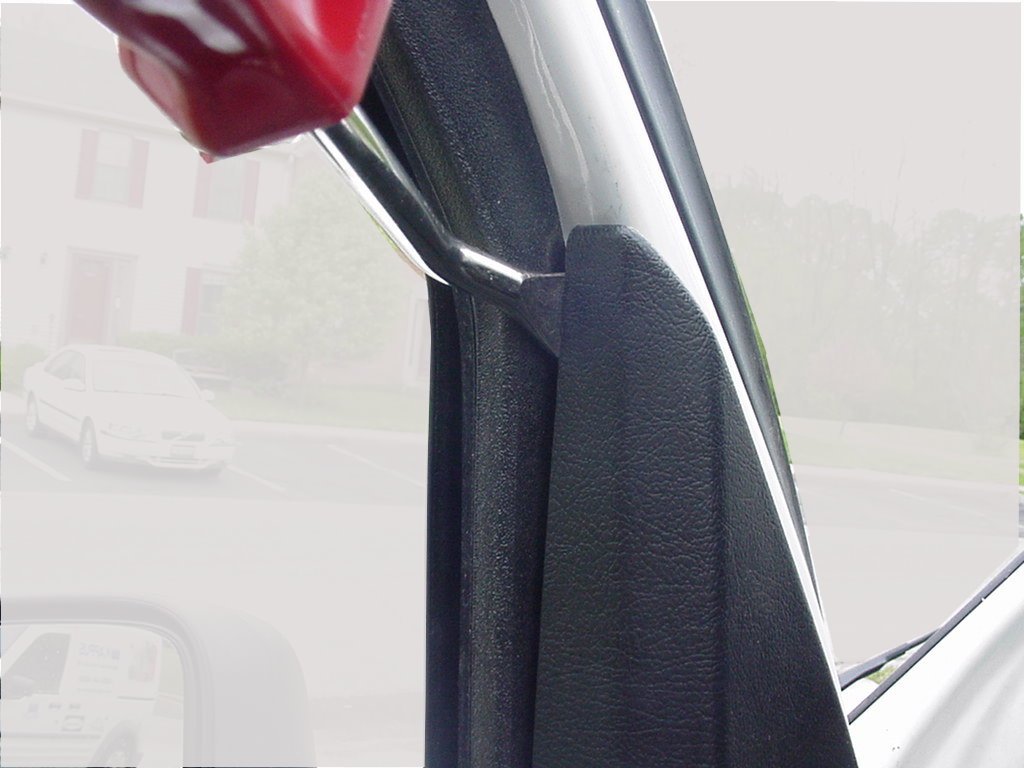
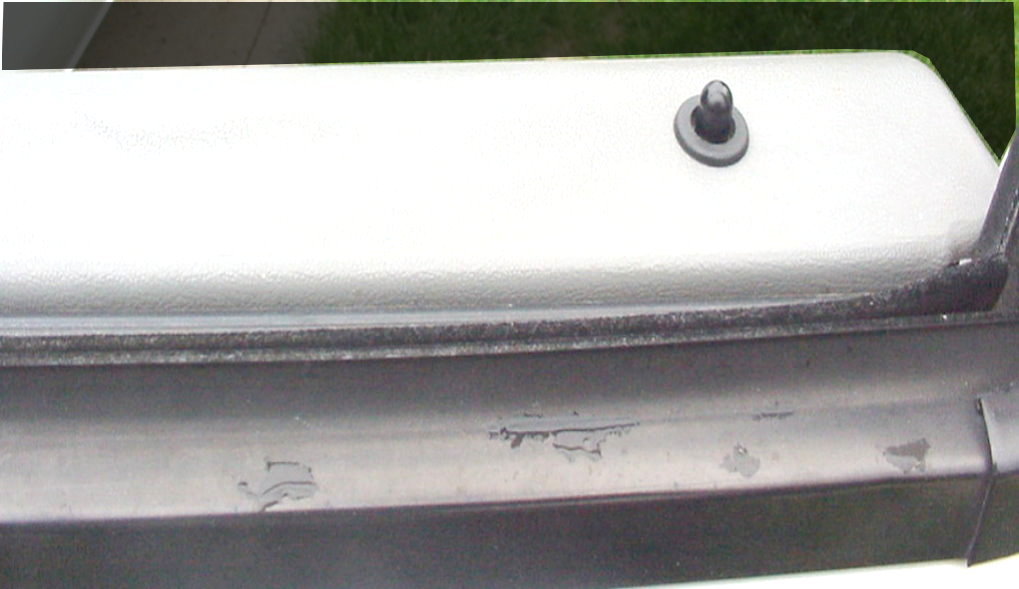
First off is the upper black trim panel covering the mirror mounting bolts. Fingers alone will work here as long the top clip pops loose first. Once free at the top it simply lifts straight up so the bottom tab clears the door panel.
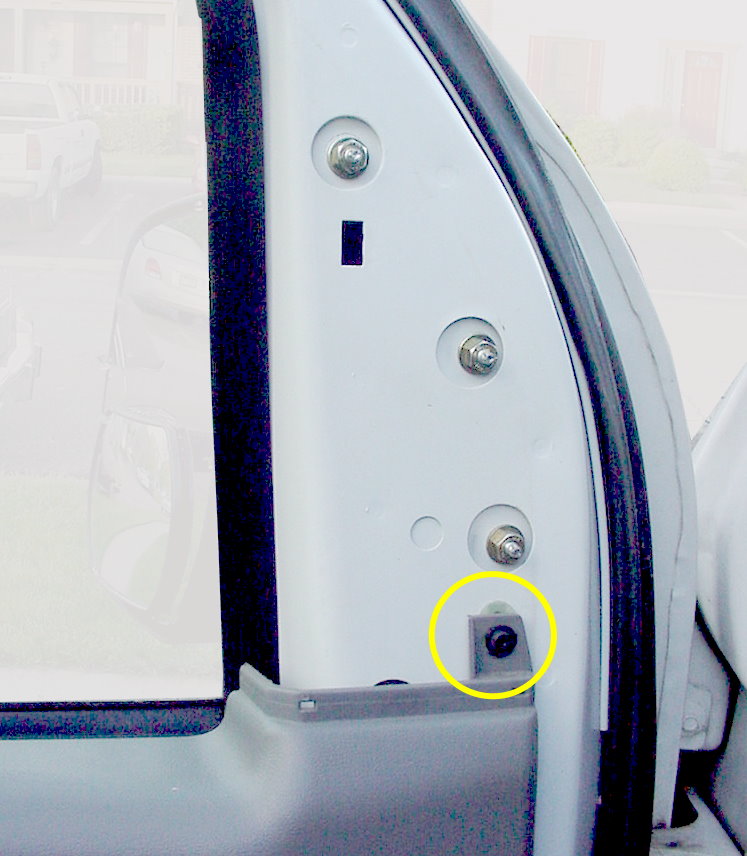
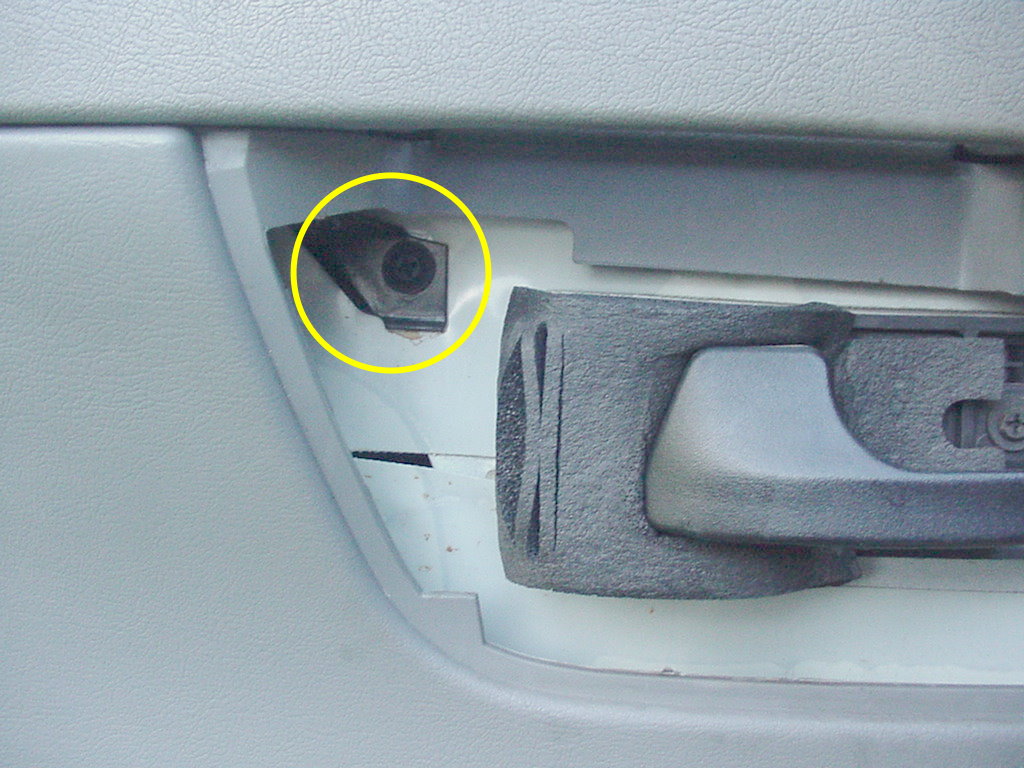
The first of four (4) screws to be removed is now visible and accessible:
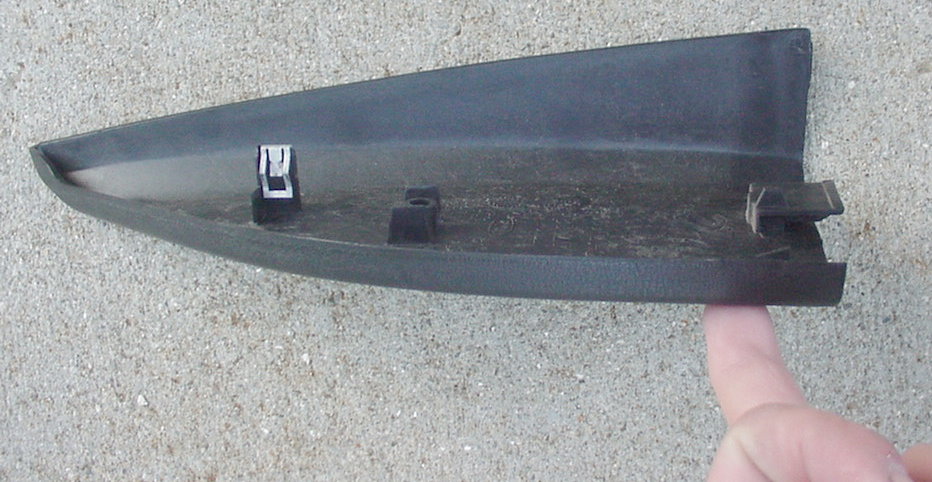
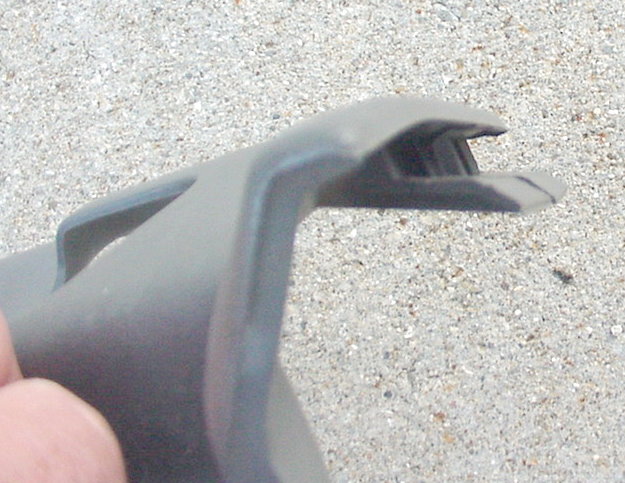
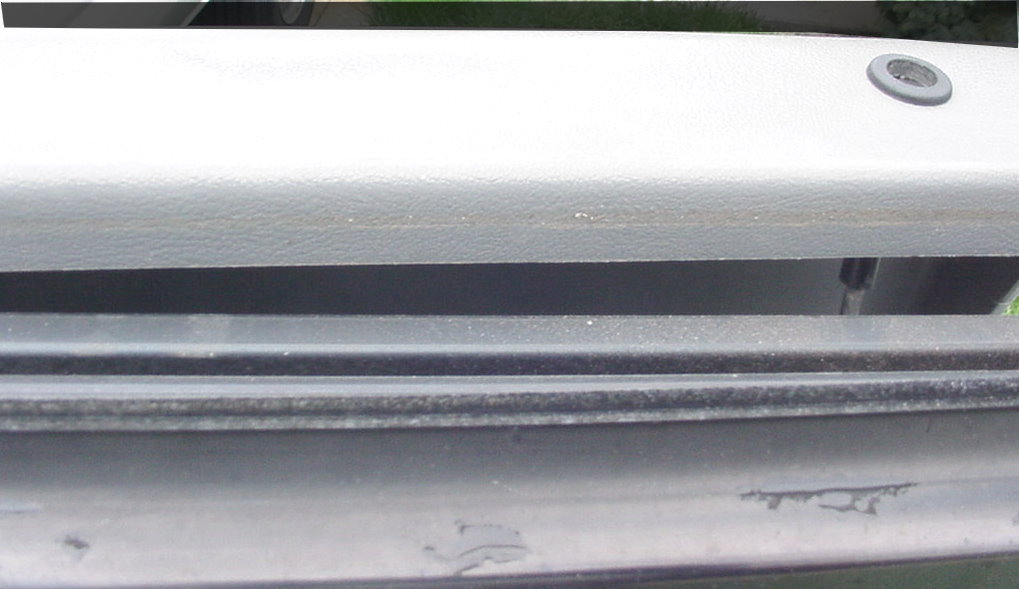
Closer view of this panels attachment clip & tab:
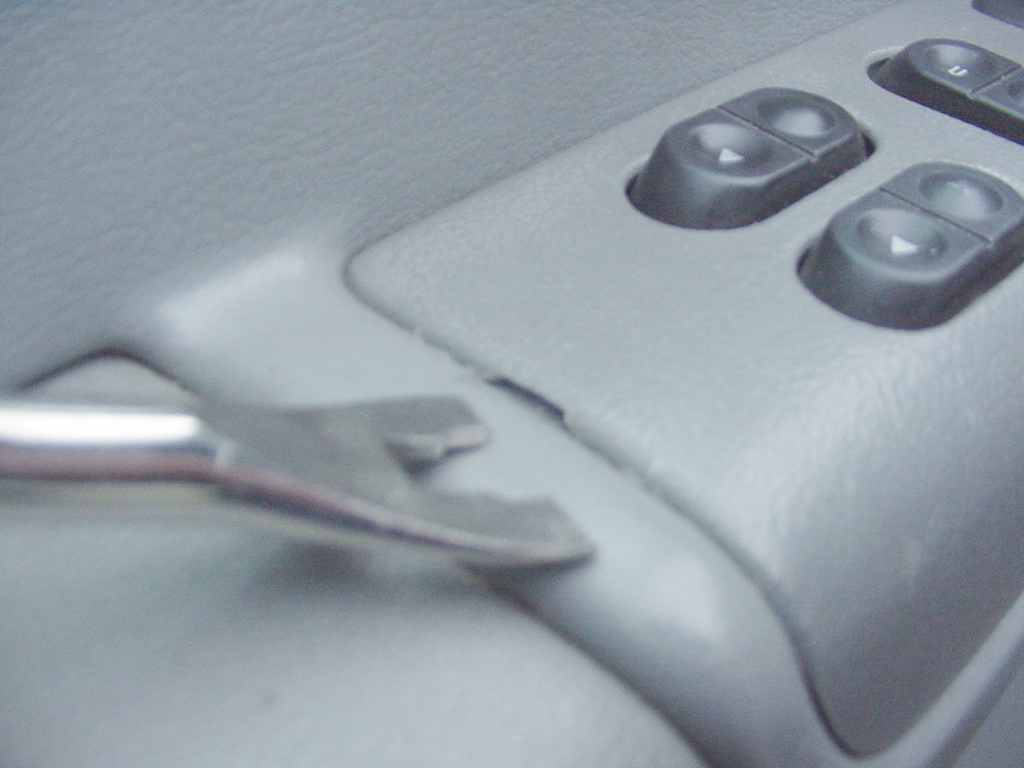
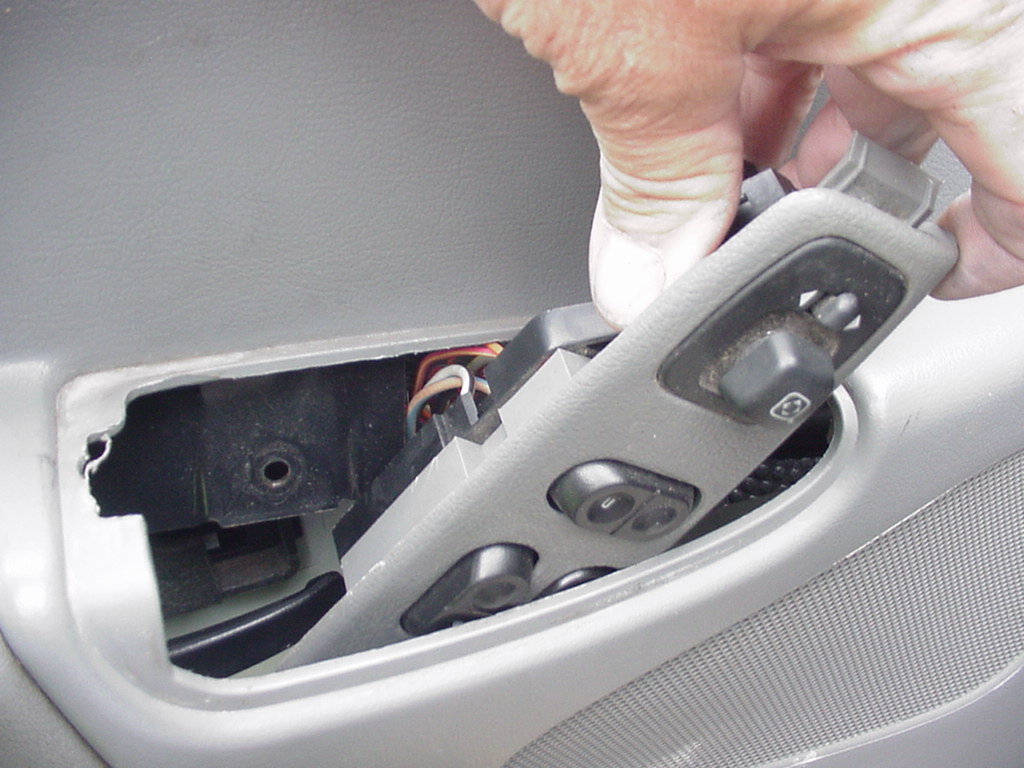
Next are interior door handle and PDL/ PW switch trim panels, no particular order. Notice there are small notches in each allowing use of the lifting tool:
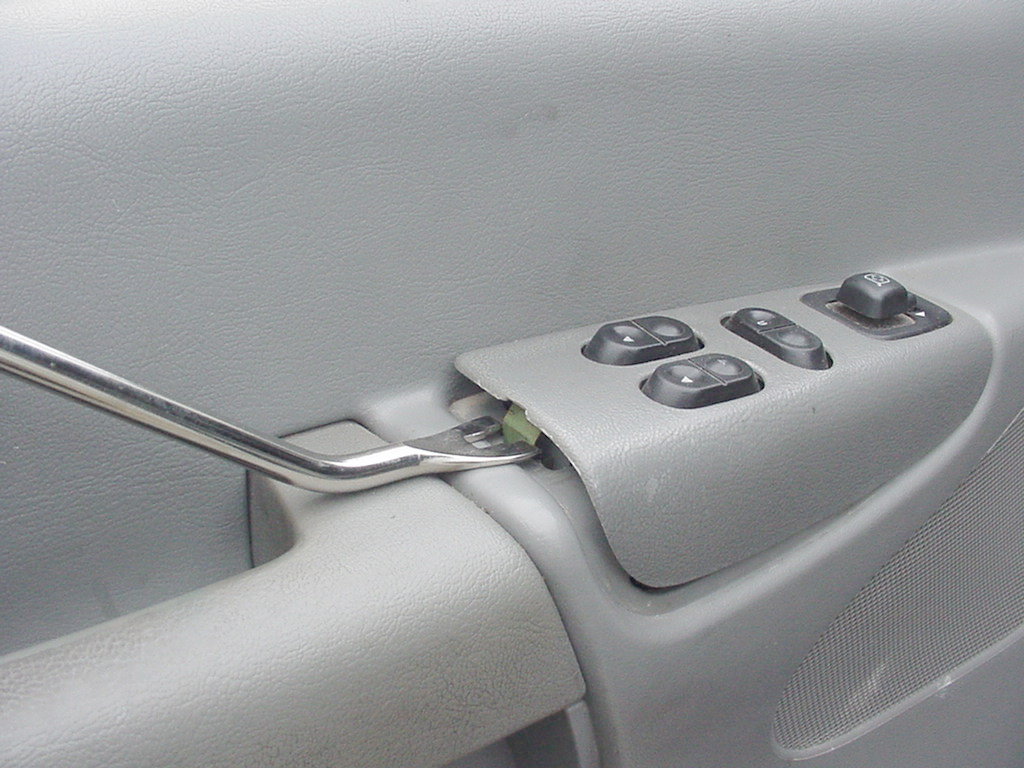
As this assembly is lifted upward the lower rear portion contacts the underside of the armrest, resisting further removal. Beoing persistent but gentle continue lifting it out, slightly careful to not damage attached wiring. Once the switch body has cleared the armrest the entire assembly is now slid backward and free from the main door panel. Its supported by the wires alone as its light, won't stress the wire harness at this point.
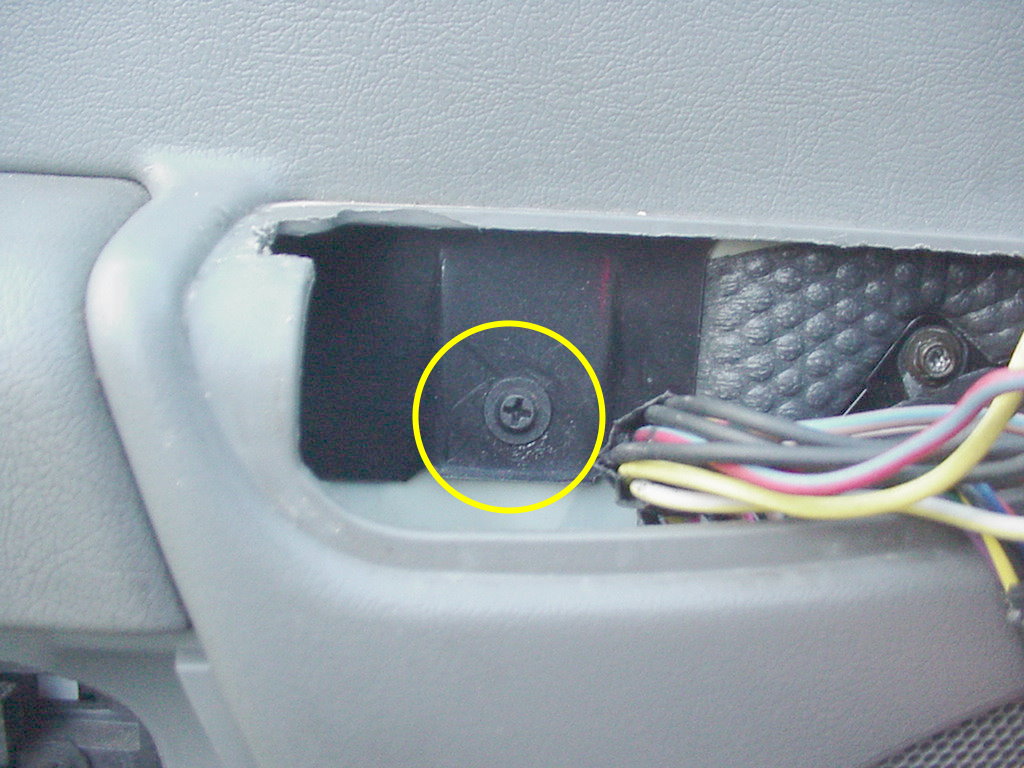
The second of four (4) screws to be removed now visible and accessible:
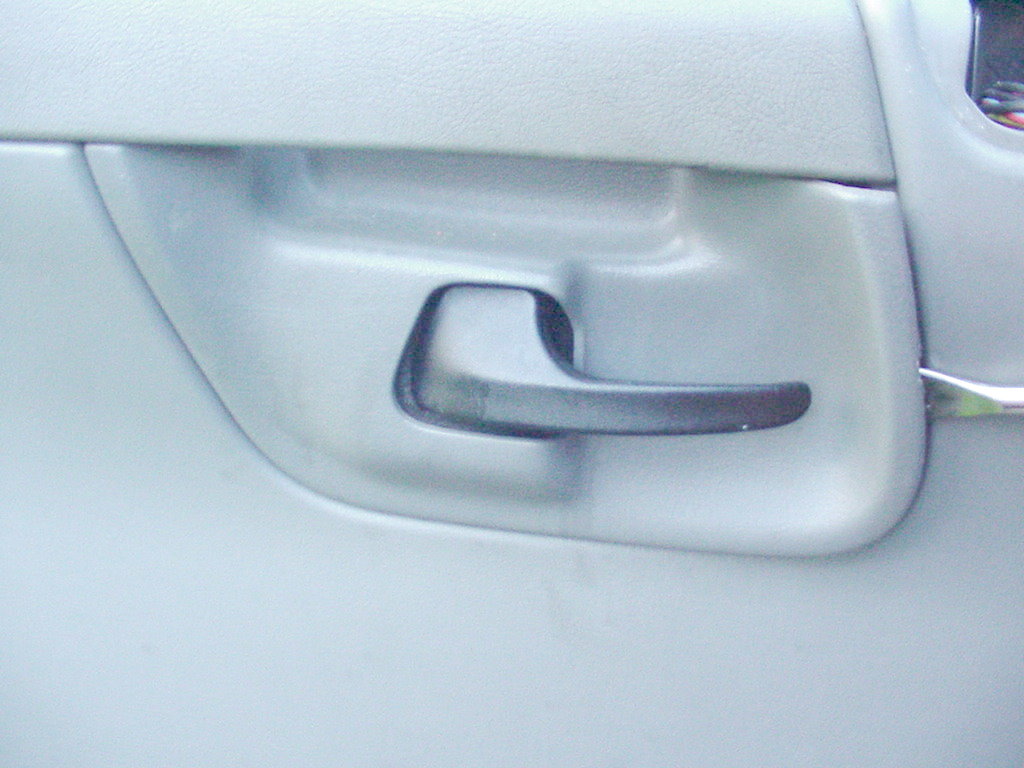
Now the interior handle trim, also with a small opening to ease removal:
Once the front clips are popped loose lift outward just enough to allow the panel to slide forward so the rear tabs clear the larger panel:
Once the front clips are out, raise the door handle enough so this panel slides forward and free, the rear tabs clearing the main panel . The third of four (4) screws to be removed now visible and accessible:
Fourth screw, located bottom rear:
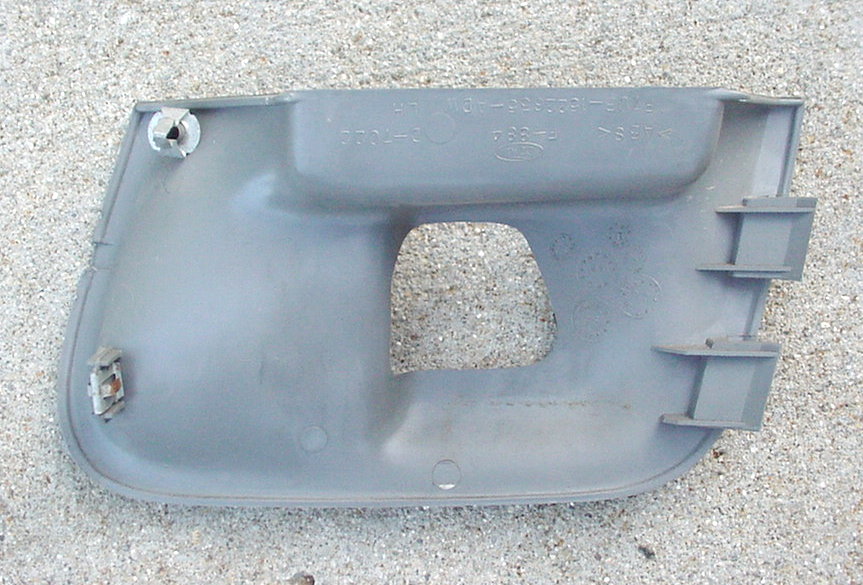
The main panel is now free to be pulled straight upward in order to free its top edge from the inner glass weather strip:
Normal:
Lifted and free at the top:
As the main panel is lifted free the PDL & PW assembly is pushed down through the opening in the armrest. As you continue lifting the panel and pulling slightly outward at the same time this easily slides through the opening:
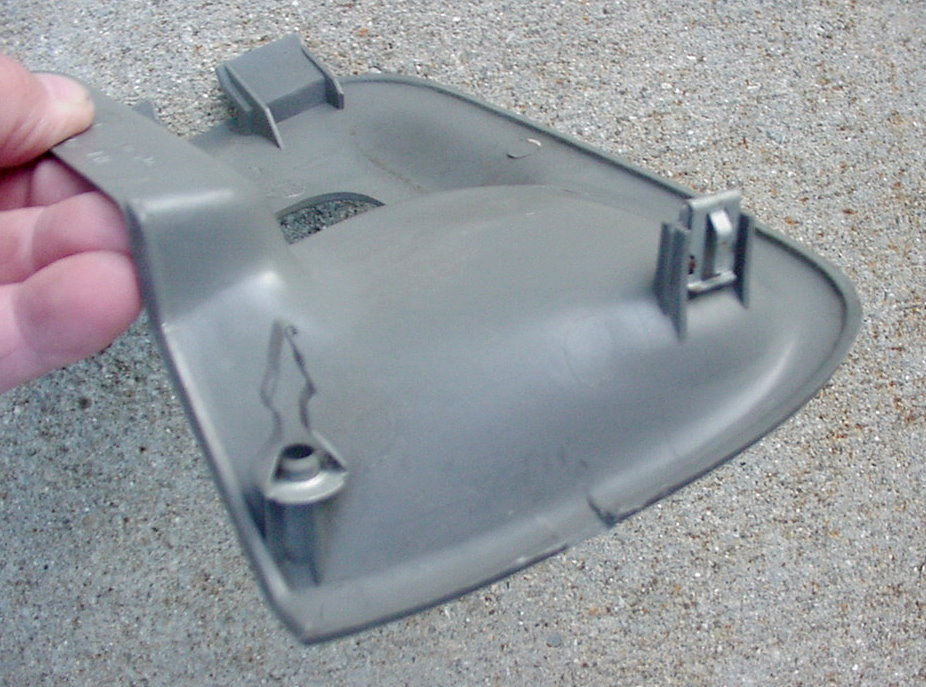
FYI The main panel is retained in place by the already-removed screws, the top edge fitting into the weather strip and the pictured tabs. These serve to pull it tight to the door shell:
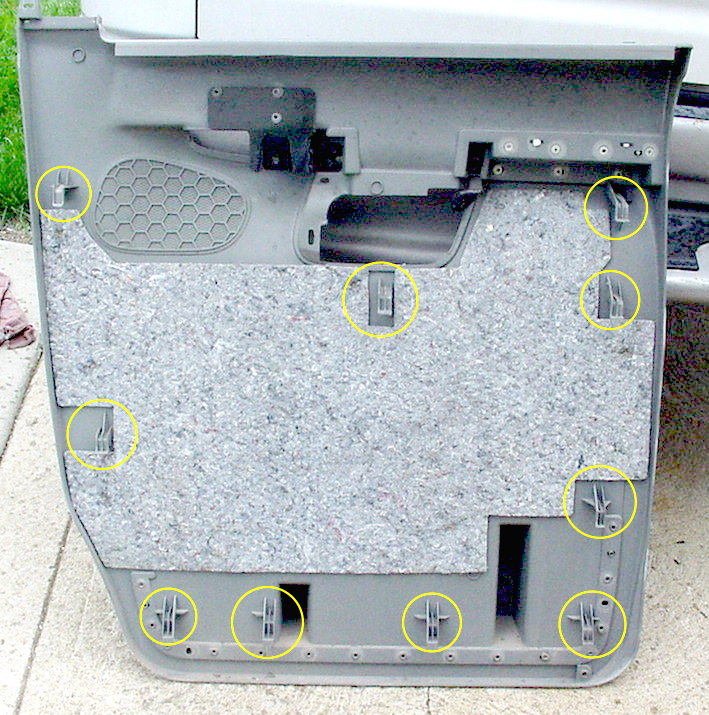
Closer view:
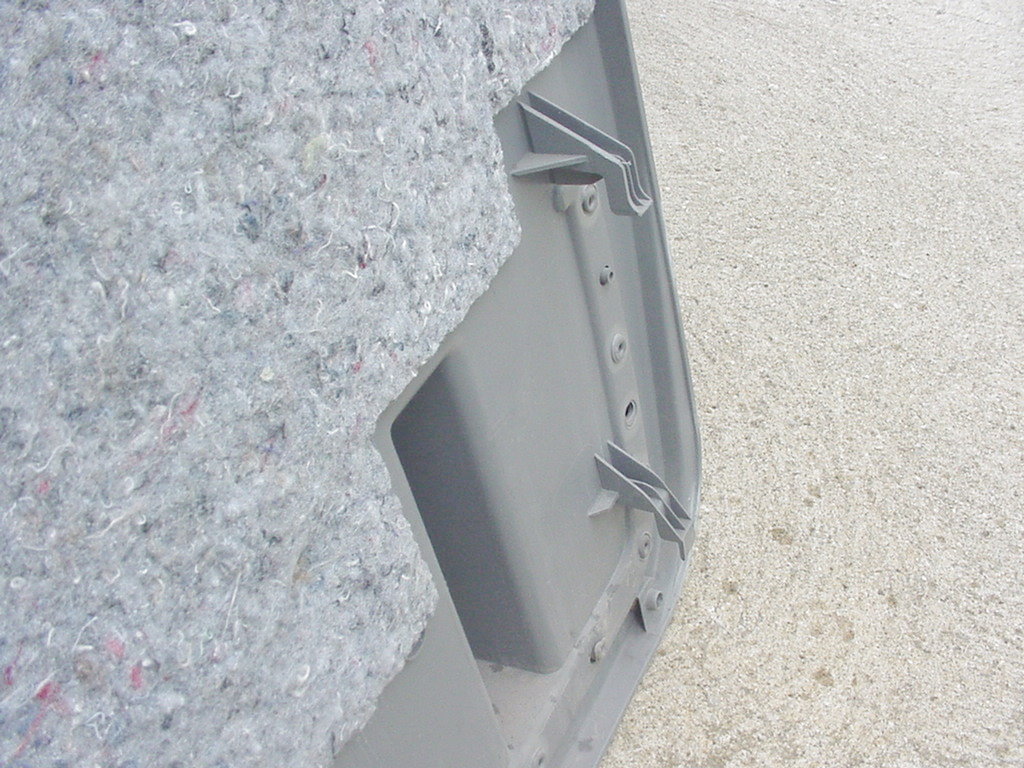
They fit into these punched openings:
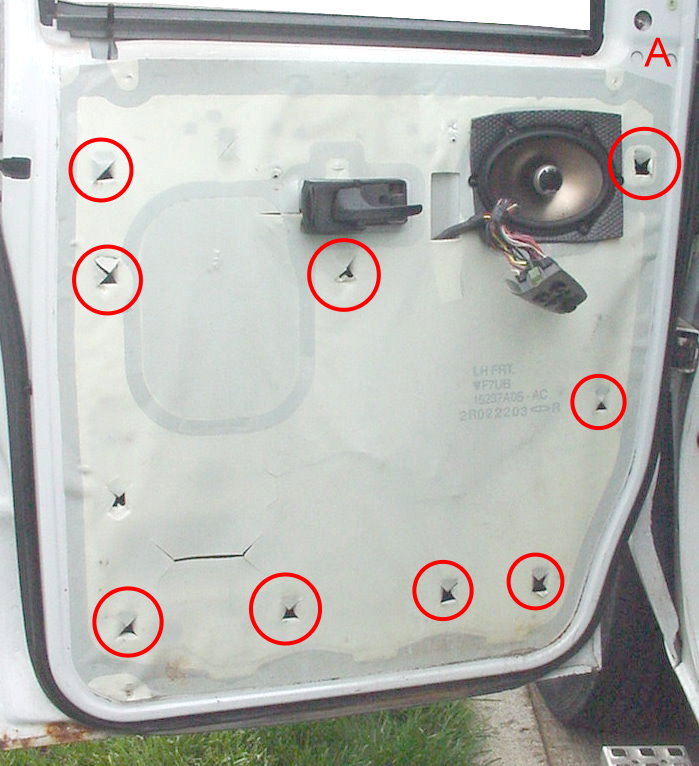
Points marked as A on both main panel and door shell are for orientation.
Please note the plastic sheet is firmly attached, its main purpose is to reduce wind through the door shell into the interior. They are NOT available for replacement (unless I've been mislead by my dealer) and need to be carefully handled if they need to be removed.
If the applied adhesive no longer holds it to the door shell any weather-resistant tape can be used to reattach it. Don't underestimate the importance of this too often overlooked feature---it was originally installed for good reason!
Reassembling is just reverse order of removal. Be advised its possible the PD and/or PDL's might not function after assembly, on just one side if both panels have been removed/reinstalled. This is due one or more wires have been slightly dislodged, not a huge problem.
Simply remove the offending switch panel once again, jostle wires leading into the particular lost function switch and eventually you'll find the loose wire. This might seem a somewhat crude approach but nothing more complicated is necessary. Operation shouldn't fail again since nothing typically acts on those connections; if they fail again you'll know where to begin troubleshooting.
If anyone can add a few images of handle removal for non-powered windows it would be a nice addition here.
Hope this is just a bit helpful!
The following was performed on an '03 E250, Power Window & Power Door Locks (PW & PDL). Apart from removing the window crank on standard window regulators this is common for model years 1992 through at least 2008. Later years may be the same or similar however I have no direct experience with those models.
The exact order of the first steps isn't important though---this becomes apparent as we proceed. Left door is shown but procedure is similar for the right side as well.
Everything done here can certainly be accomplished with dedicated auto upholstery tools but they don't need to be expensive. Used here is the Lisle #35400; cheap, readily available at most auto part retailers or online. Fact is a good metal kitchen spoon would work.
Onward then............
Fully assembled door, yellow outlines denote four (4) screws that need to be removed, access first requires removal of three interior trim pieces numbered in green:
First off is the upper black trim panel covering the mirror mounting bolts. Fingers alone will work here as long the top clip pops loose first. Once free at the top it simply lifts straight up so the bottom tab clears the door panel.
The first of four (4) screws to be removed is now visible and accessible:
Closer view of this panels attachment clip & tab:
Next are interior door handle and PDL/ PW switch trim panels, no particular order. Notice there are small notches in each allowing use of the lifting tool:
As this assembly is lifted upward the lower rear portion contacts the underside of the armrest, resisting further removal. Beoing persistent but gentle continue lifting it out, slightly careful to not damage attached wiring. Once the switch body has cleared the armrest the entire assembly is now slid backward and free from the main door panel. Its supported by the wires alone as its light, won't stress the wire harness at this point.
The second of four (4) screws to be removed now visible and accessible:
Now the interior handle trim, also with a small opening to ease removal:
Once the front clips are popped loose lift outward just enough to allow the panel to slide forward so the rear tabs clear the larger panel:
Once the front clips are out, raise the door handle enough so this panel slides forward and free, the rear tabs clearing the main panel . The third of four (4) screws to be removed now visible and accessible:
Fourth screw, located bottom rear:
The main panel is now free to be pulled straight upward in order to free its top edge from the inner glass weather strip:
Normal:
Lifted and free at the top:
As the main panel is lifted free the PDL & PW assembly is pushed down through the opening in the armrest. As you continue lifting the panel and pulling slightly outward at the same time this easily slides through the opening:
FYI The main panel is retained in place by the already-removed screws, the top edge fitting into the weather strip and the pictured tabs. These serve to pull it tight to the door shell:
Closer view:
They fit into these punched openings:
Points marked as A on both main panel and door shell are for orientation.
Please note the plastic sheet is firmly attached, its main purpose is to reduce wind through the door shell into the interior. They are NOT available for replacement (unless I've been mislead by my dealer) and need to be carefully handled if they need to be removed.
If the applied adhesive no longer holds it to the door shell any weather-resistant tape can be used to reattach it. Don't underestimate the importance of this too often overlooked feature---it was originally installed for good reason!
Reassembling is just reverse order of removal. Be advised its possible the PD and/or PDL's might not function after assembly, on just one side if both panels have been removed/reinstalled. This is due one or more wires have been slightly dislodged, not a huge problem.
Simply remove the offending switch panel once again, jostle wires leading into the particular lost function switch and eventually you'll find the loose wire. This might seem a somewhat crude approach but nothing more complicated is necessary. Operation shouldn't fail again since nothing typically acts on those connections; if they fail again you'll know where to begin troubleshooting.
If anyone can add a few images of handle removal for non-powered windows it would be a nice addition here.
Hope this is just a bit helpful!
Thread Starter
|
Fleet Owner
Joined: Aug 2010
Posts: 21,255
Likes: 1,656
From: Reynoldsburg, Ohio
Because they're trim parts the panel fitting into the larger interior trim piece tend to be dealer only---call your local guys. Looking through my crash book from 2010 that isn't listed by itself so no factory part numbers there. It might also be available on eBay under "interior trim"----I've found a few things from a seller called Tasca Auto Parts but they're not a lot cheaper than new stuff.
The switch should be available separately or through NAPA etc.
The switch should be available separately or through NAPA etc.

New User
Joined: Sep 2015
Posts: 14
Likes: 0
Thanks. I have the switch already. I just need the trim. I've searched all the ford parts diagrams and can't find the exact trim shown in the above picture. That's exactly the trim I need. I guess I'll keep hitting up the yards.
Thread Starter
|
Fleet Owner
Joined: Aug 2010
Posts: 21,255
Likes: 1,656
From: Reynoldsburg, Ohio
I could add one how to refresh steering column shift tube bushings OR how to swap out the whole steering column with tilt version-----takes me too long to type something clearly though.

New User
Joined: Dec 2016
Posts: 10
Likes: 0
thanks for this, thought the speaker grill could be removed seperately from the door panel from my 93 Club Wagon... looks like the panel is coming off instead
Trending Topics

New User
Joined: Feb 2017
Posts: 7
Likes: 0
Thank you so much !!!
This is exactly what I was looking for. I am in the process of replacing my mirrors (on order) and needed to know how to get ready to access the mirror and cabling.
Thanks again
Gsam
Thanks again
Gsam
FTE Stories
Ford Trucks for Ford Truck Enthusiasts

3 Best / 3 Worst Parts of Modern Ford Ownership
Brett Foote
10 Amazing Upgrades That Solve Common Ford Truck Owner Headaches
Pouria Savadkouei
Every 2026 Ford Engine Explained
Brett Foote
10 Ugly Ford Trucks That We Still Kinda Love
Joe Kucinski
10 Things Every Truck Owner NEEDS (2026 Edition)
Michael S. Palmer
Rezvani's Latest Post-Apocalyptic Monster Is a Ford F-150 Raptor Underneath
Verdad Gallardo
Top 10 Most Expensive Ford Trucks Ever Sold on Bring a Trailer
Joe Kucinski
2027 Ford Super Duty Buyer's Guide (Every Model, Engine, & Package)
Brett Foote
Top 10 Ford Truck Tragedies
Joe Kucinski
Thread
Thread Starter
Forum
Replies
Last Post
PStruwing
1968-Present E-Series Van/Cutaway/Chassis
1
Nov 22, 2012 01:10 PM