MII sway bar installation questions...
#1
 06-09-2012, 02:01 PM


Join Date: Aug 2011
Location: Tucson, AZ
Posts: 649
Likes: 0
Received 0 Likes
on
0 Posts
MII sway bar installation questions...
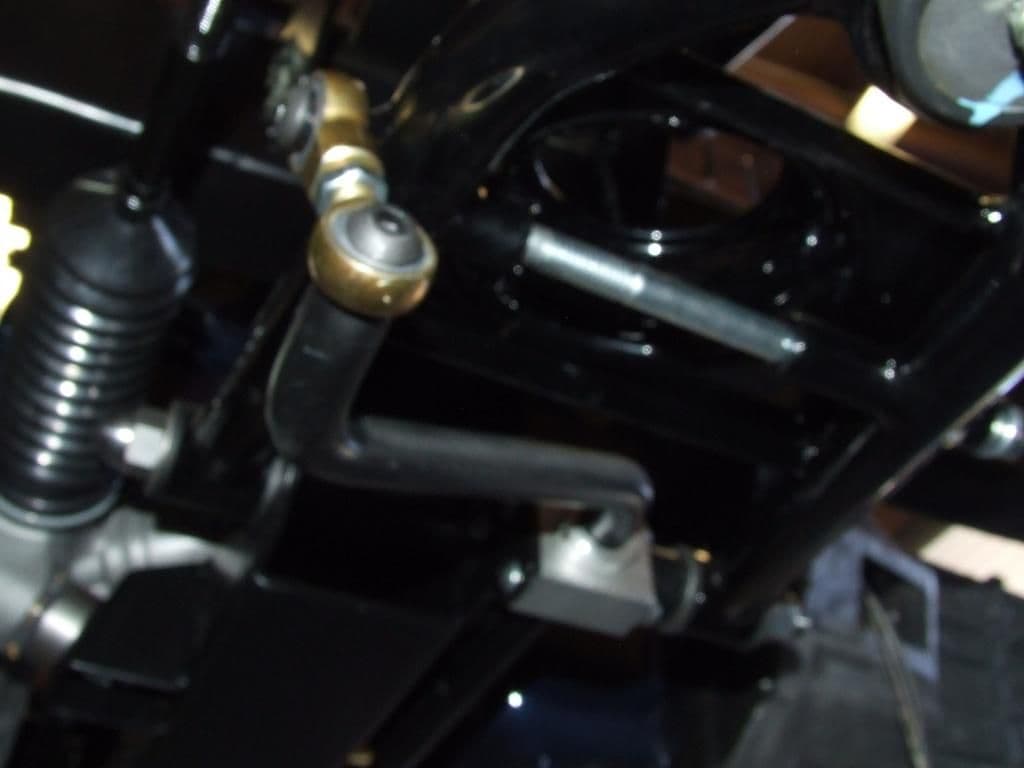
I am in the final stages of installing my TCI MII front end. The rack and pinion kit came with a sway bar, but no instructions or diagrams as to how to install it. I gave it my best guess. Please have a look at the pics below to see if I did it right.
One concern I have is the bolts and nyloc nuts that go thru that aluminum block. It seems the bolts are a hair too short so the threads don't seem to fully engage into the nyloc part of the nuts. There are split lock washers under the heads of the bolts taking up about 1/8" or so. Are the lock washers necessary with the nyloc nuts on the other end? I installed them because they were in the kit. I am thinking I should get bolts that are 1/2" longer.
There are rubber/plastic bushings that go inside the aluminum blocks. One end of the bushing has a collar that sits on the outside of the block, the other end sits flush with the block. I guessed that those aluminum locking rings go on the non-collared side of the block. Am I right?
What else do you see? Any other problems?
Tyler
Driver's side...

Passenger's side...

Passenger's side...

Passenger's side...

Passenger's side...

Driver's side...

Driver's side...
One concern I have is the bolts and nyloc nuts that go thru that aluminum block. It seems the bolts are a hair too short so the threads don't seem to fully engage into the nyloc part of the nuts. There are split lock washers under the heads of the bolts taking up about 1/8" or so. Are the lock washers necessary with the nyloc nuts on the other end? I installed them because they were in the kit. I am thinking I should get bolts that are 1/2" longer.
There are rubber/plastic bushings that go inside the aluminum blocks. One end of the bushing has a collar that sits on the outside of the block, the other end sits flush with the block. I guessed that those aluminum locking rings go on the non-collared side of the block. Am I right?
What else do you see? Any other problems?
Tyler
Driver's side...
Passenger's side...
Passenger's side...
Passenger's side...
Passenger's side...
Driver's side...
Driver's side...
Last edited by Tyler S; 06-09-2012 at 02:35 PM. Reason: clarity
#2
06-09-2012, 05:31 PM

I suppose that might work as long as it doesn't interfere with the suspension travel....
Normally the bar mounts under the frame rails in front of the cross member and the end links attach from above the lower control arms.....so it's not hanging down below.
But that sway bar almost looks like it should be mounted that way......I dunno....
Maybe contact the mfg to find out what they recommend ? Every suspension setup is probably slightly different....
#3
06-09-2012, 05:42 PM
Senior User
Join Date: Aug 2007
Location: Grande Cache Alberta
Posts: 131
Likes: 0
Received 0 Likes
on
0 Posts
#4
06-09-2012, 06:43 PM
Elder User
You have the sway bar installed correctly but you are right TCI instruction sheets really suck, I have called them over and over on that very subject.
Make sure that the sway bar does not bind on the lower A arm from full down to full up, I have found that some kits do. If it bind's up, call TCI and they can send you a longer A arm link that allows for full motion.
Make sure that the sway bar does not bind on the lower A arm from full down to full up, I have found that some kits do. If it bind's up, call TCI and they can send you a longer A arm link that allows for full motion.
#5
06-10-2012, 09:24 AM
Join Date: Aug 2011
Location: Tucson, AZ
Posts: 649
Likes: 0
Received 0 Likes
on
0 Posts
You have the sway bar installed correctly but you are right TCI instruction sheets really suck, I have called them over and over on that very subject.
Make sure that the sway bar does not bind on the lower A arm from full down to full up, I have found that some kits do. If it bind's up, call TCI and they can send you a longer A arm link that allows for full motion.
Make sure that the sway bar does not bind on the lower A arm from full down to full up, I have found that some kits do. If it bind's up, call TCI and they can send you a longer A arm link that allows for full motion.
Project, does my description of the locking rings or retaining rings sound right? I installed them on the opposite side of the mounting block from the collar of the bushing.
Tyler
#6
06-10-2012, 09:55 AM
Join Date: Aug 2011
Location: Tucson, AZ
Posts: 649
Likes: 0
Received 0 Likes
on
0 Posts
Thanks Project 55 and everyone else. I based the entire installation on this pic I found on the internet:

Project, does my description of the locking rings or retaining rings sound right? I installed them on the opposite side of the mounting block from the collar of the bushing.
Tyler
Project, does my description of the locking rings or retaining rings sound right? I installed them on the opposite side of the mounting block from the collar of the bushing.
Tyler
OK, now it is "later" and it looks like I posted the right picture afterall. My iPhone shows a different picture for some reason. Anyway, the above pic with the yellow cross member and chrome control arms is the correct one...
Now I've completely deleted the picture. I'm not too good a this. Will fix in a bit...
Here it is again...
Last edited by Tyler S; 06-11-2012 at 09:14 AM. Reason: correcting the corrected correction...
#7
06-10-2012, 10:27 AM
Trending Topics
#8
06-10-2012, 10:58 AM
Join Date: Aug 2011
Location: Tucson, AZ
Posts: 649
Likes: 0
Received 0 Likes
on
0 Posts
Tyler
#9
06-10-2012, 04:01 PM
Senior User
Join Date: Aug 2007
Location: Grande Cache Alberta
Posts: 131
Likes: 0
Received 0 Likes
on
0 Posts
#10
06-10-2012, 11:56 PM
Elder User
Sorry, I totally spaced your question about the nylon bushing before.
The lip of the bushing faces outboard and is sandwiched between the mount block and the centering collar, this way the bushing cannot work out of the mount block and it keeps the centering collars from wearing against the mount blocks as the bar cycles up and down.
I would also remove the lock washers under the bolt heads, the nylocks are more than enough to prevent to retain the mount blocks.
Sorry again for not answering all of your question the first time.
Gary
#11
06-11-2012, 09:07 AM
Join Date: Aug 2011
Location: Tucson, AZ
Posts: 649
Likes: 0
Received 0 Likes
on
0 Posts
T
#12
06-11-2012, 09:54 AM
Join Date: Aug 2011
Location: Tucson, AZ
Posts: 649
Likes: 0
Received 0 Likes
on
0 Posts
Sorry, I totally spaced your question about the nylon bushing before.
The lip of the bushing faces outboard and is sandwiched between the mount block and the centering collar, this way the bushing cannot work out of the mount block and it keeps the centering collars from wearing against the mount blocks as the bar cycles up and down.
I would also remove the lock washers under the bolt heads, the nylocks are more than enough to prevent to retain the mount blocks.
Sorry again for not answering all of your question the first time.
Gary
The lip of the bushing faces outboard and is sandwiched between the mount block and the centering collar, this way the bushing cannot work out of the mount block and it keeps the centering collars from wearing against the mount blocks as the bar cycles up and down.
I would also remove the lock washers under the bolt heads, the nylocks are more than enough to prevent to retain the mount blocks.
Sorry again for not answering all of your question the first time.
Gary
I abandoned the lock washers. In fact I abandoned the entire nut and bolt combo from the kit. Went with a grade 8 bolt 1/2" longer, nylock nuts and put flat washers on both sides.
T
#13
06-11-2012, 10:31 PM
Elder User
#14
06-11-2012, 10:58 PM
Join Date: Aug 2011
Location: Tucson, AZ
Posts: 649
Likes: 0
Received 0 Likes
on
0 Posts

Thread
Thread Starter
Forum
Replies
Last Post
Ax “85”
Explorer, Sport Trac, Mountaineer & Aviator
5
12-25-2017 04:12 PM
55forder
1948 - 1956 F1, F100 & Larger F-Series Trucks
4
05-20-2005 06:38 AM