Dad's ZF5 Swap
#361
 08-30-2012, 07:20 PM

Well, I'm surprised that you guys didn't suggest using factory parts. As the pages from the parts catalog show, D8TZ 7526-B is used as the bushing at the pedal lever as well as on the equalizer bar. That is 1/2" OD and 7/16" ID and I've found them for ~$7/ea, although I have more looking to do.
Also, I've asked for a quote on Oilite bushings, although they aren't available in that size, so I'm asking for 9/16 OD and will open up the holes if need be. My thinking is that these bushings will last longer than the plastic ones, but what do you think?
Speaking of opening the holes up, the last two pictures show the state of the clutch pedal arm and the idler lever rod before and after. On the arm, I welded the hole up and drilled it back out. For the rod, would you believe I welded it up and turned it down in the lathe? No? How about I remembered something in Rusty's toolbox and discovered a brand new idler rod?
As for the equalizer bar, it is a mess. The frame bracket as well as the transmission bracket are badly worn, and the bar itself is in sad shape. I'm going to have to see what it would cost to replace all of it, or re-engineer it. Or, go hydraulic. Any ideas?
#362
08-30-2012, 10:28 PM

I wish I had taken pictures of my stuff, it looked LOTS worse! The rod was at least 2/3rds of the way through, the lever looked approximately like yours.
I lucked out at local JY and found some replacements in decent shape... the rod was an obvious factory replacement, it still had the sticker and barcode on it.
Stuff for the Z-bar I got from LMC for relatively cheap.
I lucked out at local JY and found some replacements in decent shape... the rod was an obvious factory replacement, it still had the sticker and barcode on it.
Stuff for the Z-bar I got from LMC for relatively cheap.
#363
08-30-2012, 10:32 PM
I wish I had taken pictures of my stuff, it looked LOTS worse! The rod was at least 2/3rds of the way through, the lever looked approximately like yours.
I lucked out at local JY and found some replacements in decent shape... the rod was an obvious factory replacement, it still had the sticker and barcode on it.
Stuff for the Z-bar I got from LMC for relatively cheap.
I lucked out at local JY and found some replacements in decent shape... the rod was an obvious factory replacement, it still had the sticker and barcode on it.
Stuff for the Z-bar I got from LMC for relatively cheap.
#364
08-31-2012, 05:29 AM
Cargo Master
I did exactly as you have, Gary.........weld, drill, file, paint etc. one part at a time.
The long rod to the z-bar had worn 90% through up at the pedal lever.
Where it was practical to, I built up with nickel-bronze (high wear resistance) on one part, & steel on the mating part, vs steel on both, to minimise future wear.
Off-the-shelf rod ends would be good idea, but I decided to restore, this time anyway.......the novelty will have worn off by next time!
I machined one new bush for the z-bar, (the other one was still good) & built up pins etc.
LMC has quite a few parts available - some were better to buy, some to repair.
I had to make up a bronze bush with a flat on one side to bush the adjustable pushrod to size - these weren't supplied with the rod.
All satisfying to do if time isn't too much of an issue, & the final result was good, with no risk of firewall cracking problems.
#365
08-31-2012, 07:14 PM
More Linkage
Did more work on the linkage today. As you can see in the first picture, the ball on the frame mount for the Z-bar was badly worn. So, I ground the backside of the stud where it was peened over and pressed the ball out. Then I welded it up, put it in the lathe and trimmed it, welded it again, trimmed it, etc. When I got it where I wanted it I pressed it back in and tack-welded it on the back side. And, would you believe the divits in it were put there on purpose to hold grease? Well, how about so it'll go faster or carry further, like golf *****? 
The 3rd picture is the engine/tranny end support for the Z-bar. If you go back to yesterday's picture labeled "Section 75 Page 3" you'll see that this home-made part doesn't very closely resemble the part labeled "7A572 (8 cyl. 351 & 400)". So, I went to the text part of the catalog and looked for the # for that part, but didn't find it. ( ) I went to the LMC catalog and found that they don't have them. But, they do have the ones for the small-block/300 six and they only want $100 for it. So, I'm assuming anywhere else I might find it if I had the # would be equally expensive, and think I'll just tweak this one. Or make a new one.
The 4th and 5th pictures are of the pins on the Z-bar. Obviously, they need help. So, I heated the Z-bar and have one of them pushed out. I'll do the other one the same way and then make new ones on the lathe. I'll press them in and then weld them on the backside.
As for the bushings, one of the Ford places got back with me and a bag of 5 of the plastic bushings is $46. Or, they'll sell me 1 for $10. On the other hand, I can get them from LMC for $6.95/ea. I called Beemer, the people with the Oilite bushings, and found that I needed to call one of their distributors. I did that and ordered four of them 1/2" long, at $.37/ea, and four that are 5/8" long, at $.87/ea. All up they'll be less expensive than one plastic bushing, and the plastic ones have a 1/32" wall as opposed to the bronze bushings with 1/16" walls. The oil-impregnated bronze will surely be better than plastic.
But, I will have have to order several of the pieces for the Z-bar, including the plastic bushings and felt seals. All up I'll have maybe $25 in rebuilding the clutch linkage.
Oh yes, I ordered the clutch kit today. The 11" 460 unit including the pressure plate and pilot bearing at $109. Should be in tomorrow. Assuming we get the bed and rear sway bar off of Ray's rolling chassis in time I'll go pick it up. Won't be long before I'm doing the trial fit on that ZF5.
The 3rd picture is the engine/tranny end support for the Z-bar. If you go back to yesterday's picture labeled "Section 75 Page 3" you'll see that this home-made part doesn't very closely resemble the part labeled "7A572 (8 cyl. 351 & 400)". So, I went to the text part of the catalog and looked for the # for that part, but didn't find it. (
) I went to the LMC catalog and found that they don't have them. But, they do have the ones for the small-block/300 six and they only want $100 for it. So, I'm assuming anywhere else I might find it if I had the # would be equally expensive, and think I'll just tweak this one. Or make a new one.The 4th and 5th pictures are of the pins on the Z-bar. Obviously, they need help. So, I heated the Z-bar and have one of them pushed out. I'll do the other one the same way and then make new ones on the lathe. I'll press them in and then weld them on the backside.
As for the bushings, one of the Ford places got back with me and a bag of 5 of the plastic bushings is $46. Or, they'll sell me 1 for $10. On the other hand, I can get them from LMC for $6.95/ea.
I called Beemer, the people with the Oilite bushings, and found that I needed to call one of their distributors. I did that and ordered four of them 1/2" long, at $.37/ea, and four that are 5/8" long, at $.87/ea. All up they'll be less expensive than one plastic bushing, and the plastic ones have a 1/32" wall as opposed to the bronze bushings with 1/16" walls. The oil-impregnated bronze will surely be better than plastic.But, I will have have to order several of the pieces for the Z-bar, including the plastic bushings and felt seals. All up I'll have maybe $25 in rebuilding the clutch linkage.
Oh yes, I ordered the clutch kit today. The 11" 460 unit including the pressure plate and pilot bearing at $109. Should be in tomorrow. Assuming we get the bed and rear sway bar off of Ray's rolling chassis in time I'll go pick it up. Won't be long before I'm doing the trial fit on that ZF5.


#367
08-31-2012, 08:02 PM
I wish I had taken pictures of my stuff, it looked LOTS worse! The rod was at least 2/3rds of the way through, the lever looked approximately like yours.
I lucked out at local JY and found some replacements in decent shape... the rod was an obvious factory replacement, it still had the sticker and barcode on it.
Stuff for the Z-bar I got from LMC for relatively cheap.
I lucked out at local JY and found some replacements in decent shape... the rod was an obvious factory replacement, it still had the sticker and barcode on it.
Stuff for the Z-bar I got from LMC for relatively cheap.
I did exactly as you have, Gary.........weld, drill, file, paint etc. one part at a time.
The long rod to the z-bar had worn 90% through up at the pedal lever.
Where it was practical to, I built up with nickel-bronze (high wear resistance) on one part, & steel on the mating part, vs steel on both, to minimise future wear.
Off-the-shelf rod ends would be good idea, but I decided to restore, this time anyway.......the novelty will have worn off by next time!
I machined one new bush for the z-bar, (the other one was still good) & built up pins etc.
LMC has quite a few parts available - some were better to buy, some to repair.
I had to make up a bronze bush with a flat on one side to bush the adjustable pushrod to size - these weren't supplied with the rod.
All satisfying to do if time isn't too much of an issue, & the final result was good, with no risk of firewall cracking problems.
The long rod to the z-bar had worn 90% through up at the pedal lever.
Where it was practical to, I built up with nickel-bronze (high wear resistance) on one part, & steel on the mating part, vs steel on both, to minimise future wear.
Off-the-shelf rod ends would be good idea, but I decided to restore, this time anyway.......the novelty will have worn off by next time!
I machined one new bush for the z-bar, (the other one was still good) & built up pins etc.
LMC has quite a few parts available - some were better to buy, some to repair.
I had to make up a bronze bush with a flat on one side to bush the adjustable pushrod to size - these weren't supplied with the rod.
All satisfying to do if time isn't too much of an issue, & the final result was good, with no risk of firewall cracking problems.
Thanks! Was just thinking that I may get the cab raised on Sunday and then put the engine in on Monday or Tuesday. At that point I'll install the flywheel and check for runout, and then put the clutch/pressure plate on and see how the tranny fits. Been a long time coming, but it seems to be here at last.

#369
08-31-2012, 08:43 PM
#371
08-31-2012, 10:26 PM
Muscle Z-Bar
Now this is what I call a well-engineered z-bar. Spherical bearings in the ends of the z-bar and heim joints on the fully-adjustable links. But, it doesn't appear that they have them for our trucks. I think I'll get the stuff that came on Rusty working with lots of effort and time, but it would be tempting to just bolt something like that in.
#372
09-01-2012, 06:14 PM
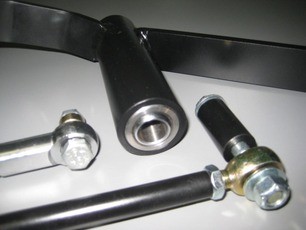
Made some progress on the clutch linkage today, a large part of which is due to Ray1986F150. He came by to drop off a bed and remove some parts off a poor grandfather's rolling frame, which is soon to be documented in WHYDTYTT, and just happened to have most of the clutch linkage! As you can see in the first picture, his frame-side pivot is a bit better than the one I repaired - yesterday, in fact.
The second picture shows the clamshell bushing that was on his pivot. It's worn through at one point so I'm glad I ordered new ones from LMC last night.
The third picture shows the best part of the "find" - the tranny-side pivot bolt. Not the whole bracket, but since his was off a 6 it wouldn't have fit my 351M anyway. However, that bolt is like gold. As you can see, it is a far cry from the ugly thing that came on Rusty - shown on the right. And, Ray's pivot came with the seal, which appears to be good enough to use, and I'm glad of that since LMC only carries the felt rings, not the true seal. Anyway, if I can't fabricate a bracket to hold that pivot I shouldn't be doing this.
Last, since Ray's Z-bar has one worn pin, I continued on with my quest to replace the pins in mine. Toward that end I looked around the shop for just the right material, and found it: Some Grade 8 main bearing cap bolts that seem to be laying around for some reason. The Oilite bushings are to be .437" minimum ID, so I turned the pin to .436" OD. But, I left the base of it alone since it was already .497". Then I drilled and reamed the lever on the Z-bar to .435" and pressed the pin in. A little welding on the back and it looks like it isn't going anywhere.
The second picture shows the clamshell bushing that was on his pivot. It's worn through at one point so I'm glad I ordered new ones from LMC last night.
The third picture shows the best part of the "find" - the tranny-side pivot bolt. Not the whole bracket, but since his was off a 6 it wouldn't have fit my 351M anyway. However, that bolt is like gold. As you can see, it is a far cry from the ugly thing that came on Rusty - shown on the right. And, Ray's pivot came with the seal, which appears to be good enough to use, and I'm glad of that since LMC only carries the felt rings, not the true seal.
Anyway, if I can't fabricate a bracket to hold that pivot I shouldn't be doing this.Last, since Ray's Z-bar has one worn pin, I continued on with my quest to replace the pins in mine. Toward that end I looked around the shop for just the right material, and found it: Some Grade 8 main bearing cap bolts that seem to be laying around for some reason.
The Oilite bushings are to be .437" minimum ID, so I turned the pin to .436" OD. But, I left the base of it alone since it was already .497". Then I drilled and reamed the lever on the Z-bar to .435" and pressed the pin in. A little welding on the back and it looks like it isn't going anywhere.
#373
09-02-2012, 07:03 PM
Didn't actually do any work on the truck today, per se, but did stop by O'Reilly's and picked up the clutch set. Hard to figure, but the set with the clutch disk, the pressure plate, the throwout bearing, and the pilot bearing costs $109. But the clutch disk by itself is $108. Anyone need a new 460 pressure plate?
And, I did some CAD work last night to document how I made the pin - for posterity as well as to help me make the next one. That went so well I added the other parts. And, I'll show them here to document it as well as to help you see how it'll go together - although you probably have that figured out.
The pictures are:
- The pin & its dimensions
- The pin in the arm of the z-bar
- The bushing added
- The rod coming down from the clutch pedal added
- Complete assembly with callouts
#374
09-04-2012, 06:01 PM
I put the 2nd pin in the z-bar today, and also put a grease fitting in it. So, that part of the linkage is done. Just waiting on the Oilite bushings and the other bushings and seals to come in and the clutch linkage will be ready.
Actually, there is a little bit more work to do there as the arm on the clutch pedal, the rod from the pedal to the z-bar, and the adjusting link to the clutch need to be taken out to 9/16" to accomodate the Oilite bushings, but that won't take much. And, the bushings will have to be trimmed as the shortest I could get are 1/2" and that's just a tad long. Oh yes, and then there's the bracket for the tranny-side z-bar pivot that has to be made. Maybe I was a bit hasty saying that it is just "a little more work"?
On the other hand, I did get the pilot bearing installed in the spacer today. It went in just right - like it was made for it.