The Street Rod Manufacturing Co. F3 Disc Brake Conversion Kit
#16
 04-20-2014, 01:52 PM


More Turbo
#17
04-20-2014, 03:46 PM
TSR used my spindles to do the original setup for the F3. They were very good to work with and gave me a nice discount on the set. I sold mine to another guy on the forum because I went with the Jag front end. He said they worked as well as I though they did. They stopped my F3 with a 5.0 EFI 5 speed very well. Hope that helps.
#18
04-22-2014, 04:38 PM
Junior User
Join Date: Jun 2012
Location: SoCal
Posts: 57
Likes: 0
Received 0 Likes
on
0 Posts

Some questions: Do you have a schematic of the caliper bracket you fabricated? Where did you source the calipers & rotors from? What is the bore diameter of the master cyl you used? Do you think using the under-the-floorboard master cyl & booster would be the way to go with this setup? Thanks!
I'm currently using stock drum brakes on my 1950 F3, but I plan on towing ~2000 lbs on a towbar (race vehicle) and would like to stop when needed.

#19
04-22-2014, 09:06 PM
More Turbo
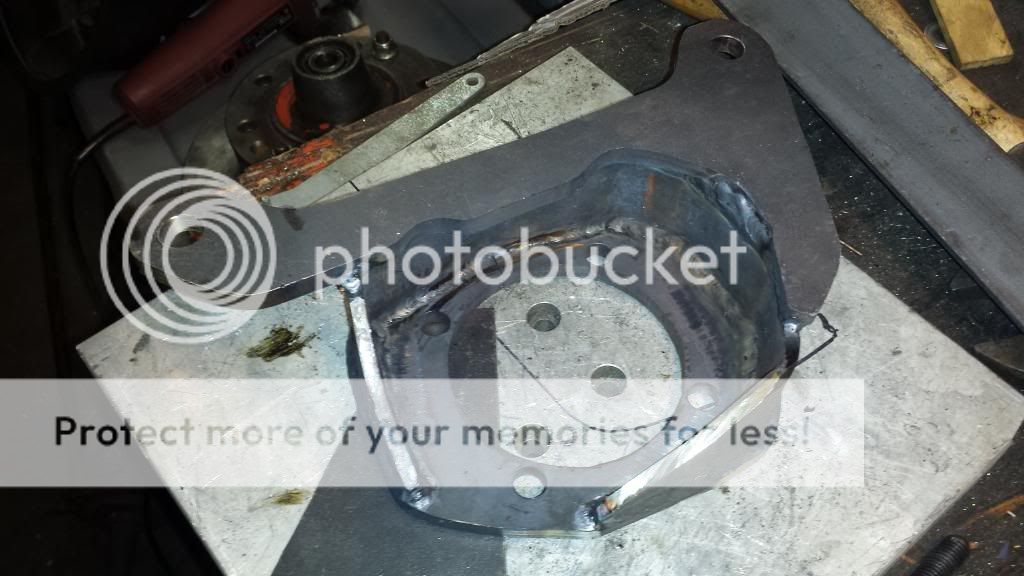
No I kinda just winged it, had dimensions scribbled on bits of cardboard and such while making them. Holes are filed to finish fit. They were not hard to make. I did not have backing plates but if you did you could just copy the bolt pattern from there, or measure like I did. The spacer between the 2 pieces of 3/8" plate is only 1/4" but probably plenty strong. They are fully welded both sides all the way around. I used wooden wedges to jam the caliper in place. Then with the brake pad outter edge in from the rotor outer edge by 1/8" and marked the mounting holes there. I had measured and figured I needed the 1/4 plate to be 1-7/8" but being lazy I just used 2" and put a washer on.
The calipers were also switched left to right.
I bought all the parts from Orielly's, I would have used Advance Auto but they do not exist in WA where I just moved to. The master cylinder is the normal boosted under floor setup for disc-drum from CPP. Corvette style.
So yes I think under floor is the way to go. I think it is cooler/neater. I may one day make a hanging pedal system that still actuates the under floor system with in cab linkages.
If you look around people use the antiquated Ford system from the early 80's it does use the same rotors and same SIZE calpiers but they mount with those weird rubber blocks with stainless strips around them.
I like what I have, after I finally learned how to adjust the rear drum brakes. It can stop HARD. Have not done a full on brake test yet, but I will when I get back from Japan(work).
#20
04-22-2014, 10:52 PM
I think I should clear up the dual piston calipers used on Ford trucks over the years:
Front Calipers
Two piece Dayton caliper with 2 3/16" pistons used slide bolts (prone to seizing)
Removable caliper mount
1968-1975 F-250 HD / F-350
1975 E-250 HD / E-350
Two piece Dayton caliper with 2 3/16" piston used H wedge
Removable caliper mount
1976-1979 F-250 HD / F-350
1976-1979 E-250 HD / E-350
One piece Ford (Dayton style) with 2 3/16" piston used H wedge
Mount integral with spindle
1980-1985 F-250 HD / F-350
1980-1985 E-250 HD / F-350
One piece Ford with 2 3/16" piston used steel / rubber wedge pin
Mount integral with spindle
1986-1994 F-250 HD / F-350
1986-1991 E-250 HD / E-350
One piece Ford with 2.358" piston used steel / rubber wedge pin
Removable caliper mount
1988-1997 F-Superduty
One piece Ford with 2 3/16" piston used slide pin
Removable caliper mount
1992-1994 E-350
One piece Ford with 60mm piston used slide pin
Removable caliper mount
1995-1997 F-250 / F-350
1995-2007 E-250 / E-350
1996-1999 E-Superduty
One piece Ford with ??mm piston used slide pin
Removable caliper mount
1999-2004 Superduty F-250 / F-350
One piece Ford with ??mm piston used slide pin
Removable caliper mount
2005-2012 Superduty F-250 / F-350
One piece Ford with ?? piston used slide pin
Removable caliper mount
2008-2013 E-150 / E-250 / E-350
Rear Calipers
One piece Ford with 2.358" piston used steel / rubber wedge pin
Removable caliper mount
1988-1997 F-Superduty
One piece Ford with ?? piston used steel / rubber wedge pin
Removable caliper mount
1996-1999 E-Superduty
One piece Ford with ?? piston used slide pin
Removable caliper mount
1999-2004 Superduty F-250 / F-350
One piece Ford with ?? piston used slide pin
Removable caliper mount
1999-2007 E-250 / E-350
One piece Ford with ?? piston used slide pin
Removable caliper mount
2005-2010 Superduty F-250 / F-350
One piece Ford with ?? piston used slide pin
Removable caliper mount
2008-2013 E-150 / E-250 / E-350
Well that is most of them...
#21
04-22-2014, 11:54 PM
Junior User
Join Date: Jun 2012
Location: SoCal
Posts: 57
Likes: 0
Received 0 Likes
on
0 Posts
No I kinda just winged it, had dimensions scribbled on bits of cardboard and such while making them. Holes are filed to finish fit. They were not hard to make. I did not have backing plates but if you did you could just copy the bolt pattern from there, or measure like I did. The spacer between the 2 pieces of 3/8" plate is only 1/4" but probably plenty strong. They are fully welded both sides all the way around. I used wooden wedges to jam the caliper in place. Then with the brake pad outter edge in from the rotor outer edge by 1/8" and marked the mounting holes there. I had measured and figured I needed the 1/4 plate to be 1-7/8" but being lazy I just used 2" and put a washer on.
The calipers were also switched left to right.
I bought all the parts from Orielly's, I would have used Advance Auto but they do not exist in WA where I just moved to. The master cylinder is the normal boosted under floor setup for disc-drum from CPP. Corvette style.
So yes I think under floor is the way to go. I think it is cooler/neater. I may one day make a hanging pedal system that still actuates the under floor system with in cab linkages.
If you look around people use the antiquated Ford system from the early 80's it does use the same rotors and same SIZE calpiers but they mount with those weird rubber blocks with stainless strips around them.
I like what I have, after I finally learned how to adjust the rear drum brakes. It can stop HARD. Have not done a full on brake test yet, but I will when I get back from Japan(work).
The calipers were also switched left to right.
I bought all the parts from Orielly's, I would have used Advance Auto but they do not exist in WA where I just moved to. The master cylinder is the normal boosted under floor setup for disc-drum from CPP. Corvette style.
So yes I think under floor is the way to go. I think it is cooler/neater. I may one day make a hanging pedal system that still actuates the under floor system with in cab linkages.
If you look around people use the antiquated Ford system from the early 80's it does use the same rotors and same SIZE calpiers but they mount with those weird rubber blocks with stainless strips around them.
I like what I have, after I finally learned how to adjust the rear drum brakes. It can stop HARD. Have not done a full on brake test yet, but I will when I get back from Japan(work).
#22
04-23-2014, 02:36 AM
More Turbo
#23
04-24-2014, 04:49 PM
Junior User
Join Date: Jun 2012
Location: SoCal
Posts: 57
Likes: 0
Received 0 Likes
on
0 Posts
Pretty much the same here...I'm not a certified welder. I took 2 semesters of TIG welding at my community college. I've been MIG welding for ~10 years now, making furniture pieces, auto restoration projects (structural & not) & the occasional art piece. I learned MIG from a rollcage and off-road truck builder, he's a very patient and knowledgable fellow. I have a Miller 211now, but started on a Miller 420 GoldSeal.
#24
07-24-2014, 08:24 PM

Jules The Great
That is an awesome thing you have done here! I don't want to violate my "Baby" with GM parts either.
I have access to a full machine shop and all the welding equipment I need. If you don't have the patterns for what you did. Could you give me some idea as to how your process went down?
Should I get all the parts from the newer truck first and then do all the fabing or what?
Any help will be appreciated!
#25
07-24-2014, 10:06 PM
More Turbo
I did not really make any templates. I just fitted all the parts together.
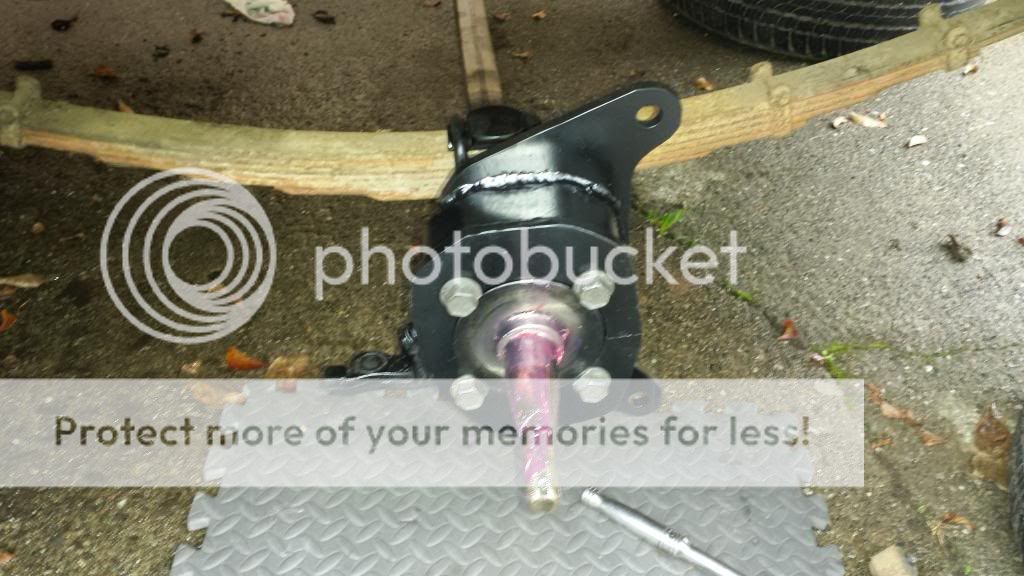
I would say to start by making the 3/8" plate that fits in place if the old backing plate. I think I made that plate about 1/2" bigger all the way around. This has to clear the rotor so it is a good idea to have ask the parts when you start.
Next I bent up the piece of 2"x1/4" plate that is the webbing between the two 3/8"thick plates. This has to hug pretty close to the axle flange because the caliper comes really close and it almost just barely fit. I think I had to grind/bevel the able flange for my wells because it was that close. I would say you don't need to weld the inside there.
Next you make up the caliper holding bracket out of 3/8" plate. When you look at the caliper mounting bracket you can see my bracket ended up with the mounting points being angled outward there are some massing angles for the bracket to engage.
I used a wedge to jam the caliper on the rotor while it was all assembled on the axle to position the caliper. I set the caliper so the edge of the brake pad was about 1/8" in from the outside of the rotor as this seemed about right.
Now to bring the caliper perfectly centered on its range of motion I put a 1/8" washer between my bracket and the caliper.
Sorry I do not have dimensions. I am more of a fly by the seat of my pants fabricator.
#26
07-25-2014, 07:01 PM

Thread
Thread Starter
Forum
Replies
Last Post
66beater
1961 - 1966 F-100 & Larger F-Series Trucks
33
06-22-2007 04:26 AM
1949f1
1948 - 1956 F1, F100 & Larger F-Series Trucks
28
03-09-2007 05:55 PM
Frankenstang57
1948 - 1956 F1, F100 & Larger F-Series Trucks
9
03-28-2005 06:41 AM