




3G Alternator Install With Pictures

Thread Starter
|
Fleet Mechanic
Joined: May 2009
Posts: 1,460
Likes: 6
From: Bay Area, Unfortunately
3G Alternator Install With Pictures
Okay, I wanted to upgrade my charging system, not because I need all the power, but mainly because I wanted to get rid of the dangerous spade terminal connections on the 2G alternator. I checked around and also learned that since a larger alternator is not straining as hard to put out the same amount of amperage as a smaller alternator might, it works less and lasts longer. I searched the internet and found plenty of 3G alternator upgrades documented, but I was confused, especially with the wiring (even though it is simple) and did not find one for our trucks.
A couple of people were interested in a write up, so here goes!
There are countless reasons to upgrade, and I am not here to sell you on them. If you are considering this upgrade, then you most likely have already researched the 3G alternator and where they come from. I got mine out of a Taurus (hint if you do not know where they come from).
If you want to do the upgrade, you will need beside the tools:
3G alternator
Mega Amp fuse
As long of a length of the alternator harness and battery wire from the back of the alternator out of the donor car you got the alternator from (it never hurts to have more and have to cut it, than not enough).
I completed this for about $30 in parts including the alternator.
There are a few different ways to go about the upgrade, and I do not know if mine is best, but it is simple and straight forward.
So lets start. *****DISCONNECT THE BATTERY***** The first and hardest part of this was getting out the old alternator. You can see why:
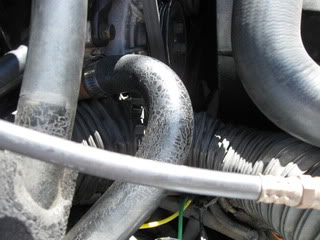
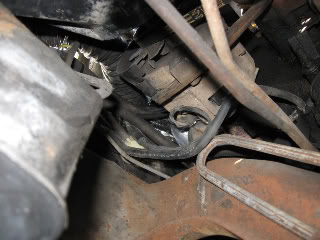
I ended up having to take the old one out from the bottom (you can also see the spade connector from the factory). VERY IMPORTANT - LAY THE OLD WIRING HARNESS ASIDE AND DO NOT DISCONNECT IT FROM THE TRUCK. Tape up the exposed ends and wire tie it safely out of the way. The wires are still HOT.
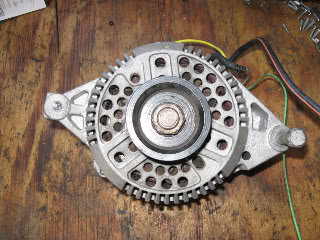
Here is your 3G alternator. You will need to tap the threaded hole to fit a 3/8" bolt.
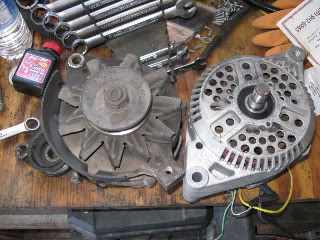
Here is the old alternator next to the new one. I have already removed the pulley off the new one and am going to put on the V-belt pulley.
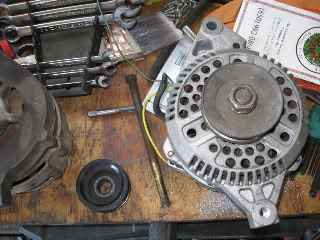
Now here is the new one with the V-belt pulley on it. It will need a spacer under the pulley to keep it from rubbing the case. I used the washer that had been behind the retaining nut from the old alternator as the spacer. I slipped it over the shaft and then the pulley, and lastly the nut.
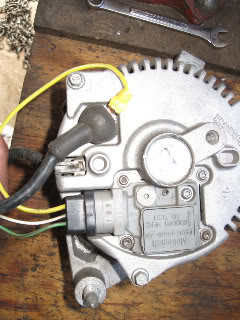
Now onto the wiring. Do not let it intimidate you. You have 3 wires, "A,S, and I" coming out of the voltage regulator. Starting with "A" (the yellow wire), it only needs an eyelet on it and then loop it to the battery post of the alternator. Next wire is "S" (the white wire). It comes out of the connector and the other end plugs into the remaining terminal of the alternator. *This is already done by the factory as can be seen when you take the plastic wiring loom off the harness.* Last wire is the "I" (the green with red stripe wire). You will need to cut the green with red stripe wire in the truck's alternator wiring harness. You then solder this wire to the same color one in the truck's harness. One of the most confusing parts of the mod is now done.
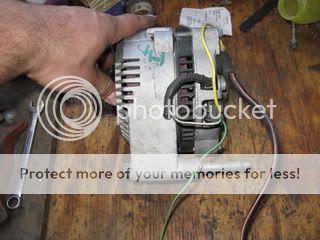
This is just a different angle of the wires.
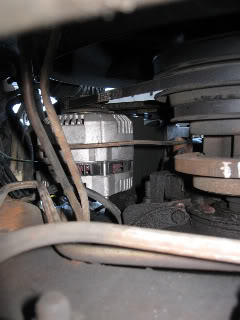
You can now bolt the alternator into the truck. There is a bushing in the upper bracket. Slide it out toward the front of the truck slightly to make it easier to put the alternator in. Once you have the alternator bolted in and belt tensioned, you are ready to finish making the connections.
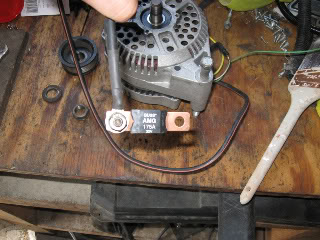
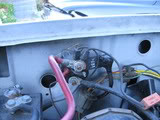
Next is on to the charging wire. This comes off the rear lug of the alternator and goes to the starter solenoid. Solder a loop terminal to the Solenoid end. YOU WILL NEED CIRCUIT PROTECTION. I picked up a Mega Fuse and bolted it to the loop terminal I soldered on to the solenoid end. I simply then bolted the the other end of the Mega Fuse to the battery side of the starter solenoid. I know they make fuse holders which look better and may or may not be safer, but I could not find them, and I taped over the end not connected to the solenoid.
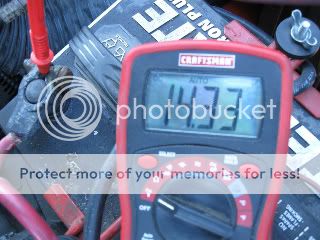
Reconnect the battery and try out the truck. If there is a problem, TURN IT OFF and re check the wiring and connections. Mine put out 14.33 volts at idle with everything on.
Good luck with this mod and please feel free to let me know if I forgot anything or should do anything different or if something could be done better.
A couple of people were interested in a write up, so here goes!
There are countless reasons to upgrade, and I am not here to sell you on them. If you are considering this upgrade, then you most likely have already researched the 3G alternator and where they come from. I got mine out of a Taurus (hint if you do not know where they come from).
If you want to do the upgrade, you will need beside the tools:
3G alternator
Mega Amp fuse
As long of a length of the alternator harness and battery wire from the back of the alternator out of the donor car you got the alternator from (it never hurts to have more and have to cut it, than not enough).
I completed this for about $30 in parts including the alternator.
There are a few different ways to go about the upgrade, and I do not know if mine is best, but it is simple and straight forward.
So lets start. *****DISCONNECT THE BATTERY***** The first and hardest part of this was getting out the old alternator. You can see why:
I ended up having to take the old one out from the bottom (you can also see the spade connector from the factory). VERY IMPORTANT - LAY THE OLD WIRING HARNESS ASIDE AND DO NOT DISCONNECT IT FROM THE TRUCK. Tape up the exposed ends and wire tie it safely out of the way. The wires are still HOT.
Here is your 3G alternator. You will need to tap the threaded hole to fit a 3/8" bolt.
Here is the old alternator next to the new one. I have already removed the pulley off the new one and am going to put on the V-belt pulley.
Now here is the new one with the V-belt pulley on it. It will need a spacer under the pulley to keep it from rubbing the case. I used the washer that had been behind the retaining nut from the old alternator as the spacer. I slipped it over the shaft and then the pulley, and lastly the nut.
Now onto the wiring. Do not let it intimidate you. You have 3 wires, "A,S, and I" coming out of the voltage regulator. Starting with "A" (the yellow wire), it only needs an eyelet on it and then loop it to the battery post of the alternator. Next wire is "S" (the white wire). It comes out of the connector and the other end plugs into the remaining terminal of the alternator. *This is already done by the factory as can be seen when you take the plastic wiring loom off the harness.* Last wire is the "I" (the green with red stripe wire). You will need to cut the green with red stripe wire in the truck's alternator wiring harness. You then solder this wire to the same color one in the truck's harness. One of the most confusing parts of the mod is now done.
This is just a different angle of the wires.
You can now bolt the alternator into the truck. There is a bushing in the upper bracket. Slide it out toward the front of the truck slightly to make it easier to put the alternator in. Once you have the alternator bolted in and belt tensioned, you are ready to finish making the connections.
Next is on to the charging wire. This comes off the rear lug of the alternator and goes to the starter solenoid. Solder a loop terminal to the Solenoid end. YOU WILL NEED CIRCUIT PROTECTION. I picked up a Mega Fuse and bolted it to the loop terminal I soldered on to the solenoid end. I simply then bolted the the other end of the Mega Fuse to the battery side of the starter solenoid. I know they make fuse holders which look better and may or may not be safer, but I could not find them, and I taped over the end not connected to the solenoid.
Reconnect the battery and try out the truck. If there is a problem, TURN IT OFF and re check the wiring and connections. Mine put out 14.33 volts at idle with everything on.
Good luck with this mod and please feel free to let me know if I forgot anything or should do anything different or if something could be done better.

Moderator


Joined: Nov 2007
Posts: 22,415
Likes: 92
From: Denver Metro Area, CO

Good job with the write-up.  Wish I could rep ya for that but it won't let me.
About the only thing that confused me at first was the white wire, the way it's
depicted in the first picture cuz the left side is cut off... Apparently, it merely loops
from the 3-conductor connector to a single-conductor connector back on itself?
That's how it appears in the next pic, anyway.
I've thought about doing this 3G stuff sometime but it won't be soon, too much
other stuff to take care of, first.
Wish I could rep ya for that but it won't let me.About the only thing that confused me at first was the white wire, the way it's
depicted in the first picture cuz the left side is cut off... Apparently, it merely loops
from the 3-conductor connector to a single-conductor connector back on itself?
That's how it appears in the next pic, anyway.
I've thought about doing this 3G stuff sometime but it won't be soon, too much
other stuff to take care of, first.
Thread Starter
|
Fleet Mechanic
Joined: May 2009
Posts: 1,460
Likes: 6
From: Bay Area, Unfortunately
Thanks guys,
That white wire is sort of a pain to describe, but yeah, it basically just loops backto the alternator.
Price is a downside - unless you get it from the junkyard, I just looked for the best condition one I could find.
That white wire is sort of a pain to describe, but yeah, it basically just loops backto the alternator.
Price is a downside - unless you get it from the junkyard, I just looked for the best condition one I could find.

Fleet Mechanic
Joined: May 2009
Posts: 1,971
Likes: 2
Thanks for the writeup!
and that's what I am going to do.
junkyard it.
except I am going to be a butthead about it.
I am going to find a 3g that is covered in a bit more grease then others. and if not possible, make it that way
less cash spent when I'm walking out the door! haha
and that's what I am going to do.
junkyard it.
except I am going to be a butthead about it.
I am going to find a 3g that is covered in a bit more grease then others. and if not possible, make it that way
less cash spent when I'm walking out the door! haha

Posting Guru
Joined: Aug 2009
Posts: 2,271
Likes: 2
From: Mexia, TX
Awesome writeup!
How many amps does this 3G alternator put out compared to the factory one you replaced? I think my truck's alternator ('81) is 60 amps, and I'm curious as to whether all the factory wiring on my truck would like 100+ amps flowing through. lol
How many amps does this 3G alternator put out compared to the factory one you replaced? I think my truck's alternator ('81) is 60 amps, and I'm curious as to whether all the factory wiring on my truck would like 100+ amps flowing through. lol

Cargo Master


Joined: Oct 2005
Posts: 2,297
Likes: 26
From: NJ
Thanks for the info. Been considering this swap for a while. The regulator on my 45 amp jobbie is on the way out, voltage bounces around a bit. Comparing cost of a new factory unit to a junkyard 3g, may as well go 3g. Thanks.
Trending Topics
Thread Starter
|
Fleet Mechanic
Joined: May 2009
Posts: 1,460
Likes: 6
From: Bay Area, Unfortunately
I am not sure on the factory output, I think it is around 60 or 65 (mine has manual windows and locks), the 3G's come in 95 and 130 amps. I forget how to visually tell, but I think it is along the lines of the 130 amp ones have 3 sets of 2 large holes in the front, where the 95 amp one has 3 sets of 4 holes in the front.
I am not sure how different it would be to convert an externally regulated alternator if at all.
I am not sure how different it would be to convert an externally regulated alternator if at all.
FTE Stories
Ford Trucks for Ford Truck Enthusiasts

2027 Ford Super Duty Buyer's Guide (Every Model, Engine, & Package)
Brett Foote
Top 10 Ford Truck Tragedies
Joe Kucinski
AEV FXL Super Duty - the Super Duty Raptor Ford Doesn't Make
Brett Foote
Lobo Vs Lobo: Proof the F-150 Lobo Should Be Even Lower!
Michael S. Palmer
Ford's 2001 Explorer Sportsman Concept Looks For a New Home
Verdad Gallardo
10 Best Ford Truck Engines We Miss the Most!
Joe Kucinski
2026 Shelby F-150 Off-Road: Better Than a Raptor R?
Brett Foote
2027 Super Duty Carhartt Package First Look: 12 Things You NEED to Know!
Michael S. Palmer
10 Most Surprising 2026 Ford Truck Features!
Joe Kucinski
Thread Starter
|
Fleet Mechanic
Joined: May 2009
Posts: 1,460
Likes: 6
From: Bay Area, Unfortunately
Time out!!!!!!!
Hold on for a minute folks. I just discovered something that may change this up a little! My choke stopped working - but I have been having minor carburetor problems for a while, even before I did the change. I pulled the wire and got no voltage...I did a little investigating, and found that the choke is run off the "S" wire on the alternator https://www.ford-trucks.com/forums/8...hoke-wire.html. This might slow down progress a little, I will work on it tomorrow and get back to you. I think I will hook it up to the positive side of the coil, that should have about the correct volatge. I will let you know and update the thread when I find out.

pedant
Joined: Jan 2008
Posts: 23,576
Likes: 38
From: EXTREME southwest CT

Ford's harness sends 6-7 volts to the bimetal choke.
The Holley 45-258 12v electric choke element is available -Buy It Now-, on Ebay for under $15 to your door.
(not allowed to post a link, but the CarbDoc parts guy is in Long Island, NY)
You'll need to add a ground wire...

[MOD EDIT 7/10/2019 That site shut down several years ago, here is a link to a Wayback Machine archive from January, 2013 that should contain (somewhere) the original information & images:
https://web.archive.org/web/20130101...injection.com/
[END MOD EDIT]
You can tell the difference between 95 and 130A alternators by the number of holes between the webs of the case.
Looking at the photos above there are 2 holes where the 95A has 4.
To TheKirbyMan,
With the internal regulator of the 3G you just abandon the old one on the fender.
All the information you could possibly want is available on http://oldfuelinjection.com/ [MOD EDIT [url]https://web.archive.org/web/20130101021249/http://oldfuelinjection.com/ ]
FWIW, you can purchase a very well made 'plug 'n play' harness for the 3G conversion from Ryan at the above site if the wiring is too intimidating for you.
He even sells the alternators new and tested with any clocking you need.
(No interest, just a satisfied customer)
Hope this helps.
The Holley 45-258 12v electric choke element is available -Buy It Now-, on Ebay for under $15 to your door.
(not allowed to post a link, but the CarbDoc parts guy is in Long Island, NY)
You'll need to add a ground wire...
[MOD EDIT 7/10/2019 That site shut down several years ago, here is a link to a Wayback Machine archive from January, 2013 that should contain (somewhere) the original information & images:
https://web.archive.org/web/20130101...injection.com/
[END MOD EDIT]
You can tell the difference between 95 and 130A alternators by the number of holes between the webs of the case.
Looking at the photos above there are 2 holes where the 95A has 4.
To TheKirbyMan,
With the internal regulator of the 3G you just abandon the old one on the fender.
All the information you could possibly want is available on http://oldfuelinjection.com/ [MOD EDIT [url]https://web.archive.org/web/20130101021249/http://oldfuelinjection.com/ ]
FWIW, you can purchase a very well made 'plug 'n play' harness for the 3G conversion from Ryan at the above site if the wiring is too intimidating for you.
He even sells the alternators new and tested with any clocking you need.
(No interest, just a satisfied customer)
Hope this helps.
Last edited by ctubutis; Jul 10, 2019 at 08:45 PM. Reason: Link to wayback machine in place of oldfuelinjection.com
pedant
Joined: Jan 2008
Posts: 23,576
Likes: 38
From: EXTREME southwest CT
Hold on for a minute folks. I just discovered something that may change this up a little! My choke stopped working - but I have been having minor carburetor problems for a while, even before I did the change. I pulled the wire and got no voltage...I did a little investigating, and found that the choke is run off the "S" wire on the alternator https://www.ford-trucks.com/forums/8...hoke-wire.html. This might slow down progress a little, I will work on it tomorrow and get back to you. I think I will hook it up to the positive side of the coil, that should have about the correct volatge. I will let you know and update the thread when I find out.
I changed my element to 12V because I did not want to splice into my harness.
But in retrospect, you could also likely purchase a 1w resistor at Radioshack to drop the alternator output voltage from 12 to the 7.5 the Motorcraft element takes.
Thread Starter
|
Fleet Mechanic
Joined: May 2009
Posts: 1,460
Likes: 6
From: Bay Area, Unfortunately
Resolved!
Okay, you can run a wire from the batt side of the coil to the choke and it should work just fine. Sorry for the confusion, the last one I did was on a fuel injected Mustang so we did not need to deal with a choke. Sorry again for the confusion, I did not want someone upset that they now had a non working choke. Carry on!

Cargo Master

Joined: Mar 2008
Posts: 2,565
Likes: 207
From: Washington
Hold on for a minute folks. I just discovered something that may change this up a little! My choke stopped working - but I have been having minor carburetor problems for a while, even before I did the change. I pulled the wire and got no voltage...I did a little investigating, and found that the choke is run off the "S" wire on the alternator https://www.ford-trucks.com/forums/8...hoke-wire.html. This might slow down progress a little, I will work on it tomorrow and get back to you. I think I will hook it up to the positive side of the coil, that should have about the correct volatge. I will let you know and update the thread when I find out.
You will have full battery voltage at the coil unless you have a round coil with a duraspark 2 module on the fender wheel well.
You could add a ballast resistor in series to drop the voltage. Get the type that has 4 connections (70's dodge) as it will give you more choices to try.
The "S" output is off of one phase of the 3 phase winding and is half wave rectified, which will give you a half wave DC wave form.
Jim
PS, very good write up, thanks for posting it with photos