


Front Straight Axle Replacement?

Post Fiend
Joined: May 2008
Posts: 7,641
Likes: 21
From: Poway, Ca.
That could be. But if you want to look at it that way then the shims installed on the top are subject to tearing a wear because they are caught between to turning friction surfaces without the bearing to buffer the shear on them.
The installation diagram that came with the king pins directed that they be put where they are in the photo, which is a "before" photo btw.
I had the correct position conformed with the Suspension and Spring Shop who replaced my springs right after the new pins were installed, with the shims in this position, and he confirmed that that was correct. He was the one who asked me about installing the bearings flat side up. I got lucky and did that right despite no instructions on those.

Senior User
Joined: Jul 2008
Posts: 140
Likes: 2
From: New Plymouth, ID
I just tore down the front suspension on my '56... getting ready to replace springs and axle... Anyway... King Pins pushed right out and I'm planning on reusing pins and bushings as they were very tight before disassembly. As far as shims I had one on top below the dust seal and one above the bearing on the lower end of the king pin both sides... I believe the shop manual shows the same in diagram but not sure as it is out in the shop...
JB
JB
Senior User
Joined: Jul 2008
Posts: 140
Likes: 2
From: New Plymouth, ID
Well... upon further review... there isn't a diagram for half ton trucks and the diagram that closely resembles my setup on my F-100 is labeled as "500 thru 600 series" which doesn't designate any shims in the stack...
JB
JB
Elder User
Joined: Jan 2008
Posts: 658
Likes: 0
From: N.W. Mo.
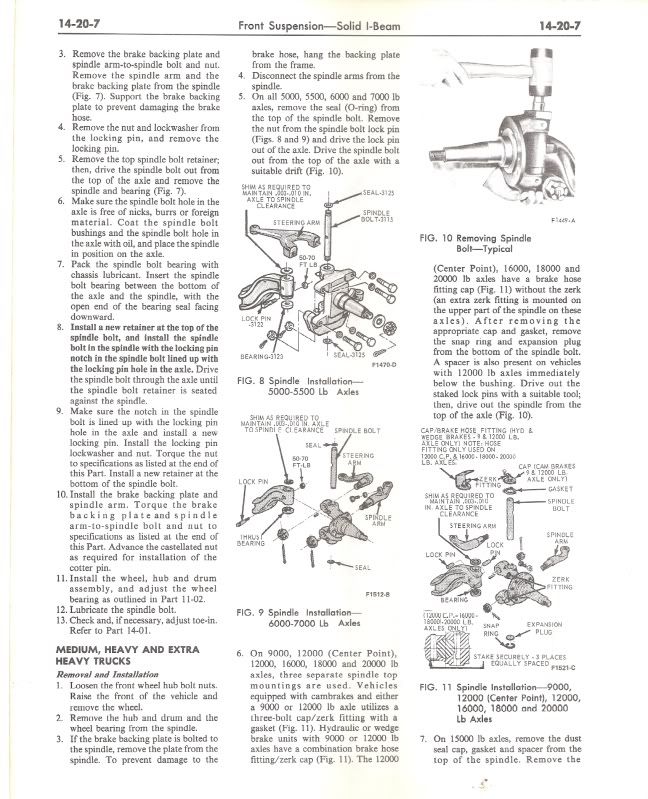
This is for a larger truck and later model but was what I came across first.
I hope it is readable. Scanning is sometimes a struggle.
I don't suppose it is critical where the shims are. Not really critical that they be there. They just take up some of the extra clearance if it is there. Sometimes they are not needed. They should not be installed to make a tight fit. If placed on top of the axle they will not be subject to wear as there should be a few thou. clearance.
As for the bearing. Without looking at a particular bearing I'm not sure what the flat side would be. Are they all made with the same physical features. The bearing should be installed so water does not run into it from the top. That may well be with the flat side up.
Post Fiend
Joined: May 2008
Posts: 7,641
Likes: 21
From: Poway, Ca.
EXCELLENT!
Thank you!
Ps Edit note: I read through the installation procedure as well. It appears as though they addressed which surface of th ebearing to install up (flat side) and down (open seal side). It looks like th elater manuals are a little better written than our earlier ones!
Thank you!
Ps Edit note: I read through the installation procedure as well. It appears as though they addressed which surface of th ebearing to install up (flat side) and down (open seal side). It looks like th elater manuals are a little better written than our earlier ones!
Senior User
Joined: Jul 2008
Posts: 140
Likes: 2
From: New Plymouth, ID
I'm getting a big pile of parts tomorrow so the front end should be done this weekend with any luck and a few bottles of propane for some heat! I went with a 3" drop axle from Sid and down and forward springs from MidFifty. Also planning on doing a disc brake upgrade so the total cost closely matches what one would pay for an IFS setup...
Bravo
Bravo
FTE Stories
Ford Trucks for Ford Truck Enthusiasts

Rezvani's Latest Post-Apocalytic Monster Is a Ford F-150 Raptor Underneath
Verdad Gallardo
Top 10 Most Expensive Ford Trucks Ever Sold on Bring a Trailer
Joe Kucinski
2027 Ford Super Duty Buyer's Guide (Every Model, Engine, & Package)
Brett Foote
Top 10 Ford Truck Tragedies
Joe Kucinski
AEV FXL Super Duty - the Super Duty Raptor Ford Doesn't Make
Brett Foote
Lobo Vs Lobo: Proof the F-150 Lobo Should Be Even Lower!
Michael S. Palmer
Ford's 2001 Explorer Sportsman Concept Looks For a New Home
Verdad Gallardo
10 Best Ford Truck Engines We Miss the Most!
Joe Kucinski
2026 Shelby F-150 Off-Road: Better Than a Raptor R?
Brett FooteThread Starter
|
Elder User
Joined: Nov 2008
Posts: 915
Likes: 1
From: Gunbarrel, Co.
I'm getting a big pile of parts tomorrow so the front end should be done this weekend with any luck and a few bottles of propane for some heat! I went with a 3" drop axle from Sid and down and forward springs from MidFifty. Also planning on doing a disc brake upgrade so the total cost closely matches what one would pay for an IFS setup...
Bravo
Bravo
Posting Guru

Joined: Aug 2000
Posts: 1,849
Likes: 0
From: S.C.
If you are using the down-n-forward springs you have to extend your drag link tube or get one extended and tie-rode extenders for the drop axle. I have some pics of the axle from MF in my gallery however, I took it out and put in a stretched original one. I was a very easy install..
I guess I took all the pics out except this one...

I guess I took all the pics out except this one...
Senior User
Joined: Jul 2008
Posts: 140
Likes: 2
From: New Plymouth, ID
Actually the extended drag link compensates for the axle moving forward the extended tie rod ends compensate for the spindles moving up from the dropped axle...
HD... looks like everything is on schedule so I should have some pics up this weekend...
Bravo
HD... looks like everything is on schedule so I should have some pics up this weekend...
Bravo
Hotshot


Joined: Oct 2004
Posts: 15,882
Likes: 88
From: Durham NC
If you used a 3" or less dropped axle, check the tie rod clearance, you may not need the tie rod extenders. I would suggest installing the HD tie rod from Mid Fifty while everything is apart, the stock one was rather flimsy and frequently bent or bowed.
Senior User
Joined: Jul 2008
Posts: 140
Likes: 2
From: New Plymouth, ID
My down and forward springs showed up yesterday... they look like good units... painted them at work and they're ready to be installed but I'm still fighting with the front shackle hanger bushings...
Waiting on the bushing removal tool from MF...
Bravo
Waiting on the bushing removal tool from MF...
Bravo