
replacing an outside cv joint boot


Thread Starter
|
New User
Joined: Jul 2007
Posts: 5
Likes: 0
replacing an outside cv joint boot
Hello thank you all for the help on the rotor problem, you all were right on the money, however I have a new question. I am needing to know what is involved with replacing an outer cv joint boot on the front right side of a 97 ford f-150 4wd. I couldn't find this in another post. Thanks again for the help.
Post Fiend

Joined: Feb 2000
Posts: 11,496
Likes: 6
From: Kansas
You are going to have to replace the inside one as well. In order to replace the outside boot you have to remove the inside. I would check into seeing if you can replace the entire half shaft instead of just doing the boots. Replacing the half shaft is as much work as replacing the boots (actually a bit less since you don't have to install the boots). Replacing the half shaft is not wildly expensive when you do it yourself.

Senior User
Joined: Mar 2006
Posts: 217
Likes: 0
From: Las Vegas, NV
I just replaced my CV axles. I would strongly recommend using FORD CV axles. I used an aftermarket CV axle on the passenger without any hickups, but the driver side was a different story. I went through 5 different aftermarket CV axles, all of them would bind when weight was taken off of the driver tire. I finally tried a FORD CV axle and it worked flawlessly.
The difference between the aftermarket and the factory CV axles is the number of ***** used in the joint. The aftermarket CV axles only have 4 ***** and the FORD CV axles have 6 *****.
The difference between the aftermarket and the factory CV axles is the number of ***** used in the joint. The aftermarket CV axles only have 4 ***** and the FORD CV axles have 6 *****.
Trending Topics
Postmaster
Joined: May 2003
Posts: 3,310
Likes: 9
From: E.Lincoln County, NC

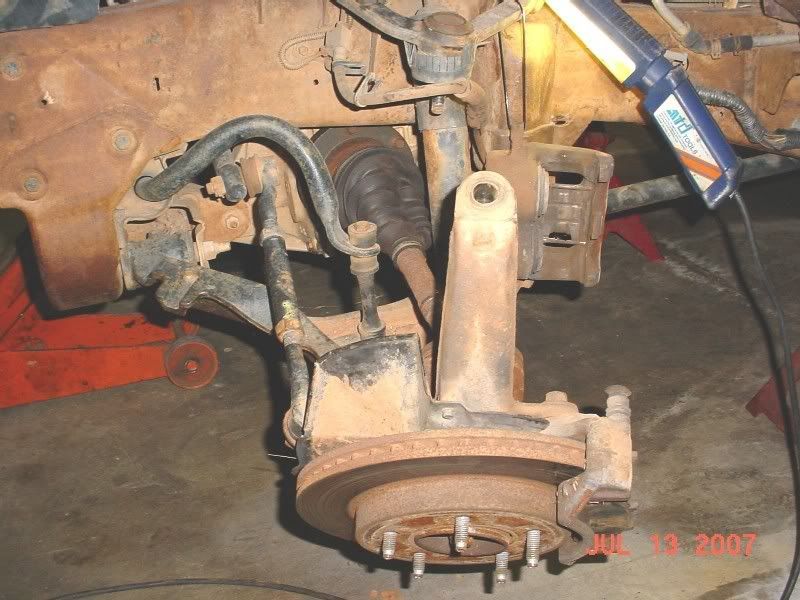
My left outer boot was all ripped up but as mentioned above I replaced the complete shaft. The main thing I learned from this job is to unbolt the half-shaft at the differential before popping the upper ball joint loose and swinging the hub out of the way. I didn't and it pulled the inner joint apart, making the shaft assy too long to come out. I cut the inner boot band and let the inner stub fall off, then it came out. How to?????
Jack up truck and put on STANDS. Remove front wheels, brake caliper( tie it up so it doesn't hang on the hose), remove the spindle nut. Unbolt the CV axle from the differential THEN remove the upper ball joint nut and pull the spindle towards you as you lift up on the upper A-frame.
I also had to unbolt the bottom of the shock and pull it out of the way so I could get the new shaft back in. The rest is the reverse of the disassembly. It took me about an hour to get it out and maybe an hour and a half to put it back. Posted a few photos here if you wish to take a look.
http://s11.photobucket.com/albums/a1...0pickups/TECH/
Last edited by ncranchero; Jul 19, 2007 at 12:56 AM.

Postmaster
Joined: May 2003
Posts: 3,310
Likes: 9
From: E.Lincoln County, NC
Originally Posted by jrm05261966
i had this problem and was told by the dealer the inside can be replaced but the outside cannot. I have a 2000 and it cost me about $500.00
Postmaster
Joined: May 2003
Posts: 3,310
Likes: 9
From: E.Lincoln County, NC
Originally Posted by jrm05261966
told by the dealer the inside can be replaced but the outside cannot.

Both boots can be replaced. You have to remove the shaft, disassemble the inner joint, remove the inner boot and then you can change out the outer boot. Boot kits are about $25 apiece.
Outer Boot Kit
Part Number: 8435
Manufacturer: PRECISION U-JOINT CORPORATION
OE Number F65Z3A331AA, F65Z3A331AC
Outer Boot Kit PJT * 8435 97-02 31.63 22.78 45.55
From Fords own Tech Resources site.
1. Remove the halfshaft from the vehicle. For additional information, refer to Halfshaft in the Removal and Installation portion of this section.
2.
CAUTION: Do not damage the boot.
Remove the boot clamps.
3. Separate the boot from the inboard CV joint housing.
4. Remove the retaining ring.
5. Remove the inboard CV joint housing.
6. Index-mark the inner race and ball cage.
7. Remove the six *****.
8. Remove the snap ring.
9. Remove the inner race and the ball cage.
10. Remove the inboard boot.
11. Remove the boot clamps.
12. Remove the outboard boot.
There are pictures that goes with this but you get the point.
")

Logistics Pro


Joined: Mar 2002
Posts: 3,877
Likes: 84
From: Wake Forest, NC
it's not entirely neccesary to remove the inner boot. The shaft is held into the outer joint by a circlip. Usually you can whack the outer casing with a dead blow hammer with a soft face and get it to pop off. It's good to do this anyway to clean out the grease, and you can pack the joint by squeezing the bag of grease in the hole the shaft goes into. It will force all the grease in, and come out around the *****. Becareful you don't rotate the cage too far, the ***** will fall out. It's like rubics cube to get them back in.

Thread
Thread Starter
Forum
Replies
Last Post
Stanislaw
1997 - 2006 Expedition & Navigator
7
Apr 15, 2015 10:02 AM
stevebigos
1997 - 2006 Expedition & Navigator
1
Nov 17, 2013 09:17 AM
Gregs69GTO
General Automotive Discussion
3
Mar 15, 2008 08:58 AM

