


Power Door Locks FIXED!!!!

New User
Joined: Sep 2006
Posts: 7
Likes: 0
Vettdvr don't worry its only against the law to deface and devaluate money. If you change it to make it worth more thats ok. (like machines that press pennys at tourist sites. The penny is now worth 50 cents) Sounds like you changed a penny in to 42 bucks good return on you money. Great site thanks guys.

New User
Joined: Aug 2006
Posts: 1
Likes: 0
This fix rocks!
We just fixed my dad's 2001 F-250 door locks. We used the aluminum foil trick and it works great. We did it slightly different. We were careful when drilling out the tops of the mushroom plactic studs. That leaves enough of the post so when you put it back together, you can take a soldering iron and melt the post to the surroudning plastic. We pop riveted the two holes with the original pop rivets and it holds strong. One other little trick we used is when putting the motor back together, we cut a piece of thin poster board about 5/16" thick and spread the brushes apart, then slid the motor together and then pulled out the poster board. Door locks work great, spend $0 and took about 2 hours on the first door and one hour (after learning our lessons on the first door) to finish the second door.

New User
Joined: Jul 2006
Posts: 5
Likes: 0
From: Orange, CA
Since I just bought my F350, I have learned my door locks also fail as did those discussed here. So tomorrow, I will do this fix as well. Now I normally have a hammer, screwdriver and cresent wrench among my most important (and only) tools so this should be fun.
Doug
Doug

New User
Joined: Aug 2006
Posts: 2
Likes: 0
Originally Posted by ssjrsw
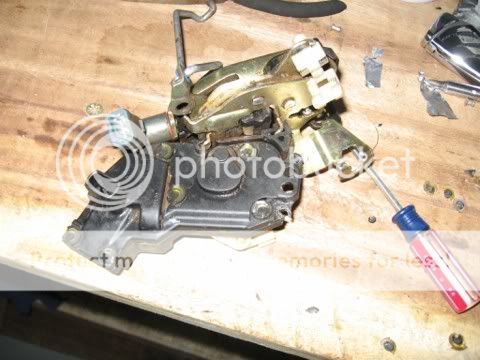
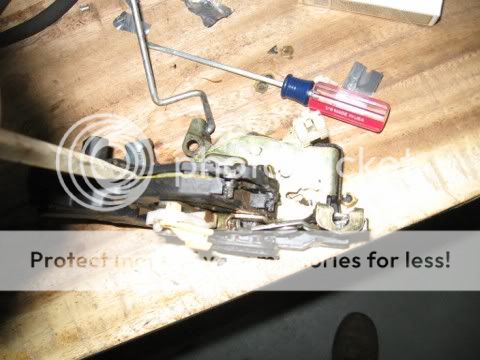
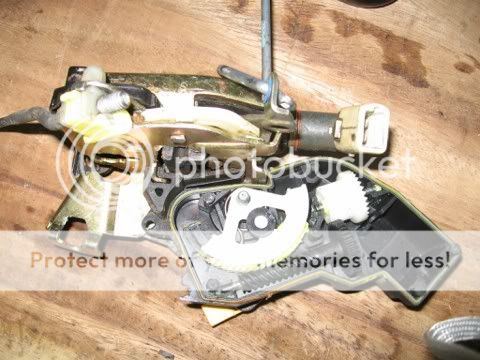
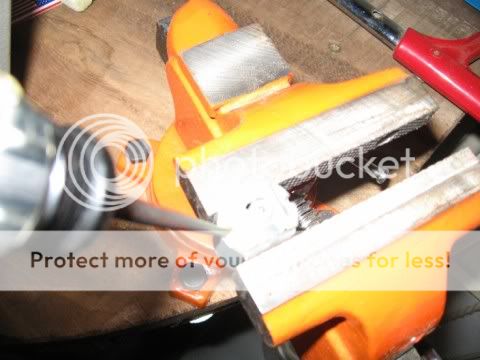
Thanks for the great info, this really works well! I took mine apart today and now they work like new. Here are some pics to help out with the fix, the are resized for dial-up (hey get high speed, I am in a third world country and have it!). I put this back a little different. I used that plastic epoxy stuff around the edges, I held the two halves together with vice grips until it was hard.
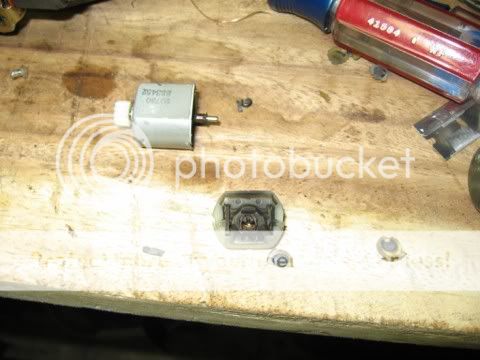
Pic one is the unit after the two rivits were removed
Prying the unit apart
The open unit minus the motor
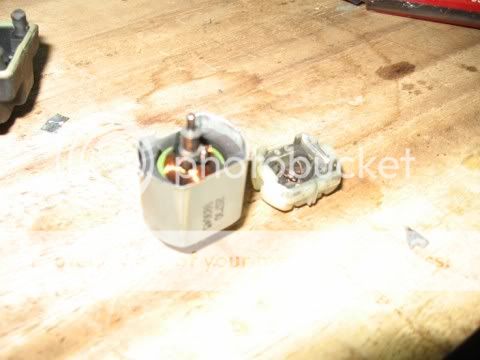
Prying the two tabs open on the motor
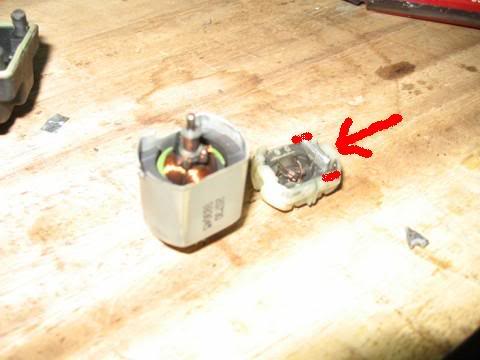
The opened motor the little metal piece to wrap in tin foil is on the left side of the cap
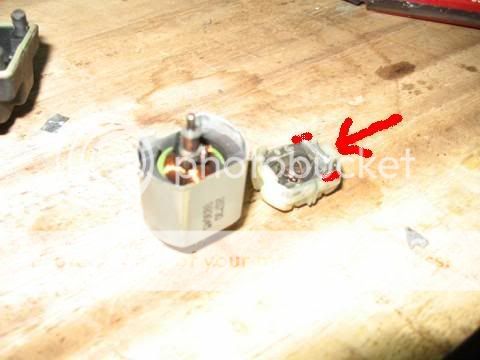
Now the motor getting ready to be put back together the part is wraped in foil on the right side in this pic.
Hope this helps
Scott
Pic one is the unit after the two rivits were removed
Prying the unit apart
The open unit minus the motor
Prying the two tabs open on the motor
The opened motor the little metal piece to wrap in tin foil is on the left side of the cap
Now the motor getting ready to be put back together the part is wraped in foil on the right side in this pic.
Hope this helps
Scott
Senior User
Joined: Jan 2006
Posts: 135
Likes: 2
I do not have other pics so I will show you with this one. Just remember to put the caps back on the same way they came off. If not you will have door locks that work backward like mine!
BTW I love the idea of tie straps to hold these together, wish I had thought of that myself.
BTW I love the idea of tie straps to hold these together, wish I had thought of that myself.
Of the next Riffraff East
Joined: Oct 2004
Posts: 8,679
Likes: 2
From: Concord NC

Originally Posted by ssjrsw
I do not have other pics so I will show you with this one. Just remember to put the caps back on the same way they came off. If not you will have door locks that work backward like mine!
BTW I love the idea of tie straps to hold these together, wish I had thought of that myself.
BTW I love the idea of tie straps to hold these together, wish I had thought of that myself.
New User
Joined: Aug 2006
Posts: 2
Likes: 0
hey thanks the computer that i was on earlier wouldn't show the pictures but my one at home does. I guess my computer at work has a pretty tough firewall or something. thank you everyone for your help.
FTE Stories
Ford Trucks for Ford Truck Enthusiasts

Top 10 Fords at 2026 Carlisle Ford Nationals
Joe Kucinski
3 Best / 3 Worst Parts of Modern Ford Ownership
Brett Foote
10 Amazing Upgrades That Solve Common Ford Truck Owner Headaches
Pouria Savadkouei
Every 2026 Ford Engine Explained
Brett Foote
10 Ugly Ford Trucks That We Still Kinda Love
Joe Kucinski
10 Things Every Truck Owner NEEDS (2026 Edition)
Michael S. Palmer
Rezvani's Latest Post-Apocalyptic Monster Is a Ford F-150 Raptor Underneath
Verdad Gallardo
Top 10 Most Expensive Ford Trucks Ever Sold on Bring a Trailer
Joe Kucinski
2027 Ford Super Duty Buyer's Guide (Every Model, Engine, & Package)
Brett Foote
New User
Joined: Jul 2006
Posts: 5
Likes: 0
From: Orange, CA
Well, I got the door panel off easily enough.
Got the three torx screws off too.
Got the outside door handle off.
Got the linkage unhooked.
Sounds OK so far, right?
But I just can't seem to get the electrical connection to come off.
How does this come off? Is it all a feel thing or can we actually see what we are doing?
Doug
Got the three torx screws off too.
Got the outside door handle off.
Got the linkage unhooked.
Sounds OK so far, right?
But I just can't seem to get the electrical connection to come off.
How does this come off? Is it all a feel thing or can we actually see what we are doing?
Doug

New User
Joined: May 2006
Posts: 15
Likes: 0
Thanks to all who kept posting on this topic. If just one or two had said they did it, I would have just figured it was too hard for me to do. Its pretty simple, even after I did everything wrong, it still only took a couple of hours to do passenger side front and rear doors of my CC f350. Actually I took my passenger rear one on and off 4 times, because I had the plastic cap on backwards first, and then after testing the button a zillion times my motor was getting weak. Of course I didn't know it until it was too late...
My tips... If you don't have to take the actuator all the way off and onto your table... don't. I just did it while the wiring was hanging out through the interior door panel opening. Just remember to use all the holes available to observe what you are doing in the panel, when putting rods/wiring/screws/bolts in place.
Like others... I didn't open the metal rivets, but just popped open the plastics ones near the actuator motor. The hardest part for me was getting the small white gear that contacts the actual motor gear in its place. For me it was best to have the black gear, and this white gear (that likes to flop around inside) in place first. Then place the motor in its place with the teeth lined up. Close cover and place a zip tie around the cover near the motor.
The first door is the worst door. Everything else is downhill from there.
New User
Joined: Jul 2006
Posts: 5
Likes: 0
From: Orange, CA
Thanks for the added assurance that this really can be done and that it takes persistance and a bit more time than I was willing to give it at first.
As for trying again today, I didn't. I will tomorrow.
Today, well I had to change lug nuts of all things. Why? Because I bought stock aluminum wheels to replace my ugly steel wheels. The steel wheels come with gigantic lug nuts that make putting on the center caps impossible unless they are replaced. Wheel Warehouse, in Anaheim, got me the smaller lug nuts and even put them on for me (They clearly saw that I was too old and apparently too frail for such a job) and sure enough, the center caps went on with no sweat. Both of them did. Now, I just "won" a third on Ebay and a fourth is coming up tomorrow.
Customizing a 1990 to look stock. Bet no one else ever has gone to so much trouble to do that!
Doug
