When you click on links to various merchants on this site and make a purchase, this can result in this site earning a commission. Affiliate programs and affiliations include, but are not limited to, the eBay Partner Network.
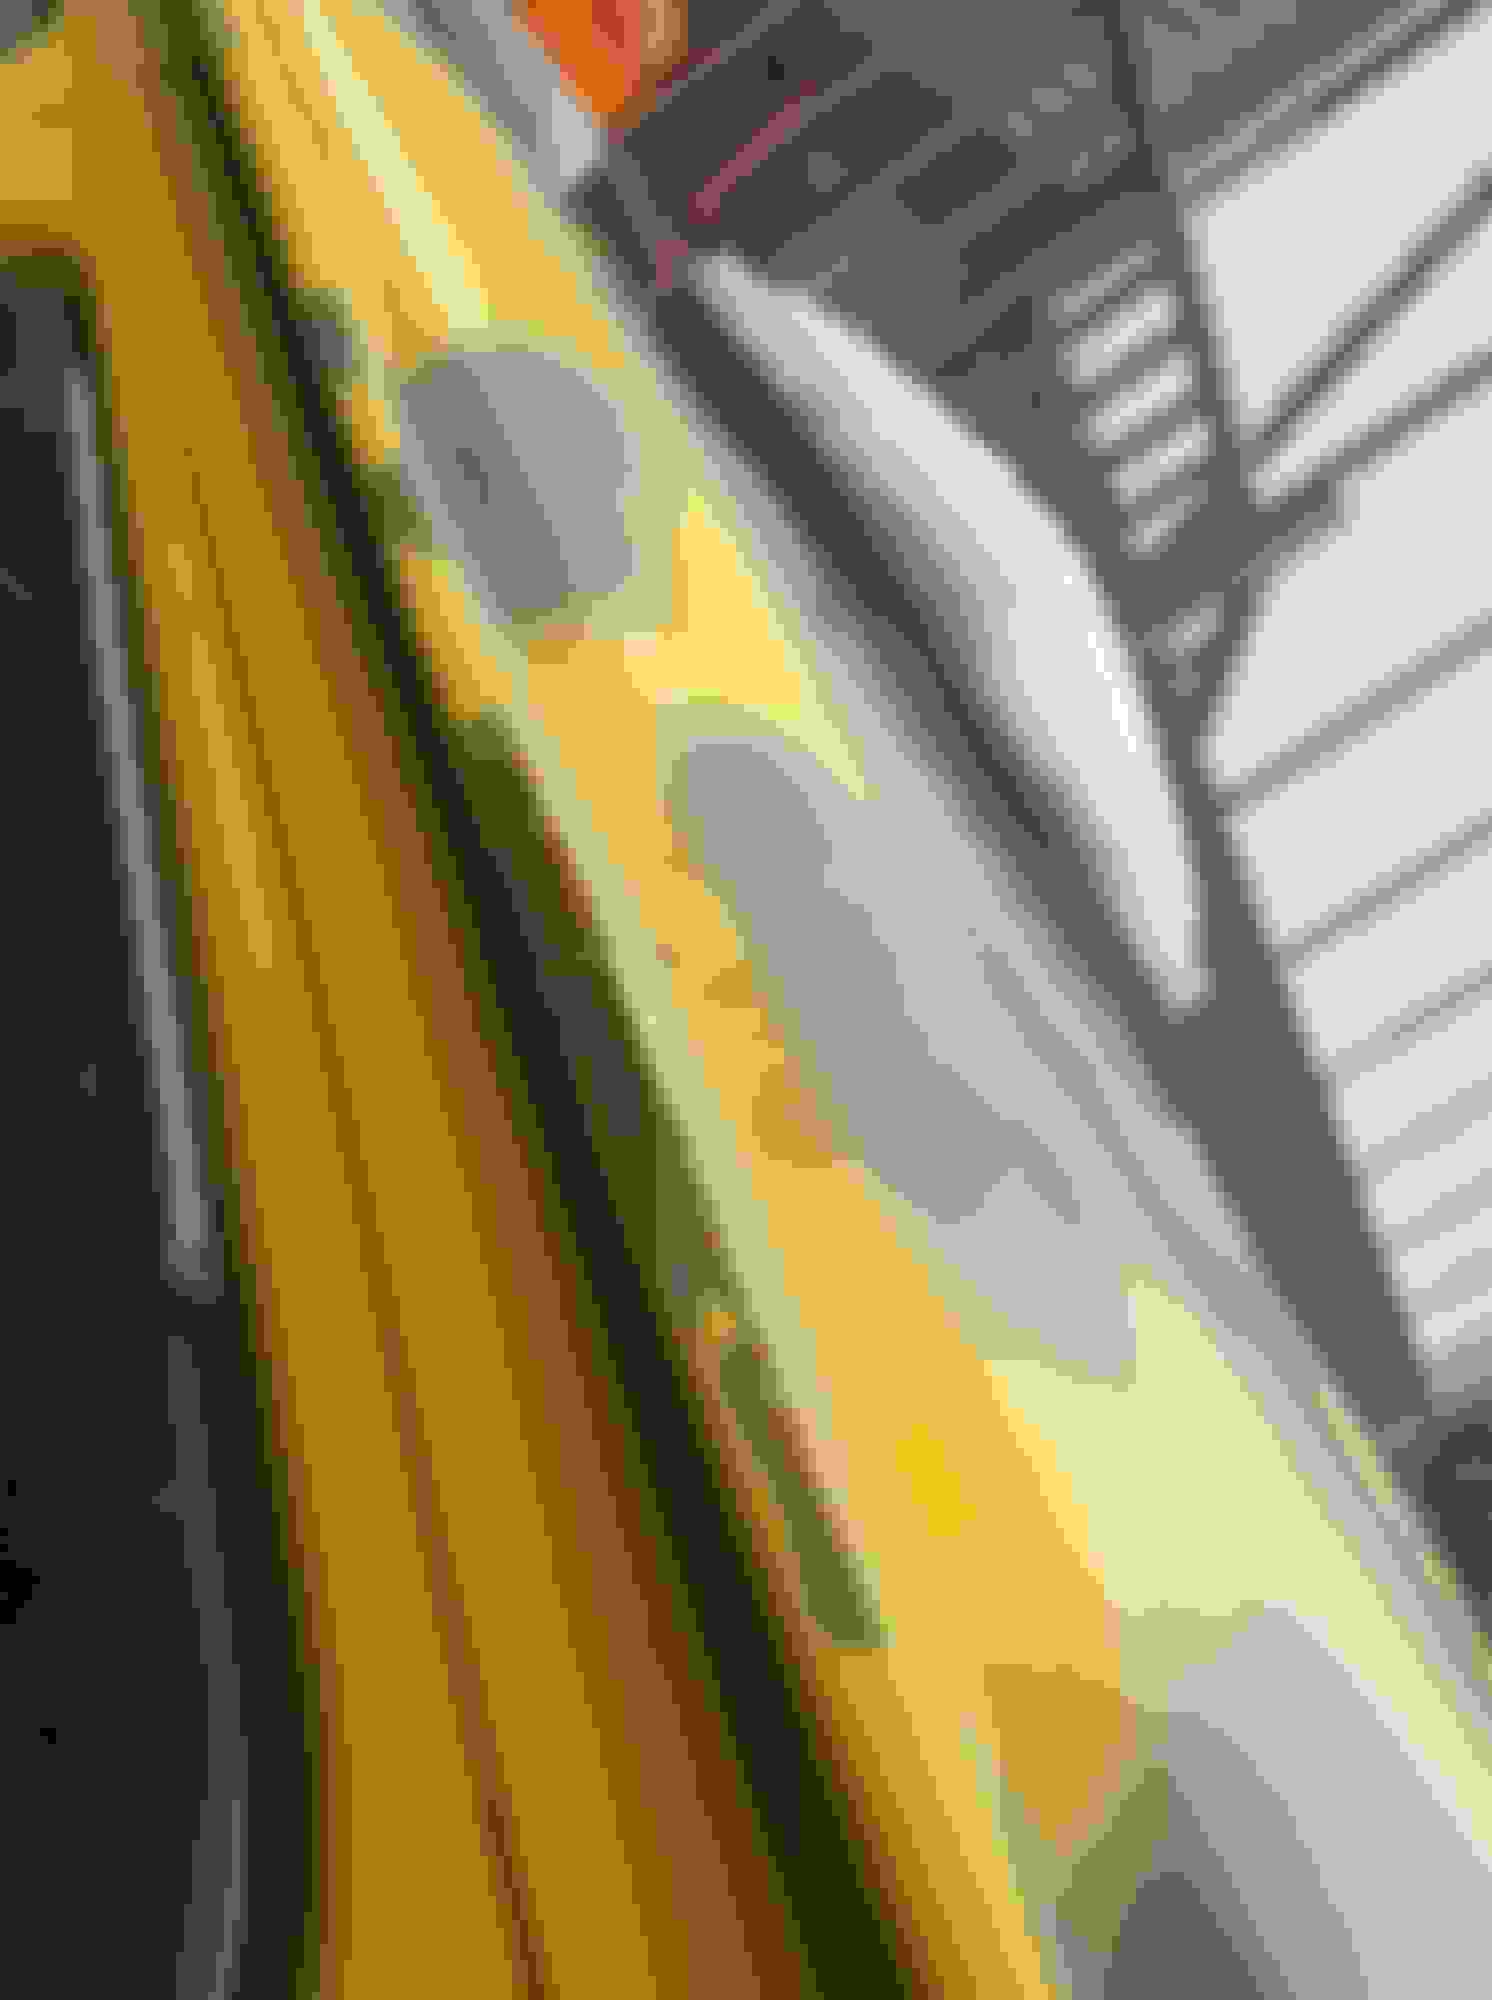
I have a van gutter that has a few rust spots and it looks as the gutter filler/sealant is hard and cracked where the rust spots are. See pictures..
What do you use/ have you used in the past?
When is it ok to fill in gaps/ patch?
When should you replace the whole sealant?
and When/if you replace the whole gutter sealant, what is the best method to remove the old?
I was sanding this rust off when it decided to rain on me.... wish i had a garage..
the worst spot, i have already removed some of the old gutter filler sealant to evaluate the rust condition.
Last edited by wcwinans; Jun 13, 2018 at 11:53 AM.
Reason: forgot somehting
Well mine has a couple of spots that are starting to concern me and I want to get right on them as they can spread fast. I don't have a pic of it but I found a place under the gutter that looked like rust. I used a small screwdriver and poked a little hole through it... Mine is a raised roof van and the trim molding sits right down in the gutter.
I do not know about your van gutters but mine doesn't seem to have any sealer at least going up the sides of the windshields.
My plan is to remove the raised roof trim and temporarily just put the screws back in to hold the roof in place.. Then I am going to use a dremel tool with a wire wheel to work down inside the gutters and any other places that need it. The reason for the dremel tool is it is small enough to use and not damage the surrounding paint that is still in good shape. I do believe they filled part of the gutter with the sealant used for the raised roof trim and i will remove all of that..
You should just go a head and remove all the old sealant so you can get in there, clean it up and do a permanent fix.
I plan to clean the gutter out, wire wheel it, use some OSPHO rust converter on all areas that show rust. The ospho is very thin so I am going to mask off any areas where I don't want it to touch the good paint. On those seam joints I will use something like a wet cotton ball or small artist brush to get enough in the seam to flow inside it but still not drip down the side of the van..
I will try to find the article about using Ospho but I remember it said do not let it dry on the metal before you rinse it off with water.
I am going to use rest-oleum self etching primer and then spray over it with several coats.
Any place where the rust comes through to the bottom of the gutter, I guess I will use body filler as it can be sanded and painted over.. Then I will use a good sealant to fill the gutters. In my case since the raised roof trim fits down in the gutter, i may just completely fill the gutter and let the trim rest on top of it before it hardens.
After I used the Ospho I rinsed it off, sanded it lightly, wiped it down with denatured alcohol, used a heat gun to make sure all the joints were dry, then primed and painted.
I found this place at the bottom of my passenger door under the weatherstrip. At first it was just a little place till I flaked some of the body filler off.
Flaking more body filler off I found more.
This is after I sanded, Ospho, rinsed with water, sanded again, wiped with denatured alcohol, and primed it..
Notice I sprayed several coats of primer to get it to fill the seam where the outer skin laps over the inner door. i really should have used seam sealer putty then primed.
Mask off and paint
Finished and it still looks great a year and half later
i had a small rust area where the dog house seals to the lip. This is after using Ospho and sanding the area. The black area is where the Ospho converted the rust and I had wiped it down with denatured alcohol. The area was pitted or dimpled from where they bent the metal somewhat so it would not sand down smooth.
Ospho causes iron oxide (rust) to chemically change to iron phosphate an inert, hard substance that turns the metal black. They say you dont need to clean the area or sand it but i did for a better look.
So clean out the gutters. Wire wheel them... Use the Ospho... rinse it off in 3 or 4 hours before it dries... Wipe it down with denatured alcohol... fill any bad places with body filler and let it dry enough to where you can sand it smooth in any places you need to... Mask off the area, prime, and paint...
That's exactly what i had been doing already, but instead of ospho i used a different phosphoric acid rust dissolver and inhibitor. I had even been using the same self etching primer. I don't exactly know what etching really means nor why is it important, but I got it. Before I hit it with the primer though i typically put a small layer of rustomlium rust converter after I wipe it clean. On the body of the vehicle on the outside, I had just been using sandpaper to clean the area of the rust and then using a bottle of touch-up paint to cover the metal.. should i have used another step in there? it seemed like the easiest thing to do was just use touch up paint. I wonder if they made touch up bottles of the primer..
here are the body spots.
My gutters also are free of sealant by the front window but the previous owners did put sealant up there, im going to have to do some research and find out what I good brand would be to fill in the gaps. I think i will use my dremel and a ladder to get the bad sealant and rust out then fill in the remainder with new after i treat for all the rust.
btw, i did exactly the same thing to my doghouse lip yesterday, its got primer on it now, but the custom yellow paint i got from NAPA in the spray aerosol can would not spray yesterday. Ill head over back to NAPA on my lunch break today and see if they cant correct that problem.
A little long winded here but wanted to get the point across ...
Also as to the dog house... I used a mirror to look under the lip and see if there was any ruse on the underside..
Keep in mind that I am far from a painter and my advice for this is just from what I have researched.. Another thing is since my van is 30 years old, the idea for me is to keep the rust from taking hold and becoming a full blown cancer. I assume that is what you are trying to do also...
First I have read that if you use Rustoleum and later want to have the van professionally painted, that the Rustoleum needs to be stripped off because many automotive paints don’t adhere well to it. If I was planing on repainting the whole van in the future I would probably go to a professional automotive paint store and buy the products they recommend...
So I chose Rustoleum... The self etching primer has a acid in it to help prevent rust and help it adhere to bare metal. It may be similar to phosphoric acid but I am not sure. I chose the Rustoleum enamel finish coat paint simply because I assume it is chemically compatible with the Rustoleum self etching primer.
IF you were sand blasting or sanding down to bare metal and had have no pits, seams, or gaps that could have any rust left in the metal, you can just use the self etching primer and then paint over it... If there is any rust left in pits or cracks, the rust will continue to grow and eventually come back. This time though it will probably show up as a bubble under the paint and will probably be deeper into the metal by the time you discover it. That is why I used the phosphoric acid, to get in the cracks and crevices that I could not get to with sanding or a wire brush.
If you were working say under the van on the frame or some other area that will not be seen, I have read that you can just use the phosphoric acid, rinse it off after it has dried, and paint over it. Some people say you don’t even need to paint over it...
Since we are working on areas that will be seen, and you want the primer and paint to adhere good as well as look somewhat presentable, here is what I came up with from research...
Clean the area, sand, wire brush, or both. Apply the phosphoric acid but do not let it dry quite all the way before you rinse it off. If it does dry then coat it again with the phosphoric acid as that is supposed to react with the freshly dried phosphoric acid making it so it can be cleaned off.
In my case I used a damp rag and wiped it off so as to not get too much water down in the seams/joints, ect.
On the door panel I was working on, the bottom of the outer door panel is folded up over the inner panel and spot welded to it. At the factory they used a seam sealer and them primed and painted over it all. Since I had to scrape off the seal sealer, that left a open seam where water could run down inside the seam which would be bare metal.
I wire brushed and sanded the rusted area and wiped it off with a dry cloth. I would have used the compressor but being such a small area, I didn’t want to drag out the compressor , hose, and all.
I used painters tape and mask off the surrounding area so the phosphoric acid would not get on the good paint. I put on rubber gloves and then dipped a rag in the phosphoric acid. as I applied the phosphoric acid I pressed the rag in at the seam to let some of the phosphoric acid run down into the seam in hopes it would soak down inside and cover any rusted areas I could not see. I could have used a brush or spray bottle but was trying to avoid getting the acid everywhere.
To rinse it off I just used another rag dipped in water and wiped it down. I then used a blow dryer/ heat gun to dry the area and I immediately wiped it down with denatured acholol then applied the first coat of self etching primer. I applied several coats of primer in order to seal the seam. In the future I will use a automotive seam sealer before the applying the primer. The seam sealer was ridiculously expensive for a little tube at the part store. I will order some on line before I do the next repair on a seam or joint.
I have two other places on the side panels. one where I think a shopping cart hit the side and flaked the paint and another where a drunk neighbor fell into the passenger door (thats a whole other story). But they both have chips and have started to rust. There is no seam so I plan on just masking off as small of an area around them as possible and the sanding them down to bear metal. Since it is a flat surface and just surface rust, I may be able to get by with just using the etching primer. If there is a little pitting where I do not think the sanding got down to it, I will use the Ospho first.
After priming I will remove the painters tape and reapply it maybe a 1/8 or so farther out away from the primed area, lightly sand the primer, and then apply the enamel paint and see how that works. The plan is hopefully it will be one of those places you don’t notice unless you are looking for it.
In your case with those spots around the windshield, that may be problematic.. The rust is probably also under the windshield trim. That trim just snaps off (well you need to find out how).. There are little retaining clips that the molding snaps onto. There are 2 or 3 different types of clips that i know of but I am not sure which one is used on our 88 vans. I will get you some info on that as I would like to know for myself! Getting the trim off without bending it can be a little tricky but once you get the hang of it, its not a problem. The molding just snaps back on. If any of the clips are rusted they can easily be found online or perhaps in the help section of the parts store.. The main point though is that you probably have rust under the trim and if you don’t repair it, it can lead to serious problems like rusting through and leaking inside the cab..
You should look up some videos or info on how to remove and install “Ford” windshield trim. Its not difficult but you just need to know the trick to avoid bending the trim
Here is a video about two different types of clips. I would bet we have the ones that clip onto the little posts
I have used epoxy putty many times on small body repairs with good results �. it is much stronger and lasts longer than automotive body filler, easy to mold into shape, and can be sanded, filed, or ground down once cured. I would think it would be a good choice for small gutter repairs. I think JB Weld makes a water-proof version.
Silicone is a VERY bad move, Silicone eats the sheet metal, and you will cross contaminate any where you touch and will never hold paint!
The Silicone patch may look good, But give it three years and you can easily drive a screw driver through the silicone and the metal under it......
Just look back at all the people who siliconed the windshield and wondered why the windshield frame rotted anyway....
Somewhere I read or posted about a new sealer that is commonly used on RV's that several [people recommended but i cant find it. RV's flex a lot more then our vans ever will and it can be painted.. 3M makes a product just for the rain gutters and it comes in a calking tube. I rad to use a popsicle sick to spread it out and push it down into the seams.
Thanks econovan fan,,, that may work great.
i would go around the van and check all the door seals and seams around them for rust too. I think my driver door has a small place under the door seal at the bottom now too. I saw a little crack in the painted seam sealer that appears to have a little orangish red tint so i will have to check that out.. The rear and side doors appear to be fine but there are cracks in the painted seam sealer.. I have also noticed at some seams around the door frame, ford used a tape over the seams.
here are some problem areas as the cracks will allow moisture inside under the paint. I may try to chip some off in areas where a repair wont be seen and see what is under these spots. If there is no rust or signs of rust under the cracked areas,,, perhaps a little sanding and painting back over the cracks might be a temporary fix to avoid rust starting..
So just a quick update, I wire wheeled the top of the van where i could see rust bubbles and hit it with a rust reformer/primer. I plan to paint this top white when im finished. I'll be wire wheeling out the gutter rust spots and refilling them with either of these two caulks.
it actually looks quite unique! You cold hide out in the mountains during the fall when the leaves turn yellow...
Something i was thinking about is with the amount of painting you will be doing, you might want to think about buying some automotive paint an primer if you haven't gotten too far along.. I know i used the Rustoleum enamel finish coat paint and primer because I was doing repairs in areas that are not really seen and are not in direct sun all day. That's not saying that the Rustoleum will not work. Searching around the internet many people say if you prep the surface really good that you will get a good 5 years or more before it starts fading. Others say much longer if the car in under a cover of some kind.
I guess one needs to consider what they want to spend and what the future plans are.. i checked the paint under my door today and it still looks shiny and new... Since the original seal sealer is cracking in some places around my doors, I will probably chip it off and use the same method I used for the first repair but this time use the seam sealer first. i am debating though on what paint to use on the drip rails ie, gutters.
Thinking if I used the same type paint that ford used, it may last much longer...... the again if the Rustoleum will last 5 to 8 years before it starts fading or pealing, that is 5 to 8 years down the road and who knows what will be going on by then. I would think as far as the gutters go,, the sealer and primer is the most important. As long as the sealer and primer are in tact, it would be a simple job to just and it a little and repaint, if it needs it, again if it needs it...
I think the point we are both trying to achieve is to stop the rust now before it gets out of hand and also end up with something that matches fairly well. Even buying the exact paint color ford originally used on the van, the paint would never match because the old paint has faded. I don't think a slight color difference would really show up that much if you painted the roof and mask it off at the bottom of the rain gutters.. It doesn't show up under my door where the new paint meets the old paint. Of course the paint under the door has never been in direct sunlight.
If you are interested in checking into buying some touch up automotive paint for some of the areas you need to repair, the paint code in on the sticker inside the drivers door frame. You can search the paint code + year and find an exact match... My paint code in 9M 1988 Ford econoline.
I may be wrong but i believe your van is a 1990? If so then your paint color may be on this chart.. If it isn't a 90 then just click the correct year.
I am going to tkae a guess and say that your exterior paint code is 6N 1990 Color Codes - Ford Paint Cross-Reference
Yes thats exactly what I'm doing, just trying to stop the rust. Well I'm learning alot along the way too, but for me, I think I'll use something not expensive. I plan on painting the roof white and adding a roof rack to it soon. The quarter panels where I had been patching with fiberglass (Bondo hair) will be covered up with truck bed liner. I will then work on undercoating better the underbody and replace the busted exhaust parts. Rplace the back bumper after the truck bed linning. I thought about taking off the exhaust manifold and painting it. I need to clean the engine .it looks like there may have been an oil leak at one time.
Some more stuff will pop up I'm sure too. But all involving rust. I went down to Napa and had them mix me up some of the custom fleet yellow from my 1989 door paint code. It worked good, just under 20 for a spray can though. Do you know anywhere that I could get a good deal on white paint for the roof?
On those rain gutters I remove all the old seam sealer all the way around the roof. If there isn't rust now there will be. The old seam sealer shrinks, gets hard and lets moisture get in under it and rust out the gutters. I use a wire wheel and some other cleaning disc to clean them down to the bare metal. It's not cheap but I use POR-15 products. The prep products clean and convert any left over rust. I then use POR Patch and put a coat in the entire gutter. Then coat the entire area with POR-15. Doing this seals it all and eliminates the need for seam sealer. And no more worries about any future rust. And after the POR-15 use either their high build or self etching primer and then you can paint the body with anything you want.
The POR Patch also fills in any small rust pin holes. On the slightly larger rust holes that aren't easy to cut out and weld in new metal, I use the POR Putty. This works great on the rust holes around the windshield. I hate using body fillers on holes. Eventually they will all fail or cause the rust to get worse. If you can't weld in some patch panels then panel bonding adhesive works great.
I avoid using rustoleum on any exterior body panels. It will need to be chemically stripped off, if you ever want to repaint it. Trying to sand it off can be a nightmare. Lots of gummed up sand paper.
What method do you use to remove the old seam sealer? Does freezing it with dry ice (or something similar) make it easy to chip out?
What method do you use to remove the old seam sealer? Does freezing it with dry ice (or something similar) make it easy to chip out?
I scrape/dig out what I can with whatever I can get to fit in there ( usually just a standard screw driver ) . Then I use either a angle grinder or drill with wire brush wheels or some kind cleaning/stripping disc. 3M makes a bunch of different disc that do a good job.
Haven't tried the dry ice on rain gutters. I've used it on floor pans for the asphalt insulation crap.Dry ice, then hammer time and shards/chunks of broken insulation bouncing all over.
Rezvani's Latest Post-Apocalyptic Monster Is a Ford F-150 Raptor Underneath
Slideshow: Called the Fortress, the 850-horsepower pickup combines Raptor underpinnings with military-inspired features, survival equipment, and a starting price of $285,000.