


Paint job ideals?

Thread Starter
|
Senior User
Joined: Jun 2013
Posts: 276
Likes: 1
Paint job ideals?
Posted this in the Large truck Section, but then seen there was forum for paint and body. So putting it here thinking it may get an answer.
Hope to have our 1987 F800 ready to paint by next summer. Have an ideal what I want to do with it. But as always open to ideals. Never know someone may have an ideal that knocks mine out. And not going to say that would be a bad ideal.
Always loved the Old School Peterbilt Tri color paint jobs and the factory 2 tone ones. Something like this.
Link to the one I like. Retro paint jobs - a gallery on Flickr
Ideal is to get it to look good with this in tow.
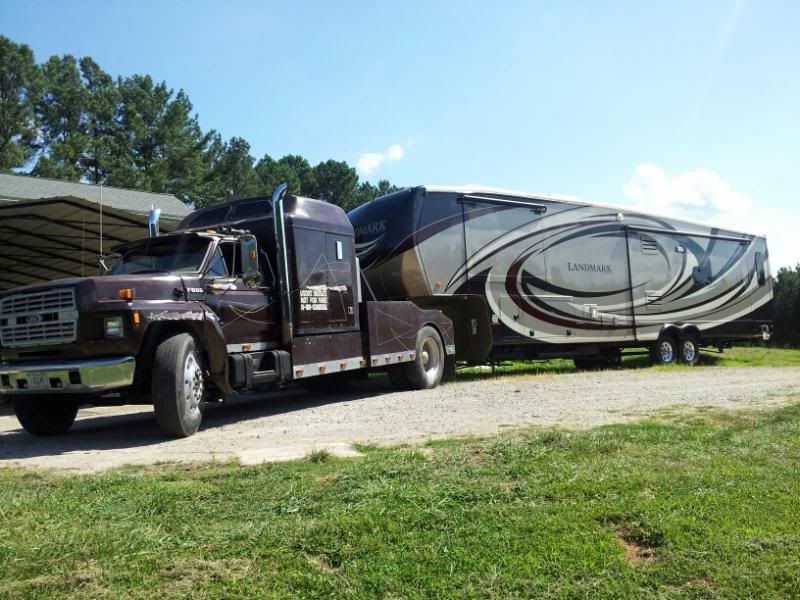

So if you have an ideal or layout that would look out of this world with the camper. Give me a heads up on it. Will say not looking to match the swirls on the camper. But more like the Fenders and lower the dark color and then the middle the main body color of the camper. Then top of the cab and sleeper and sun Visor the dark.
Forgot to add the truck is now a dark Brown somewhat like the dark brown on the camper. And thought about just putting a roll on bed liner on it . And leaving the old rough paint. Back sides of the sleeper don't match that well. For some reason the color does not match on that.
Pete
Hope to have our 1987 F800 ready to paint by next summer. Have an ideal what I want to do with it. But as always open to ideals. Never know someone may have an ideal that knocks mine out. And not going to say that would be a bad ideal.
Always loved the Old School Peterbilt Tri color paint jobs and the factory 2 tone ones. Something like this.
Link to the one I like. Retro paint jobs - a gallery on Flickr
Ideal is to get it to look good with this in tow.
So if you have an ideal or layout that would look out of this world with the camper. Give me a heads up on it. Will say not looking to match the swirls on the camper. But more like the Fenders and lower the dark color and then the middle the main body color of the camper. Then top of the cab and sleeper and sun Visor the dark.
Forgot to add the truck is now a dark Brown somewhat like the dark brown on the camper. And thought about just putting a roll on bed liner on it . And leaving the old rough paint. Back sides of the sleeper don't match that well. For some reason the color does not match on that.
Pete
Thread Starter
|
Senior User
Joined: Jun 2013
Posts: 276
Likes: 1
Also need to make a list of Materials to get gathered up before getting started. So I know I need.
New Mask for painting and fiberglass work.
Tape, Masking paper or news paper.
Fiberglass and resin
Bondo, the green stuff to pin holes and low spots been years without using any of it.
Tack Cloth
Wet/Dry sand paper not sure of what sizes in total?
I have 4 HVLP sprayer and 2 normal guns and a Turbine HVLP sprayer also. Spray lots of wood products I build.
Admom


Joined: Feb 2001
Posts: 9,414
Likes: 201
From: Silver Springs

The ones you linked to look good but the lines are too straight to go with that camper. I think it would look cool if you could follow the swirl of the camper coming down with the tan and swirling back up.
Very nice setup.
Very nice setup.
Thread Starter
|
Senior User
Joined: Jun 2013
Posts: 276
Likes: 1
We like the camper a lot and the truck I smile each time I drive it. Even though right now its a piece of crap. And tires bounce like crazy. But with time and $$ along with lots of work. I think it can be turned into one of the nicer hauler trucks around.
Pete

Freshman User
Joined: Mar 2010
Posts: 48
Likes: 0
From: NEK Vermont
Awesome set-up! When I look at the combo I see the roundness and curves of the 5th wheel and the chiseled look of the truck. That is going to be the key. Making them blend together in a seamless way. Like you had mentioned, I would use the curves from the paint on the 5th wheel not so much the swirls and blend them onto the truck. When you have the truck bodywork and primer finished, hook it on the 5th wheel in order to tape the truck up to match the color separation lines from the camper to the truck. I see an awesome radius in following the camper down the side of the truck and arcing back up the truck onto the hood, matching the front face of the camper. I also see the difference in the layout of both sides of the camper reflecting onto the hood of the truck. I also see accents of the two accent colors on the camper transposed onto the truck along with the two primary colors. I see the vision very clearly in my head. It looks awesome! The geometry will be relatively easy carry over from the camper. It will take lots of paint! I would also contact the camper manufacturer to get the paint codes to get a nice match in color tones. As far as supplies, you will need a lot of tape. I would also get the plastic mask for masking large areas of the truck while painting the other colors. I would also recommend wax/grease remover. Several rolls of fineline masking tape for the arcs. And lots of sandpaper! From 80-220 dry for bodywork prior to prime. 320-600 grit wet/dry prior to basecoat and 1000-2500 (sometimes 3000) grit wet for wetsanding and buffing. Quantities of the above amounts would depend on how much bodywork is needed. It doesn't appear to be much from the pics. Also, when using body filler over fiberglass, I usually use fiberglass reinforced filler over the fiberglass (you do not HAVE to, I just like to). Then you could use plain polyester filler over that. Followed by the smooth "icing" for pinholes and the like. What I see is insane (by insane I mean very, very cool!)!! Sorry for being so longwinded! I am a professional restorer (semi-retired now), I've had my own shop for a little over 25 years. When I see projects like this, I just get all wound up! It is an illness my wife tells me! If you really want to get crazy, I have some cool airbrushing ideas. Where are you located if you don't mind me asking? I would love to stop by and take a look!
Thread Starter
|
Senior User
Joined: Jun 2013
Posts: 276
Likes: 1
Awesome set-up! When I look at the combo I see the roundness and curves of the 5th wheel and the chiseled look of the truck. That is going to be the key. Making them blend together in a seamless way. Like you had mentioned, I would use the curves from the paint on the 5th wheel not so much the swirls and blend them onto the truck. When you have the truck bodywork and primer finished, hook it on the 5th wheel in order to tape the truck up to match the color separation lines from the camper to the truck. I see an awesome radius in following the camper down the side of the truck and arcing back up the truck onto the hood, matching the front face of the camper. I also see the difference in the layout of both sides of the camper reflecting onto the hood of the truck. I also see accents of the two accent colors on the camper transposed onto the truck along with the two primary colors. I see the vision very clearly in my head. It looks awesome! The geometry will be relatively easy carry over from the camper. It will take lots of paint! I would also contact the camper manufacturer to get the paint codes to get a nice match in color tones. As far as supplies, you will need a lot of tape. I would also get the plastic mask for masking large areas of the truck while painting the other colors. I would also recommend wax/grease remover. Several rolls of fineline masking tape for the arcs. And lots of sandpaper! From 80-220 dry for bodywork prior to prime. 320-600 grit wet/dry prior to basecoat and 1000-2500 (sometimes 3000) grit wet for wetsanding and buffing. Quantities of the above amounts would depend on how much bodywork is needed. It doesn't appear to be much from the pics. Also, when using body filler over fiberglass, I usually use fiberglass reinforced filler over the fiberglass (you do not HAVE to, I just like to). Then you could use plain polyester filler over that. Followed by the smooth "icing" for pinholes and the like. What I see is insane (by insane I mean very, very cool!)!! Sorry for being so longwinded! I am a professional restorer (semi-retired now), I've had my own shop for a little over 25 years. When I see projects like this, I just get all wound up! It is an illness my wife tells me! If you really want to get crazy, I have some cool airbrushing ideas. Where are you located if you don't mind me asking? I would love to stop by and take a look!
Like you I can see it, but for the life of me I can't get my mind wrapped around the right lines now. But I agree with the lines of the truck and trailer. It can and I hope is one great match when done. I have painted a few pickups my self. But nothing this size and detailed. But thinking just brake it down like I would any other paint job. As for the camper paint, It came with 3 oz bottle of paint to do touch up work with. Plus all the paint codes are on the bottles.
I hope to work on photo shop, to get the layout where I like the looks of it before starting. If not I will have a kid I know draw it and between both of us. Do the layout on paper. I figure it will take me 3 weeks if not more for the layout and paint. So if it takes 5 or 6 weeks it will be done when its done. Just scares me to take longer then the paint needs to lay down on top of the starting coverage.
But I also look at it as if I screw up. Its only a paint job, and can work with it or around it. Having a lot of people that see it in person to leave it as is. Old truck old paint job and let it ride. If the sleeper edges were in better shape on the paint. That might work, but this paint is 26+ years old. So guess its in great shape for that. The hood was repainted guessing someone messed it up. And I have some fiberglass work on the hinge and headlight pass side on it.
I will be willing to take any advice on this job I can get. Not one of those that will get mad if someone is trying to help.
Pete
Thread Starter
|
Senior User
Joined: Jun 2013
Posts: 276
Likes: 1
Man I feel so dumb. Been looking at the Truck and camper trying to see the paint job and how to lay it out. Today looking from a different view, it hit me DUHU. Easy as pie and thinking it going to be sharp.
Looking at it from this view nothing not a thing comes to mine for me.
But looking from the camper toward the camper the colors and movement jumps to the truck with ease. So unreal how just stop even thinking about the paint job. And then go to post a pic and it hits me like a Big Mack at MC D's...
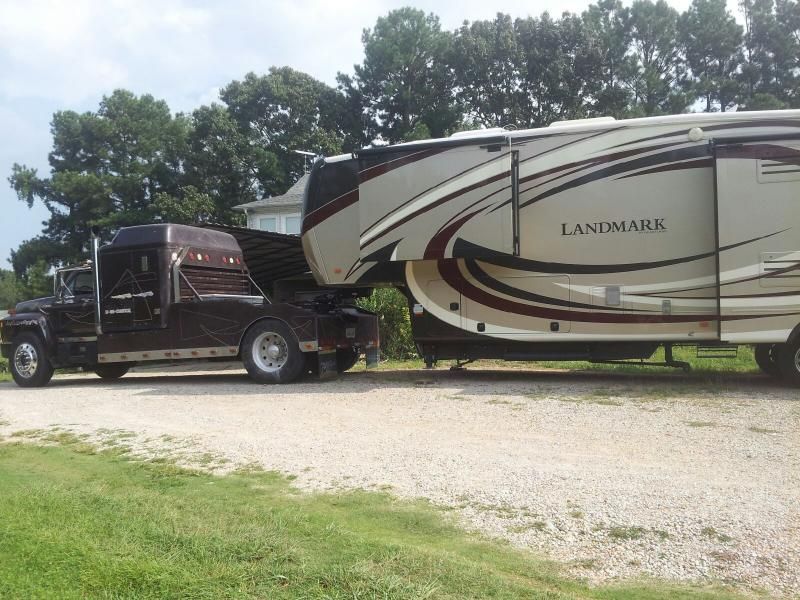
Top front of camper colors start at the nose of the hood. And the colors and lines follow all the way back on the truck. Now to just get it on paper for the layout. Thinking about doing it like a kid. Print out the pic and color the paint job on with Crayons..
Pete
Looking at it from this view nothing not a thing comes to mine for me.
But looking from the camper toward the camper the colors and movement jumps to the truck with ease. So unreal how just stop even thinking about the paint job. And then go to post a pic and it hits me like a Big Mack at MC D's...
Top front of camper colors start at the nose of the hood. And the colors and lines follow all the way back on the truck. Now to just get it on paper for the layout. Thinking about doing it like a kid. Print out the pic and color the paint job on with Crayons..
Pete
Trending Topics
Fleet Owner

Joined: May 2015
Posts: 21,195
Likes: 306
From: Near Salmon Arm BC
Any updated pics with paint....or even the crayon drawings to see.
I am very intrigued by your truck and trailer.
Off topic.....may i ask what engine and transmission is in it.
I am very intrigued by your truck and trailer.
Off topic.....may i ask what engine and transmission is in it.
FTE Stories
Ford Trucks for Ford Truck Enthusiasts

10 Things Every Truck Owner NEEDS (2026 Edition)
Michael S. Palmer
Rezvani's Latest Post-Apocalyptic Monster Is a Ford F-150 Raptor Underneath
Verdad Gallardo
Top 10 Most Expensive Ford Trucks Ever Sold on Bring a Trailer
Joe Kucinski
2027 Ford Super Duty Buyer's Guide (Every Model, Engine, & Package)
Brett Foote
Top 10 Ford Truck Tragedies
Joe Kucinski
AEV FXL Super Duty - the Super Duty Raptor Ford Doesn't Make
Brett Foote
Lobo Vs Lobo: Proof the F-150 Lobo Should Be Even Lower!
Michael S. Palmer
Ford's 2001 Explorer Sportsman Concept Looks For a New Home
Verdad Gallardo
10 Best Ford Truck Engines We Miss the Most!
Joe Kucinski
Thread Starter
|
Senior User
Joined: Jun 2013
Posts: 276
Likes: 1
The motor is the 7.8 Ford/New Holland I6 and the trans is a Road Ranger RT6610 10 speed. Sure be sad to see the F800 leave and looking like the new owner may be in Southern Fl and driving it home 12 hour+ Drive.
Still love driving the old truck, and had changed my mine on selling it. But a different toy ideal hit me. So selling it for a 2000 F150 and will be putting a 4BT cummins in it.
Pete

Thread
Thread Starter
Forum
Replies
Last Post
AK Adventurer
1973 - 1979 F-100 & Larger F-Series Trucks
39
Jun 7, 2018 10:59 AM
Jayman1976
1973 - 1979 F-100 & Larger F-Series Trucks
19
Nov 12, 2014 01:17 PM
TX76F250
1987 - 1996 F150 & Larger F-Series Trucks
8
Mar 4, 2011 06:12 AM
scalladaballa
1980 - 1986 Bullnose F100, F150 & Larger F-Series Trucks
24
Jan 28, 2011 10:25 PM