


Another 3rd row headrest install

Thread Starter
|
Senior User
Joined: May 2011
Posts: 139
Likes: 0

Another 3rd row headrest install
Ok, I thought I'd take a turn on this mod.
I have 4 kids so 2 of them sit in the back row. My oldest is tall enough that he needs a headrest, so here we are.
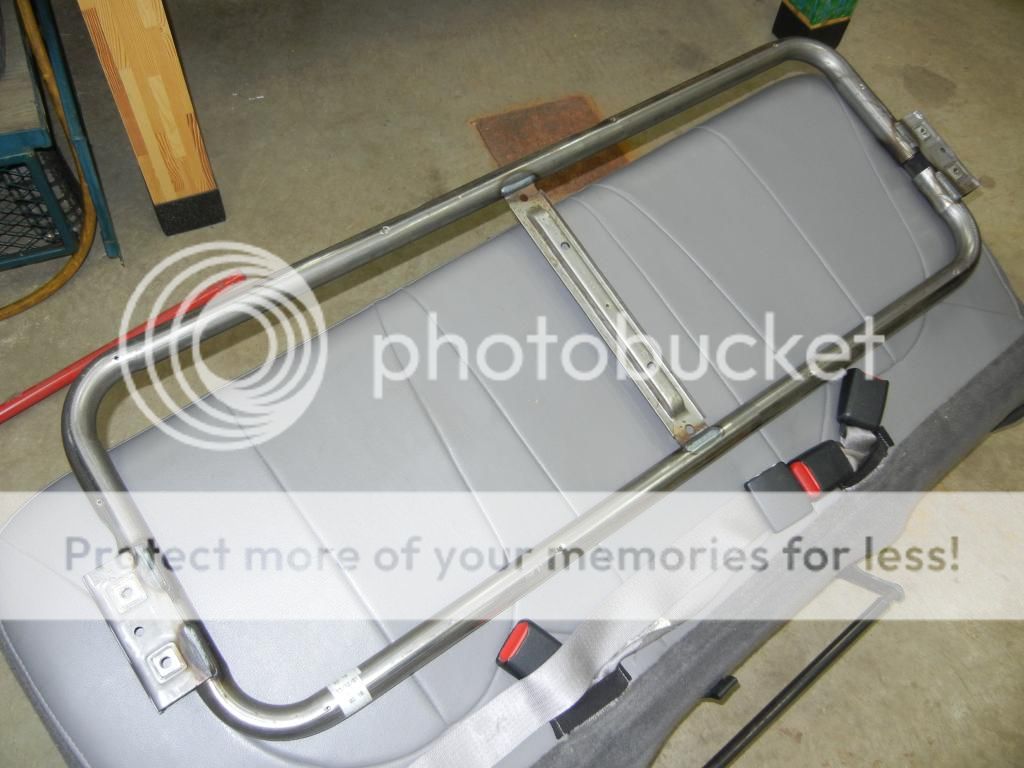
To start you have to strip off the seat back to the steel frame.
Remove the fabric by undoing the 2 strips at the bottom and remove the staples holding the flaps

Removing the entire seat back makes everything easier. For this you just have to remove the 4 torx bolts (2 on each side), then with the seat back folded down, push it down to the seat bottom to pop the two plastic plugs

Then remove the board backing and foam by removing the black plugs (3) to remove the foam and the hex head screws to remove the board.
You'll end up with a bare frame. Some of the frames have 3 vertical braces. Mine only had 1. I don't know what year mine came from.
I have 4 kids so 2 of them sit in the back row. My oldest is tall enough that he needs a headrest, so here we are.
To start you have to strip off the seat back to the steel frame.
Remove the fabric by undoing the 2 strips at the bottom and remove the staples holding the flaps
Removing the entire seat back makes everything easier. For this you just have to remove the 4 torx bolts (2 on each side), then with the seat back folded down, push it down to the seat bottom to pop the two plastic plugs
Then remove the board backing and foam by removing the black plugs (3) to remove the foam and the hex head screws to remove the board.
You'll end up with a bare frame. Some of the frames have 3 vertical braces. Mine only had 1. I don't know what year mine came from.
Thread Starter
|
Senior User
Joined: May 2011
Posts: 139
Likes: 0
Now time to build some posts for the headrest guides to mount into.
I got the guides from my old 2nd row seats. They weren't mounted in posts though so I couldn't just cut the old posts out.
So I got some 3/4", 0.065" wall tube from local hardware store. Cut it to length.

Cut the key in the posts for the guides to fit into. These prevent the guides from spinning. Just used an air cut off disc.

I got the guides from my old 2nd row seats. They weren't mounted in posts though so I couldn't just cut the old posts out.
So I got some 3/4", 0.065" wall tube from local hardware store. Cut it to length.
Cut the key in the posts for the guides to fit into. These prevent the guides from spinning. Just used an air cut off disc.
Thread Starter
|
Senior User
Joined: May 2011
Posts: 139
Likes: 0
Unfortunately, the pipe is a little too big and you need the guides to fit tight in the posts or your headrests will wobble/jiggle/shake.
So I made a cut along their length

Then squeezed them tight, welded them, then ground them down clean.

Here are the four pieces all done. The guides fit nice and tight in them.

So I made a cut along their length
Then squeezed them tight, welded them, then ground them down clean.
Here are the four pieces all done. The guides fit nice and tight in them.
Thread Starter
|
Senior User
Joined: May 2011
Posts: 139
Likes: 0
Next, you gotta decide where you want the headrests mounted on the back. I just started with as far to the outside as I could so that I was still drilling my holes on the straight part of the tube, before it curves down. I think the outside holes were 4.5" from the outside of the steel frame and the posts on the headrests are 7" apart.

I marked them, punched them, then pilot holed them. Then drilled them big enough to get a uni-bit into them to drill them out to 3/4" (just larger than my posts.

I marked them, punched them, then pilot holed them. Then drilled them big enough to get a uni-bit into them to drill them out to 3/4" (just larger than my posts.
Thread Starter
|
Senior User
Joined: May 2011
Posts: 139
Likes: 0
Test fitted the headrest with the guides and posts.

Here's a close up of the way the posts mount. The height of these is set by the thickness of the foam on top of the seat. I decided on 1 1/8" from the top tube of the frame to the underside of the release button.

Unfortunately, when I mocked this up with the seat foam and seat bottom, it looked like the headrests were a bit too far inward. AND, with my kids sitting on their booster seats in the back, they tend to sit to the very outside edge...... darn it. So I filled in the holes I had made with some sleeves (to regain the strength of the frame), and mounted the new holes a little further out.

Here's a close up of the way the posts mount. The height of these is set by the thickness of the foam on top of the seat. I decided on 1 1/8" from the top tube of the frame to the underside of the release button.
Unfortunately, when I mocked this up with the seat foam and seat bottom, it looked like the headrests were a bit too far inward. AND, with my kids sitting on their booster seats in the back, they tend to sit to the very outside edge...... darn it. So I filled in the holes I had made with some sleeves (to regain the strength of the frame), and mounted the new holes a little further out.
Thread Starter
|
Senior User
Joined: May 2011
Posts: 139
Likes: 0
Now, just gotta make sure the headrests are lined up.

Looks good and straight to me, so I tacked them here.

And here they are welded in. Make sure you take the guides out when you weld, or they'll be melted

Looks good and straight to me, so I tacked them here.
And here they are welded in. Make sure you take the guides out when you weld, or they'll be melted
Thread Starter
|
Senior User
Joined: May 2011
Posts: 139
Likes: 0
So I laid the frame with the new posts in it on top of the foam, marked the foam and cut slots for the headrest posts and holes for the guides and posts. Just need to make sure the guides don't pinch a bunch of foam or they won't click all the way in.

And here I mocked it up without the leather cover

The only thing left was to put the leather cover back on (reverse of removing it), feel for the new posts and make either a circle cut or X cut on top of them in the leather and snap in the guides. Looks like I could have mounted the guides a touch higher to eliminate the dip in the cover.

And here I mocked it up without the leather cover
The only thing left was to put the leather cover back on (reverse of removing it), feel for the new posts and make either a circle cut or X cut on top of them in the leather and snap in the guides. Looks like I could have mounted the guides a touch higher to eliminate the dip in the cover.
Trending Topics
Thread Starter
|
Senior User
Joined: May 2011
Posts: 139
Likes: 0
Oh, the finished product. The headrests are lined up perfect with the lines of the seats, and they are nice and tight.... no jiggling.

FTE Stories
Ford Trucks for Ford Truck Enthusiasts

3 Best / 3 Worst Parts of Modern Ford Ownership
Brett Foote
10 Amazing Upgrades That Solve Common Ford Truck Owner Headaches
Pouria Savadkouei
Every 2026 Ford Engine Explained
Brett Foote
10 Ugly Ford Trucks That We Still Kinda Love
Joe Kucinski
10 Things Every Truck Owner NEEDS (2026 Edition)
Michael S. Palmer
Rezvani's Latest Post-Apocalyptic Monster Is a Ford F-150 Raptor Underneath
Verdad Gallardo
Top 10 Most Expensive Ford Trucks Ever Sold on Bring a Trailer
Joe Kucinski
2027 Ford Super Duty Buyer's Guide (Every Model, Engine, & Package)
Brett Foote
Top 10 Ford Truck Tragedies
Joe Kucinski


Thread Starter
|
Senior User
Joined: May 2011
Posts: 139
Likes: 0
Yes the guides are from a 2nd row.
So I'll have 4 identical headrests in the truck.
Really though, you could use parts from any vehicle, the steps would be the same, just the dimensions and looks may be different
So I'll have 4 identical headrests in the truck.
Really though, you could use parts from any vehicle, the steps would be the same, just the dimensions and looks may be different
