When you click on links to various merchants on this site and make a purchase, this can result in this site earning a commission. Affiliate programs and affiliations include, but are not limited to, the eBay Partner Network.
Glad it was helpful Joe----that was the main reason for creating and posting it.
BTW our moderator Tom started a tech folder when first coming to this forum--it has a few other similar posts by other members.
I have another under construction dealing with the heater core in '97 and later E-Series vans----not the easiest task but manageable to the truly motivated. If others experiences regarding shop costs for this hired out you'd save yourself the $600-800 labor charges----that's motivating right?
I know this is an old thread but....this procedure likely works for 95% of the door panels but on mine it did not. Mine (2001 E150) had two hidden screws behind the panel side pocket. My pocket is not the molded pocket but rather an elastic type 'map pocket' on the panel. I don't know how many e150's had this but I had to remove the pocket assembly first to expose the screws. The pocket uses 'standard plastic push type retainers to hold it in place.
I really huffed and puffed trying to get this panel off until I finally decided there had to be some hidden screws someplace. I was right!
I'd like to see any photos you have of those hidden screws----I have the same panels pulled from a '97 E250 which should be the same as your's---WAG there though for the slightly difference in years. Just checked mine and there are no additional screws apart from what I show.
If there is a difference it would be good to note along with photos---this thread part of the Tech Folder I believe.
Drivers side storage panel (separated from door panel)
Drivers side panel (sans storage panel) showing where two hidden screws reside (aluminum tape at locations)
Ok, here's some photos. There's a photo of the passenger side panel (which was not removed) as is. Of course the other side, my drivers side which has a bad window regulator, is removed. The drivers side panel shows a couple pieces of aluminum tape (I put there so I wouldn't have to edit the photo) where the screws were. One on the left, top hole, and also on the right side.
Once again, I had to separate/remove the storage panel (pry apart) to get at the screws.
Wiskey once you've done one you'll have this pretty much down. The only real (small) challenge is reinstalling them---aligning everything before the panel basically falls into place can be frustrating.
Fishing the lock rod through the panel can be a bit tricky too but not difficult. I will lower the glass to help things along when re-installing as it seems to help a bit---that's not 100% necessary though.
Looks like the original photos are connected to a closed Photobucket account. Any chance of getting 'em back? I've got door work in my future (as well as dashboard work).
Looks like the original photos are connected to a closed Photobucket account. Any chance of getting 'em back? I've got door work in my future (as well as dashboard work).
Thanks!
I've added back pertinent photos and edited this slightly to be a bit more clear--at least that was the goal.
Thanks a ton for fixing the image links! I was able to get in and swap out my door lock pretty easily. The only thing I'd add is that on my older door with a crank window handle, the cover of the handle pops off (it doesn't look like it would) and there's a torx screw underneath. Lots of other vehicles use some kind of C clip around the crank's shaft.
Also, it turns out that somewhere along the line, someone had broken in through the window as there was a ton of glass shards in the bottom of the door. I manage to pull most of them out with a shop-vac.
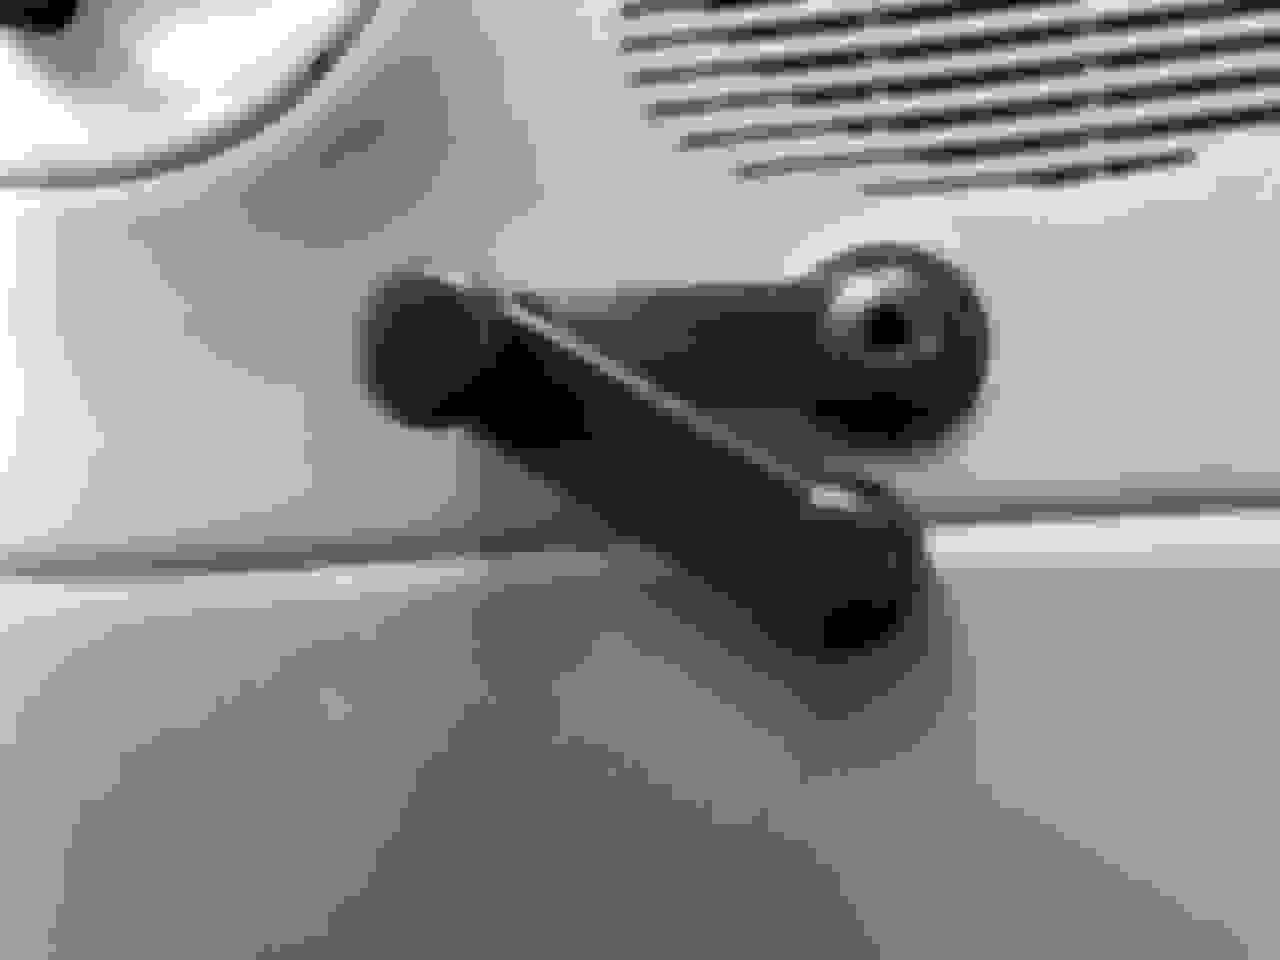
Crank door handle for 1999 Ford E series Crank door handle for 1999 Ford E series
Last edited by StickyC; Jul 6, 2019 at 10:57 AM.
Reason: Added pics
Its been ages since I've worked on a manual opening door glass---my bad for assuming everyone has power windows. IF you have a few images of removing the interior handle it'd be great sharing them in this thread. I could also add them to those above as I believe this info in in our Tech Folder too.
When I'm replacing a broken door glass once the vacuuming is done I'll open and kinda slam the door closed a few times, even banging gently on the outside to dislodge any pieces caught in the upper parts of the door shell other parts. Nothing more annoying then hearing those little bits bouncing around.
When I want to save a thread for future reference I subscribe to it so its easily retrieved later. Through the User Control Panel its your choice to receive email notifications if/when new replies are added.
A few of my subscribed threads go back to the first year I joined FTE.
THANKS!
I was just going to post a question about removing the door panel. I'm glad I came here first.
Of course, Haynes tells me to remove the screws before they are accessible.
Now maybe I can figure out why the window only goes halfway up.
I don't care one bit for Haynes and/or Chilton's but that's just me---glad parts of what I originally posted was useful.
If the window will only move so far then its possible there is something wrong with the regulator system. Are you removing the door panel to diagnose a problem?