


DIY head install/remove bracket.

Posting Guru
Joined: Nov 2011
Posts: 1,664
Likes: 4
From: Southern AZ
First wanna say thanks to Dale (Jugermaut) for supplying me with the OTC bracket for measurements. Bryan (Tuscany) for helping me with my welding skills. Thanks guys!
Please do not PM me with request to make this bracket. Thanks!
List of material and tools.
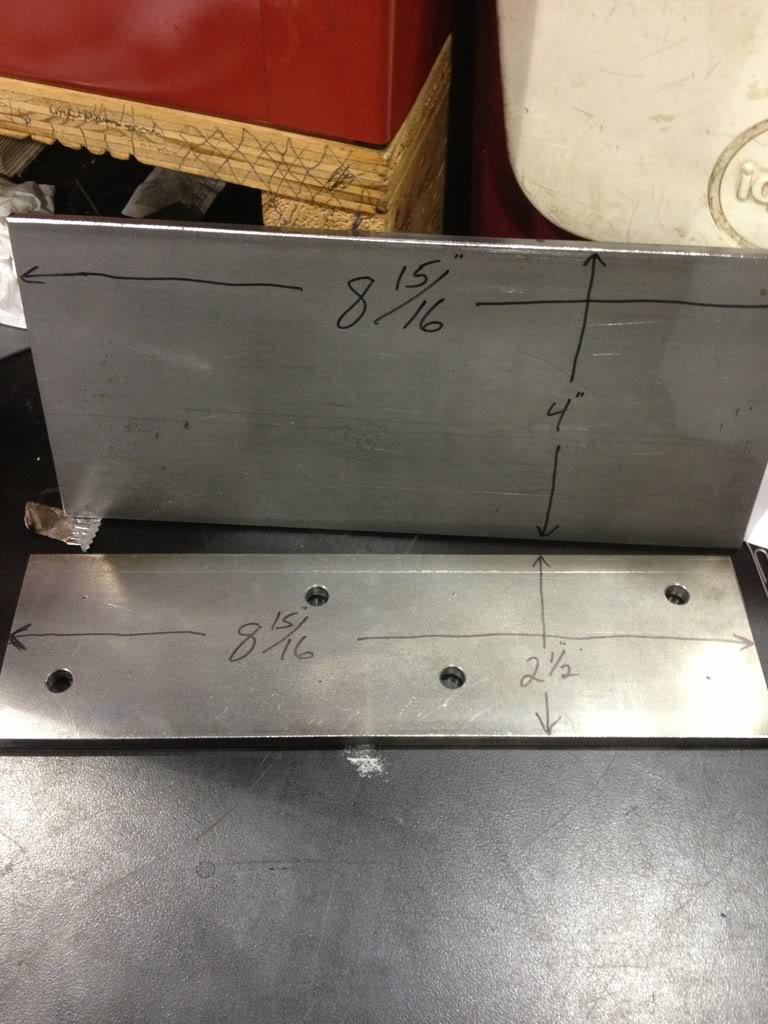
Flat stock 2 1/2" wide X 1/4" thick X 8 15/16" long, and 4" wide X 1/4" thick X 8 15/16" long.
Center drill
"L" drill
2" colbalt hole saw
Bendable flat metal (105* jig)
Four 1/4 X 20 X 1 1/2" bolts/nuts
Four 1/4" washers
Four 6m X 1.0 X 45mm long bolts
Four 1/8" NPT black pipe couplers (3/4" long)
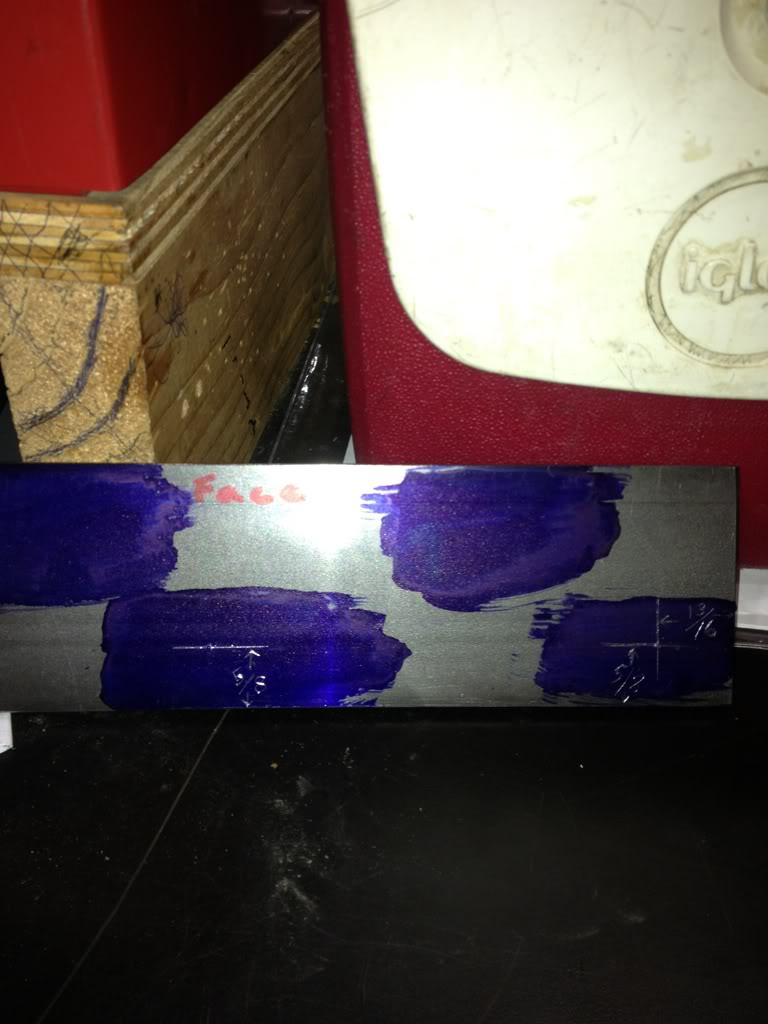
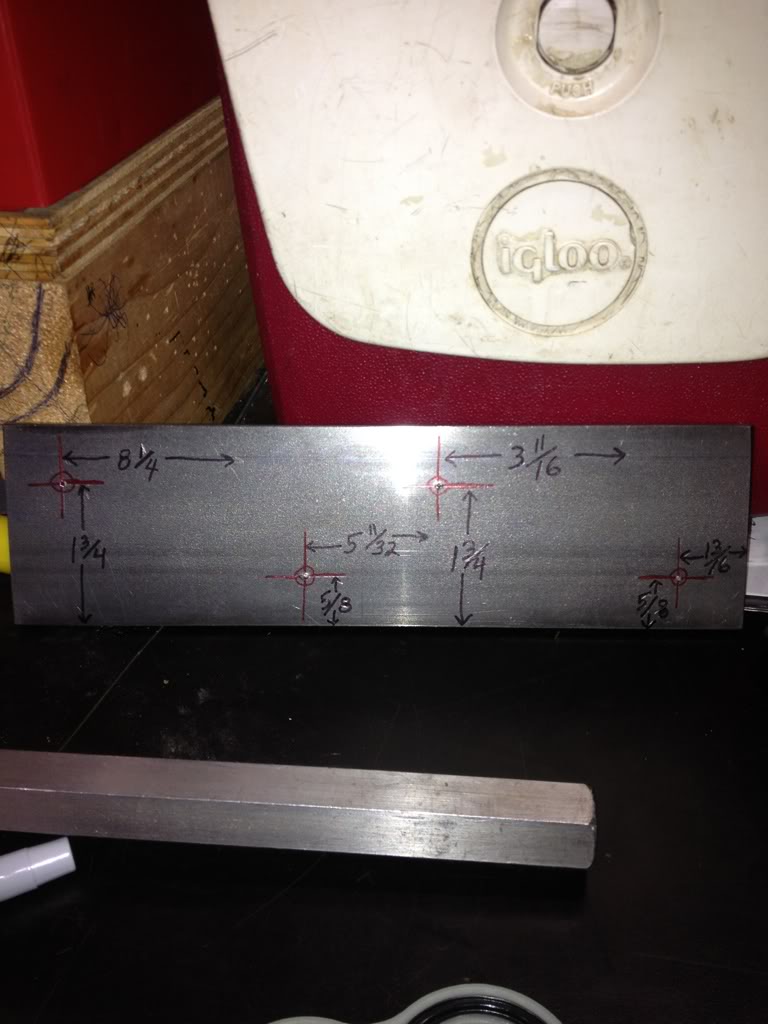
When cutting length of flat stock, be sure it's square with factory edge. Marked in "yellow" is the measuring start points (bottom edge and right edge).

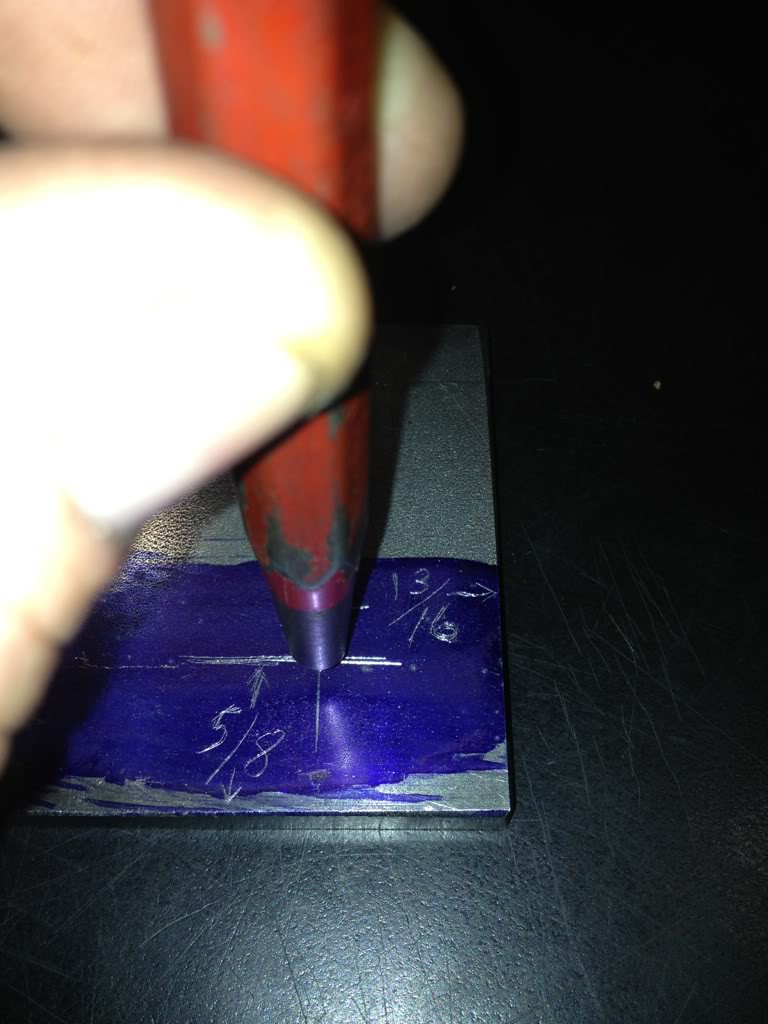
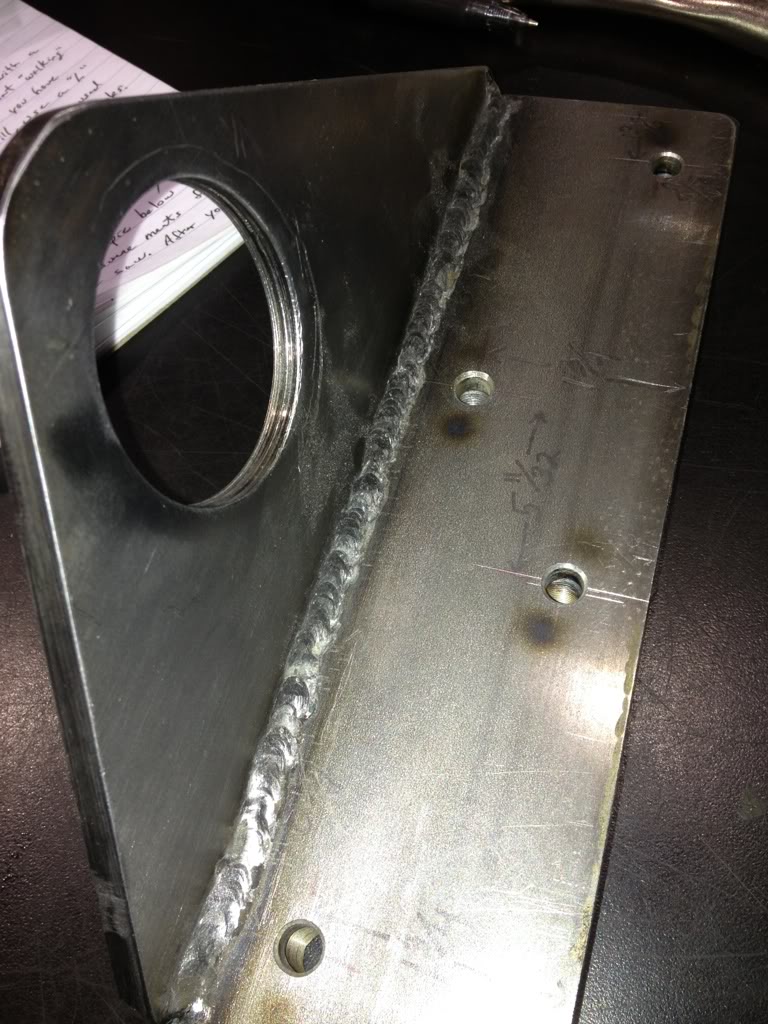
Come off the bottom edge of the 2 1/2 flat stock to 5/8" and mark/scribe the length of piece. Now coming off the right edge to 13/16" and mark/punch for your first hole to be drilled.
At this point if you have new/used intake gaskets laying around, used the marked/punched dimple as a guide. The 5/8" marked/scribed line will be your guide for the left hole.
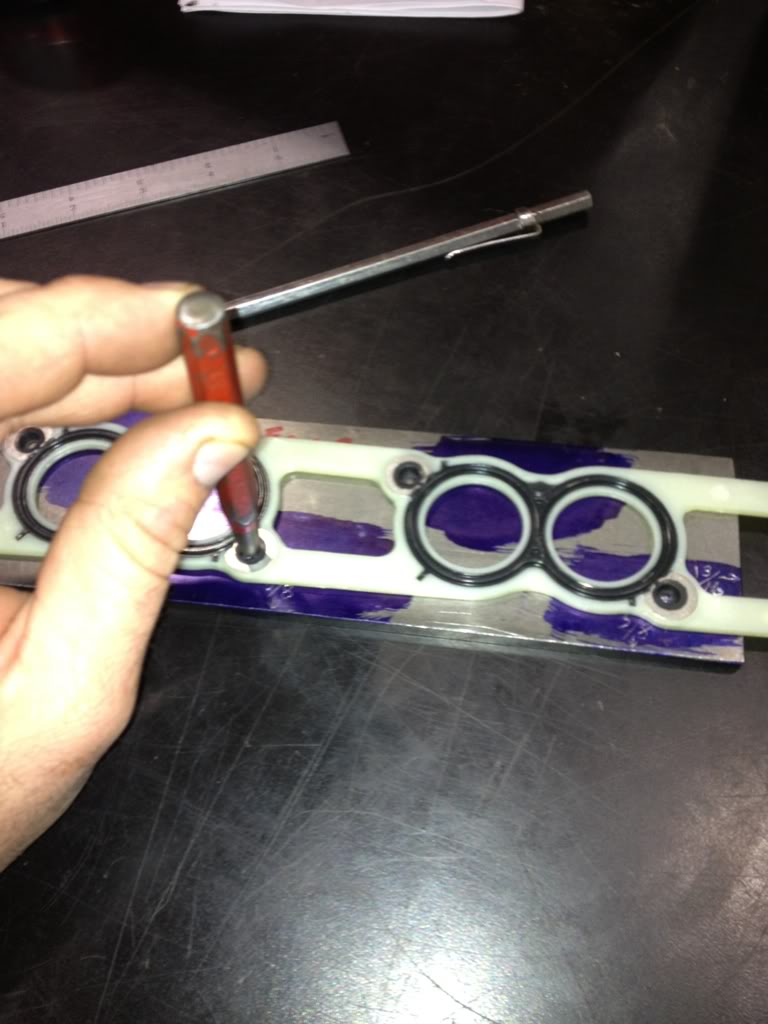
Now mark/punch the top two holes, if you used the gasket to mark/punch your holes, then your ready to move down and start drilling.
Those of you who don't have a gasket handy, look at the pic below to get your measurements. Be sure your right edge is square with the factory bottom edge.
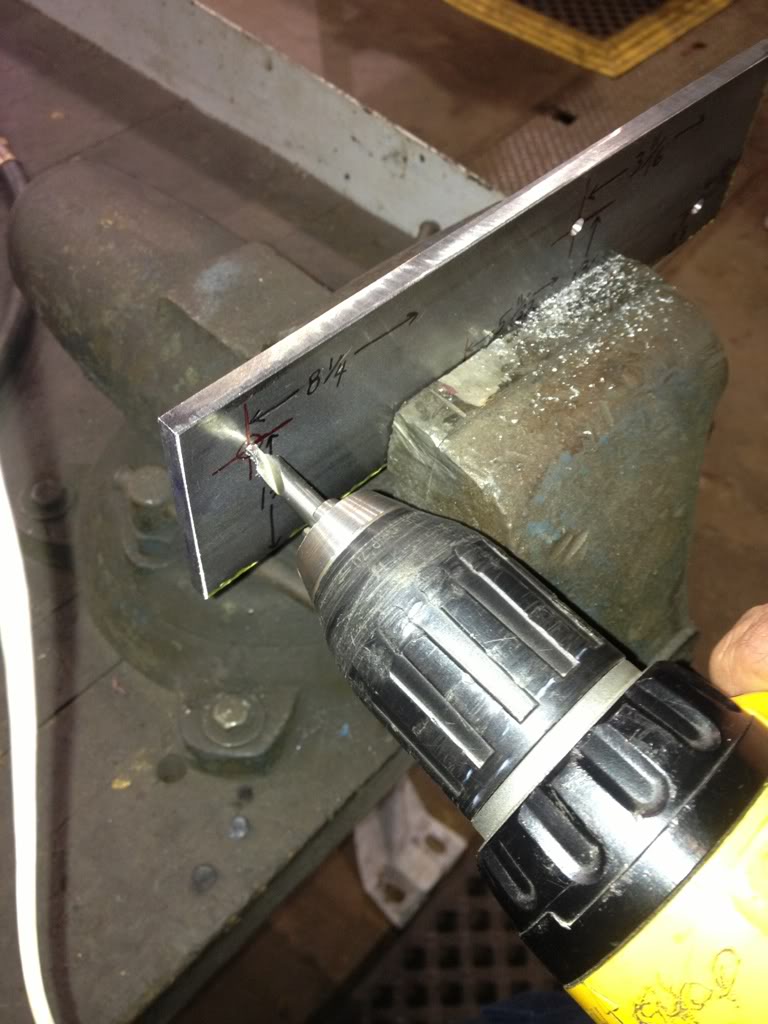
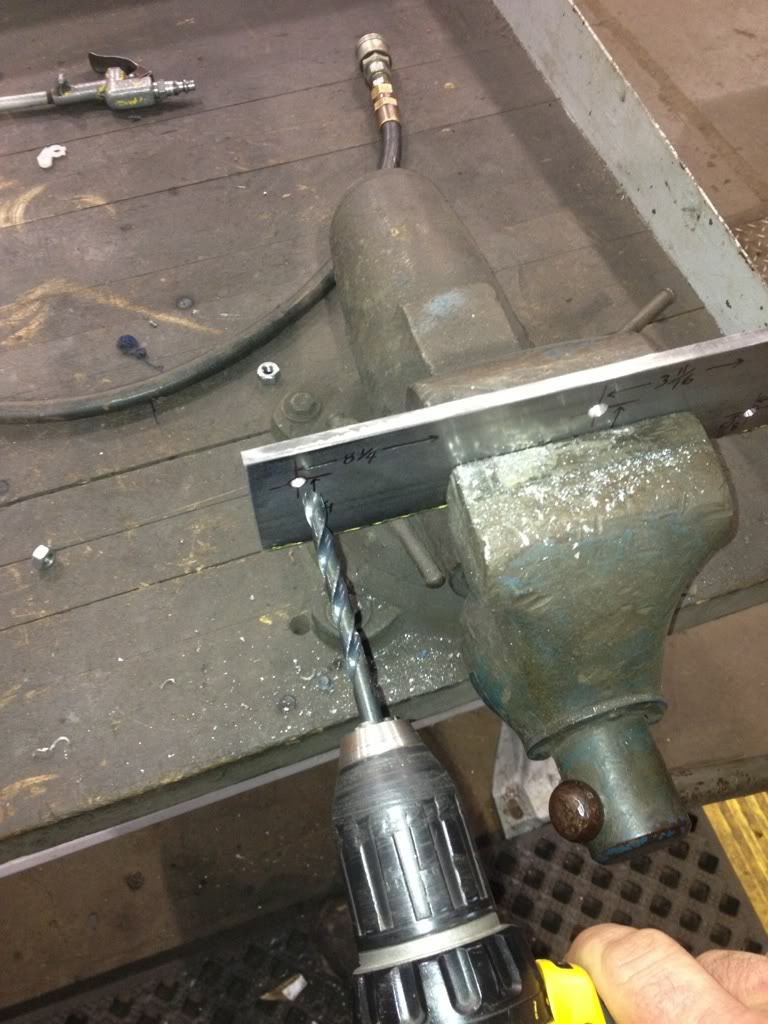
Time to drill bottom plate. Drill the punch marks first with a center drill so the "L" drill don't walk on you.
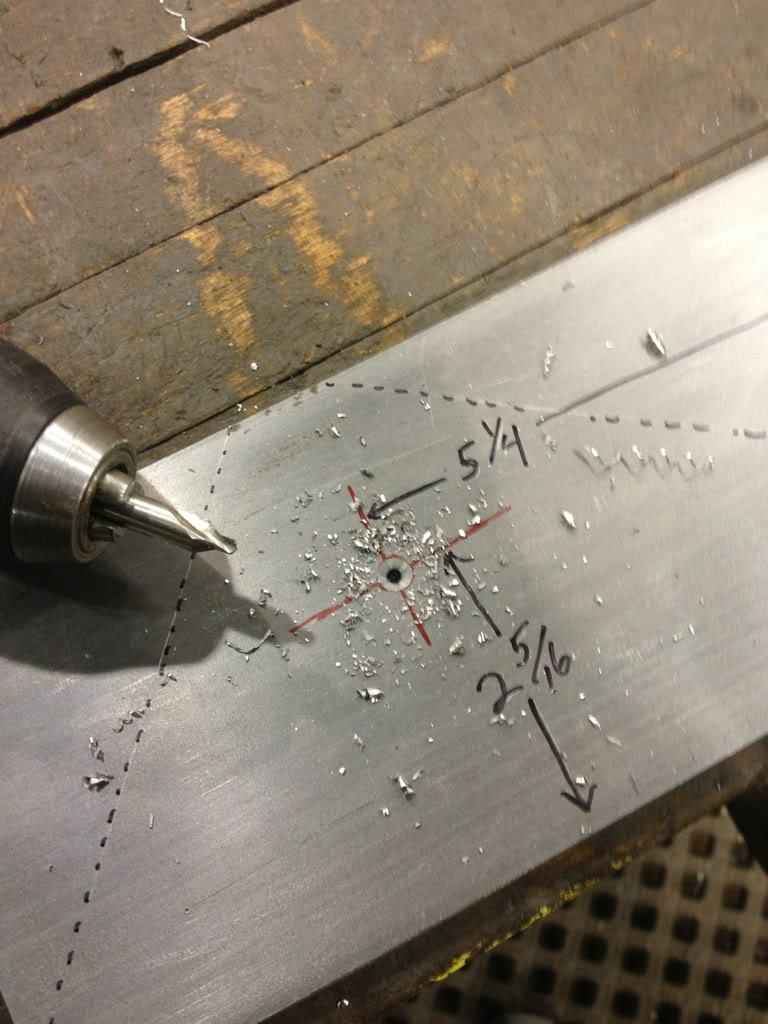
Next, take the 4" flat stock piece and make sure the right edge is square with the factory bottom edge. Use the pic below to get your measurements for the 2" hole saw.
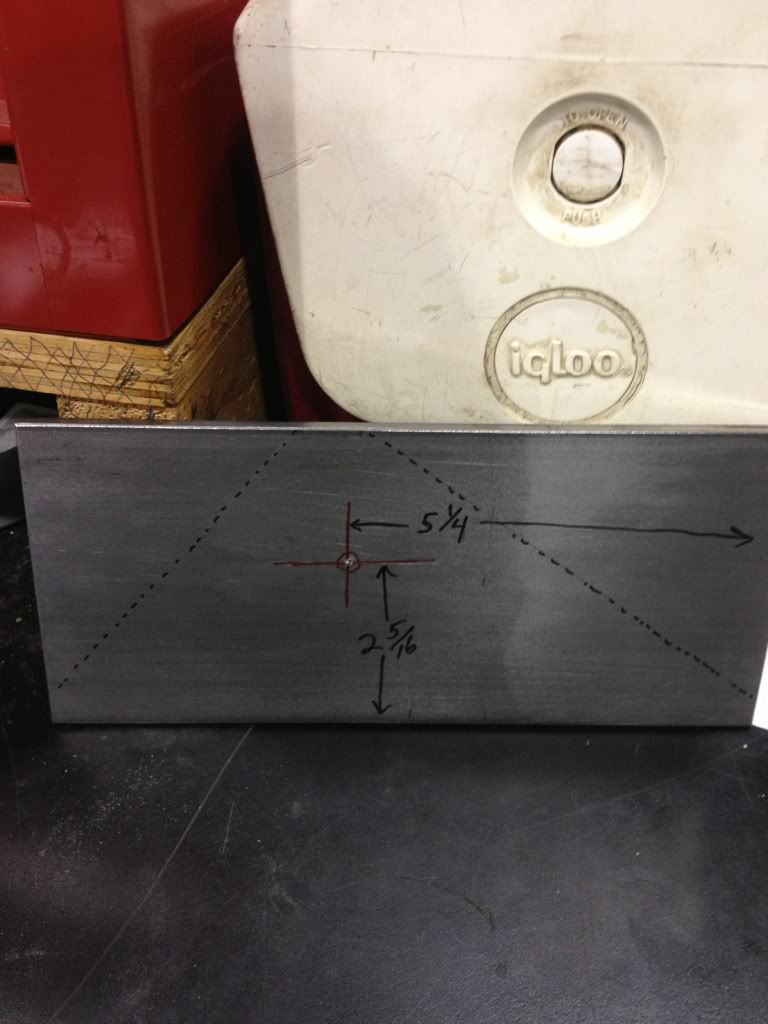
After you marked/punched where the 2" hole is going, use the center drill to start a hole and prevent the hole saw drill from walking.
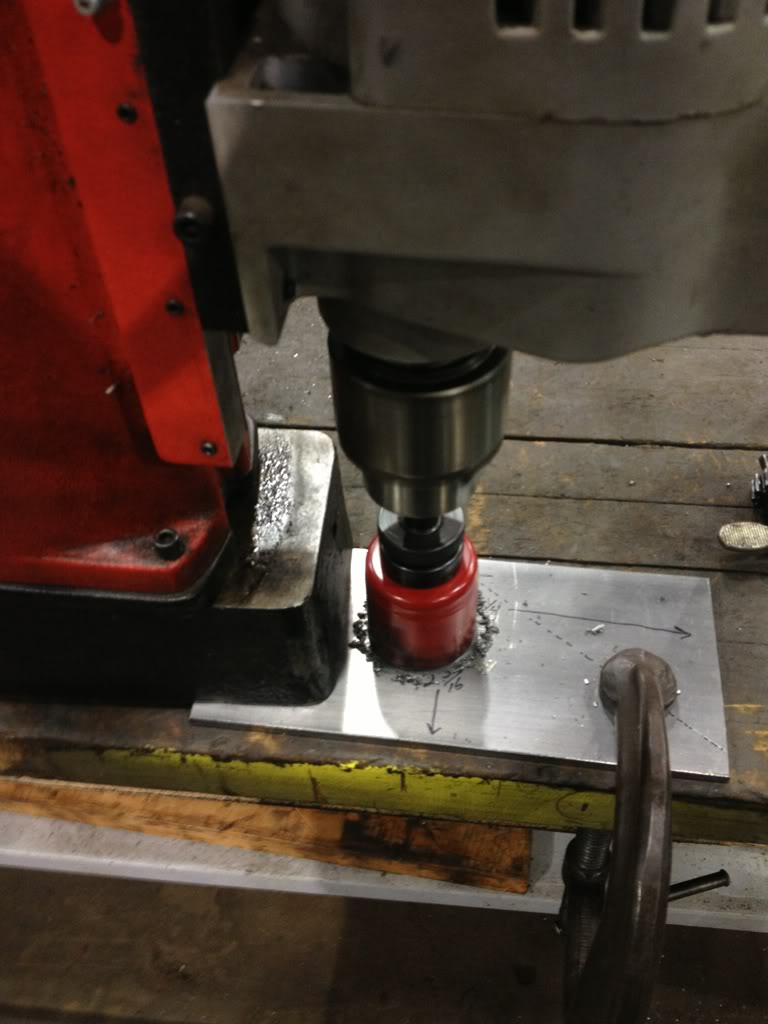
Now for the hole saw, it's best to use a drill press. You can try using a hand drill, but might have trouble holding the drill square and cause the hole saw to "bind".
Your going to keep the RPM's slow when using a hole saw. Going at a faster RPM will cause the hole saw to "chatter" and "burn up" the teeth on the blade. Use oil to keep the teeth cool, and remember "SLOW RPM"!!
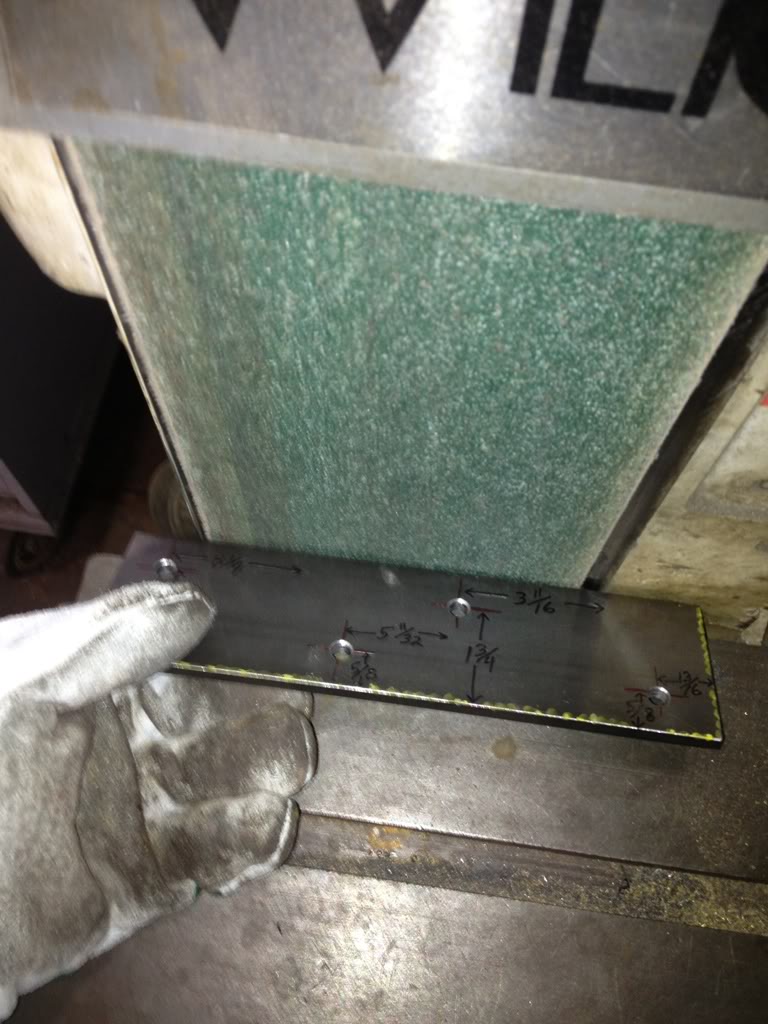
After you have the 2" hole in the 4" flat stock, you need to "bevel" the bottom edge for welding, and the 2 1/2" flat stock will get a bevel on the top edge.
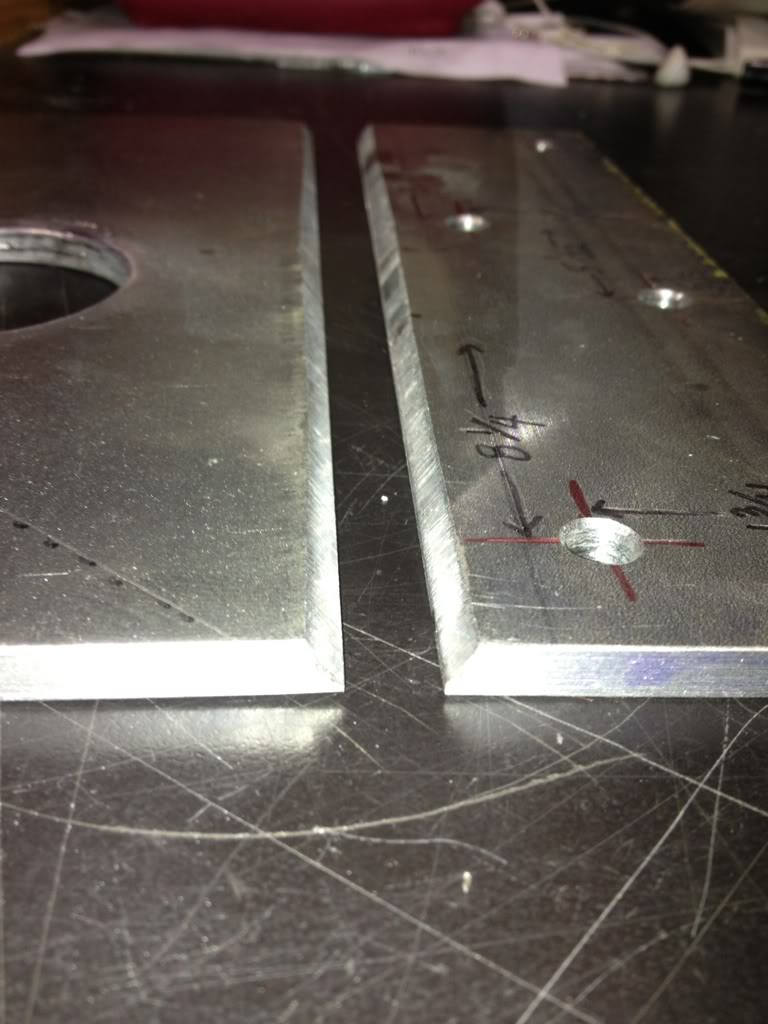
NOTICE in all the pics, your 4" flat stock will have the 2" hole just left of center. The 2 1/2" flat stock will always have the very first measured/marker hole on the bottom/right. DON'T accidentally "flip" one of the pieces and weld them on backwards.
Now move onto making the 105* template/jig. I used metal drawer dividers. Anything flat that can be bent and stay sturdy. Give them a bend till your at 105*.
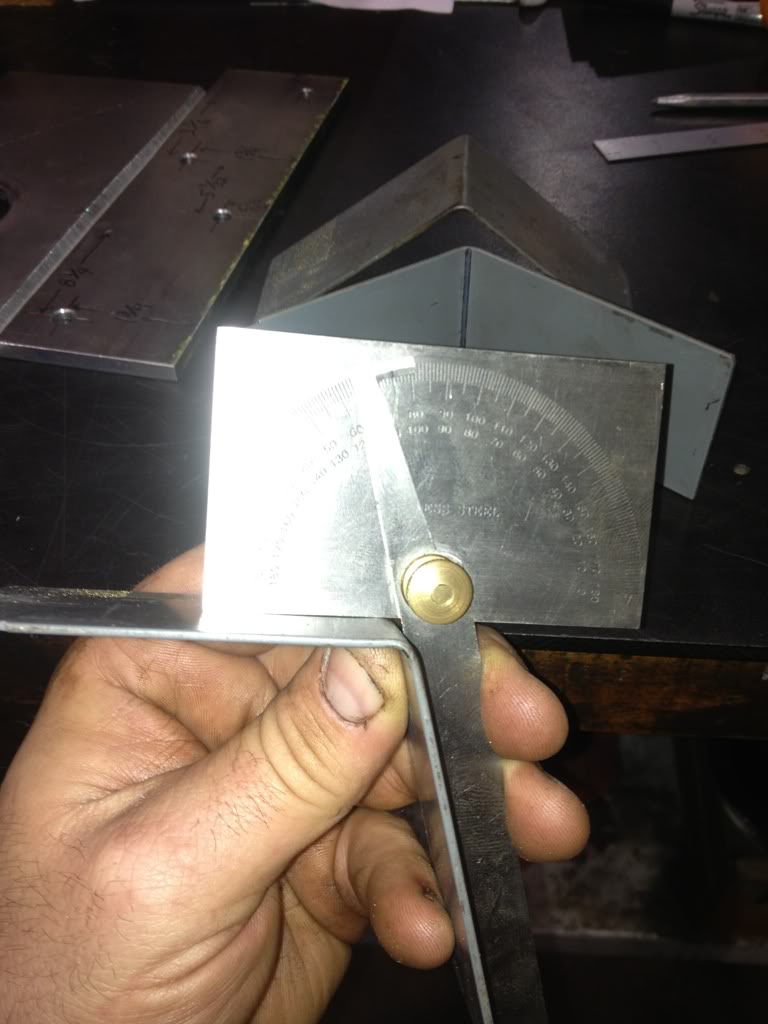
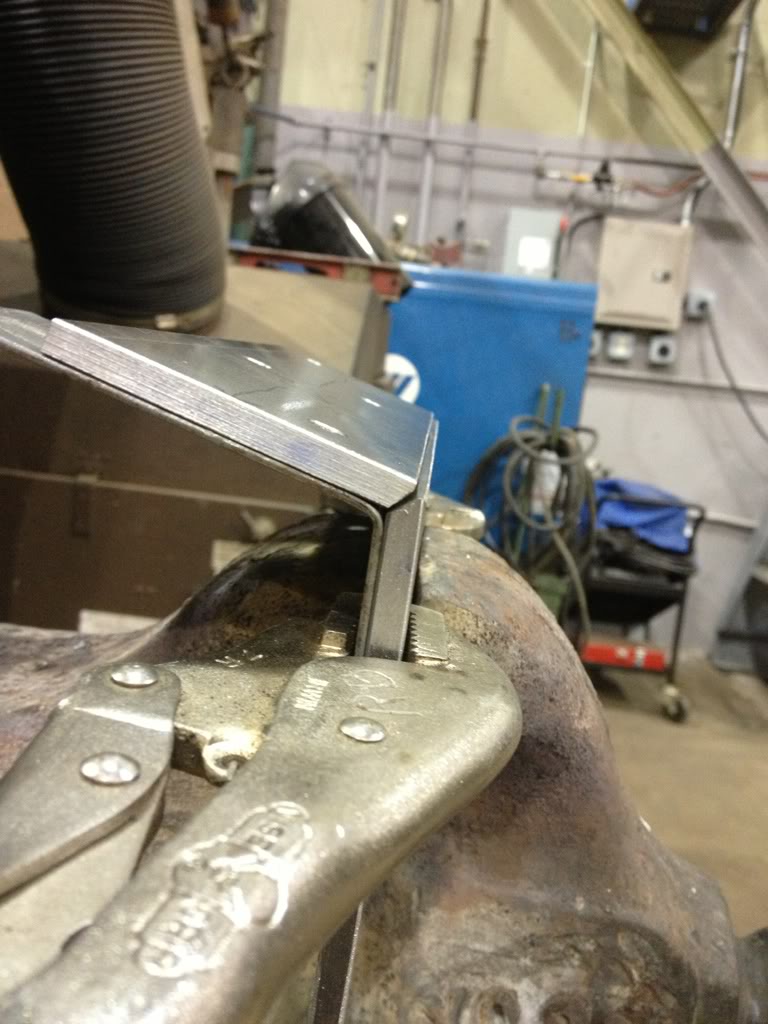
Back to the bracket, clamp the 4" flat stock in a vise. Use the 105* templates/jig and clamp them to the 4" flat stock.
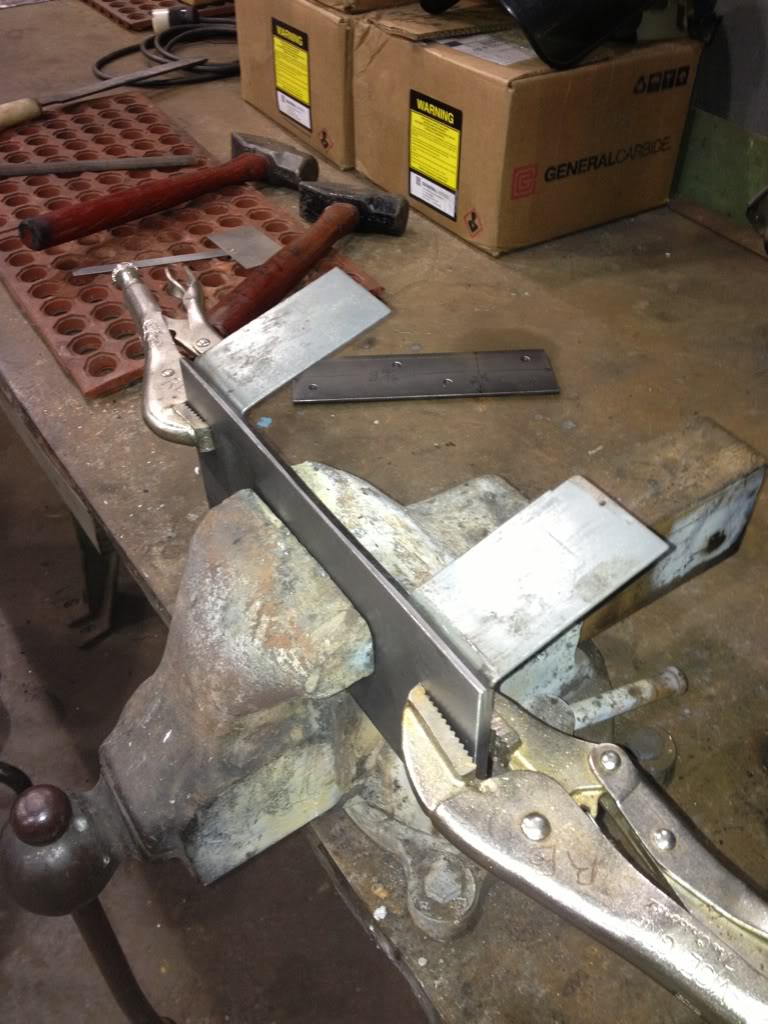
Now put your 2 1/2 flat stock onto the 105* jig and adjust until your "bevel" edges line up, also match up the two flat stock pieces line up length wise.
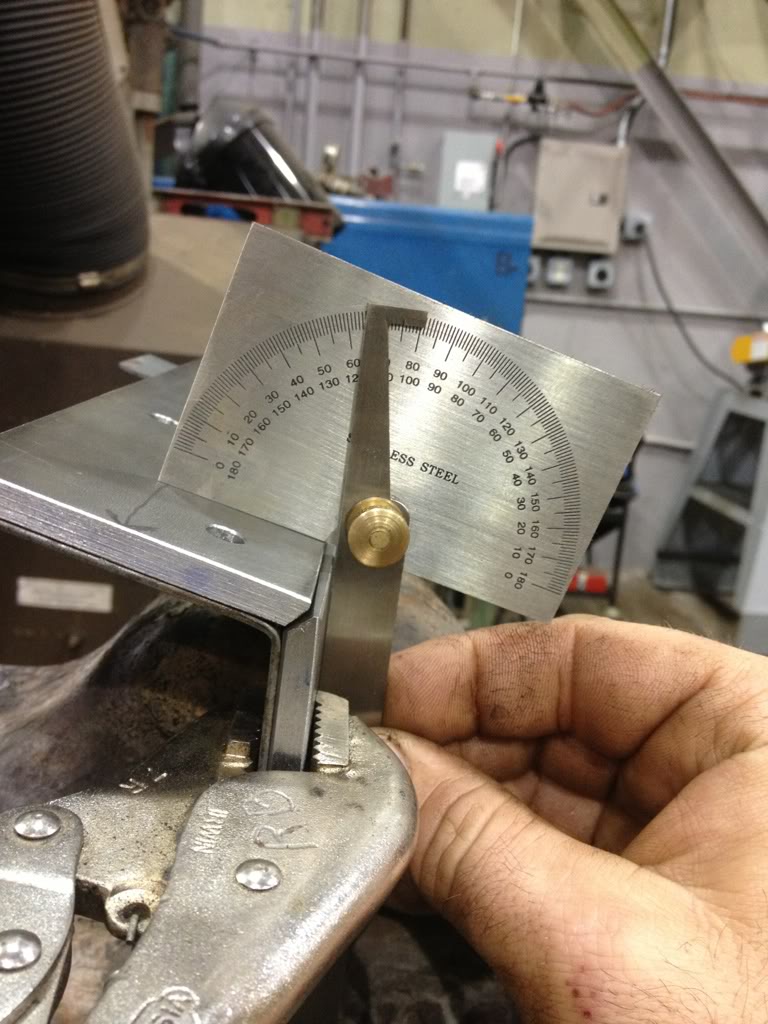
Now check to be sure you still have 105* angle.
Now your ready to weld the back side of the bracket.
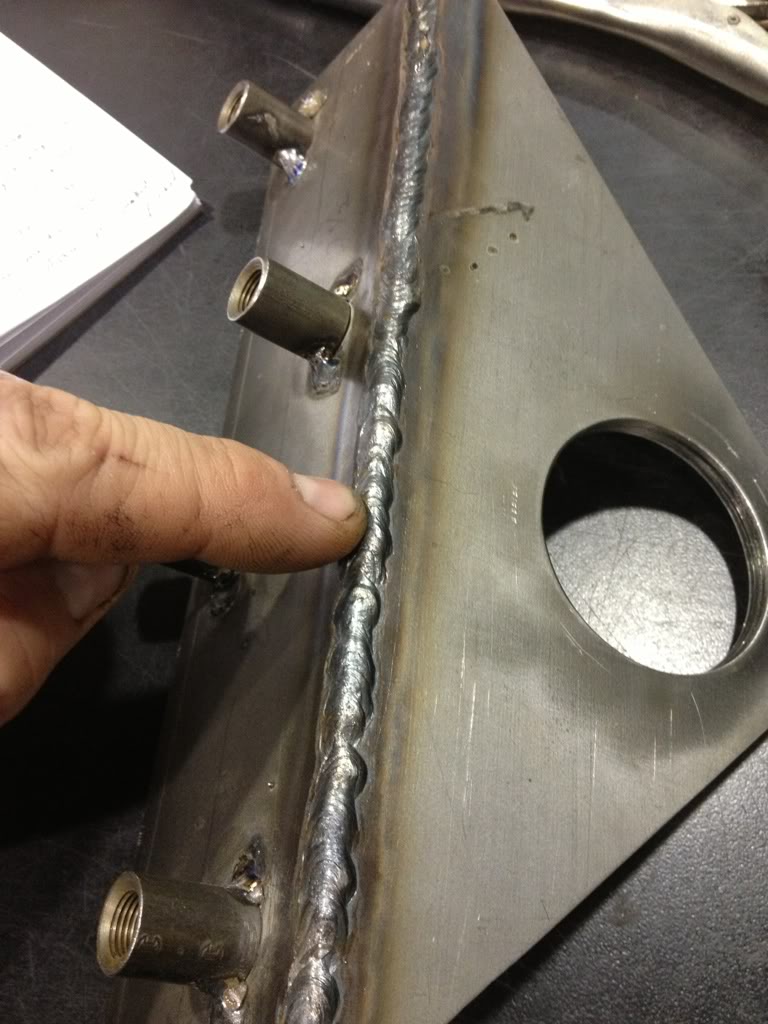
After the bracket has cooled, flip over and weld the front side.
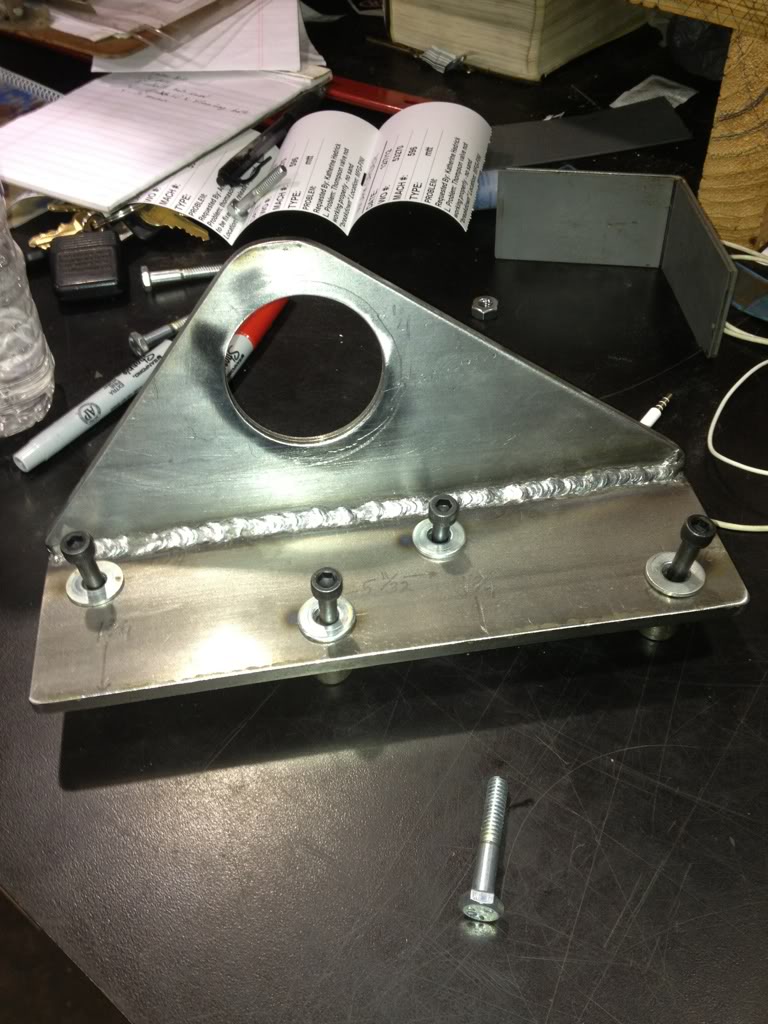
You are ready to add the 1/8" NPT couplers. I used 1/4" X 20 bolts/nut/washer to bolt the coupler to the bracket. Try to keep the coupler hole centered up with the bracket hole. Now tack weld these couplers to bracket (pic below). These couplers act as a spacer needed for the head/rocker box clearance.
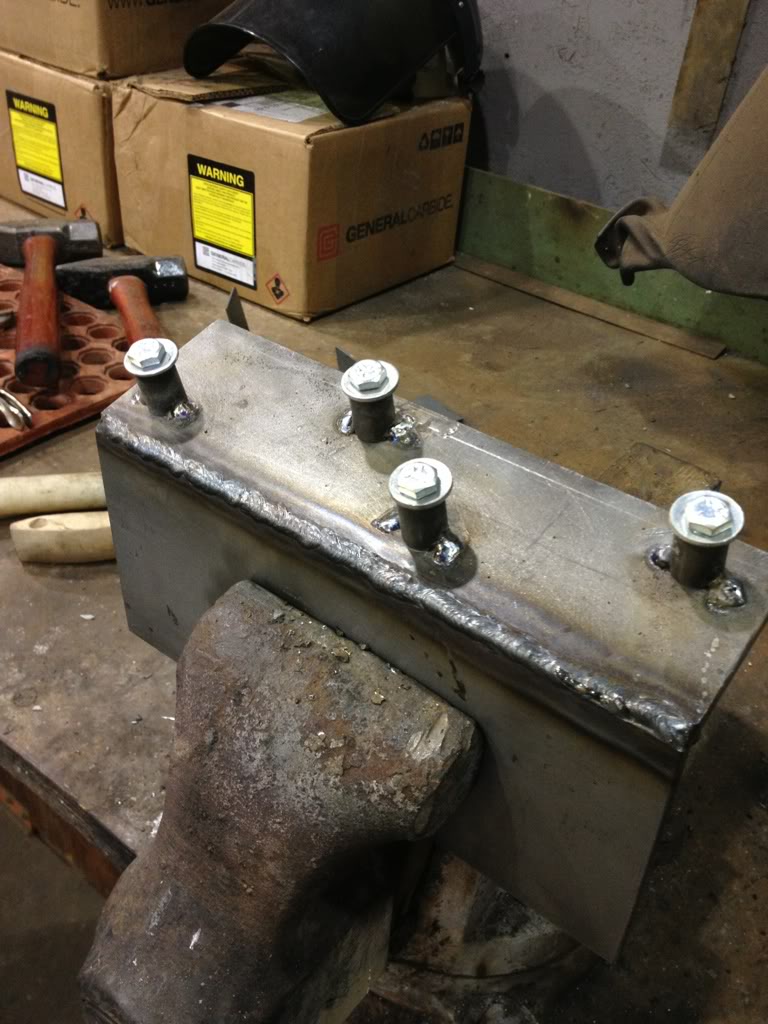
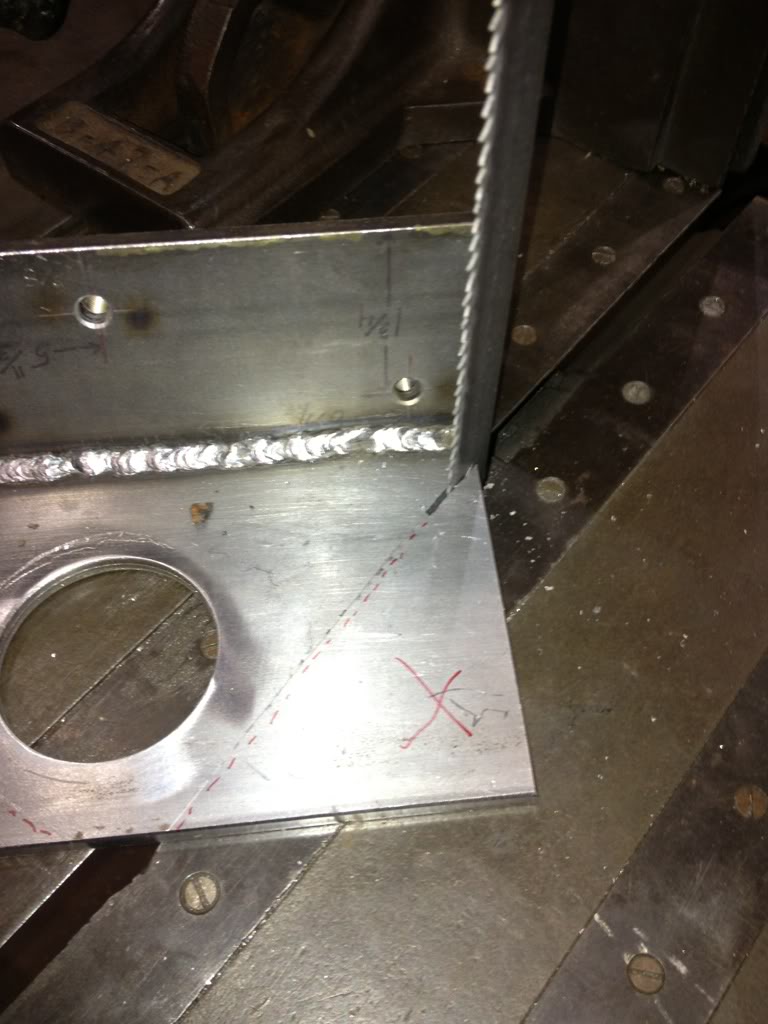
At this point you are done. You can cut off the corners of the top of bracket or leave it square. I chose to cut the corners off for "looks".
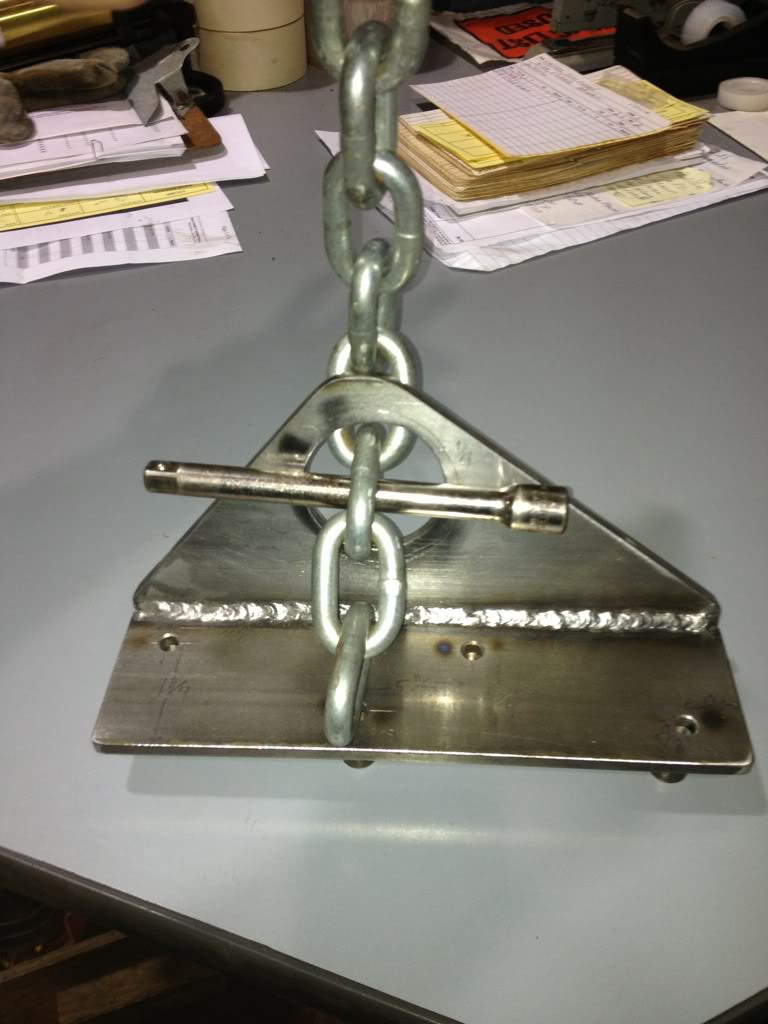
When hooking up the chain to bracket for lifting/install head, Dale set the chain up thru the back of bracket and locked it in with a ratchet extension. I don't know how a hook will work, but Dale's method kept the head at the right angle to lower the head evenly with the block/head gasket.
You will use the 6m bolts and washers to bolt the bracket to head for lifting/install.
Please do not PM me with request to make this bracket. Thanks!
List of material and tools.
Flat stock 2 1/2" wide X 1/4" thick X 8 15/16" long, and 4" wide X 1/4" thick X 8 15/16" long.
Center drill
"L" drill
2" colbalt hole saw
Bendable flat metal (105* jig)
Four 1/4 X 20 X 1 1/2" bolts/nuts
Four 1/4" washers
Four 6m X 1.0 X 45mm long bolts
Four 1/8" NPT black pipe couplers (3/4" long)
When cutting length of flat stock, be sure it's square with factory edge. Marked in "yellow" is the measuring start points (bottom edge and right edge).
Come off the bottom edge of the 2 1/2 flat stock to 5/8" and mark/scribe the length of piece. Now coming off the right edge to 13/16" and mark/punch for your first hole to be drilled.
At this point if you have new/used intake gaskets laying around, used the marked/punched dimple as a guide. The 5/8" marked/scribed line will be your guide for the left hole.
Now mark/punch the top two holes, if you used the gasket to mark/punch your holes, then your ready to move down and start drilling.
Those of you who don't have a gasket handy, look at the pic below to get your measurements. Be sure your right edge is square with the factory bottom edge.
Time to drill bottom plate. Drill the punch marks first with a center drill so the "L" drill don't walk on you.
Next, take the 4" flat stock piece and make sure the right edge is square with the factory bottom edge. Use the pic below to get your measurements for the 2" hole saw.
After you marked/punched where the 2" hole is going, use the center drill to start a hole and prevent the hole saw drill from walking.
Now for the hole saw, it's best to use a drill press. You can try using a hand drill, but might have trouble holding the drill square and cause the hole saw to "bind".
Your going to keep the RPM's slow when using a hole saw. Going at a faster RPM will cause the hole saw to "chatter" and "burn up" the teeth on the blade. Use oil to keep the teeth cool, and remember "SLOW RPM"!!
After you have the 2" hole in the 4" flat stock, you need to "bevel" the bottom edge for welding, and the 2 1/2" flat stock will get a bevel on the top edge.
NOTICE in all the pics, your 4" flat stock will have the 2" hole just left of center. The 2 1/2" flat stock will always have the very first measured/marker hole on the bottom/right. DON'T accidentally "flip" one of the pieces and weld them on backwards.
Now move onto making the 105* template/jig. I used metal drawer dividers. Anything flat that can be bent and stay sturdy. Give them a bend till your at 105*.
Back to the bracket, clamp the 4" flat stock in a vise. Use the 105* templates/jig and clamp them to the 4" flat stock.
Now put your 2 1/2 flat stock onto the 105* jig and adjust until your "bevel" edges line up, also match up the two flat stock pieces line up length wise.
Now check to be sure you still have 105* angle.
Now your ready to weld the back side of the bracket.
After the bracket has cooled, flip over and weld the front side.
You are ready to add the 1/8" NPT couplers. I used 1/4" X 20 bolts/nut/washer to bolt the coupler to the bracket. Try to keep the coupler hole centered up with the bracket hole. Now tack weld these couplers to bracket (pic below). These couplers act as a spacer needed for the head/rocker box clearance.
At this point you are done. You can cut off the corners of the top of bracket or leave it square. I chose to cut the corners off for "looks".
When hooking up the chain to bracket for lifting/install head, Dale set the chain up thru the back of bracket and locked it in with a ratchet extension. I don't know how a hook will work, but Dale's method kept the head at the right angle to lower the head evenly with the block/head gasket.
You will use the 6m bolts and washers to bolt the bracket to head for lifting/install.
This post is important and I cannot condone Photobucket's $400/year ransom... so, through some IT wizardary.. tada!
if anyone is interested in their own hosting solution for $35/year including a domain, PM me.
Richard
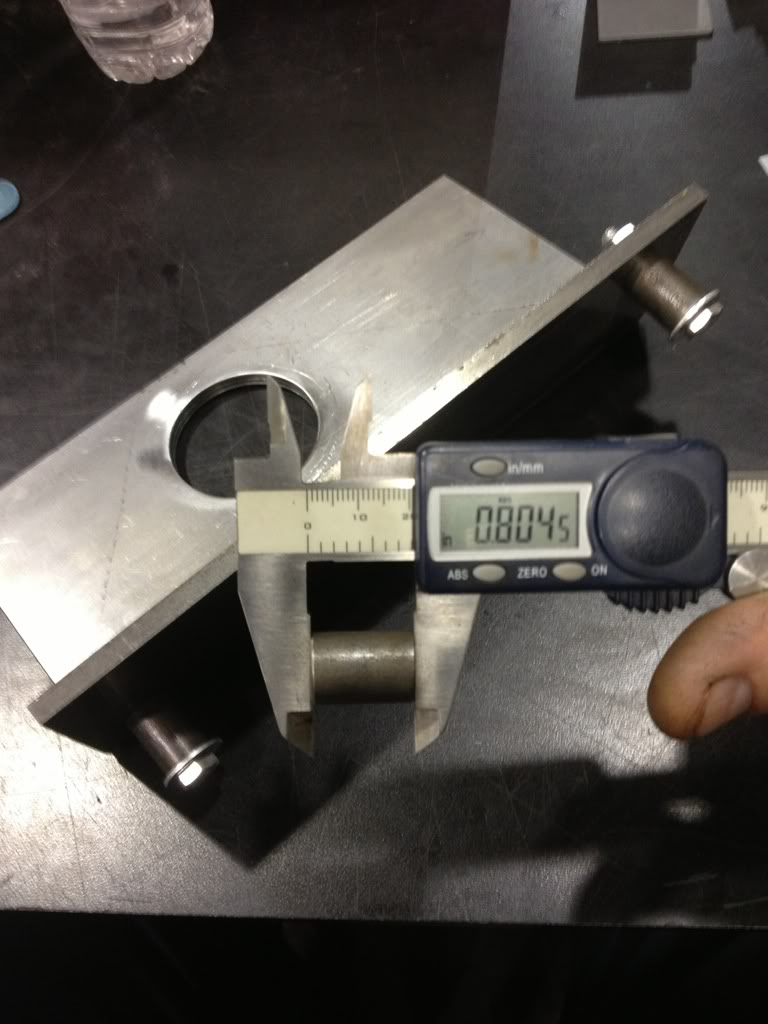
EDT: Here is an image of the measurement of the spacer I found in his album
Logistics Pro


Joined: May 2004
Posts: 3,616
Likes: 880
My brother......you are awesome!!!!!!!!!!!!!!!!!!!!
Thank you very much
Joe
Thank you very much
Joe
This post is important and I cannot condone Photobucket's $400/year ransom... so, through some IT wizardary.. tada!
if anyone is interested in their own hosting solution for $35/year including a domain, PM me.
Richard
EDT: Here is an image of the measurement of the spacer I found in his album
if anyone is interested in their own hosting solution for $35/year including a domain, PM me.
Richard
EDT: Here is an image of the measurement of the spacer I found in his album
Hotshot


Joined: Dec 2014
Posts: 17,832
Likes: 3,119
From: Jersey Shore
That's a lot of work for a bracket.
Great job of restoring an important thread Richard.
As I go to all these different forums the Photobucket kidnapping is everywhere. It reminds me of when Webshots wiped out all the pictorials I had. I never got back all the pictures I had there. An important lesson that if you want your work to be retained often it's better to just provide it to the site rather using a third party.
2006 Bullet-Riddled 6.0
Joined: Sep 2011
Posts: 651
Likes: 5
From: Sac River Delta Ca.

That's a lot of work for a bracket.
Great job of restoring an important thread Richard.
As I go to all these different forums the Photobucket kidnapping is everywhere. It reminds me of when Webshots wiped out all the pictorials I had. I never got back all the pictures I had there. An important lesson that if you want your work to be retained often it's better to just provide it to the site rather using a third party.
Great job of restoring an important thread Richard.
As I go to all these different forums the Photobucket kidnapping is everywhere. It reminds me of when Webshots wiped out all the pictorials I had. I never got back all the pictures I had there. An important lesson that if you want your work to be retained often it's better to just provide it to the site rather using a third party.
Fleet Owner

Joined: Apr 2012
Posts: 27,307
Likes: 549
From: Spanaway
You must spread some Reputation around before giving it to DarkStarMedia again.
Good save! That is why I keep my originals on my home system.
Even with the cab off tht bracket makes moving the head a lot less of a pain.
After all you don't want to scratch the sealant on the gaskets by moving the
heads around while trying to set them down.
Good save! That is why I keep my originals on my home system.
Even with the cab off tht bracket makes moving the head a lot less of a pain.
After all you don't want to scratch the sealant on the gaskets by moving the
heads around while trying to set them down.

Laughing Gas
Joined: Dec 2017
Posts: 846
Likes: 34
Attached are PDFs of the guide and dimension to be printed out (landscape mode) and laid on the metal piece to center punch before drill.
I would tape the paper to the metal piece to keep it rigid before center punch. I would draw (scratch) a square line on both pieces (on the right hand side) just in case you didn't cut them squared
I would tape the paper to the metal piece to keep it rigid before center punch. I would draw (scratch) a square line on both pieces (on the right hand side) just in case you didn't cut them squared
Hotshot
Joined: Dec 2014
Posts: 17,832
Likes: 3,119
From: Jersey Shore
FTE Stories
Ford Trucks for Ford Truck Enthusiasts

Top 10 Fords at 2026 Carlisle Ford Nationals
Joe Kucinski
3 Best / 3 Worst Parts of Modern Ford Ownership
Brett Foote
10 Amazing Upgrades That Solve Common Ford Truck Owner Headaches
Pouria Savadkouei
Every 2026 Ford Engine Explained
Brett Foote
10 Ugly Ford Trucks That We Still Kinda Love
Joe Kucinski
10 Things Every Truck Owner NEEDS (2026 Edition)
Michael S. Palmer
Rezvani's Latest Post-Apocalyptic Monster Is a Ford F-150 Raptor Underneath
Verdad Gallardo
Top 10 Most Expensive Ford Trucks Ever Sold on Bring a Trailer
Joe Kucinski
2027 Ford Super Duty Buyer's Guide (Every Model, Engine, & Package)
Brett Foote
Laughing Gas
Joined: Dec 2017
Posts: 846
Likes: 34
Skip to the end.
Genius!
Looks like this:
https://www.homedepot.com/p/Gardner-...7792/100130546
Thanks.
Genius!
Looks like this:
https://www.homedepot.com/p/Gardner-...7792/100130546
Thanks.
Hotshot
Joined: Dec 2014
Posts: 17,832
Likes: 3,119
From: Jersey Shore
Not sure it’s the right alloy .......
The head is around 70 lbs so it’s not something that really needs a bracket that can handle 500 lbs. I was mocking up one out of hardboard and that bolt hole is right there. Right there in the center. The one bolt can easy handle hundreds of pounds. A piece of 1/8” flat stock hanging over would work too and again would be more then adequate. Those clamps I had, you just need a flat washer to keep the loop from bending and it’s installed upside down. The stainless is better steel then the HD version.
The head is around 70 lbs so it’s not something that really needs a bracket that can handle 500 lbs. I was mocking up one out of hardboard and that bolt hole is right there. Right there in the center. The one bolt can easy handle hundreds of pounds. A piece of 1/8” flat stock hanging over would work too and again would be more then adequate. Those clamps I had, you just need a flat washer to keep the loop from bending and it’s installed upside down. The stainless is better steel then the HD version.
Hotshot
Joined: Dec 2014
Posts: 17,832
Likes: 3,119
From: Jersey Shore
The clamp put the lifting point at the same X-Y point. Anyone who does an alternative “bracket” needs to confirm where they are and an easy check is to use an inclinometer on the block mating surface and dangling head to insure they are at the same angle. And that’s a real important point because with the bracket the head will balance the head at a specific angle. If your truck sits on an angle or the driveway is not flat, or your engine stand is not setting the block level you have a disparity. It doesn’t help that you did all that work building a bracket or spend all that money and not have the two surfaces coming together parallel.
And if you install studs or the take-off bolts with the heads sawed off you can also guide the head back on.
And if you install studs or the take-off bolts with the heads sawed off you can also guide the head back on.
Laughing Gas
Joined: Dec 2017
Posts: 846
Likes: 34
Thanks. That's good idea about the washer and the 1/8" piece. I was a bit surprised that small "bracket" can handle that much. I didn't know it was about 80 lbs.
Laughing Gas
Joined: Dec 2017
Posts: 846
Likes: 34
The clamp put the lifting point at the same X-Y point. Anyone who does an alternative �bracket� needs to confirm where they are and an easy check is to use an inclinometer on the block mating surface and dangling head to insure they are at the same angle. And that�s a real important point because with the bracket the head will balance the head at a specific angle. If your truck sits on an angle or the driveway is not flat, or your engine stand is not setting the block level you have a disparity. It doesn�t help that you did all that work building a bracket or spend all that money and not have the two surfaces coming together parallel.
And if you install studs or the take-off bolts with the heads sawed off you can also guide the head back on.
And if you install studs or the take-off bolts with the heads sawed off you can also guide the head back on.