


Operation XLT
Thread Starter
|
Fleet Mechanic

Joined: Dec 2006
Posts: 1,925
Likes: 10
From: Phoenix, AZ
Haha I guess it's not too much of a secret.
I knew in the eyes and stuff would hurt, never though it would get up inside my ear. That REALLY hurt. I guess just because Ray Ban glasses are expensive doesn't mean they will protect well!
I should be fine though I hope, everything is going back to normal now, just feels like I have an ear ache, but its slowly going away. I suppose I'll let the sea foam I sucked in through the brake booster sit a little longer until I feel like getting back up and replacing the fuel filter.
Thread Starter
|
Fleet Mechanic
Joined: Dec 2006
Posts: 1,925
Likes: 10
From: Phoenix, AZ
Haha yeah I know, sea foam and gas. I was thinking I never deep cleaned my ear, just used q-tips and such so some gas and sea foam would do me well.
My ear/head doesn't hurt anymore now so thats awesome! I think I still have some canola oil in there though because I put some in there with a q-tip since the oil helped sooth the pain and soak up the gas after I tried rinsing it out.
Well now it's back to work on my tune-up! I had trouble getting one of the fuel lines off the filter.. so hopefully it will be easy for all this fun I went through yesterday. Haha.. I made a comment to my friend that it usually takes longer than you expect to do anything when working with vehicles and I just had to prove him right.
After the new filter, then I get to put my new Cap and Rotor and plugs on and then oil change! My truck will gain sooooo much horsepower after this. The next feasible option to get horsepower is red stripes and more stickers!!
Thread Starter
|
Fleet Mechanic
Joined: Dec 2006
Posts: 1,925
Likes: 10
From: Phoenix, AZ
I will be having a pretty big update within the next month or so, maybe sooner. I just purchased some AFR 165 cylinder heads so I'm going to install those. I'm also going to be painting my valve covers and intake manifold so my engine bay will look all nice and fancy after the new heads are on. Apparently the heads are a bolt on 100hp and from what I read that seems to be somewhat accurate. They were over 1000 so yeah.... but I got them from someone else so I got about 400-500 off which is nice. I would like to install these as soon as possible, but I do want to give myself about 3 days to do them. MAYBE I will try to tackle them this weekend, but I'm a little hesitant in case something goes wrong because this is my daily driver.
I've also been messing around with a rotary buffer trying to smooth out the orange peel on my paint-job I did. I ended up getting some pretty good result with it. I can see some swirl marks, but they aren't very noticeable and I think the paint looks much nicer.
Anyways, I'm going to be taking a lot of pictures with the head install and painting. I chose a metallic red paint. I think I'm just going to paint the valve covers and upper intake manifold, then clean up the lower so it looks nice. I have been trying to look around for some other ideas on what to paint also, but I haven't found too much. I think what I have planned will look pretty good though.
Thread Starter
|
Fleet Mechanic
Joined: Dec 2006
Posts: 1,925
Likes: 10
From: Phoenix, AZ
Alright well while I was sick, I got restless and decided to start with my head swap. I'll post pictures of some stuff I have later today when I get a chance. I'm about 1/2 way done, but I still have tons of work left.. I have to wait for the head dowels to come in before I can put my new heads on... so that's not exciting. Cleaning everything up is taking a LONG time too....
I should have posted before pictures of my intake manifold and valve covers before I started cleaning them because they were pretty gross... but they aren't fully cleaned yet. I have to run into town yet again to get more supplies to clean... I hate making more trips! Anyways, I'll quit rambling and take some pictures and get the cleaning stuff from in town.
Looking back at all the work I've done from my truck.. I've done a lot. Maybe the title of the thread should have been "Operation XLT to Eddie Bauer to Lightning"
Haha.. changing heads won't make my truck a "Bronco Lightning", but it will sure be a nice upgrade, especially since I already have free flowing exhaust and the K&N intake kit! Okay, I'll seriously stop rambling now and get some more stuff done!
Posting Guru
Joined: Jul 2012
Posts: 1,394
Likes: 5
From: cincinnati ohio
FTE Stories
Ford Trucks for Ford Truck Enthusiasts

Top 6 Best Deals Available on New Fords & Lincolns Right Now
Brett Foote
This Hennessey Takes the Expedition Tremor's Off-Roading Capability to the Next Level
Verdad Gallardo
Top 10 Fords at 2026 Carlisle Ford Nationals
Joe Kucinski
3 Best / 3 Worst Parts of Modern Ford Ownership
Brett Foote
10 Amazing Upgrades That Solve Common Ford Truck Owner Headaches
Pouria Savadkouei
Every 2026 Ford Engine Explained
Brett Foote
10 Ugly Ford Trucks That We Still Kinda Love
Joe Kucinski
10 Things Every Truck Owner NEEDS (2026 Edition)
Michael S. Palmer
Rezvani's Latest Post-Apocalyptic Monster Is a Ford F-150 Raptor Underneath
Verdad GallardoThread Starter
|
Fleet Mechanic
Joined: Dec 2006
Posts: 1,925
Likes: 10
From: Phoenix, AZ
Haha I'll get them up soon, they aren't much to look at now either. Just a big mess now, but I suppose it's kinda cool looking at everything apart. I think once it starts getting a little darker and harder to work, I'll take a longer break and upload the pictures I took.
Oh and I already had the K&N kit on my truck, so I'm just going to keep it. I did notice about 1-1.5mpg highway increase when I put it on. You're right though Encho, it doesn't do much, but since I already have it, I might as well keep it.
Oh and I already had the K&N kit on my truck, so I'm just going to keep it. I did notice about 1-1.5mpg highway increase when I put it on. You're right though Encho, it doesn't do much, but since I already have it, I might as well keep it.
Thread Starter
|
Fleet Mechanic
Joined: Dec 2006
Posts: 1,925
Likes: 10
From: Phoenix, AZ
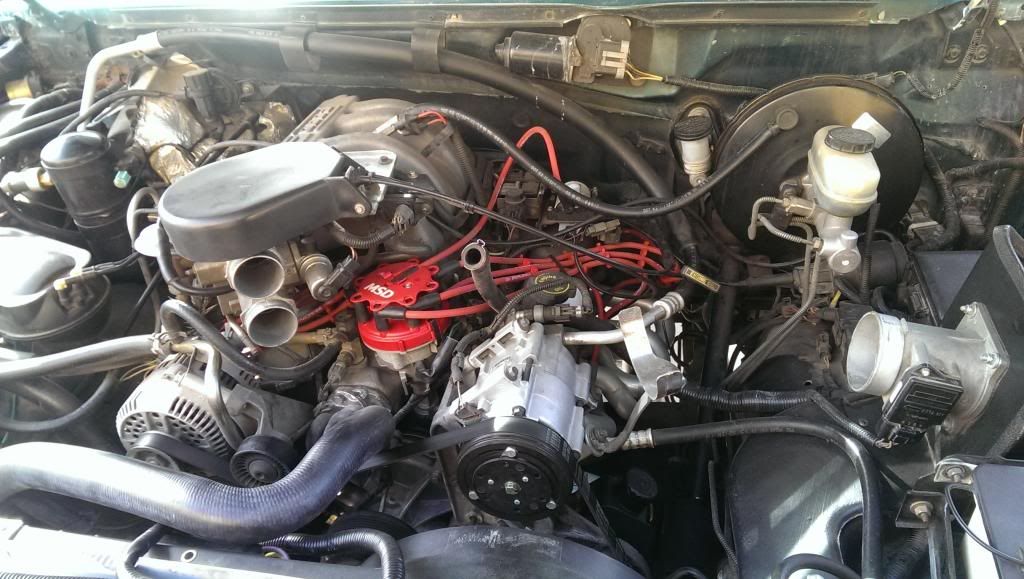
Alright well here are some of the pictures of the work I've done so far.
Here is my engine with only the air hose removed and some hoses disconnected:
Getting closer!

Finally the heads are removed!! ( And mating surfaces mostly cleaned too here)

These valve covers looked much dirtier before, but they still look gross:


And here is what the upper intake looks like before painting:

I decided to go with a metallic red for the valve covers and intake. The color looks decent I think. The STUPID paint kept laying wierd on the valve covers in a few spots so I got lazy and wiped them in the spots, then recleaned and sprayed more paint. They came out OKAY, but the spark plug wires and other stuff will probably cover the defective parts so I'm not too upset.
Now I just have to wait for those head dowels to come in before I can put the gaskets and heads back in............ I wish a 4 dollar part would be more available, but apparently no auto part stores had any in the state.. so I have to wait for them to come in. I hope the block surfaces are clean enough too. I spent quite some time cleaning them, and they feel quite smooth, but I've never done this before so I don't know what exactly to expect.
Here is my engine with only the air hose removed and some hoses disconnected:

Getting closer!

Finally the heads are removed!! ( And mating surfaces mostly cleaned too here)

These valve covers looked much dirtier before, but they still look gross:


And here is what the upper intake looks like before painting:

I decided to go with a metallic red for the valve covers and intake. The color looks decent I think. The STUPID paint kept laying wierd on the valve covers in a few spots so I got lazy and wiped them in the spots, then recleaned and sprayed more paint. They came out OKAY, but the spark plug wires and other stuff will probably cover the defective parts so I'm not too upset.
Now I just have to wait for those head dowels to come in before I can put the gaskets and heads back in............ I wish a 4 dollar part would be more available, but apparently no auto part stores had any in the state.. so I have to wait for them to come in. I hope the block surfaces are clean enough too. I spent quite some time cleaning them, and they feel quite smooth, but I've never done this before so I don't know what exactly to expect.
Thread Starter
|
Fleet Mechanic
Joined: Dec 2006
Posts: 1,925
Likes: 10
From: Phoenix, AZ
Alright, here is the intake:

I think it came out pretty well. I don't know if I should spray it with a clear or just leave it. I think I'm going to leave it as is.
Here are the valve covers:

I was able to correct the bad spots better than I expected. The bad spot on the valve cover with the oil fill spout is directly to the right of the spout, and the passenger side valve cover has a bad spot on the vertical spot under the "Ford" logo. That one isn't as bad, and almost can't be seen, so I'm not too worried anymore!
What do you guys think about the color? Should I have done something else? I figured that since I had the MSD cap with the Red Ford Racing wires, that I would go with red.
Anyways... like I said, now I just have to wait for the head dowels... Hopefully things go quickly after those come in! I'll just have to put the heads in, bolt the rocker and pushrods up to the new AFR heads, and then the rest shouldn't be too bad!
Thread Starter
|
Fleet Mechanic
Joined: Dec 2006
Posts: 1,925
Likes: 10
From: Phoenix, AZ
Well I haven't had much time to work on my truck today, I've been at school all day and I still have some homework due..
I did finally get the head dowels in!! So I ended up running a razor over the block again (and some more stuff came up Hopefully it's good now!)
I then cut some slots out of an old head bolt and chased all the head bolt holes down... Some were pretty hard to turn by hand at first so good thing I cleaned them out! Now I'm going to try and bolt the new heads up and call it a night! I can't wait to get this done.. but I have a bit of school work due this week to and have to catch up from being sick last week also....
I'll get it done soon though. Once the heads are one, I have to fix a broken vacuum line I made and also fix the EGR tube to the manifold because I noticed a crack in it. Oh well, some hi temp tubing should hopefully take care of that!
I did finally get the head dowels in!! So I ended up running a razor over the block again (and some more stuff came up
Hopefully it's good now!)I then cut some slots out of an old head bolt and chased all the head bolt holes down... Some were pretty hard to turn by hand at first so good thing I cleaned them out! Now I'm going to try and bolt the new heads up and call it a night! I can't wait to get this done.. but I have a bit of school work due this week to and have to catch up from being sick last week also....
I'll get it done soon though. Once the heads are one, I have to fix a broken vacuum line I made and also fix the EGR tube to the manifold because I noticed a crack in it. Oh well, some hi temp tubing should hopefully take care of that!
Thread Starter
|
Fleet Mechanic
Joined: Dec 2006
Posts: 1,925
Likes: 10
From: Phoenix, AZ
Well it turns out nothing ever goes as planned.
I got the heads in and bolted down. I bought new TTY bolts and followed the procedure. Then put in my original pushrods and rocker arms. Here it is with the valve covers set on top (not fully bolted down yet):

As you can see, I took the timing cover and oil pan off too. I remembered that I had a leak on the passenger side coolant port on the timing cover. I think I just didn't tighten down the bolts hard enough, because it's a new timing cover and the block seemed fairly clean. I figured that I have everything apart, now would be the best time to change the timing cover.
I remembed I had to loosen the oil pan to take out the timing cover which I HATE doing.... However, upon taking the timing cover off, I noticed my one piece fel pro oil pan gasket had some rips on the rubber piece that goes under the harmonic balancer....
So, because I had to change the gasket again, I took down the oil pan. I then started reading up on stuff and managed to convince myself that because I have over 200k miles, I better change my oil pump and pickup tube. I don't know if it was necessary, but I figured it would be good insurance.
I ended up taking off my Y-pipe, and jacking up my motor from the transmission to get the oil pan out. That DIDN'T work though.. but LUCKILY, with how high I jacked up the motor, I was able to slide the oil pan out through the front from the engine bay.
Here it is before I cleaned it up too much:

Here it is sanded with some metal polishing wheel attached to a drill:

It still had some old paint spots on it, but I spent about an hour cleaning it up and was getting tired of grinding away. I forgot to take a picture of it painted outside of the truck, but here it is sitting under the engine:

You can see a little spot kinda above the drain plug hole where there is still some texture from the old paint. It looks likghter because of the light reflection but it's not really too bad. Much better than the old messed up "paint" or whatever before. I don't know what was wrong with the old paint stuff, but it started to get a weird crackly texture all to it but was sticking really well to the pan.
Anyways, here is a picture of my new oil pump and pickup tube waiting to be bolted up:

I didn't really know what to look for under the engine with the oil pan out, but here is a crappy picture of what it looked like:

Nothing seemed out of place to me, but like I said, I don't know what wears and whatnot so hopefully everything under there was fine!
Now I just have to put the timing cover and then water pump back on and I should be ready to bolt the oil pan back up!!
For anyone who has done the oil pan gasket, should I put any RTV on the corners of the dip in the gasket (right where the dip for the harmonic balancer and rear main seal start)? I know you are supposed to install the fel pro gasket dry, but I think I still had tiny leaks last time when I had it and it seemed to be coming from both of curved parts in the gasket. Maybe I didn't have that part seated right, but I don't know!