


How bad is this?

Elder User
Joined: Jun 2012
Posts: 522
Likes: 0
It looks like a voltage regulated transistor connected to a heat sink. In electronics it would regulate current output based on voltage applied to the input and voltage applied to the p or n junction in the center. It does not belong to the truck, maybe it regulated a set of horns or lights by adjusting the voltage to the center junction. Look for a variable rheostat on the input wires.
Last edited by old broke prospector; Mar 11, 2013 at 10:35 PM. Reason: remove picture

More Turbo
Joined: Apr 2011
Posts: 707
Likes: 2
From: Sauk City, WI
Bad ignition switch possibly? Or bad coil wire? Can you test it right on the back of the ignition switch? Trace your coil wire back to the ignition switch and test it there with the key in the on/run position. Im at work or Id look in my shop manual to tell you what wire it is.

Thread Starter
|
Junior User
Joined: Jun 2011
Posts: 72
Likes: 0
Wow! I figured it out. I'm so proud of myself.
I couldn't trace the coil supply wire through the firewall and then through the bundle on the inside of the firewall.
However - there was a wire coming out of the ignition switch that heated up instantly when the key was in the on position. I couldn't follow it visually, but I sure could follow the heat. It lead me to a wire that was shorting out on the engine block. Taped it up and secured it out the way and the truck started right up!
If anyone's willing, here's my next wiring question: In the pic below, there is a heavy wire coming from the battery and one coming from the alternator. I assume they should be connected and that's what charges the battery. I assume they should be bolted onto some sore of insulated post that attaches to the inner fender screw in the center of the pic. Is that correct? And what do you call the "insulated post" that would hold them?

I couldn't trace the coil supply wire through the firewall and then through the bundle on the inside of the firewall.
However - there was a wire coming out of the ignition switch that heated up instantly when the key was in the on position. I couldn't follow it visually, but I sure could follow the heat. It lead me to a wire that was shorting out on the engine block. Taped it up and secured it out the way and the truck started right up!
If anyone's willing, here's my next wiring question: In the pic below, there is a heavy wire coming from the battery and one coming from the alternator. I assume they should be connected and that's what charges the battery. I assume they should be bolted onto some sore of insulated post that attaches to the inner fender screw in the center of the pic. Is that correct? And what do you call the "insulated post" that would hold them?
Laughing Gas
Joined: Dec 2010
Posts: 1,091
Likes: 14
From: Tucson, Arizona
Good on 'ya for hanging in there! That's a nice looking truck. The large gauge wire that comes off of your positive battery post connects to the large post on the left side of your starter solenoid. The larger gauge black wire with a yellow trace (assuming it's factory wiring - the yellow trace may have faded) from the alternator connects to the center (and only) post of the wiring junction block located on the right (passenger) side inner fender panel just forward of the starter solenoid. In your picture, the junction block appears to be missing. I seem to recall those are hard to find. Perhaps Number Dummy will have some ideas. On my '66 V8 there are two other large gauge black wires also connected to that post. If I were you, I'd check that wire you found shorting out very carefully along its full length for signs of damage - bubbled insulation, for example. A wire that has been severely overheated should be replaced. Good luck with your project!

Logistics Pro


Joined: May 2008
Posts: 3,670
Likes: 370
From: PHX AZ
Thanks for the update! Glad to see this truck got a new lease on life.I am sure you got a good education on rustbelt trucks. At least now you know its solid. Now for the details. Here is a shot of how your hubcaps looked when new, before the red trim paint got covered up.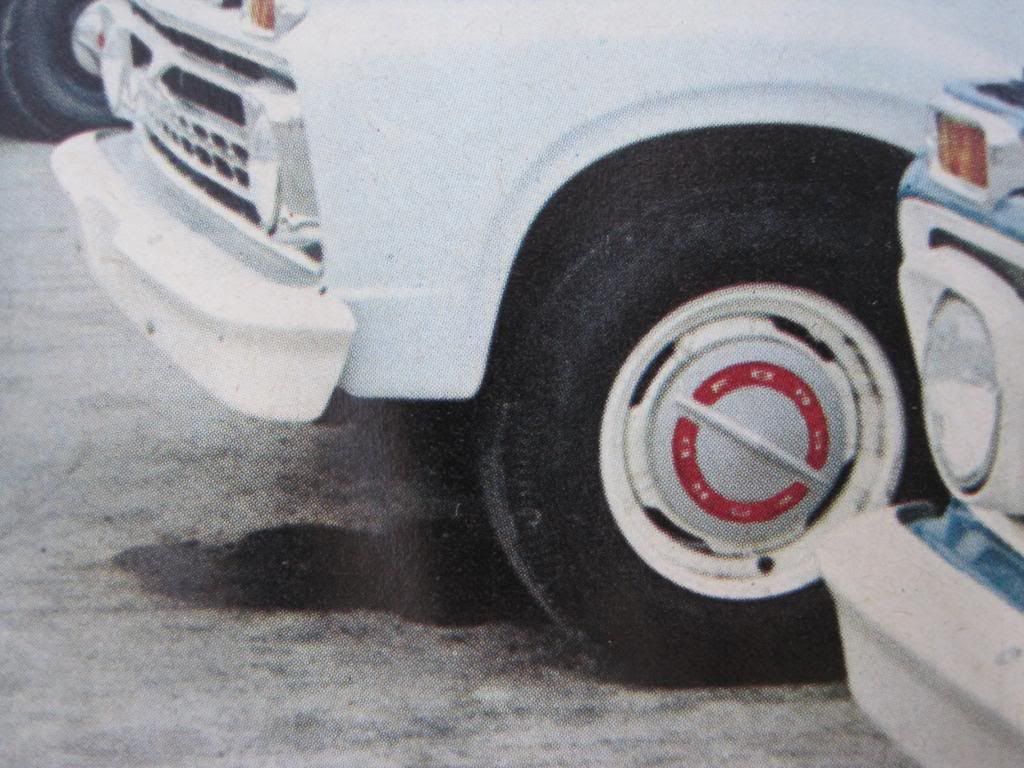
Dragged my NOS caps like those out of the parts pile.


Logistics Pro
Joined: May 2008
Posts: 3,670
Likes: 370
From: PHX AZ
Wow! I figured it out. I'm so proud of myself.
I couldn't trace the coil supply wire through the firewall and then through the bundle on the inside of the firewall.
However - there was a wire coming out of the ignition switch that heated up instantly when the key was in the on position. I couldn't follow it visually, but I sure could follow the heat. It lead me to a wire that was shorting out on the engine block. Taped it up and secured it out the way and the truck started right up!
If anyone's willing, here's my next wiring question: In the pic below, there is a heavy wire coming from the battery and one coming from the alternator. I assume they should be connected and that's what charges the battery. I assume they should be bolted onto some sore of insulated post that attaches to the inner fender screw in the center of the pic. Is that correct? And what do you call the "insulated post" that would hold them?
I couldn't trace the coil supply wire through the firewall and then through the bundle on the inside of the firewall.
However - there was a wire coming out of the ignition switch that heated up instantly when the key was in the on position. I couldn't follow it visually, but I sure could follow the heat. It lead me to a wire that was shorting out on the engine block. Taped it up and secured it out the way and the truck started right up!
If anyone's willing, here's my next wiring question: In the pic below, there is a heavy wire coming from the battery and one coming from the alternator. I assume they should be connected and that's what charges the battery. I assume they should be bolted onto some sore of insulated post that attaches to the inner fender screw in the center of the pic. Is that correct? And what do you call the "insulated post" that would hold them?
Thread Starter
|
Junior User
Joined: Jun 2011
Posts: 72
Likes: 0
Thanks everyone!
Next question. I'm having trouble getting it to run well. It sputters and backfires. Someone (not on this forum!) suggested it could be bad gas/clogged lines/etc. I think it was getting plenty of gas. But I pulled the gas tank and looked inside.
Never seen the inside of a gas tank before! It doesn't look TOO bad to me. Is it bad? Should I pay to have it cleaned and lined?

Next question. I'm having trouble getting it to run well. It sputters and backfires. Someone (not on this forum!) suggested it could be bad gas/clogged lines/etc. I think it was getting plenty of gas. But I pulled the gas tank and looked inside.
Never seen the inside of a gas tank before! It doesn't look TOO bad to me. Is it bad? Should I pay to have it cleaned and lined?
Logistics Pro
Joined: Dec 2004
Posts: 4,651
Likes: 60
From: Hemet ca.
Definitely get it cleaned. I see a lot of rust/scale flaking inside. Look at the area by the tube. Then to the far left it looks like a big flake waiting to break off. Get it cleaned out as soon as you can.
FTE Stories
Ford Trucks for Ford Truck Enthusiasts

10 Fords to Drive Before You Die
Joe Kucinski
3 Best / Worst Features Of The 2025+ Ford Expedition
Brett Foote
10 Ways Ford is LOSING to the Competition
Joe Kucinski
Top 6 Best Deals Available on New Fords & Lincolns Right Now
Brett Foote
This Hennessey Takes the Expedition Tremor's Off-Roading Capability to the Next Level
Verdad Gallardo
Top 10 Fords at 2026 Carlisle Ford Nationals
Joe Kucinski
3 Best / 3 Worst Parts of Modern Ford Ownership
Brett Foote
10 Amazing Upgrades That Solve Common Ford Truck Owner Headaches
Pouria Savadkouei
Every 2026 Ford Engine Explained
Brett Foote
Logistics Pro
Joined: Oct 2005
Posts: 3,785
Likes: 4
From: Mddl A MexCans
Do it yourself, it's already out. POR 15 sells a kit (marine clean, metal etch, sealer) You may be able to get it cheaper than ebay but after time, gas etc.. not sure. A marine supply will have the MC, maybe walmart. Metal etch, paint store ? READ the directions.... DO NOT PUT THE POR BACK IN THE CAN AND SEAL THE LID. It resembles that silver roof paint you see all over the bible belt imo.
Skip the idea of bolts and nuts to knock rust loose and use 6-10 inches of tow chain, inspect for burs. I used it between each soak, rinse and etch on my cuddy cabin saddle tanks.


Beat the heck outa the boat regularly
Half a day at most.
Skip the idea of bolts and nuts to knock rust loose and use 6-10 inches of tow chain, inspect for burs. I used it between each soak, rinse and etch on my cuddy cabin saddle tanks.
Beat the heck outa the boat regularly
Half a day at most.
Thread Starter
|
Junior User
Joined: Jun 2011
Posts: 72
Likes: 0
I cleaned it myself. I believe it came out pretty good. What do you think?
I used Prep & Etch from Home Depot. Put about a third of the gallon in. Sloshed it around for about 20 minutes. The pic below with the green liquid is what it looked like. I rinsed it out several times and hit it with a hair dryer for a long time.
The last pic is what it looks like now.


I used Prep & Etch from Home Depot. Put about a third of the gallon in. Sloshed it around for about 20 minutes. The pic below with the green liquid is what it looked like. I rinsed it out several times and hit it with a hair dryer for a long time.
The last pic is what it looks like now.
Logistics Pro
Joined: Oct 2005
Posts: 3,785
Likes: 4
From: Mddl A MexCans
You have added acid to the tank, best to add a base after. Mix up a gallon of water and 3 tblspns of baking soda, slosh and let rest on all sides. Empty and repeat. Rinse clean. The acid can continue where ever it managed to hide.
You need the coating now for sure. Don't let it rest with the tank seal coating in and pickup facing tube down. Roll it all around real slowly letting it rest here and there, then turn upside down so extra sealant drains out. Air dry 72 hrs in required conditions before adding fuel.
You need the coating now for sure. Don't let it rest with the tank seal coating in and pickup facing tube down. Roll it all around real slowly letting it rest here and there, then turn upside down so extra sealant drains out. Air dry 72 hrs in required conditions before adding fuel.

Thread
Thread Starter
Forum
Replies
Last Post
Walkenvol
1999 - 2016 Super Duty
16
Nov 16, 2021 08:13 AM
1974xlt
1973 - 1979 F-100 & Larger F-Series Trucks
4
Apr 9, 2017 09:30 AM
WideOpenFord
1999 - 2003 7.3L Power Stroke Diesel
33
Apr 16, 2009 09:01 PM
