




E4OD to ZF5 - In Process

Cargo Master

Joined: Feb 2010
Posts: 2,526
Likes: 6
From: College Station, TX
I wonder then, with yours being a 95, if there was a change in the trans harness pin locations in 96. Mine and Joseph's are 96s and Kris's is a 97. I believe Jason(jgpowerstroker or something like that) also has a 96 and had the same issue and we all used 95 and earlier donor gear. 96 also brought forward the ZF S5-47 as well. Ford has done funnier things so...

Senior User
Joined: Apr 2011
Posts: 305
Likes: 0
From: Idaho
Yea i would just focus on one step at a time get that done and then tackle another. And i have no idea on what they changed during the years, all i know is that my zf is the lighter duty model out of a 93 Idi.

Thread Starter
|
Elder User
Joined: Jan 2012
Posts: 584
Likes: 0
From: Southern West Virginia
Ok guys. The kids are in bed...so I can report on the swap progress. We started today.
Initially, we were just going to put new U-Joints in the drive shafts so they were ready...but one thing led to another...
I'm going to attempt pictures, which I've never done before...so if these don't work, I'll try again. Here's the truck in father-in-law's garage. We put it on jack stands from the start so we'd have the clearance to remove the trans:


So, we put the new U-Joints in to start out, since we already had the drive shafts out of the donor truck. While my father-in-law started that, I started taking the drive shafts out of my "recipient" truck, which I'll just call my good truck. My truck has the 4407 TCase, and we are hoping to use it (assuming that we can get everything to fit right, which we should) but it has a flange-bolt system to connect to the drive shaft, which needed to be removed and put over on the drive shaft from the donor, which has a 1356 TCase and a slip yoke connection. Here's the picture of the two yokes:

Once we got that done, which didn't take very long, we decded to do a few other things and get a jump start on what was going to be tomorrow's work. So, I started in the cab removing the seats and trim so we could pull the carpet back and remove the center hump. Meanwhile, my FIL (i'm tired of writing "father-in-law") started underneath the truck by removing the skid plate under the trans crossmember. Here are some pics of both:


So we got that done and decided to keep moving. I'm trying to remember the order in which we did things....
We pulled the wiring and the trans lines loose from the E40D and removed the starter. Then we found that the dipstick tube is bolted in, and the bolt is almost impossible to get to - it's about halfway down the tube right against the heat shield. What a pain! I never read about that anywhere before, so I guess others didn't have as much of a problem. We were excited that we didn't have to put it back in, but then we saw there was a ground wire connected with that bolt and we'd have to put it back in. We waited intil the trans was out.... Here's some pictures of the bolt I'm talking about. Pain in the butt.
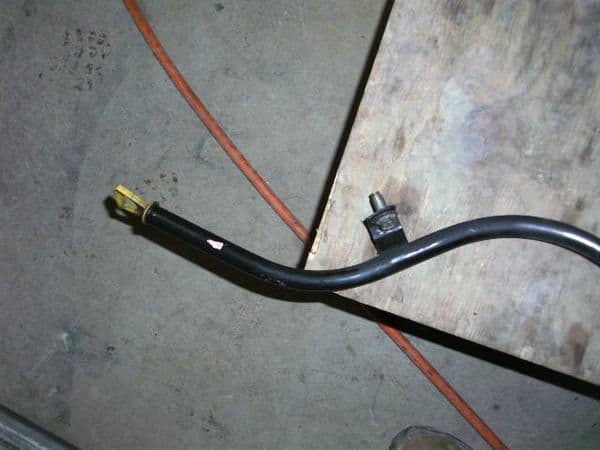
And the location of the bolt looking up from the bottom of the truck after the trans was out. It's kinda hard to see where the bolt is, but you can kinda see the round ground wire connection.

We read this before, but I'll note it again: You have to loosen the down pipe in order to get one of the bolts for the trans out. This makes it worlds easier. Then, we got the floor jack under the trans (and the t-case..we decided to leave them connected and take them apart after we dropped the whole package) and removed the cross-member for the trans. Then, we lowered the trans down a little so we could get to the top two bell housing bolts from the hole in the cab. They are super easy to get to this way - just lower the jack down a few inches and the impact gets right in there (with about an 8" extension). You can actually take out the top 4, which is what we did on both my good truck and on the donor. Then you just have the two bottom ones to remove, which are pretty easy to get to. Remove them, grunt and strain a little, and our trans and t-case were out. We also went ahead and separated the trans and t-case since we'll be re-using that t-case with the the ZF5. Here's some more pics:


Then we went decided to go ahead and reinstall the flywheel, clutch, and PPlate from the donor (if you remember, my donor already had the 13" solid mass flywheel and HD clutch and PPlate, so we decided to just reuse it. Should last for a while.) Here's a pic of that:

We did figure out that there is about a 1" spacer between the crank and the flex plate in the E4OD application, and you have to remove the 1" spacer before you reinstall the flywheel. The bell housing spacer (not sure if that's the right technical term) that the starter mounts to is the same (we were told that and we double checked, and they are the same), so we left that on there.
That's where we are now. We were happy with the progress for about 7 hours' work. We'll hit it again tomorrow after work and try to update you guys, depending on how late we work. If not tomorrow, I'll try to update soon after. We're going to start tomorrrow in the cab with the steering column - removing the automatic shifter, covering the PRND12 display, replacing the column cover. Also installing the pedal assembly, clutch master cylinder, and wiring harness. Then we'll try to get the ZF installed after that.
Any questions or comments are, as always, welcome and appreciated.
Initially, we were just going to put new U-Joints in the drive shafts so they were ready...but one thing led to another...
I'm going to attempt pictures, which I've never done before...so if these don't work, I'll try again. Here's the truck in father-in-law's garage. We put it on jack stands from the start so we'd have the clearance to remove the trans:
So, we put the new U-Joints in to start out, since we already had the drive shafts out of the donor truck. While my father-in-law started that, I started taking the drive shafts out of my "recipient" truck, which I'll just call my good truck. My truck has the 4407 TCase, and we are hoping to use it (assuming that we can get everything to fit right, which we should) but it has a flange-bolt system to connect to the drive shaft, which needed to be removed and put over on the drive shaft from the donor, which has a 1356 TCase and a slip yoke connection. Here's the picture of the two yokes:
Once we got that done, which didn't take very long, we decded to do a few other things and get a jump start on what was going to be tomorrow's work. So, I started in the cab removing the seats and trim so we could pull the carpet back and remove the center hump. Meanwhile, my FIL (i'm tired of writing "father-in-law") started underneath the truck by removing the skid plate under the trans crossmember. Here are some pics of both:
So we got that done and decided to keep moving. I'm trying to remember the order in which we did things....
We pulled the wiring and the trans lines loose from the E40D and removed the starter. Then we found that the dipstick tube is bolted in, and the bolt is almost impossible to get to - it's about halfway down the tube right against the heat shield. What a pain! I never read about that anywhere before, so I guess others didn't have as much of a problem. We were excited that we didn't have to put it back in, but then we saw there was a ground wire connected with that bolt and we'd have to put it back in. We waited intil the trans was out.... Here's some pictures of the bolt I'm talking about. Pain in the butt.
And the location of the bolt looking up from the bottom of the truck after the trans was out. It's kinda hard to see where the bolt is, but you can kinda see the round ground wire connection.
We read this before, but I'll note it again: You have to loosen the down pipe in order to get one of the bolts for the trans out. This makes it worlds easier. Then, we got the floor jack under the trans (and the t-case..we decided to leave them connected and take them apart after we dropped the whole package) and removed the cross-member for the trans. Then, we lowered the trans down a little so we could get to the top two bell housing bolts from the hole in the cab. They are super easy to get to this way - just lower the jack down a few inches and the impact gets right in there (with about an 8" extension). You can actually take out the top 4, which is what we did on both my good truck and on the donor. Then you just have the two bottom ones to remove, which are pretty easy to get to. Remove them, grunt and strain a little, and our trans and t-case were out. We also went ahead and separated the trans and t-case since we'll be re-using that t-case with the the ZF5. Here's some more pics:
Then we went decided to go ahead and reinstall the flywheel, clutch, and PPlate from the donor (if you remember, my donor already had the 13" solid mass flywheel and HD clutch and PPlate, so we decided to just reuse it. Should last for a while.) Here's a pic of that:
We did figure out that there is about a 1" spacer between the crank and the flex plate in the E4OD application, and you have to remove the 1" spacer before you reinstall the flywheel. The bell housing spacer (not sure if that's the right technical term) that the starter mounts to is the same (we were told that and we double checked, and they are the same), so we left that on there.
That's where we are now. We were happy with the progress for about 7 hours' work. We'll hit it again tomorrow after work and try to update you guys, depending on how late we work. If not tomorrow, I'll try to update soon after. We're going to start tomorrrow in the cab with the steering column - removing the automatic shifter, covering the PRND12 display, replacing the column cover. Also installing the pedal assembly, clutch master cylinder, and wiring harness. Then we'll try to get the ZF installed after that.
Any questions or comments are, as always, welcome and appreciated.
Thread Starter
|
Elder User
Joined: Jan 2012
Posts: 584
Likes: 0
From: Southern West Virginia
I just realized that in the picture with the drive shafts and yokes, we should have turned the slip yoke 180 degrees so the U joint was on the right for proper orientation. Hindsight...Hopefully you get the idea.
FTE Stories
Ford Trucks for Ford Truck Enthusiasts

Top 10 Most Expensive Ford Trucks Ever Sold on Bring a Trailer
Joe Kucinski
2027 Ford Super Duty Buyer's Guide (Every Model, Engine, & Package)
Brett Foote
Top 10 Ford Truck Tragedies
Joe Kucinski
AEV FXL Super Duty - the Super Duty Raptor Ford Doesn't Make
Brett Foote
Lobo Vs Lobo: Proof the F-150 Lobo Should Be Even Lower!
Michael S. Palmer
Ford's 2001 Explorer Sportsman Concept Looks For a New Home
Verdad Gallardo
10 Best Ford Truck Engines We Miss the Most!
Joe Kucinski
2026 Shelby F-150 Off-Road: Better Than a Raptor R?
Brett Foote
2027 Super Duty Carhartt Package First Look: 12 Things You NEED to Know!
Michael S. Palmer
Senior User
Joined: Sep 2007
Posts: 332
Likes: 0
From: Southern WV
TyBragg,
Tried to pm you but cant. What are you going to do with the auto and all associated parts you are removing? How many miles on tranny, where are you located? I would be interested for the right $$.
Tried to pm you but cant. What are you going to do with the auto and all associated parts you are removing? How many miles on tranny, where are you located? I would be interested for the right $$.
Thread Starter
|
Elder User
Joined: Jan 2012
Posts: 584
Likes: 0
From: Southern West Virginia
C350CREW - I sent you a visitor message. I am new to the forums and cannot PM until I post 25 times, which I have not yet. I sent you a visitor message though with my email, so just shoot me an email and I'll respond to that. Where in Southern WV are you located?
Thread Starter
|
Elder User
Joined: Jan 2012
Posts: 584
Likes: 0
From: Southern West Virginia
So we started inside the cab last night. Took the dash panels off around the steering column, dropped the column, and removed the automatic shifter and the entire shifter rod assembly. Then we installed the "push to remove" key lock from the donor 5 speed. Next, we removed the brake pedal assembly from the automatic. Then, it was time to install the clutch/brake pedal assembly. There are a few things we discovered: 1) it is necessary to remove the fuel pedal, 2) it is pretty necessary to remove the entire steering column ( you might be able to do it with the column in there, but after lots of struggling, we removed it and had the pedals in shortly thereafter), and 3) this is a pain in the butt. Here's a pic of it in progress:

Before we got the pedals completely installed, we got the master/slave cylinder in place. I suppose you could do it after the pedals are installed.

Here's the entire thing completed. Disregard the big red wire hanging down - that's for my CB power:

We also went ahead and routed the wiring harness for the trans while we were at it. Also - we were able to take the clutch sensor from the donor and get it installed on the master cylinder pushrod. We found the plug under the dash that plugs into this sensor (which was capped for the auotmatic), uncapped it, and got it plugged back ing. That's as far as we got yesterday, but now we are ready for trans installation today. More to come.
Tyler
Before we got the pedals completely installed, we got the master/slave cylinder in place. I suppose you could do it after the pedals are installed.
Here's the entire thing completed. Disregard the big red wire hanging down - that's for my CB power:
We also went ahead and routed the wiring harness for the trans while we were at it. Also - we were able to take the clutch sensor from the donor and get it installed on the master cylinder pushrod. We found the plug under the dash that plugs into this sensor (which was capped for the auotmatic), uncapped it, and got it plugged back ing. That's as far as we got yesterday, but now we are ready for trans installation today. More to come.
Tyler
Cargo Master
Joined: Feb 2010
Posts: 2,526
Likes: 6
From: College Station, TX
We pulled the wiring and the trans lines loose from the E40D and removed the starter. Then we found that the dipstick tube is bolted in, and the bolt is almost impossible to get to - it's about halfway down the tube right against the heat shield. What a pain! I never read about that anywhere before, so I guess others didn't have as much of a problem. We were excited that we didn't have to put it back in, but then we saw there was a ground wire connected with that bolt and we'd have to put it back in. We waited intil the trans was out.... Here's some pictures of the bolt I'm talking about. Pain in the butt.
And the location of the bolt looking up from the bottom of the truck after the trans was out. It's kinda hard to see where the bolt is, but you can kinda see the round ground wire connection.
And the location of the bolt looking up from the bottom of the truck after the trans was out. It's kinda hard to see where the bolt is, but you can kinda see the round ground wire connection.

Post Fiend
Joined: Dec 2010
Posts: 10,121
Likes: 3
From: Orrville, Ohio
I think I used a flex head ratchet to tighten that bolt when I did my engine swap. It was either a flex head ratchet and a shallow socket, or a ratchet wrench, I can't remember. But yes, that one will make you lose your religion and resort to calling down curses from gods you have never before embraced.
Thread Starter
|
Elder User
Joined: Jan 2012
Posts: 584
Likes: 0
From: Southern West Virginia
Luckily there were two of us. My FIL was up under the hood and I was under the truck. You could see from under the truck, but couldn't turn it with a ratchet. From above, you could turn the ratchet, but couldn't see. So he reached the ratcheting wrench (not the socket type - the ones with the open end wrench on one end, and the closed ratcheting wrench on the other - a socket won't fit) down through and I could reach up and guide it on the bolt. Then, little by little, we finally got it out. I never would have thought it would take two people to take out a little bolt. Then I saw the ground wire and figured out that it had to go back in. We waited until the trans was out and there was more room, then it went back in pretty easily.
As an afterthought, we thought it might have worked better to leave the bolt and that part of the tube mounted, then just wiggle it out of the joint where it goes into the trans when we dropped the trans, since it just slips in. It might have been harder that way though.
Putting the tranny in tonight! I'll let you all know how it goes.
As an afterthought, we thought it might have worked better to leave the bolt and that part of the tube mounted, then just wiggle it out of the joint where it goes into the trans when we dropped the trans, since it just slips in. It might have been harder that way though.
Putting the tranny in tonight!
I'll let you all know how it goes.
Thread Starter
|
Elder User
Joined: Jan 2012
Posts: 584
Likes: 0
From: Southern West Virginia
Also on that tranny dipstick tube bolt - we had already removed the crossmember and lowered the tranny down a little bit before we took it out - that might have made it easier to reach from above. Even though it still wasn't easy...it just might have given a little more room to ratchet.