





My new Project

Thread Starter
|
Post Fiend
Joined: Jan 2006
Posts: 5,037
Likes: 9
From: Kasson, Minnesota
I haven't updated in a while on my 75 supercab project. My time is limited, but over the past couple months I've managed to get my cab corners welded in. The passenger side corner I was going to try and salvage, but when I sanded it down, there were pin holes all over the bottom, so had to replace it. I cut down what I needed and went from there. The major body work is going well. It's too cold up here yet to start spraying primer, so I started tearing down the front clip. I'm not going all the way, but just enough to clean things up a bit and check everything out. I've also cleaned up some PO wiring, added a radio and door speakers. Currently while I'm waiting for the weather to get better, I've started to powder coat some small items that will fit in a household oven I have in my garage.


A small patch in the front corner of the bed


A quick patch on the corner of the battery tray. Nothing special, but It will do and then powder coated black.


Inner fender brackets, front grill bracket and headlight buckets powder coated chrome. (I had it so why not use it)


The radio I had so I put it in and the door speakers.


Once I get some things put back together on the front clip, I am hoping in the next month the weather will cooperate and I can start spraying some primer on the bed and maybe get it painted than I'll start on the cab. I'm trying to get as much as I can done while it's cold. I have to wait on taking apart the cab until I get the bed done so I can back out the truck and leave it outside. I could always tarp the cab outside and I may end up doing that just so I can keep going. My goal is to have this thing ready by May.
A small patch in the front corner of the bed
A quick patch on the corner of the battery tray. Nothing special, but It will do and then powder coated black.
Inner fender brackets, front grill bracket and headlight buckets powder coated chrome. (I had it so why not use it)
The radio I had so I put it in and the door speakers.
Once I get some things put back together on the front clip, I am hoping in the next month the weather will cooperate and I can start spraying some primer on the bed and maybe get it painted than I'll start on the cab. I'm trying to get as much as I can done while it's cold. I have to wait on taking apart the cab until I get the bed done so I can back out the truck and leave it outside. I could always tarp the cab outside and I may end up doing that just so I can keep going. My goal is to have this thing ready by May.
Thread Starter
|
Post Fiend
Joined: Jan 2006
Posts: 5,037
Likes: 9
From: Kasson, Minnesota
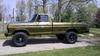
I've been slacking on pics/posts on my 75 supercab, so here is where I'm at so far. Paint is coming out pretty well. There are some imperfections, but for a first time painting in a dirty small 2 car garage, it works. Much better than when I first got the truck.


I'm still working on the front fenders, hood and doors. I had to fix a couple cracks in the doors at the mirror mounting holes and then replace the rivet nuts. I'm getting them about ready for paint. The hood I haven't done anything with yet. The front fenders, I had to fix a small rust hole. What appeared to be just a pea size surface rust blemish turned out to be about a dime size rust hole after I ground it down. I forgot to take pics of that. I just fixed a hinge on my bed toolbox door. I had to replace one hinge so I just went with a regular steel hinge from my hardware store and welded it in place. It took a couple trys to get it right. Not the most pretty welds in the world, but it will work. I forgot to turn on the gas at first and had some pretty crappy looking welds. Either way, it's solid and should work. I might do a little more welding to it to make it look a little better. The top holes I just drilled the same size as the originals.

This is taking me much longer than I originally thought it would. The two toning takes twice as long and only being able to work on it a couple hours here and there, it seems like forever. Oh well I'll get there and then I can start freshening up some mechanical things I've found.


I'm still working on the front fenders, hood and doors. I had to fix a couple cracks in the doors at the mirror mounting holes and then replace the rivet nuts. I'm getting them about ready for paint. The hood I haven't done anything with yet. The front fenders, I had to fix a small rust hole. What appeared to be just a pea size surface rust blemish turned out to be about a dime size rust hole after I ground it down. I forgot to take pics of that. I just fixed a hinge on my bed toolbox door. I had to replace one hinge so I just went with a regular steel hinge from my hardware store and welded it in place. It took a couple trys to get it right. Not the most pretty welds in the world, but it will work. I forgot to turn on the gas at first and had some pretty crappy looking welds. Either way, it's solid and should work. I might do a little more welding to it to make it look a little better. The top holes I just drilled the same size as the originals.

This is taking me much longer than I originally thought it would. The two toning takes twice as long and only being able to work on it a couple hours here and there, it seems like forever. Oh well I'll get there and then I can start freshening up some mechanical things I've found.
Cargo Master
Joined: May 2010
Posts: 3,365
Likes: 12
From: NW Indiana
Paint looks awesome Buck. Great job.
Make sure those hinges on your tool box door are "wrapped" correctly as I had issues trying to find a match that held the bottom edge of the door properly. It threw off the alignment just enough so that I had to replace both hinges or I might have shimmed one. Can't remember now.
Make sure those hinges on your tool box door are "wrapped" correctly as I had issues trying to find a match that held the bottom edge of the door properly. It threw off the alignment just enough so that I had to replace both hinges or I might have shimmed one. Can't remember now.
Thread Starter
|
Post Fiend
Joined: Jan 2006
Posts: 5,037
Likes: 9
From: Kasson, Minnesota
Paint looks awesome Buck. Great job.
Make sure those hinges on your tool box door are "wrapped" correctly as I had issues trying to find a match that held the bottom edge of the door properly. It threw off the alignment just enough so that I had to replace both hinges or I might have shimmed one. Can't remember now.
Make sure those hinges on your tool box door are "wrapped" correctly as I had issues trying to find a match that held the bottom edge of the door properly. It threw off the alignment just enough so that I had to replace both hinges or I might have shimmed one. Can't remember now.
Thanks guys.
FTE Stories
Ford Trucks for Ford Truck Enthusiasts

2027 Ford Super Duty Buyer's Guide (Every Model, Engine, & Package)
Brett Foote
Top 10 Ford Truck Tragedies
Joe Kucinski
AEV FXL Super Duty - the Super Duty Raptor Ford Doesn't Make
Brett Foote
Lobo Vs Lobo: Proof the F-150 Lobo Should Be Even Lower!
Michael S. Palmer
Ford's 2001 Explorer Sportsman Concept Looks For a New Home
Verdad Gallardo
10 Best Ford Truck Engines We Miss the Most!
Joe Kucinski
2026 Shelby F-150 Off-Road: Better Than a Raptor R?
Brett Foote
2027 Super Duty Carhartt Package First Look: 12 Things You NEED to Know!
Michael S. Palmer
10 Most Surprising 2026 Ford Truck Features!
Joe Kucinski


 .
.
Thread Starter
|
Post Fiend
Joined: Jan 2006
Posts: 5,037
Likes: 9
From: Kasson, Minnesota
Thanks guys. I had my first really screw up. I was working on my front fenders and had one leaned up against a table on its end and it was raining outside and without glass in the truck yet I couldn't have it outside. Well, I was sanding down one fender I caught my air hose on the one leaning up and it fell against my drivers cab corner and put a dent in it and chipped up some filler/paint. Should be an easy fix. I'll sand it down in the spot and patch it. I probably will just quick paint from trim down. Only thing I'm really concerned is with paint. I may run short for my tailgate, but the good thing is if I need to order another quart and it's mismatched a tad, it will be on the tailgate and hard to notice.  At the end of the day though, it's all about the learning, mistakes and frustrations that make these projects fun to do.
The PO must have had something splatter up on the truck because there is pea size spots that appear like surface rust but when I grind them down there is a tiny hole and it's only on the drivers side. Easy enough to fix, but frustrating because every time I think I can put the welder away, I have to fix a small hole.
At the end of the day though, it's all about the learning, mistakes and frustrations that make these projects fun to do.The PO must have had something splatter up on the truck because there is pea size spots that appear like surface rust but when I grind them down there is a tiny hole and it's only on the drivers side. Easy enough to fix, but frustrating because every time I think I can put the welder away, I have to fix a small hole.

Fleet Mechanic


Joined: Feb 2011
Posts: 1,410
Likes: 42
From: Michigan

Your truck is looking awesome. I am going thru all the same body repair and priming as you right now. I am leaning towards a two tone scheme also. Are you doing single stage or base/clear. I am also working in a 2-bay garage, not enough room.

Thread Starter
|
Post Fiend
Joined: Jan 2006
Posts: 5,037
Likes: 9
From: Kasson, Minnesota
I just went with a single stage enamel. I am impressed with how it looks, but a base clear would be better. However, fixing small imperfections on single stage is easy. It just won't last as long as a bc/cc system. But hey, first time doing this so I didn't want to have alot invested in paint if it turned out like crap.
The color combo has really grown on me and I am glad I did it.
The color combo has really grown on me and I am glad I did it.