


 ffice
ffice
 Just kidding, keep up the good work!

Cheyenne: The Build
Moderator & parts slinger


Joined: Feb 2007
Posts: 50,284
Likes: 5,826
From: S/W Missouri, Polk county

No its not my truck, but its a dream ride for sure, and I have more pics to help with motivation if wanted? That needle scaler looks like the pre sand blast ticket, and so does your galvanizing plan.
Looks like the worst (but fixable) is at the spring hanger and some (but less) at the shock mount area. Are you going to take off and leave off the overload spring pad brackets? No use/no need kinda thinking in my book.
I'll attach a recent pic of one of my dirty rides, not a BA as the black truck, but I like it. And some other stuff setting around (yelling pick me, pick me) to occupy my time. Sound like you have a solid plan and thats all part of it when it comes to fixing these trucks up.
Keep us posted......
Thread Starter
|
Senior User
Joined: Jan 2010
Posts: 432
Likes: 0
From: MASS
<o
 ></o>
></o> Ya know....I was starting to look at that kind of stuff. I'm all for leaving off things that are not needed, and I agree, the likelihood of the truck needing them is very minimal. For what I will do with her, it will never be towing anything extremely heavy, or have a camper on it. I could see getting a load of crushed stone here or there, but that’s about it.
<o
></o> In order to do the galvi process correctly, EVERYTHING that was bolted or riveted to the frame at the factory will be coming off, step drilled out, and put back together with Grade 8 hardware. You have to be able to get full coverage behind all parts. These are all things I have discussed here with members in various thread over the past couple years.
<o
></o>The steps that you see on both sides (to get into the truck) have the bracket welded to the frame. Im pretty certain that was an afterthought by an owner, so I will probably even need to remove those to get at what is behind it.
<o
></o> Only the frame, cross members, and attached bracketry (spring hangers, bump stops, upper shock mounts would be individually galvanized. The springs themselves, drive shafts, axels, gas tank straps, that sort of thing would not. Those are all very replaceable parts (and always will be) so I have much less concern for them. So I guess we'll just have to see as it goes back together what would all go back on. I would send everything out to be done, but that doesn’t mean it needs to go back on
Oh...and you got way to much time on your hands with all those rigs!!! Beautifull sight!!!
Thread Starter
|
Senior User
Joined: Jan 2010
Posts: 432
Likes: 0
From: MASS
Ha Ha...I didnt even realize that.
You will come to know as we go along that I am not a FORD loyalist. My daily is a GMC, but Im not a GMC loyalist either. I just like what I like, and in the pickup truck line, a dent happens to be it. I really dont care for the era's before or since oddly enough. I mean there cool to see, but I don't desire one. I want to be able to build a "like new" (or better) without having to adhere to exactly what Ford wanted to sell us. I couldn't care less about having the correct OEM nut or bolt. As long as it it right, it is solid, and it looks good. But don't worry, Im not thinking something so extreme that it doesnt look like a dent. It will always look like a dent, but with some racey performance upgrades mixed in.
Mikeo0o0o0o is doing a wonderful OEM build on his truck here. And I very much respect the job he is doing. The thing looks like it will be 100% correct when finished and is going to be MINT!
That one's for him...this one's for me.
Tuned
Joined: Aug 2002
Posts: 361
Likes: 8
From: Irvington USA
No worries man! I am a Ford loyalist, I suppose, but not a staunch one. A few years ago I had an '87 Grand Prix that I really liked. So I fall into the like what I like territory too. I am a brand loyalist, meaning a Ford in a Ford, Chevy in a Chevy, etc.
Moderator & parts slinger
Joined: Feb 2007
Posts: 50,284
Likes: 5,826
From: S/W Missouri, Polk county
I vote yes to ditch the steps and I have NO time on my hands with those rigs, and other projects. At least you have only one to concentrate your time and $$ on.
Looks like you have 2 piece 77 grill, but with a married/connected xfer case it falls under a 77.5 "low boy" when ordering a lift kit. FYI
And I guess the PO could not find a 77 bumper so he used a 78/79 bumper, what are your plans there?
Looks like you have 2 piece 77 grill, but with a married/connected xfer case it falls under a 77.5 "low boy" when ordering a lift kit. FYI
And I guess the PO could not find a 77 bumper so he used a 78/79 bumper, what are your plans there?
Thread Starter
|
Senior User
Joined: Jan 2010
Posts: 432
Likes: 0
From: MASS
Yes to the "Lowboy"...that much I did know.
Ah.....I did not realize those bumpers were not correct. Your knoweldge is good of these rigs. But I like them!!! So they are probably staying. Not a single dent, but chrome is pitting in places.
So as we head into the eve of the weekend of the engine pull, I am looking for tips and tricks. What can I expect? The jacking up of the tranny was a good one. I was not aware of that. How much we talking? Like and inch or two? Or will I just "know" when its enough. Is there anything that is going to get hung up in the flywheel? I was planning on leaving the starter on. Does that need to come off first? What else?
Until I pull the valve covers off, Im only guessing at where I will find these points that I can lift off of that you mentioned. Will it be just one on each head, so it will be a single "strap" of chain going from one head to the other? Also I have no load leveler in hand to balance it out so hopefully I can find a good balance point on my lift chain.
I have a 1000lbs rated engine stand. That should be sufficiant, yeah?
FTE Stories
Ford Trucks for Ford Truck Enthusiasts

Top 6 Best Deals Available on New Fords & Lincolns Right Now
Brett Foote
This Hennessey Takes the Expedition Tremor's Off-Roading Capability to the Next Level
Verdad Gallardo
Top 10 Fords at 2026 Carlisle Ford Nationals
Joe Kucinski
3 Best / 3 Worst Parts of Modern Ford Ownership
Brett Foote
10 Amazing Upgrades That Solve Common Ford Truck Owner Headaches
Pouria Savadkouei
Every 2026 Ford Engine Explained
Brett Foote
10 Ugly Ford Trucks That We Still Kinda Love
Joe Kucinski
10 Things Every Truck Owner NEEDS (2026 Edition)
Michael S. Palmer
Rezvani's Latest Post-Apocalyptic Monster Is a Ford F-150 Raptor Underneath
Verdad GallardoModerator & parts slinger
Joined: Feb 2007
Posts: 50,284
Likes: 5,826
From: S/W Missouri, Polk county
Well alot of FTE and alot of the internet and I kinda like these ol trucks.
Your 77 front bumper should not have the license plate cut and the ends are a little different angle. If you like it and its in good enough shape to use, then us it.
As far as jacking up the xmsn, I would say a 1" or so should work. Yes pull the starter and make sure the small (intake to firewall) ground, fuel lines, p/s lines are all disconnected. Also the trans kick down rod.
I use to pull them from the carb mount plate, thats a no go for me now. And the far opposite corner intake mount bolts could be used but.....
Now I use the bolt holes in the ends of the heads, same bolt as the ones used to bolt the bell housing to the block. (NOT the holes just the bolts) Look right behind the p/s steering mount area, should be three holes in each, you do not have to pull the valve covers.
And the back passenger side is easy to get to unless you have a a/c cab. Without a leveler is not that bad, I pull them with out one and it goes ok. I would pull the carb and lighten the eng as much as possible, the stock intake is like 25+ lb er?
They come apart easier than go together and the torque converter will come with the fly wheel. But once its free to get to it pull it off, watch out for the fluid to dump out the hole when it slides off.
Cargo Master
Joined: May 2010
Posts: 3,365
Likes: 12
From: NW Indiana
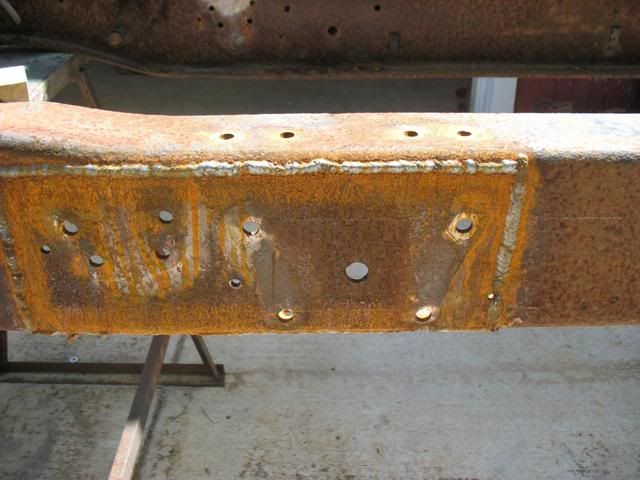
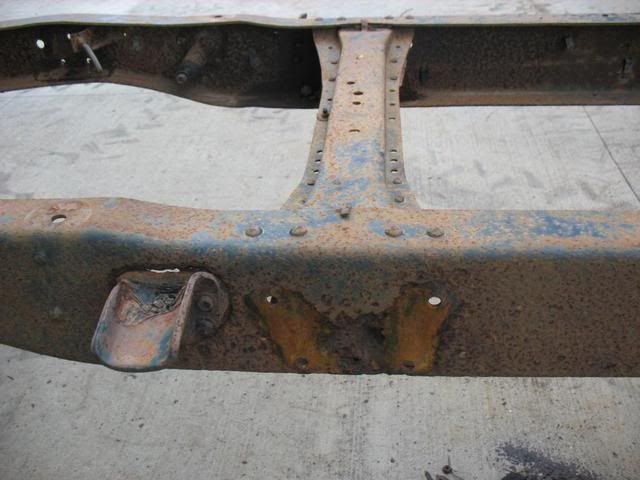
Your frame is not that bad and pretty easy to fix. Mine was worse when I started and it was easy to just want to bolt everything back on but just take your time fixing it.
It is the foundation after all.
A pic of the worst:
The way you talk this sounds like a full on rivets out resto. I can't wait to watch the progress.
It is the foundation after all.
A pic of the worst:
The way you talk this sounds like a full on rivets out resto. I can't wait to watch the progress.
Thread Starter
|
Senior User
Joined: Jan 2010
Posts: 432
Likes: 0
From: MASS
Thanks 77&79F250! That info and pic was just what I was looking for. So long as I can get the remaining fastners out oK, I should be all set. And great tip on tranny bolts being the same size I need there.
And thank you too grinnergetter, that picture validates exactly what it is I needed to do, and that it can be done successfully!!!
And thank you too grinnergetter, that picture validates exactly what it is I needed to do, and that it can be done successfully!!!

New User
Joined: Dec 2011
Posts: 23
Likes: 0
Alright,this is too uncanny. I just bought the exact same black 250, only mine is a 74. My frame is a little better, but my cab is much worse. My cab is coming off mon, and then I will do motor and trans. To be completely pushy, I am also in MA (Sharon) and if you ever need extra hands or load leveler let me know if you are near. I have an extra frame for mine, and they are not as hard to come by as you think. When I get done with my swap over, you can have my old one for sections. Anyhow, you will move much faster than me,so good luck. BTW, I also just built a new timber frame barn that the project is in, like I said uncanny. Is yours a Country Carpenters?
Cargo Master
Joined: May 2010
Posts: 3,365
Likes: 12
From: NW Indiana
One thing I would say about the dipping/coating is that the day will come when you will need a new hole somewhere. In my case I switched the running gear to a later setup which required different CM locations,etc..
I've been touching up the holes with Chassis Saver and looking back I wish I would have just done it with the CS. The dang thing will outlast me anyway.
Make sure to check frame for square if you weld on it. Mine needed some minor whacking afterward.
Just some food for thought.
I've been touching up the holes with Chassis Saver and looking back I wish I would have just done it with the CS. The dang thing will outlast me anyway.
Make sure to check frame for square if you weld on it. Mine needed some minor whacking afterward.
Just some food for thought.
Cargo Master

Joined: Oct 2010
Posts: 3,417
Likes: 32
Damn. If I ever get mine down to absolutely bare frame it going to get galvanized too. But I'd prob leave it bare as mine lives in a garage. It would probably never rust after that. Electro less nickle would be sweet too. As far as I know that doesn't rust either.
Posting Guru
Joined: Jul 2011
Posts: 2,104
Likes: 0
From: Virginia Beach, VA
May be dumb but I always thought a chrome frame would be cool. Wouldn't be to practical in some states but here in AZ it might be fine. Especially if your truck was lifted high enough so you could actually see it. Would probably have to put something over it to protect it though.